background image

72

Using Other Functions

Multi-Room

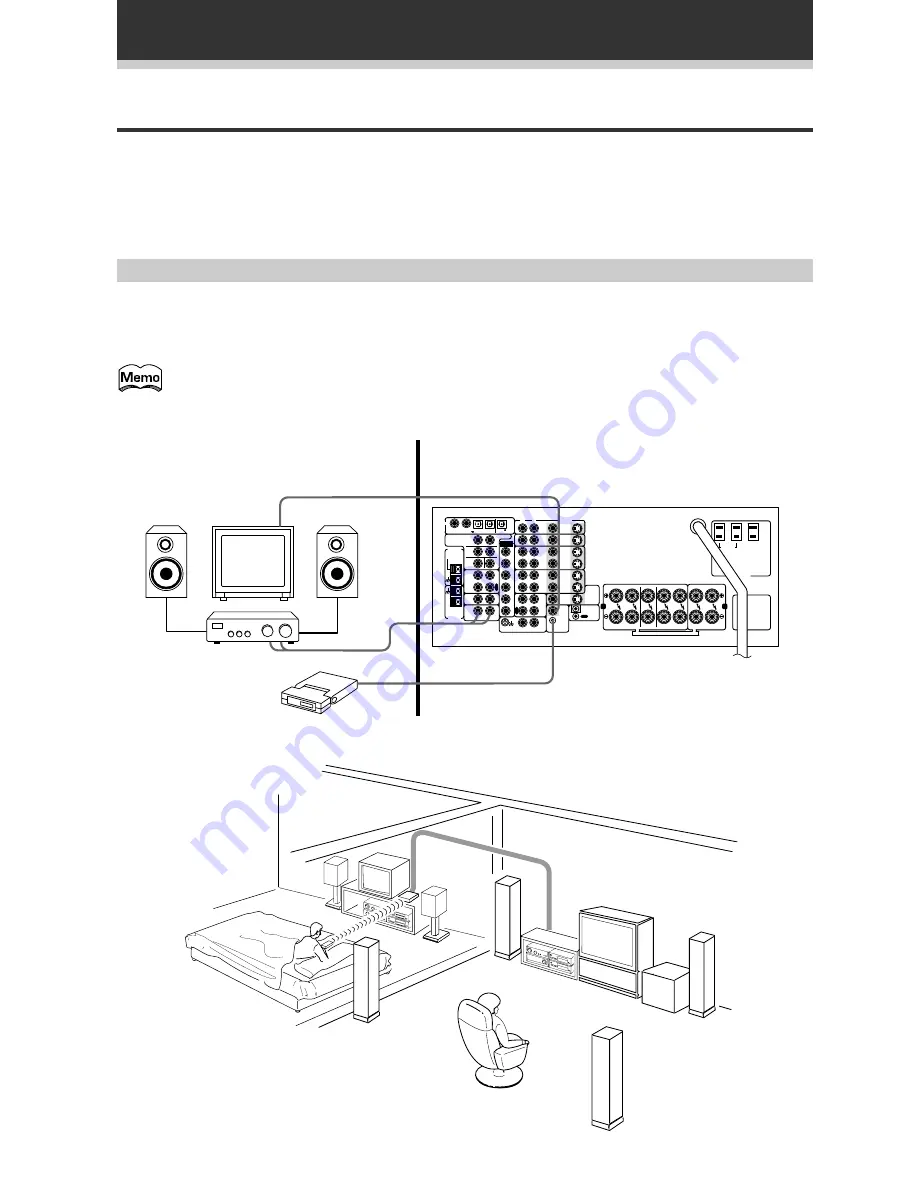
When used together with an IR receiver (a MULTI-ROOM System remote control sensor), this receiver is
capable of outputting two different sources at the same time. One to the (main) VIDEO OUT jack and
SPEAKERS terminals and another to the MULTI-ROOM AUDIO and VIDEO OUT jacks.
In addition, connecting the receiver’s CONTROL jacks to PIONEER CD players, cassette decks, or other
components with the 

Î

 logo, allows you to control those components from the sub room using the remote

control supplied with this receiver.

MULTI-ROOM connections

On the VSX-D908S, connect the MR-100 sensor to the MULTI-ROOM & SOURCE REMOTE IN jack, (on the
VSX-D908S it’s called simnply MULTI-ROOM REMOTE IN jack), then connect a separate amplifier (and
speakers) and TV monitor to the MULTI-ROOM AUDIO and VIDEO OUT jacks. All of this equipment should be
placed in your sub-room as shown below.

•When connecting the IR receiver, be sure to connect it to the green MULTI-ROOM & SOURCE

REMOTE IN jack, not the black CONTROL IN or OUT jacks.

•It is not possible to input digital signals into the SUB room, you must use analog signals.
•You can't use tone controls (etc.) and any surround modes in the SUB room.

Sub room (IR
Receiver, amplifier,
speakers and TV
monitor)

DIGITAL

IN

OUT

OUT

IN

IN

IN

VCR2

CONTROL

VCR1

PHONO

MULTI-ROOM

&SOURCE

REMOTE

IN

VIDEO

OUT

TV/

SAT

IN

TO

MONITOR

TV

DVD

/LD

IN

VIDEO

OUT

FRONT

SPEAKERS

SEE INSTRUCTION MANUAL

SE REPORTER AU MOODE D'EMPLOI

SURROUND

SPEAKERS

FRONT

SPEAKERS

SWITCHED

 TOTAL 100W(0.8A)MAX

UNSWITCHED

  100W(0.8A)MAX

CENTER

SPEAKERS

MD/

TAPE1

FM UNBAL

75

FM

ANTENNA

PREOUT

MULTI-

ROOM

&

SOURCE

TAPE2

MONITOR

CD

AM LOOP

ANTENNA

1

2

3

4

PCM/     /DTS IN

PCM/     /DTS

OUT

R

L

R

L

VIDEO

FR

FL

C

SR

SL

R

L

AC 120V  60Hz

CAUTION:

CAUTION:

ATTENTION:

ATTENTION:

IN

S2

IN

S2

IN

S2

OUT

S2

OUT

S2

OUT

S2

IN

S2

S
L

S
L

S
R

S
R

F
L

F
L

F
R

F
R

C

C

S
W

S
W

O
U
T

I

N

P

L

A

Y

P

L

A

Y

P

L

A

Y

R

E

C

R

E

C

OUT

EXTERNAL

DECODER

IN

A

B

AC OUTLETS

Sub room

Main room

IR receiver
(MR-100)

Set up example

Main room (Receiver, source
components, front, center, and
surround speakers, TV monitor etc.)

Summary of Contents for VSX-D908S

Page 1: ...Operating Instructions AUDIO VIDEO MULTI CHANNEL RECEIVER VSX D908S ...

Page 2: ...ation between the equipment and receiver Connect the equipment into an outlet on a circuit different from that to which the receiver is connected Consult the dealer or an experienced radio TV technician for help Thank you for buying this Pioneer product Please read through these operating instructions so you will know how to operate your model properly After you have finished reading the instructi...

Page 3: ...a system shouldnotbelocatedinthevicinityofoverhead power lines or other electric light or power circuits or where it can fall into such power lines or circuits When installing an outside antennasystem extremecareshouldbetaken to keep from touching such power lines or circuits as contact with them might be fatal OVERLOADING Do not overload wall outlets extension cords or integral convenience recept...

Page 4: ...ty reproduction from even the most demanding Dolby Digital and DTS program sources Advanced Theater Modes This mode enhances the sound of either film or music so a more dramatic effect can be achieved The four modes are each designed to accentuate specific sound qualities giving the listener a wide range of possibilities DSP Surround Modes DSP Digital Signal Processing surround mode gives you the ...

Page 5: ...ng playback DIGITAL NR Function 41 Listening in MIDNIGHT LISTENING Mode 42 External decoder playback 43 96kHz 24Bit Performance 43 Listening in LOUDNESS Mode 44 Direct playback 44 Adjusting bass and treble Tone Control 44 Adjusting the brightness of the display 45 Using the Tuner 46 Automatic and Manual Tuning 46 Direct Access Tuning 47 Memorizing Frequently Used Stations 48 Recalling Memorized St...

Page 6: ... to get proper surround sound OPERATION To play some music or soundtrack refer to Basic Playback on p 35 Using the Tuner p 46 explains how to use the radio of this unit Doing the operations in Remote Control of Other Components p 50 is highly recommended so you can use this unit s remote control for all your components Using Other Functions p 62 explain the other possibilities of the receiver Tech...

Page 7: ...t function properly if There are obstacles between the remote control and the remote sensor Direct sunlight or fluorescent light is shining onto the remote sensor The receiver located near a device emitting infrared rays Operated simultaneously with another remote control which uses infrared rays Opening the Front Panel To open the front panel push gently on the lower third of the panel with your ...

Page 8: ...t only play like a turntable you only need to hook up one set of stereo plugs two plugs To use DTS surround sound features you must hook up your digital components to the digital inputs but it is also a good idea to hook up your digital components to analog audio jacks If you want to record to from digital components like an MD to from analog components you must hook up your digital equipment with...

Page 9: ...Dolby Digital you should hook up their audio to a digital input see the next page It is also a good idea to hook up your digital components with analog audio connections as well see the previous page To cover all possible laser discs a DVD LD player or LD player requires an analog connection as shown here and two digital connections see the next page When connecting your equipment always make sure...

Page 10: ...lity of these two types of connections is the same but since some digital components only have one type of digital terminal it is a matter of matching like with like for example the coaxial out from the component to coaxial in on the receiver The VSX D908S has two coaxial and two optical inputs for a total of four digital inputs Connect your digital components as shown below There is one digital o...

Page 11: ...n DIGITAL IN OUT OUT IN IN IN VCR2 CONTROL VCR1 PHONO MULTI ROOM SOURCE REMOTE IN VIDEO OUT TV SAT IN TO MONITOR TV DVD LD IN VIDEO OUT FRONT SPEAKERS SEE INSTRUCTION MANUAL SE REPORTER AU MOODE D EMPLOI SURROUND SPEAKERS FRONT SPEAKERS SWITCHED TOTAL 100W 0 8A MAX UNSWITCHED 100W 0 8A MAX CENTER SPEAKERS MD TAPE1 FM UNBAL 75Ω PREOUT MULTI ROOM SOURCE TAPE2 MONITOR CD AM LOOP ANTENNA 1 2 3 4 PCM D...

Page 12: ...AL IN OUT OUT IN IN IN VCR2 CONTROL VCR1 PHONO MULTI ROOM SOURCE REMOTE IN VIDEO OUT TV SAT IN TO MONITOR TV DVD LD IN VIDEO OUT FRONT SPEAKERS SEE INSTRUCTION MANUAL SE REPORTER AU MOODE D EMPLOI SURROUND SPEAKERS FRONT SPEAKERS SWITCHED TOTAL 100W 0 8A MAX UNSWITCHED 100W 0 8A MAX CENTER SPEAKERS MD TAPE1 FM UNBAL 75Ω PREOUT MULTI ROOM SOURCE TAPE2 MONITOR CD AM LOOP ANTENNA 1 2 3 4 PCM DTS IN P...

Page 13: ...und Indoor antenna Vinyl coated wire ground Outdoor antenna 15 18 feet 5 6 m DIGITAL IN OUT OUT IN IN IN VCR2 CONTROL VCR1 PHONO MULTI ROOM SOURCE REMOTE IN VIDEO OUT TV SAT IN TO MONITOR TV DVD LD IN VIDEO OUT FRONT SPEAKERS SEE INSTRUCTION MANUAL SE REPORTER AU MOODE D EMPLOI SURROUND SPEAKERS FRONT SPEAKERS SWITCHED TOTAL 100W 0 8A MAX UNSWITCHED 100W 0 8A MAX CENTER SPEAKERS MD TAPE1 FM UNBAL ...

Page 14: ... be lost Similarly if you choose just the B system you ll only hear the front speakers connected to the B system and multi channel sources will be down mixed to these two speakers Be sure to complete all other connections before connecting this unit to the AC power source DIGITAL IN OUT OUT IN IN IN VCR2 CONTROL VCR1 PHONO MULTI ROOM SOURCE REMOTE IN VIDEO OUT TV SAT IN TO MONITOR TV DVD LD IN VID...

Page 15: ... 3 8 in 10 mm Speaker impedance You can change the speaker impedance to suit the kind of speakers you have in your home system but we recommend using speakers with an impedance of 8 Ω 16 Ω the default setting If you are using 6 Ω less than 8 Ω impedance speakers you need to change the impedance setting This display indicates an 6 Ω less than 8 Ω impedance setting This display indicates a 6 Ω less ...

Page 16: ...near the TV we recommend using magnetically shielded speakers to prevent possible interference such as distortion in the color of the TV screen If you do not have magnetically shielded speakers and notice discoloration of the TV screen place the speakers farther away from the TV Install the center speaker above or below the TV so that the sound of the center channel is localized at the TV screen C...

Page 17: ... to use separate amplifiers to power your speakers make the connections shown below When connecting your equipment always make sure the power is turned off and the power cord is disconnected from the wall outlet for all the eqiuipment Power connections AC OUTLETS SWITCHED TOTAL 100 W 0 8 A MAX Power supplied through these outlets is turned on and off by the receiver s POWER switch Total electrical...

Page 18: ...on indicator Displays the function or the frequency of the current radio station 6 DSP indicator See p 37 38 Light when a DSP or Advanced Theater mode is selected 7 STEREO indicator See p 37 38 Lights when a STEREO mode is selected 8 2 Surround dts mode indcators 2 DIGITAL When the 2 Surround dts mode on the receiver is on this indicator lights to indicate playback of a Dolby Digital signal Howeve...

Page 19: ...when a FM stereo broadcast is received in the auto stereo mode TUNED Lights when a broadcast is received AM FM Light to indicate the current band FM or AM Character display Displays sound modes general information etc Speaker indicators Light to indicate the current speaker system see Front Panel SPEAKERS A B SP A Lights when speaker system A is selected SP B Lights when speaker system B is select...

Page 20: ... See p 37 38 Press to select the STEREO sound mode In this mode sound comes from the front left and right speakers only 6 2 DTS buttons See p 36 38 77 78 ADVANCED THEATER Press to select one of the four Advanced Theater modes STANDARD Press for pure decoding of multi channel sources 7 Display See page 18 8 Remote sensor Point the remote control toward the remote sensor to operate the receiver 9 MU...

Page 21: ...e preset station classes FM AM Press to select the AM or FM band TUNING Use to manually tune to radio stations STATION buttons See p 48 49 Use to choose programmed radio stations MEMORY button See p 48 Press to start the memorization of a preset station MPX button See p 46 Press to switch between auto stereo and MONO reception of FM broadcasts When the broadcast signal is weak selecting MONO will ...

Page 22: ...come stronger and more noticeable The scale ranges from 10 90 with 70 as the default setting First turn on the DSP Advanced Theater you want by pressing the DSP Advanced Theater button until you get the mode and then increase or decrease the amount of effect CH SEL You may want to adjust the channels when listening to some sound sources Use this button to select the channel you want to adjust Use ...

Page 23: ... perform a variety of different functions depending on the remote operation mode They are most useful for CD and tuner operations ENTER EXIT DISC button These buttons can perform a variety of different functions depending on the remote operation mode MASTER VOLUME button Use to raise or lower the volume of the receiver MUTE button Press to mute or restore the volume FUNCTION button Press to select...

Page 24: ...D DSP MUTE TV VOLUME MD TAPE1 TUNER TV CONT RECEIVER MULTI OPERATION CLASS MPX MULTI CONTROL DIRECT ACCESS STATION CHANNEL TUNING DTV ON OFF DTV MENU EXIT DISC 10 GUIDE TV CONTROL FUNCTION SIGNAL SELECT EFFECT CH SEL 2 dts DIGITAL MULTI PROCESSING AMPLIFIER REMOTE CONTROL UNIT REMOTE SETUP SYSTEM SETUP BAND SYSTEM OFF 1 2 3 4 5 6 7 8 9 0 ENTER Î 7 3 1 4 8 2 1 Surround Sound Set Up 1 Always use the...

Page 25: ... from distorting the sound from the speakers D Range Control See p 33 This feature makes possible excellent surround sound effects when listening to Dolby Digital sources at low volumes Digital In Select See p 34 In order to use your digital components you must match the numbered digital input buttons with the numbered digital jacks used by your digital components Multi Room See p 72 76 You can se...

Page 26: ... LARGE LARGE LARGE YES Front L Center Surround Subwoofer EXIT 2 Select a speaker setting mode with the 2 3 buttons Press the button S0URCE DVD LD TV SAT VCR1 VCR2 CD TV VOL TV FUNC MENU ENTER STEREO DIGITAL NR MIDNIGHT ADVANCED STANDARD DSP MUTE TV VOLUME MD TAPE1 TUNER TV CONT RECEIVER MULTI OPERATION CLASS MPX MULTI CONTROL DIRECT ACCESS STATION CHANNEL TUNING DTV ON OFF DTV MENU EXIT DISC 10 GU...

Page 27: ...ers will reproduce bass frequencies effectively Select small to send bass frequencies to the other speakers or sub woofer If you did not connect surround speakers deselect them In this case the sound of the surround channels is output from the front and center speakers SUB WOOFER default setting is YES Leave it selected if you connected a sub woofer If you did not connect a sub woofer deselect it ...

Page 28: ...ting is 10 ft 2 Use the 5 buttons to select a speaker Specify the distance from your listening position to each speaker using the commands below 1 Press 2 or 3 to adjust the speaker distance in 1 foot increments from 1 to 30 feet 1 foot equals approximately 0 3 meters 2 Use the 5 buttons to move to the next set of speakers 3 Repeat for each speaker The order proceeds NOTE Sound takes about 1 ms mi...

Page 29: ...test tone between each speaker automatically Use this mode when balancing the speaker levels by ear The automatic test tone is output in the following order FL CT FR SR SL SW MANUAL manual TEST TONE This mode lets you switch the test tone between each speaker manually You can use this mode when you want to balance the speaker levels by ear at a more leisurely pace S0URCE DVD LD TV SAT VCR1 VCR2 CD...

Page 30: ... Pressure Level SPL meter Take the readings from your main listening position and adjust the level of each speaker to 75 dB SPL C weighted slow model 5 When you have adjusted each speaker level select SETTING OK and press ENTER to return to the previous screen The MASTER VOLUME will return to its original position Next proceed to CROSSOVER NETWORK below If you want to change a setting before proce...

Page 31: ...channel s bass frequencies to the sub woofer or LARGE speakers The present function lets you determine which frequencies will be sent to the sub woofer or LARGE speakers 1 Press 2 or 3 to move the hand to 80 Hz 100 Hz or 150 Hz 2 Press 80 Hz Sends bass frequencies below 80 Hz to the sub woofer or LARGE speakers 100 Hz Sends bass frequencies below 100 Hz to the sub woofer or LARGE speakers 150 Hz S...

Page 32: ...il you hear the test tone from the sub woofer and specify the peak LFE level Use the 2 or 3 arrows to gradually increase the level of the LFE channel until the test tone begins to distort Then go back and leave the level setting at a point just before that Press ENTER and the receiver will remember this bass output level To exit before outputting the TEST TONE Press ENTER To exit while outputting ...

Page 33: ...4 if you are unsure how to do this Press ENTER Dynamic Range Control Serect Mode OFF for Dolby Digital EXIT The default setting is OFF If listening at loud volumes we recommend turning the Dynamic Range Control OFF 2 Use the 2 or 3 arrows to choose OFF MID or MAX 3 Select EXIT and press ENTER to return to the SYSTEM SETUP MENU If you want to change a setting before proceeding Choose a new DYNAMIC ...

Page 34: ... 3 to choose the input function that matches the component hooked up to that digital terminal The possible choices include DVD LD TV SAT CD MD TAPE 1 VCR 1 VCR 2 You cannot assign digital inputs to the TUNER VIDEO PHONO and TAPE 2 MONITOR functions 3 Select EXIT and press ENTER to return to the SYSTEM SETUP MENU If you want to change a setting before proceeding Simply use the arrow buttons to go b...

Page 35: ... playback of the component you selected in step 1 6 Adjust the volume by using the MASTER VOLUME buttons on the remote control or the MASTER VOLUME on the front panel If you are not able to get sound from the receiver the problem may well lie with the SIGNAL SELECT switch You need to make sure the input is set to the appropriate ANALOG or DIGITAL setting Refer to page 40 for more on this S0URCE DV...

Page 36: ...l Signal Processing to create different types of sound environments MUSICAL This mode is primarily for music and adds a spacious feeling to the sound A long delay time of reflected sounds provides resonant tones which emulate a concert hall DRAMA CINEMA This mode is designed for movies with a lot of dialog The elements of dialog are enhanced making the characters seem more real The mode also compr...

Page 37: ...e acoustic effects of a dance club Features a strong bass sound Reflected sound delay time is virtually below 50 msec for the listener to enjoy the the visceral power of dance music THEATER 1 Reproduces theater sound field effects without losing the localization of each channel Theater effects can be enjoyed without losing Dolby Digital Pro Logic effects when used in combination those formats with...

Page 38: ...UNING DTV ON OFF DTV MENU EXIT DISC 10 GUIDE TV CONTROL FUNCTION SIGNAL SELECT EFFECT CH SEL 2 dts DIGITAL MULTI PROCESSING AMPLIFIER REMOTE CONTROL UNIT REMOTE SETUP SYSTEM SETUP BAND SYSTEM OFF 1 2 3 4 5 6 7 8 9 0 ENTER Î 7 3 1 4 8 STANDARD ADVANCED DSP STEREO The effects of ADVANCED THEATER mode can be adjusted in the range of 10 to 90 by pressing EFFECT The default setting is 70 Also the effec...

Page 39: ...VOLUME on the front panel We recommend using different modes for different types of DTS material For watching movies the ADVANCED THEATER setting should provide the best results For listening to music the STANDARD DIRECT STEREO or DSP modes should serve the listener best When playing LD recorded in Dolby Digital When connecting a DVD LD player or LD player using the AC 3 RF output a commercially a...

Page 40: ... PROCESSING AMPLIFIER REMOTE CONTROL UNIT REMOTE SETUP SYSTEM SETUP BAND SYSTEM OFF 1 2 3 4 5 6 7 8 9 0 ENTER Î 7 3 8 1 4 SIGNAL SELECT If the Digital In Select see p 34 choices are set to OFF the SIGNAL SELECT will default to ANALOG Because the audio from a karaoke microphone and LD recorded with analog audio only is not output from the digital output set SIGNAL SELECT to ANALOG This receiver can...

Page 41: ... For each source DIGITAL NR is effective at and above levels shown below Cassette tape 20 dB Video tape 15 dB AM tuner 10 to 15 dB FM tuner 15 to 16 dB Depending on the condition of the source there may not be a noticeable improvement in the quality of the sound S0URCE DVD LD TV SAT VCR1 VCR2 CD TV VOL TV FUNC MENU ENTER STEREO DIGITAL NR MIDNIGHT ADVANCED STANDARD DSP MUTE TV VOLUME MD TAPE1 TUNE...

Page 42: ...the volume level You can t use the MIDNIGHT LISTENING mode with the DIRECT or EXTERNAL DECODER modes S0URCE DVD LD TV SAT VCR1 VCR2 CD TV VOL TV FUNC MENU ENTER STEREO DIGITAL NR MIDNIGHT ADVANCED STANDARD DSP MUTE TV VOLUME MD TAPE1 TUNER TV CONT RECEIVER MULTI OPERATION CLASS MPX MULTI CONTROL DIRECT ACCESS STATION CHANNEL TUNING DTV ON OFF DTV MENU EXIT DISC 10 GUIDE TV CONTROL FUNCTION SIGNAL ...

Page 43: ... ATT SPEAKERS TREBLE BASS L AUDIO R VIDEO INPUT EXTERNAL DECORDER IN 96kHz24bit Performance This receicver is capable of playing back advanced DVD discs which are recorded in 96kHz 24 bit format these are all stereo discs The receiver will automatically read the format of the disc and play accordingly of course the SIGNAL SELECT will have to set to DIGITAL to read the DVD soundtrack When the recei...

Page 44: ... Signal Processor STEREO DTS N m L POWER OUTPUT IDEO EXTERNAL DECODER IN FL DIMMER TAPE 2 MONITOR DIRECT LOUDNESS MIDNIGHT DIGITAL NR CLASS FM AM TUNER CONTROL MEMORY MPX INPUT ATT SPEAKERS TUNING STATION TREBLE BASS L AUDIO R VIDEO INPUT LOUDNESS DSP MODE MULTI ROOM SOURCE MIN ADVANCED STANDARD CONTROL DEO MULTI CHANNEL RECEIVER Digital Signal Processor STEREO DTS N m L POWER OUTPUT IDEO EXTERNAL...

Page 45: ...ote it is a feature of this unit that the fluorescent display will be brighter for a few seconds after you choose a function like DVD LD CD etc and then get softer This will still happen when you adjust the brightness but the new setting will be the one the display softens to DSP MODE MULTI ROOM SOURCE MIN ADVANCED STANDARD CONTROL DEO MULTI CHANNEL RECEIVER Digital Signal Processor STEREO DTS N m...

Page 46: ...nd stop automatically at the first station it locates Repeat to locate other stations For Manual Tuning To change frequencies one step at a time press TUNING repeatedly To change frequencies quickly hold down TUNING and release when you reach the frequency you desire 4 Adjust the volume MPX Mode If the TUNED or STEREO indicators do not light when tuning an FM station because the station is too far...

Page 47: ...VOLUME 4 Use the number buttons to enter the frequency of the station you desire Example To tune station 106 00 FM press 1 0 6 0 0 dB STEREO SIGNAL SELECT ANALOG SP A STEREO TUNED VOLUME To cancel before inputting the frequency Press DIRECT ACCESS and enter the frequency again 5 Adjust the volume S0URCE DVD LD TV SAT VCR1 VCR2 CD TV VOL TV FUNC MENU ENTER STEREO DIGITAL NR MIDNIGHT ADVANCED STANDA...

Page 48: ...uning on pages 46 and 47 2 Press MEMORY to activate the memory function dB STEREO SIGNAL SELECT ANALOG SP A STEREO TUNED VOLUME 3 Press CLASS repeatedly to select a class number Each press switches the display CLASS A CLASS B CLASS C 4 Press STATION repeatedly to select a channel 0 9 within the respective class The station is memorized automatically after 5 seconds dB STEREO SIGNAL SELECT ANALOG S...

Page 49: ... SP A STEREO TUNED VOLUME To skip through each channel in order Press STATION repeatedly Using the front panel 1 Select the TUNER function by using the INPUT SELECTOR dial 2 Press CLASS repeatedly to select a class number 3 Press STATION repeatedly to select the channel you desire S0URCE DVD LD TV SAT VCR1 VCR2 CD TV VOL TV FUNC MENU ENTER STEREO DIGITAL NR MIDNIGHT ADVANCED STANDARD DSP MUTE TV V...

Page 50: ... REMOTE SETUP The REMOTE SET UP menu appears on your TV screen Select Remote Setup Mode Remote SETUP 1 Preset Recall Remote SETUP 2 Learning Remote SETUP 3 Multi Operation Remote SETUP 4 Direct Function You have four set up options 1 PRESET RECALL 2 LEARNING 3 MULTI OPERATION See p 65 4 DIRECT FUNCTION See p 68 PRESET RECALL and LEARNING are the two modes that teach the remote control to operate y...

Page 51: ...FF and there is more than one setup code try inputting another code starting again from step 4 Some manufacturers use several sets of remote control signals and the first code may not correspond to your component Repeat steps 4 through 6 to assign preset codes for as many components as necessary If you can t get your component to respondd to any of the codes you can still program the comnponent in...

Page 52: ...ARNING SETUP mode Press REMOTE SET UP Learning Setup 1Place both commanders pointing at each other 2Select the item from the Multi control buttons that should be duplicated ex DVD Multi control button starts blinking EXIT Remote setup 4 Press the MULTI CONTROL button for the component you want to control Each button can be set to control one of the following components The selected button continue...

Page 53: ...ONTROL button blinks to indicate that the operation has been learned To program additional operations for the current component Repeat steps 5 and 6 To program operations for another component Repeat steps 4 through 6 7 Press REMOTE SETUP to exit the LEARNING SETUP mode The remote control and TV return to their previous operation modes 3 inches S0URCE DVD LD TV SAT VCR1 VCR2 CD TV VOL TV FUNC MENU...

Page 54: ... to navigate through options on menu screens and to change settings ENTER Use to implement settings selected with the cursor buttons or to set items highlighted in a menu for DVD only 8 3 Press to start playback 9 8 Press to pause playback 0 4 4 Press to return to the beginning of the current chapter track Press repeatedly to return to the beginning of previous chapters tracks Press to advance to ...

Page 55: ...VD video recorder only 7 5 2 3 ENTER 5 2 3 Use to navigate through options on menu screens and to change settings ENTER Use to implement settings selected with the cursor buttons or to set items highlighted in a menu for DVD video recorder only 8 3 Press to start playback 9 8 Press to pause playback 0 CHANNEL Use to change channels on the VCR s tuner ENTER SIDE A B Use this button to switch the VC...

Page 56: ... tracks 6 10 You can also use this button when selecting track numbers higher than 10 7 3 Press to start playback 8 8 Press to pause playback 9 4 4 Press to return to the beginning of the current track Press repeatedly to return to the beginning of previous tracks Press to advance to the beginning of the next track Press repeatedly to advance to the beginning of following tracks 0 DISC Use to swit...

Page 57: ...uttons Use to select tracks 6 10 You can also use this button when selecting track numbers higher than 10 7 3 Press to start playback 8 8 Press to pause playback 9 4 4 Press to return to the beginning of the current track Press repeatedly to return to the beginning of previous tracks Press to advance to the beginning of the next track Press repeatedly to advance to the beginning of following track...

Page 58: ...ite functions 3 Number buttons Use to select satellite channels 4 GUIDE Use to turn the program information screen on or off 5 5 2 3 ENTER 5 2 3 Press the button to select items on the SAT GUIDE screen or SAT MENU screen ENTER Press to activate the selected function 6 EXIT Press to exit the current setting of the SAT 7 MENU Use to turn the main menu on or off S0URCE DVD LD TV SAT VCR1 VCR2 CD TV V...

Page 59: ...2 3 ENTER 5 2 3 Use to navigate through options on menu screens and to change settings ENTER Use to implement settings selected with the cursor buttons or to set items highlighted in a menu for DVD video recorder only 7 7 3 8 BLUE GREEN RED YELLOW Use to make selections from the DTV menu 8 CHANNEL Use to select a TV channel 9 ENTER Use to select the channel specified with the number buttons not al...

Page 60: ...select a specific TV channel 6 5 2 3 ENTER 5 2 3 Press to select or adjust items on the menu screen ENTER Press to activate the selected function 7 7 3 8 BLUE GREEN RED YELLOW Use to make selections from the DTV menu 8 CHANNEL Use to select a TV channel 9 ENTER Use to select the channel specified with the number buttons not all models require this step 0 MENU Use to select different menus on a DTV...

Page 61: ...the tape Press to fast forward the tape 5 Number buttons 1 6 1 7 Press to stop playback or recording 2 3 Press to start playback of the side of the cassette which has been loaded as the front 3 8 Press to pause playback or recording 4 1 Press to rewind the tape 5 2 Press to start reverse playback 6 Press to fast forward the tape 6 3 Press to start playback of the side of the cassette which has bee...

Page 62: ...nd choose ANALOG Recording DIGITAL signals is not possible 2 Start recording with a TAPE or MD etc 3 Playback the source to be recorded Record monitor TAPE 2 MONITOR If you connect a cassette deck etc with a record monitor function to the TAPE 2 MONITOR jacks you can listen to the sound of the recording as it is recorded Press TAPE 2 MONITOR to switch between the sound of the recording TAPE 2 indi...

Page 63: ...fect on the recorded signal 1 Prepare the source you want to record and set the SIGNAL SELECT to digital Load the DVD MD etc into the player Here we ll use a CD as an example of the source being recorded Press the SIGNAL SELECT button on the remote control or use the button on the front panel and choose DIGITAL 2 Start recording with a CD R or MD etc 3 Playback the source to be recorded In some ca...

Page 64: ... analog Press the SIGNAL SELECT button on the remote control or use the button on the front panel and choose analog Recording DIGITAL signals is not possible 2 Start recording with VCR 1 or VCR 2 etc 3 Playback the source to be recorded S0URCE DVD LD TV SAT VCR1 VCR2 CD TV VOL TV FUNC MENU ENTER STEREO DIGITAL NR MIDNIGHT ADVANCED STANDARD DSP MUTE TV VOLUME MD TAPE1 TUNER TV CONT RECEIVER MULTI O...

Page 65: ...nk To cancel MULTI OPERATION SETUP mode Press REMOTE SETUP Multi operation 1Select an item from the Multi Contorol buttons ex DVD 2Select the operation button ex DVD MENU 3First command has been learned 4You can repeat this proccess for 5 commands EXIT Remote setup 3 Press the FUNCTION button that you want to use to start the MULTI OPERATION You can use any function button for this procedure It do...

Page 66: ...d in the section before this 1 Press the MULTI OPERATION button on the remote control The MULTI CONTROL buttons start to blink 2 Press the MULTI CONTROL button that has been set up with multi operations The power of the main unit goes on and the programmed multi opearations are performed automatically S0URCE DVD LD TV SAT VCR1 VCR2 CD TV VOL TV FUNC MENU ENTER STEREO DIGITAL NR MIDNIGHT ADVANCED S...

Page 67: ...eight possible components Be sure to recall or teach the remote control commands for each component before attempting MULTI OPERATIONS see Setting Up the Remote Control to Control Other Components p 65 1 Press REMOTE SETUP and 3 at the same time to select the MULTI OPERATION SETUP mode The REMOTE SETUP menu appears on your TV screen The MULTI CONTROL and the SYSTEM OFF buttons start to blink To ca...

Page 68: ...3 Set the DIRECT FUNCTION of each external source to NO by pressing 2 4 Press REMOTE SETUP to exit the DIRECT FUNCTION mode The default setting is all YES If you have turned a DIRECT FUNCTION to NO and want to turn it back to YES follow the directions above and press 1 in step 3 S0URCE DVD LD TV SAT VCR1 VCR2 CD TV VOL TV FUNC MENU ENTER STEREO DIGITAL NR MIDNIGHT ADVANCED STANDARD DSP MUTE TV VOL...

Page 69: ...E DVD LD TV SAT VCR1 VCR2 CD TV VOL TV FUNC MENU ENTER STEREO DIGITAL NR MIDNIGHT ADVANCED STANDARD DSP MUTE TV VOLUME MD TAPE1 TUNER TV CONT RECEIVER MULTI OPERATION CLASS MPX MULTI CONTROL DIRECT ACCESS STATION CHANNEL TUNING DTV ON OFF DTV MENU EXIT DISC 10 GUIDE TV CONTROL FUNCTION SIGNAL SELECT EFFECT CH SEL 2 dts DIGITAL MULTI PROCESSING AMPLIFIER REMOTE CONTROL UNIT REMOTE SETUP SYSTEM SETU...

Page 70: ...ti operation settings will beerased S0URCE DVD LD TV SAT VCR1 VCR2 CD TV VOL TV FUNC MENU ENTER STEREO DIGITAL NR MIDNIGHT ADVANCED STANDARD DSP MUTE TV VOLUME MD TAPE1 TUNER TV CONT RECEIVER MULTI OPERATION CLASS MPX MULTI CONTROL DIRECT ACCESS STATION CHANNEL TUNING DTV ON OFF DTV MENU EXIT DISC 10 GUIDE TV CONTROL FUNCTION SIGNAL SELECT EFFECT CH SEL 2 dts DIGITAL MULTI PROCESSING AMPLIFIER REM...

Page 71: ... 2 dts DIGITAL MULTI PROCESSING AMPLIFIER REMOTE CONTROL UNIT REMOTE SETUP SYSTEM SETUP BAND SYSTEM OFF 1 2 3 4 5 6 7 8 9 0 ENTER Î 7 3 1 4 8 1 1 Erasing all signals learned preset codes 1 Press and hold both REMOTE SETUP and 0 for more than 3 seconds The MULTI CONTROL buttons will blink 3 times and all preset will be erased S0URCE DVD LD TV SAT VCR1 VCR2 CD TV VOL TV FUNC MENU ENTER STEREO DIGITA...

Page 72: ...onnect it to the green MULTI ROOM SOURCE REMOTE IN jack not the black CONTROL IN or OUT jacks It is not possible to input digital signals into the SUB room you must use analog signals You can t use tone controls etc and any surround modes in the SUB room Sub room IR Receiver amplifier speakers and TV monitor DIGITAL IN OUT OUT IN IN IN VCR2 CONTROL VCR1 PHONO MULTI ROOM SOURCE REMOTE IN VIDEO OUT ...

Page 73: ...VEL setting 5 Select the IR RECEIVER type with the 5 buttons and select the type by using the 2 3 buttons If you have the Pioneer made MR 100 select PIONEER If you have an IR RECEIVER from a different company select OTHER 6 Move to the EXIT setting and press ENTER to exit MULTI ROOM set up and return to normal operations You can leave the MULTI ROOM set up mode any time by pressing the SYSTEM SETU...

Page 74: ...The display shown below will illuminate The INPUT SELECTOR steps through the functions in the following order TUNER MD TAPE 1 VCR 1 TV SAT DVD LD CD 4 Press the CONTROL button again and use the INPUT SELECTOR to adjust the VOLUME The volume can be adjusted in a range of 82dB to 0dB The display will appear as shown below 5 When in TUNER function press the CONTROL button and use the INPUT SELECTOR t...

Page 75: ... class STATION button for recalling memorized radio stations the tuner is selected automatically Number button 0 9 MAIN room SUB room STANDBY ON DSP MODE MULTI ROOM SOURCE INPUT SELECTOR MASTER VOLUME MIN MAX THX CINEMA ADVANCED STANDARD CONTROL STANDBY AUDIO VIDEO MULTI CHANNEL RECEIVER STEREO DTS MULTI ROOM SOURCE CONTROL S0URCE DVD LD TV SAT VCR1 VCR2 CD TV VOL TV FUNC MENU ENTER STEREO DSP MUT...

Page 76: ... another PIONEER component bearing the Î mark Remote operation may not be possible if direct light from a strong fluorescent lamp is shining on the IR receiver remote sensor window The tuner cannot be tuned to more than one station at a time Therefore changing the station in one room also changes the station in the other room Please be careful not to change stations when recording a radio broadcas...

Page 77: ...ality is prevented by using masking technology and digital filtering technology based on the human auditory characteristics Laser disc format Laser discs are now available on the market in large numbers This means that the recording of different format audio signals on the laser disc raises the important question of compatibility with existing laser discs Dolby Digital tracks on Laser discs record...

Page 78: ...1 000 movie theaters around the world have adopted the DTS format which is now the most popular digital format for movie theaters especially in U S A Europe and Asia No of recorded channels No of playback channels Playback channel structure Sound processing Rear Surround high frequency playback limit Other Dolby Digital 5 1 channels Max 5 1 channels Max Front Left Front Right Center Surround Left ...

Page 79: ... 000 008 101 105 106 103 104 100 107 100 102 DVD code 201 SAT 203 SAT 202 SAT 200 SAT 204 Digital Tuner 401 406 408 414 405 413 411 415 403 404 417 414 408 426 403 410 426 412 427 425 420 408 432 433 405 409 426 428 430 429 408 414 431 407 408 401 406 436 434 416 417 404 408 409 420 421 422 423 424 408 407 410 412 425 435 402 418 419 411 409 408 432 433 402 418 419 452 400 453 DVD Video Recorder 8...

Page 80: ...enna terminals and wires FM broadcasts The FM antenna is not fully extended or is poorly positioned Weak radio signals AM broadcasts The AM antenna is poorly positioned Weak radio signals Interference caused by other equipment fluorescent lamp motor etc Weak radio signals Settings route signal away from Sub woofer Remedy Connect the power plug to the wall outlet Disconnect the power plug from the ...

Page 81: ...as fluorescent light is shining onto the unit s remote control signal light receiving window A cord is connected to the CONTROL IN terminal on this unit The IR Receiver type is mismatched with the setting The FL DIMMER button is pushed Remedy See speaker setting on p 26 to check the speaker settings See channel level p 29 to check the speaker levels Connect the speakers see p 14 Set SIGNAL SELECT ...

Page 82: ...ovements Amplifier Section Continuous average power output of 100 watts per channel min at 8 ohms from 20 Hz to 20 000 Hz with no more than 0 09 total harmonic distortion front Continuous Power Output Front 100 W 100 W 20 Hz 20 kHz 0 09 8 Ω Center 100 W 20 Hz 20 kHz 0 09 8 Ω Rear 100 W 100 W 20 Hz 20 kHz 0 09 8 Ω Input Sensitivity Impedance PHONO MM 4 7 mV 47 kΩ VCR 1 VCR 2 DVD LD TV SAT VIDEO CD ...

Page 83: ...ada pour obtenir le nom de la Société de Service Autorisée Pioneer le plus près de chez vous Ou encore veuillez vous communiquer avec le Service de Clientèle de Pioneer Pioneer électroniques du Canada Inc Département de service au consommateurs 300 Allstate Parkway Markham Ontario L3R OP2 905 479 4411 1 877 283 5901 Should this product require service in Canada please contact a Pioneer Canadian Au...

Page 84: ...orcycle truck traffic lawn mower 100 Garbage truck chain saw pneumatic drill 120 Rockbandconcertinfrontofspeakers thunderclap 140 Gunshot blast jet plane 180 Rocket launching pad Information courtesy of the Deafness Research Foundation Power cord CAUTION Handle the power cord by the plug Do not pull out the plug by tugging the cord and never touch the power cord when your hands are wet as this cou...

Reviews: