background image

English

15

En

Connecting Your Equipment

Optical cable (sold
separately, don’t
pinch or bend
cable sharply)

Audio cord
(sold separately)

Video cord (sold separately)

Before making or changing the connections, switch off the power and disconnect the power cord from the AC wall
outlet.

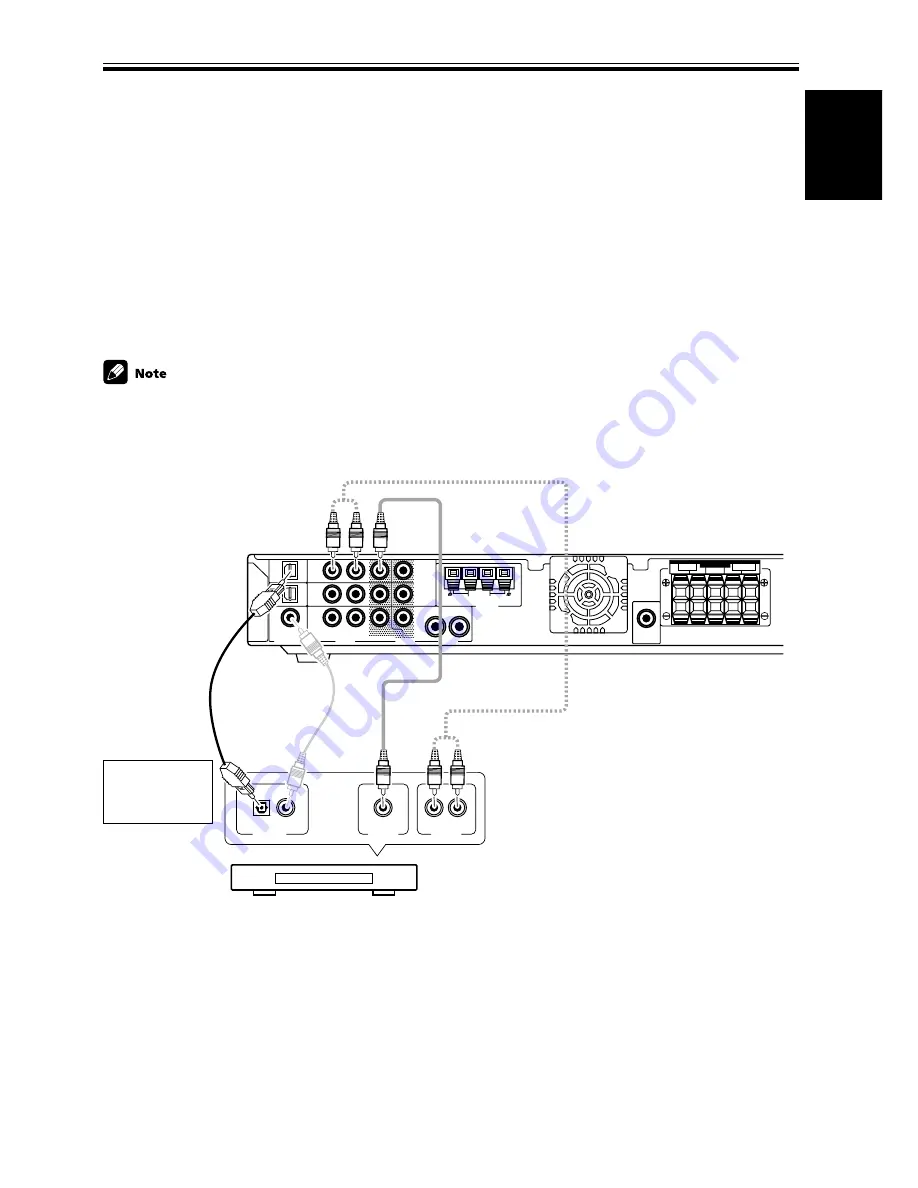
Connecting a Digital Tuner/Set Top Box

If you have an external digital tuner (like a set top box for satellite or cable TV) you need to connect it to either the
optical digital terminals or the coaxial digital terminal in order to play digital cable/satellite broadcasting. The quality
of these two types of connection is the same so it’s simply a matter of matching like with like. It is easiest, however, if
you follow this receiver’s default settings and connect your cable/satellite tuner (or TV/SAT as it’s called on the remote
control) to optical terminal 1. If your TV/SAT does not have an optical terminal, use the coaxial terminal to hook it up
(consult the DVD hook up information on the previous page). In this case you need to assign the TV/SAT function to
that terminal. See p.33 in order to do this. Follow the diagram below to hook up your TV/SAT to either the optical or
coaxial terminal.
Make sure you use a digital connection as well as an analog one for the audio on the cable/satellite tuner, as pictured
below.

The basic default settings for the DIGITAL IN terminals are as follows: COAX: DVD; OPT. 1: TV/SAT; OPT. 2: DVR. If
you need to use the coaxial terminal for your TV/SAT, then assign the coaxial terminal to TV/SAT. The digital termi-
nals settings change to: COAX: TV/SAT; OPT. 1: DVD; OPT. 2: DVR. (see p.33)

Why you need an analog connection as well as a
digital one:

• If you don’t have an digital output on your TV tuner

you will need to use an analog connection.

• If the program you want to watch isn’t output from

the digital terminals you need an analog connection.

• If you want to get a signal from a video deck instead

of a TV tuner you need an analog connection.

Match the shape
of terminal and
the optical plug.

Coaxial cable
(sold separately)

DIGITAL OUT

AUDIO OUT

L

R

VIDEO OUT

CENTER

L

R

L

R

SUB

WOOFER

OUT

OUT

F M   UNBAL75

AM  LOOP

MONITOR

OUT

DVD

DVD

COA X

R

R

AUD IO

DIGITAL IN

AUDIO

VIDEO

L

L

1

2

SPEAKERS

FRONT

SURROUND

DVR /

 VCR

DVR /

  VCR

IN

T V/

SAT

IN

IN

( T V /

    S AT )

ANTENNA

(DVD)

DVR /

 VCR

T V/

SAT

OPT1

OPT2

Digital Set Top Box

Summary of Contents for VSX-C100-S

Page 1: ...AUDIO VIDEO MULTI CHANNEL RECEIVER VSX C100 VSX C100 S Operating Instructions ...

Page 2: ...l interference in a residential installation This equipment generates uses and can radiate radio frequency en ergy and if not installed and used in accordance with the instructions may cause harmful interference to radio communications However there is no guarantee that interference will not occur in a particular installation If this equipment does cause harmful interference to radio or television...

Page 3: ...e point where they exit from the product OUTDOOR ANTENNA GROUNDING If an outside antenna or cable system is connected to the product be sure the antenna or cable system is grounded so as to provide some protection against voltage surges and built up static charges Article 810 of the National ElectricalCode ANSI NFPA70 provides information with regard to proper grounding of the mast and supporting ...

Page 4: ...ess purposes in a restaurant or use in a car or ship and which requires repair will be charged for even during the warranty period K041_En TWO VOLTAGE SELECTOR SWITCHES multi voltage model only Only multi voltage model is provided with these switches Mains voltages in Saudi Arabia are 127 V and 220 V only Never use this model with the 110 V setting in Saudi Arabia Only multi voltage model is provi...

Page 5: ...that can enhance your listening experience and bring out the best in each soundtrack Each mode is designed to bring out a specific quality of the soundtrack or balance the sound The NATURAL corrects the frequencies for small speakers to achieve better theater like surround sound The MIDNIGHT listening mode allows you to obtain excellent surround sound effects even when listening at low volumes som...

Page 6: ...on Your DVD or other Player 26 Program Format Speaker Channel Indicators 26 Playing a Source 27 05 Fine Tuning Your Surround Sound 28 Room Setup 28 Personalizing Your Surround Sound 29 Setting the Volume Level of Each Channel 34 06 Playback Modes 35 Listening Modes 35 Selecting a Listening Mode 36 Sound Modes 37 Selecting a Sound Mode 37 07 Using the Tuner 38 Finding a Station 38 Channel Step Sett...

Page 7: ...TV and VHS videotapes The important part here is all these sources have soundtracks recorded on them with various kinds of technology this is called the sound encoding Home theater sources are recorded encoded with multiple sound channels that is discrete parts of the overall sound CDs which are stereo sources work the same way but they only have two sound channels the left channel and the right c...

Page 8: ...se easy settings on the VSX C100 C100 S In most cases you can leave the receiver in the default settings Default Settings Speaker Setting Automatically sensed by the receiver Input Setting DVD Signal Select AUTO Listening Mode AUTO Sound Mode NATURAL 1 Hook up your DVD player speakers subwoofer and TV Connect your DVD player to this unit using either the coaxial digital terminal or the optical dig...

Page 9: ... is hooked up to on your TV and consult the manual that came with the TV to figure out the proper TV setting Confirm that DVD appears in the receiver s display indicating that the receiver is set to the DVD input If it does not press the DVD button to set the receiver to DVD input 3 Confirm the settings on your DVD player are correct for the source you want to play Make sure your DVD player is out...

Page 10: ...tart on page 29 The VSX C100 C100 S has many different listening modes to accommodate many different kinds of sources speaker configurations and sound reproduction Experiment with these features to figure out what suits your tastes The listening mode explanations and settings start on page 35 The above is a quick guide to getting you started with your home theater system and a few setup suggestion...

Page 11: ...olor TV the screen may distort near a cassette deck or close to a device that gives off a magnetic field This may interfere with the sound in direct sunlight in damp or wet areas in extremely hot or cold areas in places where there is a vibration or other movement in places that are very dusty in places that have hot fumes or oils such as a kitchen Ventilation When installing this unit make sure t...

Page 12: ...n the remote control and the receiver s remote sensor Direct sunlight or fluorescent light is shining onto the remote sensor The receiver is located near a device that is emitting infrared rays The receiver is operated simultaneously with another infrared remote control unit Introductory Information Loading the Batteries The remote control operates on two AA batteries supplied Maintenance of Exter...

Page 13: ...and in the case of the optical cable right side up If it is inserted improperly it can break the shutter on the optical terminal this won t however affect the connection or insertion of an optical cable Audio Video Cords Use audio video cords not supplied to make analog audio and video connections Connect red plugs to R right white plugs to L left and the yellow plugs to VIDEO Be sure to insert co...

Page 14: ...s Also connect your TV to this receiver as shown below The basic default settings for the DIGITAL IN terminals are as follows COAX DVD OPT 1 TV SAT OPT 2 DVR If you need to use an optical terminal for your DVD use OPT 1 In this case assign your coaxial terminal to TV SAT see p 33 and the optical default settings change to OPT 1 DVD OPT 2 DVR Optical cable sold separately don t pinch or bend cable ...

Page 15: ...nal See p 33 in order to do this Follow the diagram below to hook up your TV SAT to either the optical or coaxial terminal Make sure you use a digital connection as well as an analog one for the audio on the cable satellite tuner as pictured below The basic default settings for the DIGITAL IN terminals are as follows COAX DVD OPT 1 TV SAT OPT 2 DVR If you need to use the coaxial terminal for your ...

Page 16: ... default DVD setting the optical terminals default settings are OPT 1 TV SAT OPT 2 DVR If you assigned the coaxial terminal to TV SAT the optical terminals default settings are OPT 1 DVD OPT 2 DVR All video decks both DVRs and VCRs should be hooked up with analog connections as well If you want to record programs it is necessary to connect to the DVR VCR IN AUDIO terminals as shown next page Optic...

Page 17: ... only connected with an digital cable coaxial or optical which is for audio you need to connect analog video and audio cables in order to be able to record video programs with soundtracks Match the shape of terminal and the optical plug Portable DVD Player etc Optical cable sold separately don t pinch or bend cable sharply OPTICAL COAXIAL DIGITAL OUT CONTROL CENTER L R L R SUB WOOFER OUT OUT FM UN...

Page 18: ... pressing down the speaker tab push the speaker wire into the terminal and release speaker terminal tab When you re hooking up your subwoofer make sure its power cord is disconnected Before making or changing the connections switch off the power and disconnect the power cord from the AC wall outlet Connecting Speakers A full complement of five speakers is shown here but naturally everyone s home s...

Page 19: ...way from the TV Install the center speaker above or below the TV so that the sound of the center channel is localized at the TV screen CAUTION If you choose to install the center speaker on top of the TV be sure to secure it by suitable means to reduce the risk of damage or injury resulting from the speaker falling from the TV in the event of external shocks such as earthquakes If possible install...

Page 20: ...ception suspend horizontally outdoors Using External Antennas 75 Ω coaxial cable PAL connector FM UNBAL75Ω AM LOOP ANTENNA 5 6m 15 18 feet Outdoor antenna Indoor antenna Vinyl coated wire Before making or changing the connections switch off the power and disconnect the power cord from the AC wall outlet Connecting Antennas Connect the AM loop antenna and the FM wire antenna as shown below To impro...

Page 21: ...ng in the Receiver After you have connected all your components including the speakers plug the receiver into a wall outlet Mono mini plug optional Mono mini plug optional Point remote control towards remote sensor of component that only has a cord connected to its CONTROL OUT terminal The power cord is removable from main unit for storage to wall outlet Power cord CAUTION Handle the power cord by...

Page 22: ... in 2 PRO LOGIC II Lights when the 2 PRO LOGIC II mode is selected This mode automatically plays back in 2 PRO LOGIC II see p 35 ADVANCED Lights when an ADVANCED mode is selected These modes playback emphasizing certain characteristics of the sound see p 35 36 6 SOUND MODE Lights when you have chosen one of the sound modes to be applied to playback see p 37 7 Input buttons Use to select the playba...

Page 23: ...ere see page 14 Use these terminals to input the signal from a DVD player Make sure to connect to the video terminals and both the analog and coaxial digital terminals for audio To be able to play Dolby Digital and other surround soundtracks you need to make digital connections To do this it s best to use the coaxial digital terminal but you can use the OPT 1 digital terminal if necessary in this ...

Page 24: ...t and play accord ingly SURROUND button see page 35 Use this button to choose one of the surround listening modes this receiver is equipped with ADVANCED button see page 35 Use this button to choose one of the advanced listening modes this receiver is equipped with SOUND MODE button see page 37 Use this button to choose one of the sound modes this receiver is equipped with 5 System setup buttons S...

Page 25: ...ons when adjusting the tuner or navigating TV or DVD menus See these respective sections for more information SUBTITLE button Use to switch the subtitles on a DVD player or disc Component Tuner Satellite Tuner CATV control buttons The main function of these buttons 3 7 etc is to control a component CD for example after you have selected it using the Input Control Mode Select buttons The tuner sate...

Page 26: ...surround sound Program Format Speaker Channel Indicators One very useful feature of this receiver is the Program Format Speaker Channel Indicators This indicator looks something like this With this indicator you can determine which channels are present in a Dolby Digital or DTS source as well as the speakers that are currently being used The letters L C R LFE LS RS represent the signal being input...

Page 27: ...ith your TV to figure out the proper setting 6 Start playback of the component you selected in step 3 7 Press MASTER VOLUME to adjust the volume level If you want to use analog sources choose analog with the SIGNAL SELECT button see page 42 When you re using your TV s internal tuner the TV shouldn t be set to this receiver step 5 above For Karaoke make sure the equipment is hooked up with analog c...

Page 28: ...ell as the output level from each speaker It is also possible to select these functions manually To do so see below For the distance between the listening position and the speakers see pages 29 31 For the output level of each speaker see page 34 The settings made most recently whether here or manually on the pages mentioned directly above will supercede any previous settings The default setting is...

Page 29: ...channel when the LFE level is so high as to distort Front speakers distance setting mode page 31 Use to specify the distance from your listening position to your front speaker Center speakers distance setting mode page 31 Use to specify the distance from your listening position to your center speaker Surround speakers distance setting mode page 32 Use to specify the distance from your listening po...

Page 30: ...ning modes for all the inputs will automatically go into AUTO mode Surround speakers setting This settings establishes the size and configuration of the surround speaker you have connected more exactly than the automatic setup Select either Large L or Small S This will determine if bass sounds are sent by the receiver to the speaker being set If no speakers are connected choose Large If the cone s...

Page 31: ...page 29 if necessary Use the buttons to choose the distance of the center speaker from the main listening position within a range from 1 foot 0 3m to 30 feet 9m Press SETUP to advance to the next receiver setting mode Press ENTER if you want to exit the setting mode The default setting is 5 feet 1 5m One step equals about 1 foot 0 3m When CENTER is selected in Center speaker setting the Center spe...

Page 32: ...1 2 on page 29 if necessary Use the buttons to choose the surround speakers from the main listening position within a range from 1 foot 0 3m to 30 feet 9m Press SETUP to advance to the next receiver setting mode Press ENTER if you want to exit the setting mode The default setting is 6 feet 1 8m One step equals about 1 foot 0 3m When SURR is selected in Surround speakers setting the Surround speake...

Page 33: ...ical terminals default settings will change in accordance with how you assign the coaxial terminal here See the next heading for more information Follow steps 1 2 on page 29 if necessary Use the buttons to choose the component that you hooked up with coaxial cords Press SETUP to advance to the next receiver setting mode Press ENTER if you want to exit the setting mode Optical connection default se...

Page 34: ...ss TEST TONE to turn off the test tone Since the subwoofer transmits an ultra low frequency its sound may seem quieter than it actually is Be careful not to turn up your subwoofer too much and check the volume with an actual source The subwoofer volume is best controlled with the volume control on the powered subwoofer The speaker volume can be adjusted without outputting the test tone by pressing...

Page 35: ...ives 4 1 channel surround sound It is less sensitive to the quality of the source material so it may be useful when PRO LOGIC II MOVIE MUSIC do not give good results 2 PRO LOGIC II MOVIE MOVIE This mode gives 5 1 channel surround sound It is suitable for movies especially those recorded in Dolby Surround The channel separation and movement of surround effects is comparable to Dolby Digital 5 1 2 P...

Page 36: ...g used If you did not connect center and surround speakers you can only choose VIRTUAL or STEREO in SURROUND mode 1 2 TV SURROUND This mode produces surround sound even for mono or stereo TV sources It is useful for old movies A mono TV signal will be able to approximate the effect of overall surround sound GAME Use this mode when playing a video game It works especially well with sound moving fro...

Page 37: ...e softer sounds more audible and the louder sounds a bit softer so you can hear the entire soundtrack especially quiet sounds and dialog with a good surround sound feeling when listening at low volumes QUIET This mode reduces the bass and treble in the signal It is best used when you feel sounds are too harsh or sharp and would like to smooth them out BRIGHT This mode is used for 2ch Stereo and is...

Page 38: ...ceiver into mono reception mode This should improve the sound quality and allow you to enjoy the broadcast 1 2 MPX 3 SOURCE RECEIVER SLEEP AUTO SURROUND SIGNAL SELECT ADVANCED SOUND MODE DIMMER SETUP DTV ON OFF CLASS MPX TV CONTROL D ACCESS DTV INFO CH RETURN ENTER TEST TONE TOP MENU DTV MENU MENU AUDIO SUBTITLE CHANNEL CHANNEL VOLUME INPUT SELECT 10 GUIDE T EDIT DISPLAY CH_SELECT ROOM SETUP RECEI...

Page 39: ... 38 1 Tune to a station you want to memorize See Finding a Station on page 38 and Tuning Directly to a Station on this page for more detail on how to do this 2 Press T EDIT The display shows a blinking memory class 3 Press CLASS to select one of the three classes Repeatedly pressing this button cycles through the three available classes A B and C 4 Press the ST or ST buttons or the number buttons ...

Page 40: ...T to select the FM preset channel 4 Press T EDIT twice to select the station name mode 5 Press ST or ST to choose the first character Scroll through the letters numbers and symbols you can input Stop on the one you want 6 Press ENTER to input the first of the four characters That character lights steadily in the display and the cursor automatically moves to the next space 7 Enter up to three more ...

Page 41: ...splay will light for about two seconds and then go off again 1 1 Using the Headphones The headphone features are explained here Plug headphones into the PHONES jack on the front of the receiver No sound will be audible from the speakers when headphones are plugged in When using the headphones you can only select STEREO or PHONES SURROUND listening modes STANDBY ON PHONES VIDEO AUDIO DIGITAL IN L R...

Page 42: ...sleep timer 1 1 SEL ANA SEL DIG SEL AUTO When the SLEEP timer has been set or is active a dot indicator will appear in the display to the left of the volume indicator Press the SLEEP button once to view how much time is left on the timer before shutdown Each press after that will cycle through the possible SLEEP time lengths SLEEP indicator Resetting the System Use this feature to reset the system...

Page 43: ...und Setting Type Default Settings Default Settings for the Receiver All the settings that return to their defaults when you reset the system are listed here see the previous page Resetting the System Using Other Functions page 30 page 30 page 31 page 31 page 31 page 32 page 32 page 32 page 33 page 35 page 35 page 34 page 27 page 27 The default settings for the remote control to control other compo...

Page 44: ...ate This will both change the input into the receiver and the remote control operation mode The factory settings for all Input Control Mode Select buttons are explained here All the settiings are all for Pioneer components but you can change this DVD DVD player TV SAT TV DVR VCR DVD recorder FM AM the built in radio tuner FRONT VCR TV TV For a detailed chart of the factory settings see Clearing th...

Page 45: ... able operate other equipment unless preset with the method above 1 Controlling the Rest of Your System 1 Recalling Preset Codes The following steps show you how to recall preset codes for each Input Control Mode Select button or the TV CONTROL buttons In the former case once the preset code is assigned pressing the button will automatically set the remote to operate the respective component Refer...

Page 46: ...the box below Input Control Mode Select button Preset Code Component Manufacturer DVD TV SAT DVR VCR FRONT 000 600 456 400 DVD PIONEER TV PIONEER DVD Recorder PIONEER VCR PIONEER 1 TV CONTROL 600 TV PIONEER SOURCE RECEIVER SLEEP AUTO SURROUND SIGNAL SELECT ADVANCED SOUND MODE DIMMER SETUP DTV ON OFF CLASS MPX TV CONTROL D ACCESS DTV INFO CH RETURN ENTER TEST TONE TOP MENU DTV MENU MENU AUDIO SUBTI...

Page 47: ... a f r o f n w o d d l o H D L D V D R C V R D C D M D C k c e d e t t e s s a C r e d r o c e r D V D 3 k c a b y a l p t r a t S D L D V D R C V R D C D M D C k c e d e t t e s s a C r e d r o c e r D V D 7 y d a e r l a s i c s i d e h t n e h w s i h t g n i s s e r p s l e d o m e m o s n o k c a b y a l p p o t S n e p o o t y a r t c s i d e h t e s u a c l l i w d e p p o t s D L D V D R C...

Page 48: ...T e l b a C V T l a t i g i D U N E M P O T m e t s y s t a h t f o u n e m e d i u g e h t o t u o y s e k a T V T V T e t i l l e t a S V T e l b a C V T l a t i g i D Y A L P S I D l e n n a h c s u o i v e r p e h t o t u o y s e k a T V T u n e m V T D e h t w o h s o t e s U V T l a t i g i D 1 l e n n a h c s u o i v e r p a o t n r u t e r o t e s U l a t i g i D V T e t i l l e t a S V T ...

Page 49: ...202 ECHOSTAR 205 PRIMESTAR 206 BELL 208 PIONEER 200 207 231 DTV Manufacturer Code PIONEER 229 207 PANASONIC 230 TUNER Manufacturer Code PIONEER 500 VCR Manufacturer Code ORION 445 446 424 FUNAI 441 RCA 401 406 408 414 405 413 411 415 460 461 462 463 435 ZENITH 403 404 417 MAGNAVOX 414 408 426 403 FISHER 410 426 412 427 425 420 PANASONIC 408 432 433 TOSHIBA 405 409 426 JVC 428 430 429 408 414 431 4...

Page 50: ... the display and no sound is output The unit does not respond when the buttons are pressed No sound is output when the AM FM is selected Considerable noise in radio broadcasts Broadcast stations cannot be selected automatically Remedy Connect the power plug to the wall outlet Disconnect the power plug from the outlet and insert again Make sure there are no loose strands of speaker wire touching th...

Page 51: ...ad The search function performed by the player slightly alters the digital informa tion making it unreadable The player is paused The player s sound output settings are wrong Different discs have different recording levels so some may be louder than oth ers Remedy Refer to speakers setting mode on page 30 to check the speaker settings Turn levels up Refer to Setting the Volume Level of Each Channe...

Page 52: ... or control something on the receiver Something is plugged into the CON TROL IN Terminal see page 21 The plug was inserted improperly Remedy Turn on input attenuator see page 33 Turn the volume down Set the front speakers to large refer to page 30 Make sure the video component is con nected correctly refer to pages 13 to 16 Make sure the proper component is se lected by pressing the correct functi...

Page 53: ...ty sound and dynamic surround effects In this system 6 channels of digital sound are recorded on CD ROM rather than on the film DTS adopts a simultaneous playback format With a low rate of compression of sound signals and a high rate of transmittance a higher sound quality format is produced Also unlike the process of recording digital sounds on film directly the only components required are a CD ...

Page 54: ...hannel Stereo Playback This is conventional stereo playback from the left and right speakers called front speakers on this receiver Virtual Surround Playback PHONES VIRTUAL indicator lights With this playback method you can get multichannel like surround sound even when using just two speakers This is achieved by the Virtual surround listening mode which uses SRS Tru Surround technology Headphone ...

Page 55: ...55 En English Techno Know How ...

Page 56: ... Section Frequency Range 87 5 MHz to 108 MHz Usable Sensitivity Mono 13 2 dBf IHF 1 3 µV 75 Ω 50 dB Quieting Sensitivity Mono 20 2 dBf Stereo 38 6 dBf Signal to Noise Ratio Mono 73 dB at 85 dBf Stereo 70 dB at 85 dBf Distortion Stereo 0 5 1 kHz Alternate Channel Selectivity 60 dB 400 kHz Stereo Separation 40 dB 1 kHz Frequency Response 30 Hz to 15 kHz 1dB Antenna Input DIN 75 Ω unbalanced AM Tuner...

Page 57: ...0 2 dBf Stereo 38 6 dBf Specifications Multi voltage model and Singaporean model 0 3 0 3 Signal to Noise Ratio Singaporean model Mono 76 dB at 85 dBf Stereo 72 dB at 85 dBf Multi voltage model Mono 73 dB at 85 dBf Stereo 70 dB at 85 dBf Distortion Singaporean model Stereo 0 6 1 kHz Multi voltage model Stereo 0 5 1 kHz Alternate Channel Selectivity Singaporean model 70 dB 400 kHz Multi voltage mode...

Page 58: ...58 En ...

Page 59: ...59 En English ...

Page 60: ...nia 90801 1540 U S A PIONEER ELECTRONICS OF CANADA INC 300 Allstate Parkway Markham Ontario L3R OP2 Canada PIONEER EUROPE NV Haven 1087 Keetberglaan 1 B 9120 Melsele Belgium TEL 03 570 05 11 PIONEER ELECTRONICS AUSTRALIA PTY LTD 178 184 Boundary Road Braeside Victoria 3195 Australia TEL 03 9586 6300 PIONEER ELECTRONICS DE MEXICO S A DE C V San Lorenzo 1009 3er Piso Desp 302 Col Del Valle Mexico D ...

Reviews: