background image

07

Pour regarder la télévision

23

Fr

F

rançais

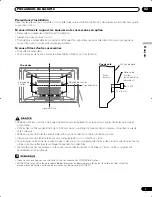
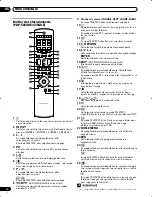
Écran plasma

(vue de droite)

/–

Réglage du niveau sonore

Silencieux

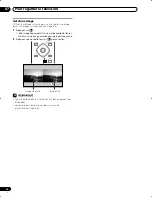
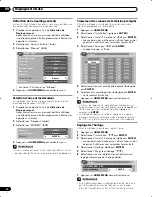
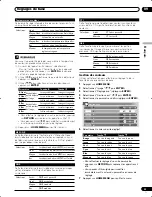
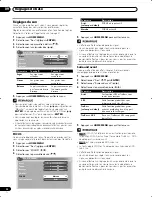
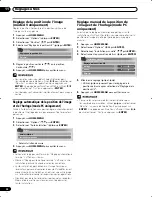
Réglage des canaux analogues favoris

Vous pouvez enregistrer en tout un maximum de 16 canaux
de télévision favoris, puis les sélectionner rapidement parmi
vos canaux favoris.

1

Tout en regardant une émission analogue, appuyez sur

ENTER

 pour appeler la liste de canaux favoris.

2

Sélectionnez un canal favori à syntoniser ( / , 

/

puis 

ENTER

).

• Appuyez sur 

RETURN

 pour quitter la liste de canaux

favoris.

• Reportez-vous aux pages 28 et 29 sur la manière

d’enregistrer des canaux favoris.

01

02

03

04

05

06

07

08

**********

****

****

****

****

****

****

****

09

10

11

12

13

14

15

16

**********

****

****

****

****

****

****

****

Favori

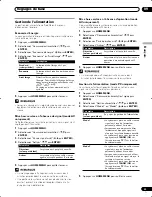
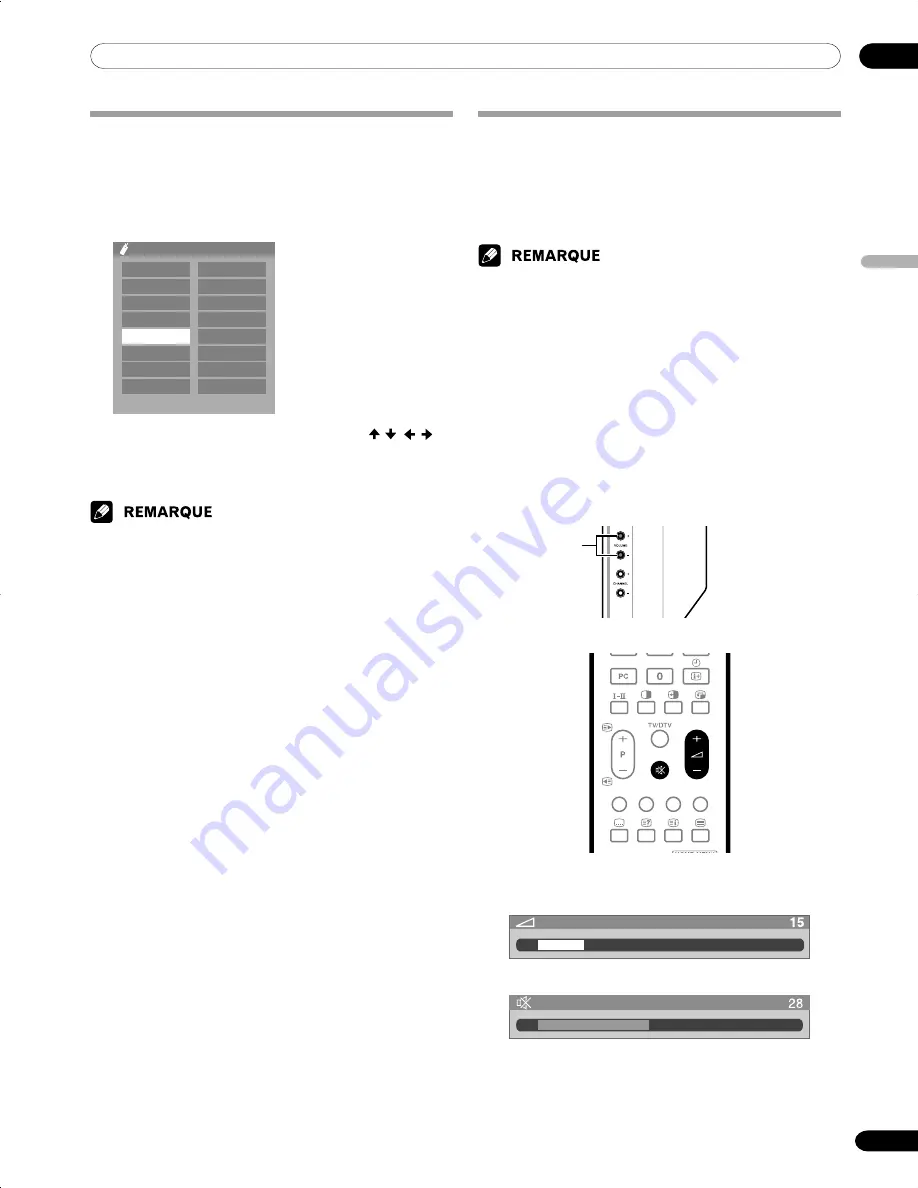
Modification du niveau sonore

Utilisation des touches 

+

/

 du boîtier de

télécommande

• Pour augmenter le niveau sonore, appuyez sur 

+

.

• Pour diminuer le niveau sonore, appuyez sur 

.

• Les touches 

VOLUME


+

/

 de l’écran plasma agissent de la

même manière que les touches 

+

/

.

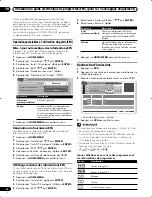
Utilisation de la touche 

e

 du boîtier de

télécommande

La touche 

e

 coupe les sons.

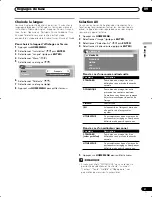
1

Appuyez sur 

e

.

• Le symbole 

M

 apparaît sur l’écran.

2

Appuyez une nouvelle fois sur 

e

 pour rétablir les sons.

• Une pression sur la touche 

+

 rétablit également

les sons.

PDP-505XDE-Fre (21-26)

04.6.16, 4:44 PM

23

Summary of Contents for PDP-435HDE

Page 1: ...Operating Instructions Mode d emploi Bedienungsanleitung PLASMA DISPLAY SYSTEM SYSTEME D ÉCRAN PLASMA PLASMA DISPLAY SYSTEM PDP 505XDE PDP 435XDE PDP 505HDE PDP 435HDE PDP 505XDE 435XDE ...

Page 2: ...Receiver 13A Plasma Display fuse Should the fuse need to be replaced a BSI or ASTA approved BS 1362 fuse marked or and of the same rating as above which is also indicated on the pin face of the plug must be used Always refit the fuse cover after replacing the fuse Never use the plug without the fuse cover fitted In the unlikely event of the socket outlet in your home not being compatible with the ...

Page 3: ...UTLET DO NOT DEFEAT THE SAFETY PURPOSE OF THE GROUNDING EARTHING TYPE PLUG The following symbols are found on labels attached to the product They alert the operators and service personnel of this equipment to any potentially dangerous conditions WARNING This symbol refers to a hazard or unsafe practice which can result in personal injury or property damage CAUTION This symbol refers to a hazard or...

Page 4: ... range of the remote control unit 19 Cautions regarding the remote control unit 19 Basic connections 20 Connecting to an antenna 20 Connecting the power cord 20 07 Watching TV Turning on the power 21 Turning off the power 21 Changing channels 22 Setting up analogue favourite channels 23 Changing the volume and sound 23 Using the multiscreen functions 25 Splitting the screen 25 Freezing images 26 0...

Page 5: ...VD image 46 Enjoying a game console and watching camcorder images 47 Connecting a game console or camcorder 47 Displaying an image from the game console or camcorder 47 Enjoying through audio equipment in connection 47 Connecting audio equipment 47 Connecting control cords 48 About SR 48 Watching an image from a personal computer 48 Connecting a personal computer 48 Displaying an image from a pers...

Page 6: ...imes the length of the previous still moving image After using the Plasma Display System always switch the display to STANDBY mode Installation guidelines The Pioneer PureVision PDP 505XDE 435XDE PDP 505HDE 435HDE Plasma Display System incorporates a very thin design To ensure safety please take the proper measures to mount or install the Plasma Display in order to prevent the unit from tipping ov...

Page 7: ...oving images are displayed The time for the after images to disappear depends on the lumi nance of the still images and the time they had been displayed 2 After image lag image due to burning Avoid displaying the same image on the Plasma Display continuously over a long period of time If the same image is displayed continuously for several hours or for shorter periods of time over several days a p...

Page 8: ... cords at the plugs and product 13 The plasma Display used in this product is made of glass Therefore it can break when the product is dropped or applied with impact Be careful not to be injured by broken glass pieces in case the plasma Display breaks 14 Overloading Do not overload AC outlets or extension cords Overloading can cause fire or electric shock 15 Entering of objects and liquids Never i...

Page 9: ... to use the optional PIONEER mounting products PIONEER shall not be liable for any personal injury or product damage that results from the use of mounting items other than the optional PIONEER products Installation Precautions Observe the following precautions when installing with any items such as the optional stand When using the optional stand brackets or equivalent items Ask your dealer to per...

Page 10: ...of the product may be adversely af fected Switch on and run the product occasionally Condensation Condensation may take place on the surface or inside of the product when the product is rapidly moved from a cold place to a warm place or just after a heater is switched on in winter morning for example When condensation takes place do not switch on the product and wait until condensation disappears ...

Page 11: ...th Speed clamp x 3 Bead band x 3 For Europe except U K and Eire For U K and Eire AA size battery x 2 Manganese battery Only the power cord that is appropriate in your country or region is supplied Speaker cushion x 3 Use when installing the optional speakers at the bottom of the Plasma Display Plasma Display 04 Supplied Accessories for PDP 505HDE 435HDE Remote control unit For Europe except U K an...

Page 12: ...nal BLACK 10 SYSTEM CABLE terminal WHITE 11 SPEAKER right left terminals 12 AC INLET terminal The terminals are set facing down About the illustrations in these operating instructions These instructions are provided for both the PDP 505XDE 435XDE and PDP 505HDE 435HDE whose Media Receiver and remote control units appearances differ slightly Please note that throughout these instructions the PDP 50...

Page 13: ...UTPUT terminals AUDIO 18 INPUT 2 terminals COMPONENT VIDEO Y PB PR 19 INPUT 3 terminal HDMI 20 SYSTEM CABLE terminal WHITE 21 SYSTEM CABLE terminal BLACK SERVICE ONLY i o link A SELECT INPUT 2 3 INPUT 2 INPUT 1 I N OUT CONTROL INPUT 3 OUT IN OPTICAL ANT DIGITAL DIGITAL OUT COMMON INTERFACE SUB WOOFER OUTPUT INPUT 2 Y PB PR COMPONENT VIDEO MONITOR OUTPUT R AUDIO L S VIDEO VIDEO INPUT 3 BLACK WHITE ...

Page 14: ...s a command 14 EXIT PDP 505XDE 435XDE only Returns to the normal screen in one step 15 p y TV External input mode Displays the channel informa tion DTV input mode Displays the banner information 16 Moves the location of the small screen when in the picture in picture mode 17 Switches between the two screens when in the 2 screen or picture in picture mode 18 i i Sets the volume 19 e Mutes the sound...

Page 15: ...th the stand Using the optional PIONEER speakers For details on installation refer to the instruction manual provided with the speaker Operating Environment Operating environment temperature and humidity 0 C to 40 C less than 85 RH cooling vents not blocked Avoid installing in the following locations Under direct exposure to sunlight Under strong artificial light In high humidity Poorly ventilated...

Page 16: ...s Keep the shock absorbing pads and screws They are re quired when you place the Media Receiver in the horizontal position 4 Plug the screw holes using the supplied caps When you have installed the Media Receiver verti cally be sure to use the supplied stand If you place the unit directly on the floor the cooling vents will be blocked resulting in mechanical failure Remove the separation sheet Scr...

Page 17: ...m Connecting the system cable to the Plasma Display THESE SPEAKER TERMINALS CAN BE APPLIED WITH HAZARDOUS VOLTAGE WHEN YOU CONNECT OR DISCONNECT THE SPEAKER CABLES TO PREVENT THE RISK OF ELECTRIC SHOCK DO NOT TOUCH UNINSULATED PARTS BEFORE DISCONNECTING THE POWER CORD Connecting the system cable to the Media Receiver For details on optional PIONEER speaker installation refer to the instruction man...

Page 18: ...nsert 1 into an appropriate hole on the rear of the Plasma Display and snap 2 into the back of 1 to lock the clamp Speed clamps are designed to be difficult to undo once in place Please attach them carefully Use pliers to twist the clamp 90 pulling outward The clamp may deteriorate over time and become damaged if removed 1 2 Speaker cable Speed clamps Speaker cable Speaker cable Cable binders supp...

Page 19: ... time remove the batteries from it WHEN DISPOSING OF USED BATTERIES PLEASE COMPLYWITHGOVERNMENTALREGULATIONSOR ENVIRONMENTALPUBLICINSTRUCTION SRULES THATAPPLYINYOURCOUNTRY AREA Cautions regarding the remote control unit Do not expose the remote control unit to shock In addition do not expose the remote control unit to liquids and do not place in an area with high humidity Do not install or place t...

Page 20: ... OUT COMMON INTERFACE SUB WOOFER OUTPUT INPUT 2 Y PB PR COMPONENT VIDEO MONITOR OUTPUT R AUDIO L S VIDEO VIDEO BLACK WHITE SYSTEM CABLE AC IN OUT IN HDMI INPUT 3 Connecting the power cord Plasma Display bottom view Media Receiver rear view SERVICE ONLY i o link A SELECT INPUT 2 3 INPUT 2 INPUT 1 I N OUT CONTROL INPUT 3 OPTICAL ANT DIGITAL DIGITAL OUT COMMON INTERFACE SUB WOOFER OUTPUT INPUT 2 Y PB...

Page 21: ...the Plasma Display Panel and Media Receiver You can also reverse steps 1 and 2 Turning off the power 1 Press a on the remote control unit or STANDBY ON on the Plasma Display The system enters standby mode and the image on the screen disappears Both STANDBY indicators light up in red The TIMER indicator lights when a programme is preset for recording watching Do not turn off the POWER button on the...

Page 22: ...n DTV mode to select channel 123 3 digit channel press 1 2 followed by 3 PDP 505XDE 435XDE only When viewing Teletext information View a page directly which is 3 digit page number from 100 to 899 by pressing buttons 0 to 9 See page 53 In the standby mode when you press 0 the power turns on and the on screen image comes from the INPUT 1 source Or when you press any button from 1 to 9 a TV image dis...

Page 23: ...ess e again to cancel the mute mode Pressing i can also cancel the mute mode Volume adjustment Muting Setting up analogue favourite channels You can register up to 16 analogue TV channels in total then quickly select from your favourite channels only 1 While watching analogue broadcasts press ENTER to call up the Favourite Channel List 2 Select a favourite channel to tune in then ENTER Press RETUR...

Page 24: ...ype of sound In this case sound is determined by the video source Each time you press g MTS toggles as shown below p mode pp mode MONO mode p pp MONO 1 AAA NICAM STEREO 10 00 1 AAA NICAM STEREO 10 00 1 AAA MONO 10 00 2 BBB NICAM p 10 00 2 BBB NICAM pp 10 00 2 BBB MONO 10 00 3 CCC NICAM MONO 10 00 3 CCC NICAM MONO 10 00 3 CCC MONO 10 00 4 DDD STEREO 10 00 4 DDD STEREO 10 00 4 DDD MONO 10 00 5 EEE D...

Page 25: ...ss to move the position of the small screen anti clockwise 2 To select the desired input source press the appropriate input source button If watching TV programmes press P P to change the channel The multiscreen function cannot display images from the same input source at the same time If you make such an attempt a warning message appears When you press HOME MENU the single screen mode is restored...

Page 26: ...ving image that you are watching 1 Press d A still image appears on the right screen while a moving image is shown on the left screen 2 Press d again to cancel the function With the screen split any image cannot be frozen When this function is not available a warning message appears Normal image Still image ...

Page 27: ... 42 Option Position 38 WSS 41 4 3 Mode 41 Colour System 39 Input Select 39 Side Mask 41 HDMI Input 45 Setup Auto Installation 28 Analogue TV Setup 28 30 DTV Setup PDP 505XDE 435XDE only Password 42 43 Language 31 Home Gallery 50 52 Menu operations The following describes the typical procedure for setting up the menus For the actual procedures see the appropriate pages that describes individual fun...

Page 28: ...R 10 Select Start then ENTER Auto Installation automatically starts To quit Auto Installation in progress press RETURN 11 After Auto Installation has been finished press HOME MENU to exit the menu Setting up analogue TV channels manu ally This section describes how to set up analogue TV channels manually Using Manual Adjust Use Manual Adjust to set up analogue TV channels manually 1 Press HOME MEN...

Page 29: ...ns for Label Child Lock and Decoder See Labelling TV channels Setting Child Lock and Selecting a decoder input terminal Colour System Store Label Auto Yes 1 2 3 4 5 6 7 8 9 0 A Delete Space OK B C D E F G H I J K L M N O P Q R S T U V W X Y Z _ The name entry screen appears 3 Select the first character then ENTER The cursor moves to the second character 4 Repeat step 3 to enter up to five characte...

Page 30: ... default selected you cannot watch any images from the decoder Sorting preset TV channels Use the following procedure to change the sequence of the preset TV programmes 1 Press HOME MENU 2 Select Setup then ENTER 3 Select Analogue TV Setup then ENTER The password entry screen appears Enter your 4 digit password using buttons 0 9 4 Select Sort then ENTER The sort screen appears Sort 1 4 56789 01 01...

Page 31: ...pe of the current TV programme or the type of images input from external equipment 1 Press HOME MENU 2 Select Picture then ENTER 3 Select AV Selection then ENTER 4 Select the desired option then ENTER For AV source Item Description STANDARD For a highly defined image in a normally bright room DYNAMIC For a very sharp image with the maximum contrast This mode does not allow manual image quality adj...

Page 32: ...le parameters see the table PureCinema Automatically detects a film based source originally encoded at 24 frames second analyses it then recreates each still film frame for high definition picture quality Selections Off Deactivates the PureCinema Standard Produces smooth and vivid moving images film specific by automati cally detecting recorded image information when displaying DVD or high definit...

Page 33: ...ger blue R Low For weaker red For stronger red G Low For weaker green For stronger green B Low For weaker blue For stronger blue To perform adjustment for another item press RETURN and then repeat steps 2 and 3 You may press to immediately change an item to be adjusted 4 Press HOME MENU to exit the menu Fine adjustment for bright portions Fine adjustment for dark portions Colour Management Perform...

Page 34: ...TER 3 Select an item to be adjusted 4 Select the desired level Bass Balance Treble Reset 0 0 2 Sound STANDARD Item button button Treble For weaker treble For stronger treble Bass For weaker bass For stronger bass Balance Decreases audio from Decreases audio from the right speaker the left speaker 5 Press HOME MENU to exit the menu To restore the factory defaults for all items press to select Reset...

Page 35: ...V programme finishes No Operation off AV mode only The system will be automatically placed into the standby mode when no operation is performed for three hours 1 Press HOME MENU 2 Select Power Control then ENTER 3 Select No Operation off then ENTER 4 Select Enable then ENTER Item Description Disable Does not place the system into the factory default standby mode Enable Places the system into the s...

Page 36: ...lect Data Provider then ENTER 6 Select the desired broadcasting station 7 Press HOME MENU to exit the menu Data Provider EPG Disable Off Station Matching Data Auto Update Item Description Disable Deactivates the EPG factory default Enable Automatically acquires EPG information at midnight the time specified by the user PDP 505XDE 435XDE only and when watching a broadcasting station specified as an...

Page 37: ...ogramme appears 3 Press the red button 4 Select Rec Speed 6 Select PDC VPS 7 Select ON or OFF 8 Select Record 9 Select OK then ENTER 10 Press EPG to exit the menu Make sure to leave the VCR power on when presetting TV programmes for recording You can return to the programme list screen by pressing RETURN This function is available only when recording equipment has been connected to the INPUT 2 or ...

Page 38: ...just the vertical position or the horizontal position 6 Press HOME MENU to exit the menu Auto Setup starts 4 Press HOME MENU to exit the menu When Auto Setup is finished Auto Setup completed appears Even when Auto Setup completed appears Auto Setup may have failed depending on conditions Auto Setup may fail with a PC image composed of similar patterns or monochrome If not successful change the PC ...

Page 39: ...INPUT 1 INPUT 2 or INPUT 3 terminal specify the type of video signals to be received from the connected equipment For the type of the signals see the operation manual that came with the connected equipment Before starting the menu press INPUT 1 INPUT 2 or INPUT 3 on the remote control unit or press INPUT on the Plasma Display to select an input source 1 Press HOME MENU 2 Select Option then ENTER 3...

Page 40: ...x pictures Bars may appear on the top and bottom with some programmes CINEMA For 14 9 letterbox pictures Bars may appear on the top and bottom on some programmes PC mode except for XGA signals Item Description 4 3 Fills the screen without altering the input signal aspect ratio FULL Full 16 9 screen display Dot by Dot Matches input signal with same number of screen pixels PC mode for XGA signals Ex...

Page 41: ...Select 4 3 Mode then ENTER 4 Select 4 3 or WIDE then ENTER Changing the brightness at both sides of the screen Side Mask With the 4 3 FULL 14 9 CINEMA 14 9 screen size selected for the AV mode you can change the brightness of the grey side masks that appear at both sides of the screen 1 Press HOME MENU 2 Select Option then ENTER 3 Select Side Mask then ENTER 4 Select the desired parameter then ENT...

Page 42: ...eir choices Entering a password In a case where you select a channel blocked with Child Lock or password entry is requested when attempting to open the menu enter a password correctly 1 Enter a correct 4 digit password using buttons 0 9 Please Input Your Password If you fail password entry three times Invalid password appears and the menu is closed In order to display the password entry screen aga...

Page 43: ... password 1 Press HOME MENU 2 Select Setup then ENTER 3 Select Password then ENTER The password entry screen appears Enter your 4 digit password using buttons 0 9 4 Select Reset then ENTER 5 Select Yes then ENTER 6 Press HOME MENU to exit the menu The above procedure will reset the password to the factory default 1234 Disabling the password 1 Press HOME MENU 2 Select Setup then ENTER 3 Select Pass...

Page 44: ...OUT COMMON INTERFACE SUB WOOFER OUTPUT INPUT 2 Y PB PR COMPONENT VIDEO MONITOR OUTPUT R AUDIO L S VIDEO VIDEO INPUT 3 HDMI OUT IN HDMI INPUT 3 Displaying a VCR image To watch a VCR image press INPUT 2 on the remote control unit or press INPUT on the Plasma Display to select INPUT2 If VCR images do not come in clearly you may need to change the input signal type setting using the menu See page 39 R...

Page 45: ...will be made to identify the type of digital video signals when digital video signals are received Item Description Auto Automatically identifies input digital video factory default signals Colour 1 Digital Component Video signals 4 2 2 locked Colour 2 Digital Component Video signals 4 4 4 locked Colour 3 Digital RGB signals locked 4 Press HOME MENU to exit the menu If you select a parameter other...

Page 46: ...ed and dis played If the i o Link A has been deactivated Video is always selected for signals other than RGB because the system cannot identify among RGB Y C S Video and CVBS Video signals for example receiving Y C S Video signals results in monochrome display Media Receiver rear view SCART cable commercially available SERVICE ONLY i o link A SELECT INPUT 2 3 INPUT U INPUT 1 I N OUT CONTROL INPUT ...

Page 47: ...e Enjoying through audio equipment in connection Connecting audio equipment You can enjoy more powerful sound by connecting such audio equipment as an AV receiver or subwoofer OPTICAL DIGITAL OUT COMMON INTERFACE SUB WOOFER OUTPUT INPUT 2 Y PB PR COMPONENT VIDEO MONITOR OUTPUT R AUDIO L S VIDEO VIDEO BLACK WHITE SYSTEM CABLE AC IN IN HDMI INPUT 3 AV Receiver Subwoofer PDP 505XDE 435XDE Optical dig...

Page 48: ...ROL IN OUT CONTROL IN OUT CONTROL IN OUT I N OUT CONTROL HDMI INPUT 3 Connecting control cords Connect control cords between the Media Receiver and other PIONEER equipment having the logo You can then operate the connected equipment by sending commands from its remote control unit to the remote control sensor on the Media Receiver After the CONTROL IN terminals have been connected the remote contr...

Page 49: ... the initial Home Gallery screen appears Memory card with PC CARD adapter Front of the Media Receiver with the front door opened Digital still camera Image data display Memory card with PC CARD adapter Top side 3 Close the front door on the Media Receiver Removing a memory card To remove a memory card quit the memory card screen and then push the PC CARD eject button The memory card is ejected Com...

Page 50: ...y screen 1 Press HOME MENU 2 Select Home Gallery then ENTER Starting a thumbnail screen When a folder is selected on the initial Home Gallery screen images in the folder are displayed in thumbnail format Home Gallery Thumbnail 1 25 RETURN HOMEMENU Return Select End Start Slide Show Picture information 011 JPG Setup Picture 011 JPG 018 JPG 048 JPG 059 JPG 084 JPG DSC00086 JPG DSC00087 JPG DSC00088 ...

Page 51: ...re displayed with blank surrounding You may not be able to enlarge or reduce images because of their original sizes Starting the Slide Show Setup screen When the thumbnail screen is in display press GREEN to start the screen for setting up for Slide Show that sequentially changes images 1 Select Display Mode 2 Select Normal or Full With Full selected images are displayed using the full screen 3 Se...

Page 52: ...l selected for Playback Mode press P P to change images While images are automatically changed you can stop and hold automatic image change for approximately 90 seconds by pressing d 2 When quitting the Slide Show screen press RETURN to restore the thumbnail screen or HOME MENU to quit the Home Gallery function With Random selected for Playback Order selected you cannot press P to manually change ...

Page 53: ...ogramme with no Teletext signal Cannot display Teletext appears Selecting and operating Teletext pages Use the following remote control buttons to select and operate Teletext pages Colour RED GREEN YELLOW BLUE You can select a group or block of pages displayed in the coloured brackets at the bottom of the screen by pressing the corresponding colour RED GREEN YELLOW BLUE on the remote control unit ...

Page 54: ...sing stops automatic subpage change and per forms its respective button function BLOCK PAGES TV PROGRAMS COLOUR BAR WEATHER NEWS MOVIE LOCAL SPORTS BLOCK 1 BLOCK 2 BLOCK 3 GROUP PAGES FOOT BALL BASKETBALL TENNIS SKI JUDO SWIM GROUP 1 GROUP 2 GROUP 3 GROUP 4 T O P O v e r V i e w 1 Press m to display Teletext 2 While receiving TOP Teletext press l to display TOP Over View 3 Press and to select the ...

Page 55: ...uorescent lighting Is a fluorescent light illuminated to remote control sensor Check if the input source for video or PC has been unintentionally selected although you want to watch a TV channel See page 22 Check if you have selected a channel blocked with Child Lock See page 30 Enter a password to temporarily cancel Child Lock See page 42 Is connection to other components correct See pages 44 to ...

Page 56: ...short in speaker cable and the speakers SD1 1 Powering off Internal temperature too high Check if the ambient temperature of the Media Receiver is high Check the temperature around media receiver Signal names for 15 pin mini D sub connecter 15 14 13 12 9 11 10 8 7 6 5 4 3 2 1 Front view Pin No Signal name 1 R 2 G 3 B 4 Not connected 5 Not connected 6 GND ground 7 GND ground 8 GND ground 9 5V 0 GND...

Page 57: ...ed Connecting pin assignments for SCART Various audio and video devices may be connected via the SCART terminals 8 Audio video control 9 Earth 10 AV link control 11 Not used 12 Not used 13 Earth 14 Not used 15 Chroma S Video input 16 Not used 17 Earth for video 18 Earth 19 Video output 20 Video input S Video input 21 Plug shield SCART INPUT 3 1 Audio right output 2 Audio right input 3 Audio left o...

Page 58: ...al Tuner VHF UHF VHF Band III 170 to 230 MHz and UHF Band IV V 470 to 862 MHz Not Applicable Auto Channel Preset 999 ch Auto Preset Auto Label Auto Sort STEREO MPEG layer I II Dolby Digital Terminals Rear INPUT 1 SCART AV in RGB in TV out INPUT 2 SCART AV in out S VIDEO in AV link 1 Component Video INPUT 3 SCART AV in out S VIDEO in RGB in AV link 1 HDMI in Antenna 75 Ω Din Type for VHF UHF in Ana...

Page 59: ...mark of Video Electronics Standards Association HDMI the HDMI logo and High Definition Multimedia Interface are trademarks or registered trademarks of HDMI Licensing LLC The names of companies or institutions are trademarks or registered trademarks of the respective companies or institutions PDP 505XDE 435XDE only Manufactured under license from Dolby Laboratories Dolby and the double D symbol are...

Page 60: ......

Page 61: ... ASSURE LA MASSE MISE À LA TERRE DE LA FICHE DU CORDON D ALIMENTATION Les symboles suivants figurent sur les étiquettes apposées sur l appareil Ils appellent l attention des utilisateurs et du personnel d entretien sur des dangers potentiels AVERTISSEMENT Ce symbole signale une pratique dangereuse ou contraire à la sécurité qui peut entraîner une blessure ou des dégâts matériels DANGER Ce symbole ...

Page 62: ... 19 Raccordements de base 20 Raccordement à l antenne 20 Raccordement du cordon d alimentation 20 07 Pour regarder la télévision Mise en service 21 Mise hors service 21 Sélection des canaux 22 Réglage des canaux analogues favoris 23 Modification du niveau sonore 23 Utilisation des fonctions d affichage 25 Partage d écran 25 Gel d une image 26 08 Configuration du menu Utilisation du menu 27 Menus d...

Page 63: ...d un lecteur de DVD 46 Affichage des images provenant d un lecteur de DVD 46 Utilisation d une console de jeu et visionnement des images d un caméscope 47 Raccordement d une console de jeu ou d un caméscope 47 Affichage des images d une console de jeu ou d un caméscope 47 Utilisation des appareils audio reliés 47 Raccordement d un appareil audio 47 Raccordement des câbles de commande 48 Quelques m...

Page 64: ... plasma n oubliez pas de repasser en veille STANDBY Instructions d installation Le système d écran à plasma Pioneer PureVision PDP 505XDE 435XDE PDP 505HDE 435HDE présente une très faible épaisseur Pour des raisons de sécurité et pour éviter que l appareil ne puisse se renverser en cas de vibration ou contact accidentel veillez à fixer ou à installer le système d écran à plasma de la manière conve...

Page 65: ...a remplace Le temps requis pour la disparition de l image dépend de la luminosité de l image fixe qui lui a donné naissance et du temps d exposition de cette image 2 Image rémanente due au brûlage Évitez d afficher sur l écran à plasma la même image pendant longtemps Si la même image demeure sur l écran pendant plusieurs heures ou encore apparaît tous les jours au cours d une période plus courte m...

Page 66: ...nement du câble d alimentation près de la prise secteur et au point de sortie de l appareil 13 Le panneau de l écran à plasma est en verre Il peut donc être brisé par la chute de l appareil ou par un choc En cas de casse du panneau veillez à ne pas être blessé par les débris 14 Surcharge Ne surchargez pas les prises secteur ou les rallonges Cela peut entraîner un incendie ou encore vous exposer à ...

Page 67: ...iliser les accessoires PIONEER de fixation PIONEER ne saurait être tenue responsable des blessures ou dommages matériels qui résulteraient de l utilisation d accessoires de fixation autres que ceux conçus et fabriqués par PIONEER Précautions d installation Observez les précautions suivantes si vous effectuez une installation mettant en oeuvre des accessoires tels que le support en option Si vous u...

Page 68: ...l non utilisé pendant longtemps son fonctionnement peut en souffrir profondément Mettez l appareil en service et faites le fonctionner régulièrement Condensation De la condensation peut se former à la surface ou à l intérieur de l appareil si vous le transportez rapidement d une pièce froide dans une pièce chaude ou bien lorsque le matin en hiver vous allumez un appareil de chauffage Si de la cond...

Page 69: ...3 Collier à œil x 3 Pour l Europe à l exception de l Eire et du Royaume Uni Pour l Eire et le Royaume Uni Pile AA x 2 pile au manganèse Seul le cordon d alimentation convenant pour le pays ou la région de distribution est fourni Garniture pour enceinte x 3 À utiliser si les enceintes en option sont montées à la partie inférieure de l écran plasma pour PDP 505HDE 435HDE Boîtier de télécommande Pour...

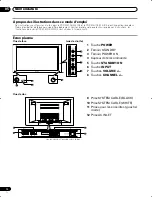
Page 70: ...e SYSTEM CABLE WHITE 11 Prises pour les enceintes gauche droite 12 Prise AC INLET Les prises sont tournées vers le bas À propos des illustrations dans ce mode d emploi Ces instructions sont fournies à la fois pour le PDP 505XDE 435XDE et le PDP 505HDE 435HDE dont l aspect du récepteur Média et du boîtier de télécommande diffère légèrement Veuillez prendre note que tout au long de ces instructions ...

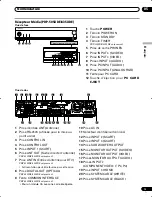
Page 71: ...R OUTPUT VIDEO 17 Prises MONITOR OUTPUT AUDIO 18 Prises INPUT 2 COMPONENT VIDEO Y PB PR 19 Prise INPUT 3 HDMI 20 Prise SYSTEM CABLE WHITE 21 Prise SYSTEM CABLE BLACK SERVICE ONLY i o link A SELECT INPUT 2 3 INPUT 2 INPUT 1 I N OUT CONTROL INPUT 3 OUT IN OPTICAL ANT DIGITAL DIGITAL OUT COMMON INTERFACE SUB WOOFER OUTPUT INPUT 2 Y PB PR COMPONENT VIDEO MONITOR OUTPUT R AUDIO L S VIDEO VIDEO INPUT 3 ...

Page 72: ...EXIT PDP 505XDE 435XDE uniquement Elle rétablit la page normale en une étape 15 p y En mode téléviseur entrée extérieure Cette touche affiche les informations sur le canal En mode d entrée DTV elle affiche les informations sur la bannière 16 Elle déplace la position du petit écran en mode une image dans l image 17 Cette touche permet de commuter entre les deux écrans en mode 2 images ou une image ...

Page 73: ...ONEER en option Pour de plus amples détails concernant leur installation reportez vous au mode d emploi qui les accompagne Conditions ambiantes de fonctionnement Température et humidité ambiantes de fonctionnement 0 C à 40 C humidité relative inférieure à 85 les ouïes d aération sont dégagées Évitez les emplacements suivants Exposition directe à la lumière du soleil Exposition à une lumière artifi...

Page 74: ...et les vis Vous en aurez besoin si vous décidez de monter le récepteur Média dans la position horizontale 4 Bouchez les perçages de vis au moyen des capuchons fournis Pour monter le récepteur Média verticalement ne faites usage que du support fourni Si vous posez le récepteur directement sur le plancher les évents d aération se trouveront obstrués ce qui conduira à une panne mécanique Retirez la f...

Page 75: ... à l écran plasma LES PRISES DES CES ENCEINTES PEUVENT ÊTRE SOUMISES À UNE TENSION DANGEREUSE LORS DU BRANCHEMENT OU DÉBRANCHEMENT DES CÂBLES D ENCEINTE POUR EVITER TOUTE ÉLECTROCUTION NE TOUCHEZ PAS LES PIÈCES NON ISOLÉES AVANT DE DÉBRANCHER LE CORDON D ALIMENTATION Raccordement du câble système au récepteur Média Pour de plus amples détails concernant l installation des enceintes PIONEER en opti...

Page 76: ... 1 dans le perçage convenable à l arrière de l écran à plasma puis engagez la partie 2 dans la partie 1 pour assurer la fermeture du collier Les colliers rapides sont conçus pour être difficiles à déposer une fois qu ils sont en place et fermés Effectuez leur pose avec soin Utilisez une paire de pinces pour tourner le collier de 90 puis tirez vers l extérieur Le collier peut se détériorer avec le ...

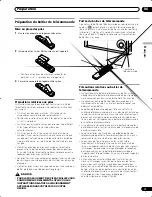
Page 77: ...s si vous envisagez de ne pas faire usage du boîtier de télécommande pendant longtemps POUR LA MISE AU REBUT DES PILES VEUILLEZ VOUS CONFORMER AUX REGLEMENTS LOCAUX OU AUX INSTRUCTIONS RELATIVES A L ENVIRONNEMENT APPLICABLES DANS VOTRE PAYS OU VOTRE RÉGION Précautions relatives au boîtier de télécommande Ne heurtez pas le boîtier de télécommande Par ailleurs n exposez pas le boîtier de télécommand...

Page 78: ... OUT COMMON INTERFACE SUB WOOFER OUTPUT INPUT 2 Y PB PR COMPONENT VIDEO MONITOR OUTPUT R AUDIO L S VIDEO VIDEO BLACK WHITE SYSTEM CABLE AC IN OUT IN HDMI INPUT 3 Raccordement du cordon d alimentation Écran plasma vue de dessous Récepteur Média vue de dos SERVICE ONLY i o link A SELECT INPUT 2 3 INPUT 2 INPUT 1 I N OUT CONTROL INPUT 3 OPTICAL ANT DIGITAL DIGITAL OUT COMMON INTERFACE SUB WOOFER OUTP...

Page 79: ...t référence à l ensemble comprenant l écran plasma et le récepteur Média Vous pouvez également inverser les opérations 1 et 2 Mise hors service 1 Appuyez sur a sur le boîtier de télécommande ou sur STANDBY ON sur l écran plasma Le système passe en veille et l image disparaît de l écran Les deux témoins STANDBY s éclairent couleur rouge Le témoin TIMER est éclairé lorsqu un programme est préparé po...

Page 80: ...is sur 2 En mode DTV pour sélectionner le canal 123 numéro à 3 chiffres appuyez sur 1 2 puis sur 3 PDP 505XDE 435XDE uniquement Au cours de l affichage d informations télétexte Vous avez accès direct à une page dont le numéro à 3 chiffres est compris entre 100 et 899 grâce aux touches 0 à 9 Reportez vous à la page 53 En veille une pression sur la touche 0 provoque la mise en service et l image pro...

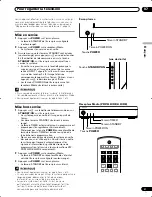
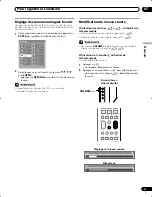
Page 81: ...tter la liste de canaux favoris Reportez vous aux pages 28 et 29 sur la manière d enregistrer des canaux favoris 01 02 03 04 05 06 07 08 09 10 11 12 13 14 15 16 Favori Modification du niveau sonore Utilisation des touches i i du boîtier de télécommande Pour augmenter le niveau sonore appuyez sur i Pour diminuer le niveau sonore appuyez sur i Les touches VOLUME de l écran plasma agissent de la même...

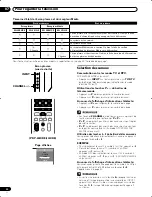
Page 82: ... 4 ou encore PC En effet la nature des sons est alors définie par la source vidéo Chaque pression sur la touche g provoque l adoption d un type de sons donné Mode p Mode pp Mode MONO p pp MONO 1 AAA NICAM STEREO 10 00 1 AAA NICAM STEREO 10 00 1 AAA MONO 10 00 2 BBB NICAM p 10 00 2 BBB NICAM pp 10 00 2 BBB MONO 10 00 3 CCC NICAM MONO 10 00 3 CCC NICAM MONO 10 00 3 CCC MONO 10 00 4 DDD STEREO 10 00 ...

Page 83: ...placer la petite image dans le sens anti horaire 2 Pour sélectionner une source appuyez sur la touche d entrée qui lui correspond Si vous regardez une émission télévisée les touches P P vous donnent le moyen de changer de canal La fonction d affichage ne permet pas de faire apparaître sur l écran en même temps deux images provenant de la même source Si vous tentez cette opération un message d aver...

Page 84: ...us regardez 1 Appuyez sur d Une image fixe apparaît sur la partie droite de l écran tandis qu une image animée occupe la partie gauche 2 Appuyez une nouvelle fois sur d pour annuler Avec le partage d écran toutes les images ne peuvent pas être gelées Lorsque le gel n est pas possible un message d avertissement apparaît Image normale Image fixe ...

Page 85: ... Mode 4 3 41 Système couleur 39 Sélection entrée 39 Cache latéral 41 Entrée HDMI 45 Installation Autoinstallation 28 Install TV analogue 28 30 Installation DTV PDP 505XDE 435XDE uniquement Mot de passe 42 43 Langue 31 Home Gallery 50 52 Opérations du menu Voici une présentation des procédures types pour le réglage des menus Pour connaître chaque procédure reportez vous aux pages appropriées décriv...

Page 86: ...to installation démarre d elle même Pour abandonner l auto installation en cours appuyez sur RETURN 11 Lorsque l auto installation est terminée appuyez sur HOME MENU pour quitter le menu Réglage manuel des canaux de télévision analogiques Cette section traite de la manière d effectuer le réglage manuel des canaux Utilisation de Réglage manuel Utilisez la fonction Réglage manuel pour effectuer le r...

Page 87: ... l écran Space puis appuyez sur ENTER 5 Pour valider le nom utilisez ou de façon à sélectionner sur l écran OK puis appuyez sur ENTER 6 Appuyez sur HOME MENU pour quitter le menu Réglage manuel 42 75MHz 1 B G Recherche Système Entrer programme Système Système couleur Mémoriser Non B G Auto 9 Sélectionnez Système 10 Sélectionnez un système sonore Vous pouvez choisir parmi les systèmes suivants B G ...

Page 88: ...d afficher les images provenant du décodeur Classement des canaux de télévision préréglés Utilisez la méthode suivante pour classer les canaux de télévision préréglés dans l ordre désiré 1 Appuyez sur HOME MENU 2 Sélectionnez Installation puis ENTER 3 Sélectionnez Install TV analogue puis ENTER La page de saisie du mot de passe s affiche Tapez un mot de passe à 4 chiffres en vous servant des touch...

Page 89: ...is ENTER 3 Sélectionnez Sélection AV puis ENTER 4 Sélectionnez l option désirée puis ENTER Sélection AV STANDARD DYNAMIQUE CINÉMA JEU UTILISATEUR Dans le cas d une source audiovisuelle Paramètre Description STANDARD Pour obtenir une image très bien définie dans une pièce de luminosité normale DYNAMIQUE Pour obtenir une image très nette présentant un contraste maximum Ce mode ne vous donne pas le m...

Page 90: ... exemple films cadencées à 24 images s ADV Production d images animées régulières et de qualité telles qu on peut les voir dans une salle de cinéma par conversion à 72 Hz tandis que sont affichées des images de DVD par exemple films cadencées à 24 images s Dans le cas où PC est la source et dans le cas de Home Gallery la page suivante s affiche Si vous souhaitez régler PureCinema Temp Couleur MPEG...

Page 91: ...st diminué Le bleu est augmenté R Bas Le rouge est diminué Le rouge est augmenté V Bas Le vert est diminué Le vert est augmenté B Bas Le bleu est diminué Le bleu est augmenté Pour effectuer le réglage d un autre paramètre appuyez sur RETURN puis reprenez les opérations 2 et 3 Vous pouvez utiliser pour modifier immédiatement la valeur du paramètre en cours de réglage 4 Appuyez sur HOME MENU pour qu...

Page 92: ... définir 4 Sélectionnez la valeur désirée Graves Balance Aigus Réinitial 0 0 2 Son STANDARD Paramètre Touche Touche Aigus Les aigus sont Les aigus sont atténués accentués Graves Les graves sont Les graves sont atténués accentués Balance La puissance émise La puissance émise par par l enceinte droite l enceinte gauche diminue diminue 5 Appuyez sur HOME MENU pour quitter le menu Pour que les valeurs...

Page 93: ...l entrée du récepteur Média à la fin d une émission de télévision Mise hors service en l absence d opération mode AV uniquement Ce paramètre place le système en veille si aucune opération n est exécutée pendant 3 heures 1 Appuyez sur HOME MENU 2 Sélectionnez Commande alimentation puis ENTER 3 Sélectionnez Pas d opération arrêt puis ENTER 4 Sélectionnez Activer puis ENTER Paramètre Description Désa...

Page 94: ... désirée 7 Appuyez sur HOME MENU pour quitter le menu Fourniss de données EPG Désactiver Arrêt Corresp Stations Données auto actual Paramètre Description Désactiver EPG n est pas actif valeur par défaut Activer Les informations EPG sont automatiquement acquises à minuit à l heure spécifiée par l utilisateur PDP 505XDE 435XDE uniquement et lorsque vous regardez une émission diffusée par une station...

Page 95: ...touche rouge 4 Sélectionnez Vitesse d enregistrement 6 Sélectionnez PDC VPS 7 Sélectionnez MARCHE ou ARRÊT 8 Sélectionnez Enregistrer 9 Sélectionnez OK puis ENTER 10 Appuyez sur EPG pour quitter le menu N oubliez pas de conserver le magnétoscope sous tension si vous avez préréglé l enregistrement d une émission Vous pouvez rétablir la page donnant la liste des émissions en appuyant sur RETURN Ce m...

Page 96: ...tallation démarre 4 Appuyez sur HOME MENU pour quitter le menu Lorsque les réglages sont terminés Réglage automatique terminé s affiche sur l écran Même si Réglage automatique terminé s affiche l auto installation peut avoir échouée selon les conditions L auto installation peut échouer si l image fournie par l ordinateur personnel comprend des motifs répétés ou est monochrome En cas d échec choisi...

Page 97: ...es INPUT 1 INPUT 2 ou INPUT 3 indiquez le type de signal d entrée qui sera fourni par l appareil relié Pour de plus amples détails concernant les types de signal reportez vous au mode d emploi qui accompagne l appareil relié Avant d ouvrir le menu appuyez sur INPUT 1 INPUT 2 ou INPUT 3 sur le boîtier de télécommande ou bien appuyez sur INPUT sur l écran plasma pour sélectionner la source 1 Appuyez...

Page 98: ...en haut et en bas de l image CINÉMA Pour afficher des images 14 9 allongées Dans certains cas une bande peut être visible en haut et en bas de l image Mode PC sauf pour les signaux XGA Paramètre Description 4 3 L image occupe la totalité de la surface de l écran mais son format n est pas modifié PLEIN Image 16 9 plein écran Pt par Pt À un pixel du signal d entrée correspond un pixel sur l écran Mo...

Page 99: ... puis ENTER 4 Sélectionnez 4 3 ou LARGE puis ENTER Modification de la luminosité de chaque côté de l écran cache latéral Si vous avez sélectionné le format 4 3 PLEIN 14 9 CINÉMA 14 9 pour le mode AV vous avez la possibilité de modifier la luminosité du cache latéral gris qui est visible sur l écran 1 Appuyez sur HOME MENU 2 Sélectionnez Options puis ENTER 3 Sélectionnez Cache latéral puis ENTER 4 ...

Page 100: ...uvent pas être modifiés par quelqu un qui ne connaît pas le mot de passe Saisie du mot de passe Si vous sélectionnez une chaîne interdite aux enfants ou si la frappe du mot de passe vous est demandée pour accéder à un menu tapez le mot de passe 1 Tapez un mot de passe à 4 chiffres en vous servant des touches 0 à 9 Intro votre code svp Si vous tapez 3 fois un mot de passe erroné Code non valide s a...

Page 101: ...Sélectionnez Mot de passe puis ENTER La page de saisie du mot de passe s affiche Tapez un mot de passe à 4 chiffres en vous servant des touches 0 à 9 4 Sélectionnez Réinitial puis ENTER 5 Sélectionnez Oui puis ENTER 6 Appuyez sur HOME MENU pour quitter le menu La méthode ci dessus rétablit le mot de passe par défaut 1234 Désactivation du mot de passe 1 Appuyez sur HOME MENU 2 Sélectionnez Installa...

Page 102: ... images d un décodeur Raccordement d un décodeur Utilisez INPUT 1 pour raccorder un décodeur ou un autre appareil audiovisuel Affichage des images provenant d un décodeur Pour afficher les images d un décodeur 1 Utilisez les touches 0 à 9 ou P P pour sélectionner le programme spécifique au décodeur page 30 2 Appuyez sur INPUT 1 sur le boîtier de télécommande ou sur INPUT sur l écran plasma de mani...

Page 103: ...l appareil tente d identifier les signaux vidéo numériques lorsqu ils sont reçus Paramètre Description Auto Le signal d entrée vidéo numérique est valeur par défaut automatiquement identifié Couleur 1 Signaux vidéo composante numériques 4 2 2 verrouillés Couleur 2 Signaux vidéo composante numériques 4 4 4 verrouillés Couleur 3 Signaux RVB numériques verrouillés 4 Appuyez sur HOME MENU pour quitter...

Page 104: ...ée sortie Link A n est pas en fonctionnement les signaux autres que RVB sont toujours considérés comme étant du type vidéo car le système ne sait pas distinguer les signaux RVB Y C S vidéo et CVBS vidéo ainsi la réception de signaux Y C S vidéo donne une image monochrome Récepteur Média vue de dos Câble péritel disponible dans le commerce SERVICE ONLY i o link A SELECT INPUT 2 3 INPUT U INPUT 1 I ...

Page 105: ...ls audio reliés Raccordement d un appareil audio Vous pouvez bénéficier de sonorités plus puissantes si vous reliez les appareils audio qui conviennent par exemple un récepteur audiovisuel ou un caisson de graves OPTICAL DIGITAL OUT COMMON INTERFACE SUB WOOFER OUTPUT INPUT 2 Y PB PR COMPONENT VIDEO MONITOR OUTPUT R AUDIO L S VIDEO VIDEO BLACK WHITE SYSTEM CABLE AC IN IN HDMI INPUT 3 Récepteur audi...

Page 106: ...UT 3 Raccordement des câbles de commande Reliez les câbles de commande au récepteur Média et aux autres appareils PIONEER portant le logo Vous pouvez alors agir sur l appareil relié en envoyant les ordres émis par son boîtier de télécommande vers le capteur de télécommande du récepteur Média Lorsque les prises CONTROL IN d un appareil sont reliées à celui ci le capteur de télécommande de cet appar...

Page 107: ...aptateur PC CARD Face avant du récepteur Média avec le volet ouvert Appareil de photo numérique Affichage des données de l image Carte de mémoire dans l adaptateur PC CARD Face supérieure 3 Fermez le volet de la face avant du récepteur Média Retrait d une carte de mémoire Pour retirer la carte de mémoire quittez la page de la carte puis appuyez sur le bouton d éjection de PC CARD La carte de mémoi...

Page 108: ...puyez sur HOME MENU 2 Sélectionnez Home Gallery puis ENTER Lancement d une page de vignettes Après avoir sélectionné un dossier de la page initiale Home Gallery les images de ce dossier sont affichées sous forme de vignettes Home Gallery Miniature 1 25 RETURN HOMEMENU Retour Sélectionner Fin Démarrage Diaporama Information image 011 JPG Configuration Image 011 JPG 018 JPG 048 JPG 059 JPG 084 JPG D...

Page 109: ...c un entourage vide Il peut être impossible d agrandir ou de réduire une image en raison de sa taille d origine Configuration de lancement de diaporama Une page de vignettes étant affichée appuyez sur VERT pour ouvrir la page de définition du diaporama c est à dire de la fonction qui affiche les images l une après l autre 1 Sélectionnez Mode affichage 2 Sélectionnez Normal ou Plein Si vous avez sé...

Page 110: ... pour Mode de lecture utilisez P P pour changer les images Tandis que les images sont automatiquement changées vous pouvez arrêter momentanément 90 secondes cette opération en appuyant sur d 2 À la fin du diaporama appuyez sur RETURN pour rétablir la page des vignettes ou bien appuyez sur HOME MENU pour quitter la fonction Home Gallery Si vous avez sélectionné Aléatoire pour Mode de lecture la tou...

Page 111: ...essage Ne peut pas afficher le télétexte apparaît sur l écran Sélection et emploi d une page télétexte Utilisez les touches suivantes du boîtier de télécommande pour sélectionner et employer les pages de télétexte Couleur ROUGE VERT JAUNE BLEU Vous pouvez sélectionner un groupe ou un ensemble de pages notés entre crochets à la partie inférieure de l écran en utilisant pour cela les touches de coul...

Page 112: ... secondaires ces dernières sont automatiquement affichées dans l ordre 2 Pour abandonner le changement automatique des pages secondaires utilisez Vous pouvez alors changer manuellement les pages secondaires au moyen des touches Une pression sur w x provoque le changement de page et la disparition de la page secondaire Une pression sur arrête le changement automatique des pages secondaires puis l e...

Page 113: ...urce sélectionnée n est pas par hasard une source vidéo ou l ordinateur personnel alors que vous désirez regarder une émission de télévision Reportez vous à la page 22 Assurez vous que vous n avez pas choisi une chaîne interdite aux enfants Reportez vous à la page 30 Tapez le mot de passe qui permet de supprimer temporairement l interdiction Reportez vous à la page 42 Les raccordements aux autres ...

Page 114: ...circuit dans le câble de l enceinte SD1 1 S éteint Température interne trop élevée Assurez vous que la température du récepteur média n est pas trop Vérifier la température dans le récepteur du média élevée Bornage du connecteur mini D sub à 15 broches 15 14 13 12 9 11 10 8 7 6 5 4 3 2 1 Vue de face N de broche Nom du signal 1 R 2 V 3 B 4 Non reliée 5 Non reliée 6 GND Masse 7 GND Masse 8 GND Masse...

Page 115: ...e audio gauche 7 Non utilisée Bornage de la prise péritel Divers appareils audio et vidéo peuvent être interconnectés grâce aux prises péritel 8 Commande audio vidéo 9 Masse 10 Commande de la liaison AV 11 Non utilisée 12 Non utilisée 13 Masse 14 Non utilisée 15 Entrée chrominance pour S vidéo 16 Non utilisée 17 Masse pour la vidéo 18 Masse 19 Sortie vidéo 20 Entrée vidéo entrée S vidéo 21 Blindag...

Page 116: ...e III VHF 170 à 230 MHz et Band IV Non applicable V UHF 470 à 862 MHz Préréglage automatique 999 canaux préréglage automatique étiquetage des canaux automatique classement automatique Stéréophonie MPEG de couche I II Dolby Digital Prises Arrière INPUT 1 Péritel entrée AV entre RVB sortie télévision INPUT 2 Péritel entrée sortie AV entrée S VIDEO liaison AV 1 entrée pour les composantes vidéo INPUT...

Page 117: ... Electronics Standards Association HDMI le logo HDMI et High Definition Multimedia Interface sont des marques de commerce ou des marques déposées de HDMI Licensing LLC Les noms de société ou d organisme sont des marques de commerce ou des marques déposées de leur société ou organisme respectif PDP 505XDE 435XDE uniquement Fabriqué sous licence de Dolby Laboratories Dolby et le symbole double D son...

Page 118: ......

Page 119: ...ON EINEM ELEKTRIKER AUSGEWECHSELT WERDEN VERSUCHEN SIE NICHT DEN SCHUTZKONTAKT MISSBRÄUCHLICH ZU UMGEHEN DienachstehendenSymbolebefindensichaufam Gerät angebrachten Aufklebern Sie machen den BenutzerunddasWartungspersonalaufmögliche Gefahren aufmerksam WARNUNG Dieses Symbol weist auf eine gefährliche oder unsichere Vorgehensweise hin die zu Personenverletzungen oder Sachschäden führen kann VORSICH...

Page 120: ...19 Vorsichtsmaßregeln zu Batterien 19 Wirkungsbereich der Fernbedienung 19 Beim Umgang mit der Fernbedienung zu beachten 19 Basisanschlüsse 20 Anschließen einer Antenne 20 Anschließen des Netzkabels 20 07 Fernsehempfang Einschalten 21 Ausschalten 21 Kanalwechsel 22 Einstellen analoger Kanäle als Favoriten 23 Lautstärke und Toneinstellungen 23 Gebrauch der Multiscreen Funktionen 25 Bildschirmteilun...

Page 121: ...eines DVD Bilds 46 Anschließen eines DVD Spielers 46 Anzeigen eines DVD Bilds 46 Wiedergabe von Spielekonsole oder Camcorder 47 Anschließen einer Spielkonsole oder eines Camcorders 47 Wiedergeben des Spielekonsolen oder Camcorderbilds 47 Wiedergabe über angeschlossene Audio Geräte 47 Anschließen von Audio Geräten 47 Anschließen von Steuerkabeln 48 Zu SR 48 Wiedergabe von einem Personal Computer 48...

Page 122: ...auf den Bereitschafts Modus Standby Grundregeln zur Aufstellung Das Pioneer PureVision Plasma Display System PDP 505XDE 435XDE PDP 505HDE 435HDE zeichnet sich durch eine sehr flache Bauweise aus Aus Sicherheitsgründen sollten bei der Montage oder Aufstellung geeignete Maßnahmen getroffen werden um ein Umkippen bei Vibrationen oder unbeabsichtigter Berührung zu verhindern Zum Aufstellen des Produkt...

Page 123: ...rgegeben werden Die Zeitdauer bis zur Auflösung der Nachbilder hängt von der Luminanz der ehemaligen Standbilder und deren Anzeigedauer ab 2 Nachbild durch Einbrennen Meiden Sie Wiedergabe desselben Bilds über eine längere Zeit Wenn dasselbe Bild fortwährend mehrere Stunden lang oder für kürzere Zeit jedoch über mehrere Tage hinweg angezeigt wird kann es am Plasma Display einbrennen und ein perman...

Page 124: ...keine schweren Gegenstände darauf abgestellt werden Kontrollieren Sie die Kabel insbesondere an den Steckern und am Produkt 13 Das Plasma Display enthält Glasteile Es kann brechen wenn es fallen gelassen oder Druck darauf ausgeübt wird Im Falle des Falles ist Vorsicht geboten um sich nicht an Scherben oder Splittern zu verletzen 14 Überlastung Netzsteckdosen und Verlängerungskabel dürfen nicht übe...

Page 125: ...ör zu verwenden PIONEER übernimmt keine Verantwortung für Personenverletzungen und Produkteschäden die sich auf den Gebrauch von anderen Befestigungsteilen als den optionalen PIONEER Produkten zurückführen lassen Beim Installieren zu beachten Beachten Sie beim Installieren jedes Artikels wie z B des optionalen Fußes bitte die folgenden Punkte Bei Gebrauch des optionalen Fußes von Halterungen oder ...

Page 126: ...g Feuchtigkeit kann sich an der Oberfläche oder im Inneren des Produkts niederschlagen wenn es schnell von einer kalten an eine warme Stelle gebracht wird oder zum Beispiel an einem Wintermorgen unmittelbar nach Einschalten einer Heizung Wenn eine derartige Kondenswasserbildung stattgefunden hat schalten Sie das Produkt nicht ein sondern warten Sie bis die Feuchtigkeit verdunstet ist Gebrauch des ...

Page 127: ...igungstuch Schnellverschlussklemme x 3 Kugelband x 3 Für Europa außer UK und Irland Für UK und Irland Zwei Mignonzellen AA Manganbatterie Nur das für Ihr Land bzw Gebiet geeignete Netzkabel ist mitgeliefert Lautsprecherkissen x 3 Bei Installation der optionalen Lautsprecher an der Unterseite des Plasma Displays zu verwenden Plasma Display bei PDP 505HDE 435HDE Fernbedienung Für Europa außer UK und...

Page 128: ...STEM CABLE WHITE 11 Lautsprecheranschlüsse rechts links 12 Anschluss AC INLET Netzeingang Anschlüsse weisen nach unten Über die Illustrationen in den Bedienungsanleitungen Diese Bedienungsanleitung dient gleichzeitig für die beiden Serien PDP 505XDE 435XDE und PDP 505HDE 435HDE zwischen denen sich die Gestaltung von Media Receiver und Fernbedienung geringfügig unterscheidet Bitte beachten Sie dass...

Page 129: ... MONITOR OUTPUT AUDIO 18 Anschlüsse INPUT 2 COMPONENT VIDEO Y PB PR 19 Anschluss INPUT 3 HDMI 20 Anschluss SYSTEM CABLE WHITE 21 Anschluss SYSTEM CABLE BLACK SERVICE ONLY i o link A SELECT INPUT 2 3 INPUT 2 INPUT 1 I N OUT CONTROL INPUT 3 OUT IN OPTICAL ANT DIGITAL DIGITAL OUT COMMON INTERFACE SUB WOOFER OUTPUT INPUT 2 Y PB PR COMPONENT VIDEO MONITOR OUTPUT R AUDIO L S VIDEO VIDEO INPUT 3 BLACK WH...

Page 130: ...aus 14 EXIT Nur PDP 505XDE 435XDE Schaltet direkt auf den normalen Bildschirm zurück 15 p y TV Extern Eingangsmodus Zeigt die Kanaldaten an DTV Eingangsmodus Zeigt die Bannerdaten an 16 Zum Umplatzieren des Minibilds im Bild in Bild Modus 17 Zum Umschalten zwischen den Bildschirmen im Doppelbildschirm oder Bild in Bild Modus 18 i i Zum Einstellen der Lautstärke 19 e Schaltet den Ton stumm 20 m Wäh...

Page 131: ...leitung Gebrauch der optionalen PIONEER Lautsprecher Näheres zur Installation finden Sie in der den Lautsprechern beiliegenden Anleitung Betriebsumgebung Lufttemperatur und Luftfeuchtigkeit 0 C bis 40 C weniger als 85 rel F Belüftungsöffnungen nicht blockiert Folgende Bedingungen sind bei der Aufstellung zu vermeiden Direkte Sonnenbestrahlung Starkes Kunstlicht Hohe Luftfeuchtigkeit Schlechte Belü...

Page 132: ...ie Stoßdämpfer und Schrauben auf Sie werden für horizontale Installation des Media Receivers benötigt 4 Verschließen Sie die Schraubenöffnungen mit den mitgelieferten Kappen Verwenden Sie bei vertikaler Installation des Media Receivers stets den mitgelieferten Fuß Wenn Sie das Gerät direkt auf den Boden stellen werden die Belüftungsöffnungen blockiert wodurch dauerhafte Schäden verursacht werden k...

Page 133: ...nschluss des Systemkabels an das Plasma Display AN DEN LAUTSPRECHERKLEMMEN KÖNNEN HOHE SPANNUNGEN ANLIEGEN WEGEN STROMSCHLAGGEFAHR DÜRFEN BEIM ANSCHLIESSEN ODER ABTRENNEN DER LAUTSPRECHERKABEL KEINE UNISOLIERTEN TEILE BERÜHRT WERDEN BEVOR DER NETZSTECKER GEZOGEN WURDE Anschluss des Systemkabels an den Media Receiver Näheres zur Installation optionaler PIONEER Lautsprecher finden Sie in der den Lau...

Page 134: ...n eine geeignete Öffnung an der Rückseite des Plasma Displays ein und schnappen Sie 2 in die Rückseite von 1 ein um die Klemme zu arretieren Schnellverschlussklemmen lassen sich nicht wieder ohne weiteres lösen nachdem sie einmal angebracht worden sind Bringen Sie sie daher bedachtsam an Drehen Sie die Klemme mit einer Zange um 90 und ziehen Sie sie nach außen Die Klemme kann im Laufe der Zeit alt...

Page 135: ...e Zeit nicht benutzt wird sollten Sie die Batterien entnehmen BEIM ENTSORGEN VERBRAUCHTER BATTERIEN SIND DIE IM JEWEILIGEN LAND GEBIET GELTENDEN GESETZLICHEN VORSCHRIFTEN UND UMWELTBESTIMMUNGEN ETC ZU BEACHTEN Beim Umgang mit der Fernbedienung zu beachten Setzen Sie die Fernbedienung keinen Stößen aus Setzen Sie die Fernbedienung auch keinen Flüssigkeiten aus und bewahren Sie sie nicht an feuchten...

Page 136: ...OPTICAL ANT DIGITAL DIGITAL OUT COMMON INTERFACE SUB WOOFER OUTPUT INPUT 2 Y PB PR COMPONENT VIDEO MONITOR OUTPUT R AUDIO L S VIDEO VIDEO BLACK WHITE SYSTEM CABLE AC IN OUT IN HDMI INPUT 3 Anschließen des Netzkabels Plasma Display Unterseite Media Receiver Rückseite SERVICE ONLY i o link A SELECT INPUT 2 3 INPUT 2 INPUT 1 I N OUT CONTROL INPUT 3 OPTICAL ANT DIGITAL DIGITAL OUT COMMON INTERFACE SUB...

Page 137: ...die Kombination aus Plasma Display und Media Receiver verstanden Sie können die Schritte 1 und 2 auch umkehren Ausschalten 1 Drücken Sie a an der Fernbedienung oder STANDBY ON am Plasma Display Das System schaltet auf den Bereitschaftsmodus und das Bild auf dem Bildschirm erlischt Die beiden Anzeigen STANDBY leuchten rot auf Die TIMER Anzeige leuchtet wenn ein Programm für Aufnahme Betrachtung vor...

Page 138: ...it P an der Fernbedienung Drücken Sie P zum Erhöhen der Kanalnummer Drücken Sie P zum Verringern der Kanalnummer Beim Betrachten von Videotext Drücken Sie P zum Erhöhen der Seitennummer Drücken Sie P zum Verringern der Seitennummer CHANNEL am Plasma Display funktioniert wie P P Mit P P können keine Kanäle aufgerufen werden die auf Überspringen eingestellt sind Mit P P können keine Kanäle aufgerufe...

Page 139: ...um die Stummschaltung wieder aufzuheben Die Stummschaltung kann auch durch Drücken von i aufgehoben werden Einstellen analoger Kanäle als Favoriten Sie können max 16 analoge Fernsehkanäle als Favoriten registrieren und die Programmwahl im Interesse schnellen Zugriffs auf diese Kanäle begrenzen 1 Während des Betrachtens eines analogen Programms mit ENTER die Liste der Favoriten aufrufen 2 Den gewün...

Page 140: ...ch der Tontyp nicht In diesem Fall wird der Ton durch die Video Programmquelle bestimmt Mit jedem Druck auf g wird MTS wie unten gezeigt umgeschaltet Modus p Modus pp Modus MONO p pp MONO 1 AAA NICAM STEREO 10 00 1 AAA NICAM STEREO 10 00 1 AAA MONO 10 00 2 BBB NICAM p 10 00 2 BBB NICAM pp 10 00 2 BBB MONO 10 00 3 CCC NICAM MONO 10 00 3 CCC NICAM MONO 10 00 3 CCC MONO 10 00 4 DDD STEREO 10 00 4 DDD...

Page 141: ...ilds mit im Gegenuhrzeigersinn weitergeschaltet werden 2 Zur Wahl der Eingangsquelle drücken Sie die entsprechende Eingangsquellentaste Bei Fernsehempfang drücken Sie P P um den Kanal zu wechseln Mit der Multiscreen Funktion können Bilder von derselben Eingangsquelle nicht gleichzeitig angezeigt werden Wenn Sie einen derartigen Versuch unternehmen erscheint eine Warnmeldung Wenn Sie HOME MENU drüc...

Page 142: ...ben vor 1 Drücken Sie d Ein Standbild erscheint auf dem rechten Screen während der linke Screen ein bewegtes Bild zeigt 2 Drücken Sie d erneut um die Funktion wieder aufzuheben Bei Bildschirmteilung ist Wiedergabe eines eingefangenen bewegten Vollbilds als Standbild nicht möglich Wenn diese Funktion nicht verfügbar ist erscheint eine Warnmeldung Normales Bild Standbild ...

Page 143: ... 41 Farbsystem 39 Eingangswahl 39 Seitenmaske 41 HDMI Eingabe 45 Grundeinstellungen Autoinstallation 28 Analog TV Konfig 28 30 DTV Konfigurierung Nur PDP 505XDE 435XDE Passwort 42 43 Sprache 31 Home Gallery 50 52 Menü Bedienung Im Nachstehenden ist das typische Vorgehen zur Vornahme der Einstellungen in den Menüs beschrieben Konkrete Anleitungen finden Sie auf den entsprechenden Seiten mit den Bes...

Page 144: ...sch an Wenn Sie die laufende Autoinstallation abbrechen möchten drücken Sie RETURN 11 Nach Abschluss der Autoinstallation drücken Sie HOME MENU um das Menü zu verlassen Manuelles Einrichten von analogen TV Kanälen Dieser Abschnitt beschreibt das manuelle Einrichten der analogen Fernsehkanäle Manuelle Einstellung Programmieren Sie die Fernsehkanäle über Manuelle Einstellung 1 Drücken Sie HOME MENU ...

Page 145: ...Name Kindersicherung und Decoder vorgenommen werden Siehe Eingeben von Fernsehkanalnamen Einstellen der Kindersicherung und Wählen eines Decodereingangs Farbsystem Speichern Name Auto Ja 1 2 3 4 5 6 7 8 9 0 A Delete Space OK B C D E F G H I J K L M N O P Q R S T U V W X Y Z _ Die Namen Eingabeanzeige erscheint 3 Das erste Zeichen wählen dann ENTER Der Cursor rückt zum zweiten Zeichen 4 Wiederholen...

Page 146: ...edergabe vom Decoder nicht möglich Sortieren programmierter Fernsehkanäle Gehen Sie wie nachfolgend beschrieben vor um die Reihenfolge programmierter Fernsehkanäle zu ändern 1 Drücken Sie HOME MENU 2 Grundeinstellungen wählen dann ENTER 3 Analog TV Konfig wählen dann ENTER Die Passwort Eingabeanzeige erscheint Geben Sie Ihr vierstelliges Passwort mit den Tasten 0 9 ein 4 Sortieren wählen dann ENTE...

Page 147: ...hkeiten 1 Drücken Sie HOME MENU 2 Bild wählen dann ENTER 3 AV Wahl wählen dann ENTER 4 Gewünschte Einstellung wählen dann ENTER Für AV Programmquelle Gegenstand Beschreibung STANDARD Für ein Bild mit hoher Auflösung bei normaler Raumbeleuchtung DYNAMISCH Für ein sehr scharfes Bild mit maximalem Kontrast In diesem Modus kann die Bildqualität nicht manuell angepasst werden FILM Für einen Film SPIELE...

Page 148: ...Tabelle PureCinema Erkennt automatisch Quellen die auf Kinofilmen basieren ursprünglich 24 Bilder Sekunde analysiert die Signale und bereitet die einzelnen Bilder für eine Bildqualität mit hoher Auflösung auf Wählbare Punkte Aus Deaktiviert PureCinema Standard Liefert ein lebhaftes bewegtes Bild filmspezifisch mit glatten Übergängen indem die aufgezeichnete Bildinformation bei der Wiedergabe von D...

Page 149: ...um Abschwächen von Rot Zum Betonen von Rot G niedrig Zum Abschwächen von Grün Zum Betonen von Grün B niedrig Zum Abschwächen von Blau Zum Betonen von Blau Um einen anderen Posten einzustellen drücken Sie RETURN und wiederholen dann die Schritte 2 und 3 Durch Drücken von wird der Einstellposten direkt weitergeschaltet 4 Drücken Sie HOME MENU um das Menü zu verlassen Feineinstellung für helle Bereic...

Page 150: ...nden Menüpunkt 4 Stellen Sie den gewünschten Pegel ein Bass Balance Höhen Rückstellen 0 0 2 Ton STANDARD Gegenstand Taste Taste Höhen Zum Abschwächen der Höhen Zum Betonen der Höhen Bass Zum Abschwächen der Bässe Zum Betonen der Bässe Balance Zum Absenken des rechten Zum Absenken des linken Lautsprecherpegels Lautsprecherpegels 5 Drücken Sie HOME MENU um das Menü zu verlassen Zum Zurückstellen all...

Page 151: ...nung aus nur AV Modus Schaltet das System automatisch auf den Bereitschaftsmodus wenn drei Stunden lang keine Bedienung vorgenommen wird 1 Drücken Sie HOME MENU 2 Energiesparmodi wählen dann ENTER 3 Keine Bedienung aus wählen dann ENTER 4 Aktiviert wählen dann ENTER Gegenstand Beschreibung Deaktiviert Schaltet das System nicht auf den Werksvorgabe Bereitschaftsmodus Aktiviert Schaltet das System a...

Page 152: ... dann ENTER 5 Datenanbieter wählen dann ENTER 6 Den gewünschten Sender wählen 7 Drücken Sie HOME MENU um das Menü zu verlassen Datenanbieter EPG Deaktiviert Aus Stationen ordnen Auto Aktual Daten Gegenstand Beschreibung Deaktiviert Deaktiviert EPG Werksvorgabe Aktiviert Für automatisches Herunterladen von EPG Daten um Mitternacht zur vom Benutzer eingestellten Zeit nur PDP 505XDE 435XDE und beim B...

Page 153: ...amm werden angezeigt 3 Drücken Sie die rote Taste 4 Aufnahmegeschwindigkeit wählen 6 PDC VPS wählen 7 EIN oder AUS wählen 8 Aufnehmen wählen 9 OK wählen dann ENTER 10 Drücken Sie EPG um das Menü zu verlassen Vergewissern Sie sich dass das Aufnahmegerät eingeschaltet bleibt wenn Sie Fernsehprogramme für Aufnahme vorgewählt haben Wenn Sie wieder zur Programmauflistung zurückgelangen möchten drücken ...

Page 154: ...HOME MENU um das Menü zu verlassen Automatische Einstellung beginnt 4 Drücken Sie HOME MENU um das Menü zu verlassen Manuelle Einstellung H V Positionseinstellung Vertikale Korrektur Horizontale Korrektur Rückstellen 0 0 5 Die Einstellung vornehmen und Verwenden Sie nur um die vertikale Position nach Wahl von H V Positionseinstellung einzustellen 6 Drücken Sie HOME MENU um das Menü zu verlassen Zu...

Page 155: ...hlüsse vorgenommen worden sind geben Sie den Typ der Videosignale an die von den angeschlossenen Geräten zu erwarten sind Bezüglich Signaltypen siehe Bedienungsanleitung für das entsprechende angeschlossene Gerät Bevor Sie das Menü abrufen drücken Sie INPUT 1 INPUT 2 oder INPUT 3 an der Fernbedienung oder INPUT am Plasma Display um eine Eingangsquelle zu wählen 1 Drücken Sie HOME MENU 2 Weiterführ...

Page 156: ...rimiertes Bild ZOOM Für 16 9 Letter Box Bild Bei gewissen Programmen können Balken am oberen und unteren Rand auftreten KINO Für 14 9 Letter Box Bild Bei gewissen Programmen können Balken am oberen und unteren Rand auftreten PC Modus außer für XGA Signale Gegenstand Beschreibung 4 3 Füllt den Bildschirm ohne Änderung des Bildseitenverhältnisses aus VOLL Volle 16 9 Bildschirmanzeige Punkt für Gleic...

Page 157: ...ENTER 3 4 3 Modus wählen dann ENTER 4 4 3 oder BREITBILD wählen dann ENTER Ändern der Helligkeit an beiden Bildschirmseiten Seitenmaske Bei Wahl des Bildschirmformats 4 3 VOLL 14 9 KINO 14 9 für den AV Modus kann die Helligkeit der grauen Seitenmasken an den beiden Bildschirmseiten geändert werden 1 Drücken Sie HOME MENU 2 Weiterführende Einstellungen wählen dann ENTER 3 Seitenmaske wählen dann EN...

Page 158: ...ssworts beim Öffnen eines Menüs verlangt wird achten Sie darauf das Passwort richtig einzugeben 1 Geben Sie Ihr vierstelliges Passwort mit den Tasten 0 9 korrekt ein Ihr Passwort eingeben Wenn dreimal ein falsches Passwort eingegeben wird erscheint Ungültiges Passwort und das Menü wird geschlossen Um die Passwort Eingabeanzeige zur Entsicherung des Passworts wieder abzurufen wählen Sie den gesperr...

Page 159: ...undeinstellungen wählen dann ENTER 3 Passwort wählen dann ENTER Die Passwort Eingabeanzeige erscheint Geben Sie Ihr vierstelliges Passwort mit den Tasten 0 9 ein 4 Rückstellen wählen dann ENTER 5 Ja wählen dann ENTER 6 Drücken Sie HOME MENU um das Menü zu verlassen Durch das obige Verfahren wird das Passwort auf die Werksvorgabe 1234 rückgestellt Deaktivieren des Passworts 1 Drücken Sie HOME MENU ...

Page 160: ... Zum Anschließen eines Decoders oder anderen Audio Video Geräts verwenden Sie den Anschluss INPUT 1 Anzeigen eines Decoder Bilds Für Wiedergabe von einem Decoder 1 Drücken Sie die Tasten 0 9 oder P P um ein für Decoder Einstellung bestimmtes Programm Seite 30 zu wählen 2 Drücken Sie INPUT 1 an der Fernbedienung oder INPUT am Plasma Display um EINGANG 1 zu wählen Verwenden Sie zum Anschluss eines D...

Page 161: ...osignale deren Typ zu identifizieren Gegenstand Beschreibung Auto Identifiziert zugeführte digitale Werksvorgabe Videosignale automatisch Farbe 1 Digitale Komponenten Videosignale 4 2 2 verriegelt Farbe 2 Digitale Komponenten Videosignale 4 4 4 verriegelt Farbe 3 Digitale RGB Signale verriegelt 4 Drücken Sie HOME MENU um das Menü zu verlassen Wenn Sie einen anderen Parameter als Auto wählen nehmen...

Page 162: ... und wiedergegeben Wenn i o Link A deaktiviert worden ist wird stets Video für andere Signale als RGB gewählt da das System nicht zwischen RGB Y C S Video und CVBS Video unterscheiden kann Empfang von Y C S Video Signalen führt zum Beispiel zu monochromer Anzeige Media Receiver Rückseite SCART Kabel im Fachhandel erhältlich SERVICE ONLY i o link A SELECT INPUT 2 3 INPUT U INPUT 1 I N OUT CONTROL I...

Page 163: ...schließen von Audio Geräten Durch den Anschluss von Audio Geräten wie eines AV Receivers oder eines Subwoofers können Sie die Klangwiedergabe in neue Dimensionen führen OPTICAL DIGITAL OUT COMMON INTERFACE SUB WOOFER OUTPUT INPUT 2 Y PB PR COMPONENT VIDEO MONITOR OUTPUT R AUDIO L S VIDEO VIDEO BLACK WHITE SYSTEM CABLE AC IN IN HDMI INPUT 3 AV Receiver Subwoofer PDP 505XDE 435XDE Optisches Digitalk...

Page 164: ...LE AC IN OUT IN CONTROL IN OUT CONTROL IN OUT CONTROL IN OUT I N OUT CONTROL HDMI INPUT 3 Anschließen von Steuerkabeln Verbinden Sie den Media Receiver und andere PIONEER Geräte mit dem Logo mit Steuerkabeln Derartig angeschlossene Geräte können dann über Steuersignale von deren Fernbedienungen zum Fernbedienungssensor am Media Receiver bedient werden Nach Belegung der CONTROL IN Anschlüsse nehmen...

Page 165: ...Home Gallery Startanzeige Speicherkarte mit PC CARD Adapter Vorderseite des Media Receiv ers mit geöffneter Frontklappe Digital Standbild kamera Bilddatenanzeige Speicherkarte mit PC CARD Adapter Oberseite 3 Schließen Sie die Frontklappe am Media Receiver Entnehmen einer Speicherkarte Zum Entnehmen einer Speicherkarte verlassen Sie den Speicherkarten Bildschirm und drücken dann die PC CARD Auswurf...

Page 166: ...1 Drücken Sie HOME MENU 2 Home Gallery wählen dann ENTER Abrufen einer Miniaturansichtanzeige Wenn ein Ordner in der Home Gallery Startanzeige gewählt wird werden die Bilder im Ordner in Miniaturansicht angezeigt Home Gallery Miniatur 1 25 RETURN HOMEMENU Rückkehr Wählen Ende Start Dia Show Bildinformation 011 JPG Einstellungen Bild 011 JPG 018 JPG 048 JPG 059 JPG 084 JPG DSC00086 JPG DSC00087 JPG...

Page 167: ...ünglichen Größe können nicht alle Bilder vergrößert oder verkleinert werden Einstellungen der Dia Show Drücken Sie bei Miniatursichtanzeige Grün um die Dia Show Einstellanzeige abzurufen 1 Anzeigemodus wählen 2 Normal oder Voll wählen Bei Wahl von Voll wird das Bild unter Nutzung der gesamten Bildschirmfläche angezeigt 3 Reihenfolge der Wiedergabe wählen 4 Reihenfolge der Namen oder Zufall wählen ...

Page 168: ...cken Sie P P um Bilder zu wechseln Automatischen Bildwechsel können Sie stoppen und etwa 90 Sekunden lang anhalten indem Sie d drücken 2 Beim Verlassen der Dia Show Anzeige drücken Sie RETURN um zur Miniaturansichtanzeige zurückzukehren oder HOME MENU um die Home Gallery Funktion zu verlassen Wenn Sie Zufall für Reihenfolge der Wiedergabe gewählt haben können Bilder durch Drücken von P nicht manue...

Page 169: ...signal gewählt haben wird Teletext kann nicht angezeigt werden angezeigt Wählen und Steuern von Videotextseiten Mit den folgenden Tasten an der Fernbedienung können Sie Videotextseiten wählen und steuern Farbe Rot Grün Gelb Blau Sie können eine Gruppe oder einen Block von Seiten die in farbigen Klammern an der Unterseite des Bildschirms angezeigt sind wählen indem Sie die entsprechende Farbe Rot G...

Page 170: ...rücken von wird der automatische Unterseitenwechsel gestoppt und die Funktion der entsprechenden Taste wird ausgeführt Seiten des Blocks TV PROGRAMS COLOR BAR WEATHER NEWS MOVIE LOCAL Sport BLOCK 1 BLOCK 2 BLOCK 3 Seiten der Gruppe FOOT BALL BASKETBALL TENNIS SKI JUDO SWIM GROUP 1 GROUP 2 GROUP 3 GROUP 4 T O P Ü b e r s i c h t 1 Drücken Sie m um Videotext anzuzeigen 2 Während TOP Videotextempfang...

Page 171: ...le für Video oder PC gewählt worden ist obwohl Sie ein Fernsehprogramm sehen möchten Siehe Seite 22 Kontrollieren Sie ob ein Kanal gewählt worden ist der mit der Kindersicherung gesperrt ist Siehe Seite 30 Geben Sie das Passwort ein um die Kindersicherung vorübergehend aufzuheben Siehe Seite 42 Sind die Verbindungen mit anderen Komponenten korrekt vorgenommen Siehe Seiten 44 bis 48 Wird ein inkomp...

Page 172: ...sprecherkabel Display und den Lautsprechern SD1 1 Es wird ausgeschaltet Interne Temperatur ist zu hoch Prüfen Sie auf hohe Temperatur um den Media Receiver Temperatur um den Media Receiver kontrollieren Signalbelegung der 15 poligen Mini D Sub Steckbuchse 15 14 13 12 9 11 10 8 7 6 5 4 3 2 1 Vorderseite Pin Nr Signalbezeichnung 1 R 2 G 3 B 4 Nicht belegt 5 Nicht belegt 6 GND Erde 7 GND Erde 8 GND E...

Page 173: ...g SCART INPUT 2 1 Ausgang Audio rechts 2 Eingang Audio rechts 3 Ausgang Audio links 4 Gemeinsame Erde für Audio 5 Erde 6 Eingang Audio links 7 Nicht belegt 8 Audio Video Steuerung 9 Erde 10 AV Link Steuerung 11 Nicht belegt 12 Nicht belegt 13 Erde 14 Nicht belegt 15 Eingang Chroma S Video 16 Nicht belegt 17 Erde für Video 18 Erde 19 Ausgang Video 20 Eingang Video Eingang S Video 21 Steckerabschirm...

Page 174: ...VHF UHF VHF Band III 170 bis 230 MHz und Entfällt UHF Band IV V 470 bis 862 MHz Autom Kanalvoreinstellung 999 ch Autom Kanalspeicherung Autom Kanalbezeichnung Autom Kanalsortierung STEREO MPEG Ebene I II Dolby Digital Anschlüsse Hinten INPUT 1 SCART AV in RGB in TV out INPUT 2 SCART AV in out S VIDEO in AV link 1 Component Video in INPUT 3 SCART AV in out S VIDEO in RGB in AV link 1 HDMI in Antenn...

Page 175: ...zeichen der Video Electronics Standards Association HDMI das HDMI Logo und High Definition Multimedia Interface sind Warenzeichen oder eingetragene Warenzeichen von HDMI Licensing LLC Namen der erwähnten Firmen oder Institutionen sind Warenzeichen oder eingetragene Warenzeichen der jeweiligen Inhaber Nur PDP 505XDE 435XDE Hergestellt unter Lizenz von Dolby Laboratories Dolby und das Doppel D Symbo...

Page 176: ...Markham Ontario L3R OP2 Canada TEL 1 877 283 5901 PIONEER EUROPE NV Haven 1087 Keetberglaan 1 B 9120 Melsele Belgium TEL 03 570 05 11 PIONEER ELECTRONICS ASIACENTRE PTE LTD 253 Alexandra Road 04 01 Singapore 159936 TEL 65 6472 7555 PIONEER ELECTRONICS AUSTRALIA PTY LTD 178 184 Boundary Road Braeside Victoria 3195 Australia TEL 03 9586 6300 PIONEER ELECTRONICS DE MEXICO S A DE C V Blvd Manuel Avila...

Reviews: