background image

Using with other equipment

11

62

En

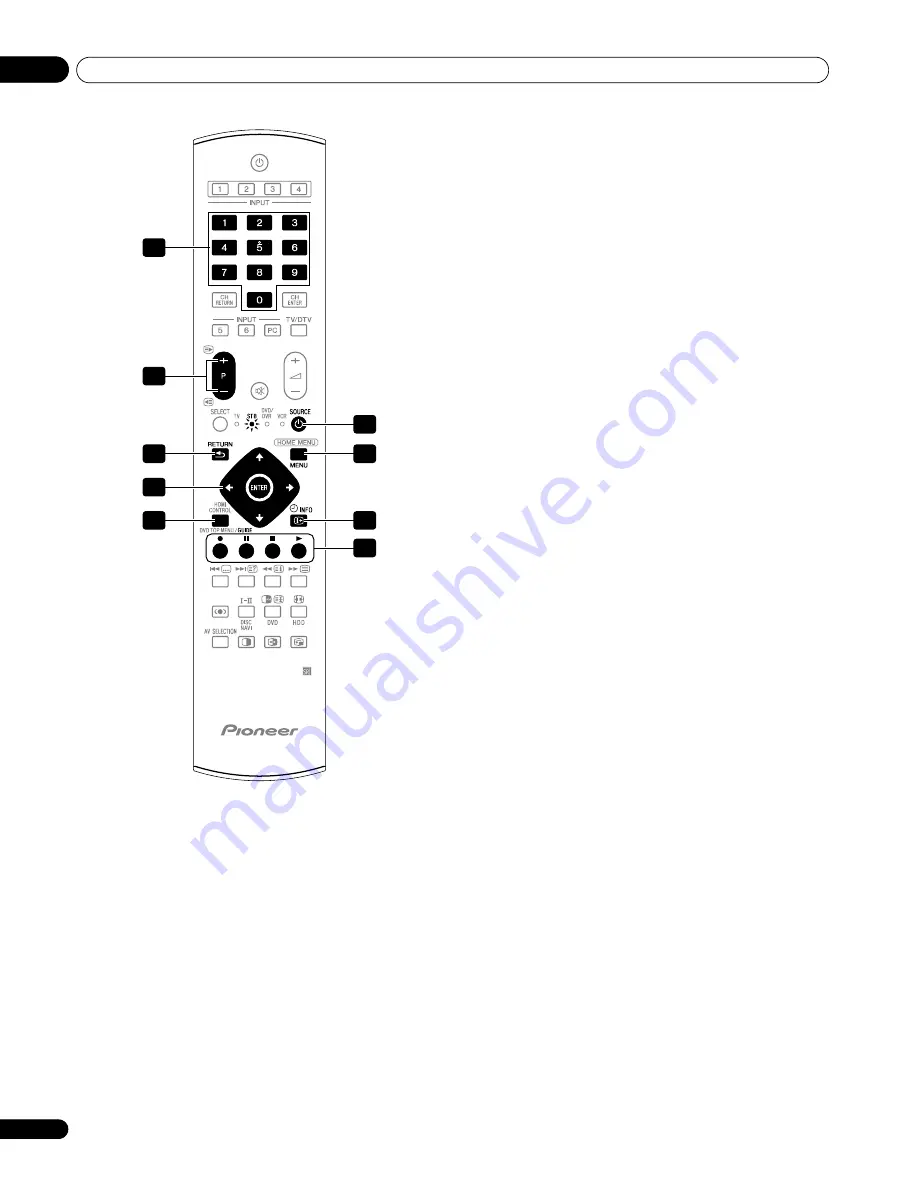
STB (set - top box) control buttons

When in the STB mode, the buttons on the remote control unit 
function as below.

1

0

 to 

9

Function as the numeric buttons.

2

P+/P–

Press to tune in a higher or lower channel.

3

RETURN

When the broadcasting menu screen is in display, press to 
restore the immediately previous screen.

4

ENTER

Press to activate the selected function.

///


Press to select items on the broadcasting menu screen or the 
broadcasting guide screen.

5

GUIDE

Press to display the broadcasting guide screen.

6

SOURCE


Turns the set-top box on and off.

7

MENU

Press to display the broadcasting menu screen.

8

INFO

Press to display information on the current broadcasting.

9

Colour (RED/GREEN/YELLOW/BLUE)


This operation is available for only AonVision and Zinwell 
products.

1

2

4

3

5

6
7

8
9

Summary of Contents for PDP-428XDA

Page 1: ...Operating Instructions PLASMA TELEVISION ...

Page 2: ...ining a time display or station name displayed on the screen are viewed for a long period of time or viewed repeatedly the displayed characters may be easily burned onto the screen If images of fixed patterns such as those of personal computer displays or game software are displayed for a long period of time the patterns may be easily burned onto the screen It is recommended to use your plasma tel...

Page 3: ...as a lighted candle on the equipment D3 4 2 1 7a_A_En VENTILATION CAUTION When installing this unit make sure to leave space around the unit for ventilation to improve heat radiation For the minimum space required see page 15 WARNING Slots and openings in the cabinet are provided for ventilation to ensure reliable operation of the product and to protect it from overheating To prevent fire hazard t...

Page 4: ...ise 28 Setting Child Lock 28 Suppressing audio distortion 28 Labeling TV channels 29 Sorting preset TV channels 29 Language setting 29 AV Selection 30 Basic picture adjustments 30 Advanced picture adjustments 31 Comparing picture adjustments on the screen 34 Sound adjustments 35 Listening to audio from the sub screen using headphones 35 Power Control 36 09 Enjoying DTV broadcasts 38 Watching DTV p...

Page 5: ...joying through USB interface Home Gallery function 57 Controlling other equipment using the supplied remote control unit 60 12 Using the HDMI Control 65 Using the HDMI Control functions 65 Making the HDMI Control connections 66 Setting the HDMI Control 68 Using the HDMI Control menus 69 13 Using Teletext 70 Using the Teletext functions 70 Operating the Teletext basics for analogue TV or external i...

Page 6: ...r FULL screen setting for more than three times the length of the previous still moving image After using the plasma television always switch the television to STANDBY mode Installation guidelines The Pioneer PDP 508XDA PDP 428XDA plasma television incorporates a very thin design To ensure safety please take the proper measures to mount or install the plasma television in order to prevent the unit...

Page 7: ...the product for a long period of time the functions of the product may be adversely affected Switch on and run the product occasionally Condensation Condensation may take place on the surface or inside of the product when the product is rapidly moved from a cold place to a warm place or just after a heater is switched on in winter morning for example When condensation takes place do not switch on ...

Page 8: ...eriod of time If the same image is displayed continuously for long periods or for shorter periods of time over several days a permanent after image may remain on the screen due to burning of the fluorescent materials Such images may become less noticeable if moving images are later displayed but they will not disappear completely Note To prevent damage from screen burning after a display time of 5...

Page 9: ... them or objects from resting on them Check the cords at the plugs and product 13 The plasma television used in this product is made of glass Therefore it can break when the product is dropped or applied with impact Be careful not to be injured by broken glass pieces in case the plasma television breaks 14 Overloading Do not overload AC outlets or extension cords Overloading can cause fire or elec...

Page 10: ...the rear of the plasma television Be sure to install the plasma television on a flat surface because it contains glass The screw holes other than the illustrations on the left are to be used only for the specified products Never use them for mounting non specified products Do not mount or remove the plasma television to or from the stand with speakers attached for PDP 508XDA only Note It is strong...

Page 11: ... 3 Supplied accessories Check that all of the following accessories are supplied in the box Remote control unit AA size battery x 2 Speed clamp x 3 Bead band x 3 Antenna cable Power cord Cleaning cloth Warranty card Operating instructions ...

Page 12: ...ght Sensor 6 Remote control sensor 7 STANDBY ON button 8 INPUT button 9 VOLUME buttons 10 CHANNEL buttons 11 USB port 12 PHONES output terminal 13 INPUT 6 terminal S VIDEO 14 INPUT 6 terminal VIDEO 15 INPUT 6 terminals AUDIO SLEEP ON STANDBY SLEEP ON STANDBY 5 Viewed from the underside of the display Viewed from the front of the display Side PDP 508XDA PDP 428XDA Side 1 4 3 2 5 6 6 4 3 2 1 7 9 10 ...

Page 13: ...L OUT terminal OPTICAL 23 PC INPUT terminal AUDIO STEREO 24 INPUT 2 terminals COMPONENT VIDEO Y PB PR 25 INPUT 1 terminals COMPONENT VIDEO Y PB PR 26 INPUT 3 terminals AUDIO L R 27 SPEAKERS L R terminals PDP 508XDA only MONITOR OUT SUB WOOFER DIGITAL DIGITAL OUT OUT OPTICAL OPTICAL MONITOR OUT DIGITAL DIGITAL OUT OUT OPTICAL OPTICAL SUB WOOFER MONITOR OUT SUB WOOFER DIGITAL DIGITAL OUT OUT OPTICAL...

Page 14: ... page Turns subtitle on and off in DTV input mode depending on the broadcast 13 k Displays hidden characters 14 h Use to select a sound effect mode 15 g Sets the sound multiplex mode DTV input mode Selects the Audio channel Mpeg Dolby Digital 16 AV SELECTION Selects audio and video settings AV source OPTIMUM STANDARD DYNAMIC MOVIE SPORT GAME USER PC source STANDARD USER 17 c Press to select 2 scre...

Page 15: ...a flat stable location Using the optional Pioneer stand For details on installation refer to the instruction manual supplied with the stand Using the optional Pioneer speakers for PDP 508XDA For details on installation refer to the instruction manual supplied with the speaker Moving the plasma television When installing on a rack etc hold the plasma television as shown on the right Because the pla...

Page 16: ...hook Nominal diameter 8 mm length 12 mm to 18 mm Caution A table or rack with adequate strength should always be used to support the plasma television Failure to do so could result in personal injury and physical damage When installing the plasma television please take the necessary safety measures to prevent it from falling or overturning in case of emergencies such as earthquakes or of accidents...

Page 17: ...and digital broadcasts with a single connecting cable use the provided loop antenna cable For optimum picture quality connect an antenna cable directly to a single either digital or analogue antenna terminal Routing cables Use the speed clamps as necessary to route the connecting cables The diagrams below show the location of the holes on the rear of the display Attaching and removing speed clamps...

Page 18: ...o follow the instructions below When you replace the batteries use manganese or alkaline ones Place the batteries with their terminals corresponding to the and indicators Do not mix batteries of different types Different types of batteries have different characteristics Do not mix old and new batteries Mixing old and new batteries can shorten the life of new batteries or cause chemical leakage in ...

Page 19: ...ghting or plasma television or operate the remote control unit closer to the remote control sensor When any obstacle exists between the remote control unit and the remote control sensor the remote control unit may not function As the batteries become empty the remote control unit can function within a shorter distance from the remote control sensor Replace the batteries with new ones early enough ...

Page 20: ...mage on the screen disappears Note When a on the plasma television is off you cannot turn the power on by pressing a or 0 to 9 on the remote control unit or STANDBY ON on the plasma television If you are not going to use the plasma television for a long period of time be sure to remove the power cord from the power outlet Plasma television status indicators The table below shows the operational st...

Page 21: ... TV channels manually page 27 While in DTV mode P P cannot pick up digital channels that are not registered as favourites with the Channel Change function set to Favourites List See Customizing channel related settings on page 39 Using 0 to 9 on the remote control unit Select channels directly by pressing buttons 0 to 9 For example Press 2 to select channel 2 one digit channel Press 1 then 2 to se...

Page 22: ... mono even if the system receives a stereo broadcast You must switch the mode back to or mode if you want to hear stereo sound again While watching an analogue TV channel with any High Deviation setting page 28 you cannot change the sound multiplex mode In digital TV mode Mpeg or Dolby Digital may only be selected depending on the received broadcasting signals As the broadcasting channel being rec...

Page 23: ...d sound In picture in picture mode press to move the position of the small screen anti clockwise 2 To select the desired input source press the appropriate input source button If watching TV programmes press P P to change the channel Note The multiscreen function cannot display images from the same input source at the same time If you make such an attempt a warning message appears The multiscreen ...

Page 24: ...e supplied remote control unit on page 60 Important Displaying a static image for a long period of time or for shorter periods of time everyday may result in image retention Press d A still image appears on the right screen while a moving image is shown on the left screen Press d again to cancel the function Note You cannot freeze the picture when using the 2 screen or picture in picture mode When...

Page 25: ...o Size 47 Side Mask 47 HDMI Input 54 HDMI Control Setting 68 Blue LED Dimmer 48 Orbiter 49 Video Pattern 49 Drive Mode 45 Colour System 46 Monitor Out 54 Game Control Pref 46 Room Light Sensor 48 Setup Auto Installation 27 Analogue TV Setup 27 DTV Setup 38 Password 49 Language 29 Home Gallery 57 HDMI Control 65 HOME MENU Item Page Picture AV Selection 30 Contrast 31 Brightness 31 Red 31 Green 31 B...

Page 26: ... until you access the desired submenu item The number of menu layers differs depending on the menu items 4 Press to select an option or parameter and then press ENTER For some menu items press instead of 5 Press HOME MENU to exit the menu Note You can return to the upper menu levels by pressing RETURN Before operating with the remote control unit make sure to select the TV mode using its SELECT bu...

Page 27: ...ars Enter your four digit password using buttons 0 to 9 For the password see Using a password on page 49 If no channels are found check the antenna connections and then retry Auto Installation Setting up analogue TV channels manually Use the Manual Adjust function to set up analogue TV channels manually 1 Press HOME MENU 2 Select Setup then ENTER 3 Select Analogue TV Setup then ENTER The password ...

Page 28: ...s of broadcasting signals The factory default is On Setting Child Lock Child Lock inhibits selected TV channels from being tuned and watched 1 Repeat steps 1 to 6 provided for Reducing video noise After selecting a programme number using Programme Entry perform the following steps 2 Select Child Lock 3 Select Block The selection is switched between View factory default and Block 4 Press HOME MENU ...

Page 29: ...e the following procedure to change the sequence of the preset TV programmes 1 Press HOME MENU 2 Select Setup then ENTER 3 Select Analogue TV Setup then ENTER Enter your four digit password using buttons 0 to 9 when prompted 4 Select Sort then ENTER The sort screen appears 5 Select a channel to be shifted then ENTER 6 Select a new location then ENTER Sorting is executed 7 Press HOME MENU to exit t...

Page 30: ... PC source or when the Home Gallery function is on the following screen appears 4 Select the desired level Item Description OPTIMUM Automatically adjusts the brightness of the image to the optimum level in accordance with the brightness level of the viewing area The setting is shared by the external inputs and TV input sources STANDARD For a highly defined image in a normally bright room This sett...

Page 31: ... Select Pro Adjust then ENTER 4 Select Intelligent Mode then ENTER 5 Select the desired parameter then ENTER 6 Press HOME MENU to exit the menu Note As this function automatically optimizes image quality the process in which image settings such as brightness and tint gradually change may be seen on the screen This is not a malfunction Item button button Contrast For less contrast For more contrast...

Page 32: ...rd DRE Picture Low Moderate DRE Picture Black Level Emphasizes dark portion on images so that the difference between brightness and darkness becomes more distinct Selections Off Deactivates Black Level On Activates Black Level ACL Performs such compensation that results in the optimum contrast characteristics for images Selections Off Deactivates ACL On Activates ACL Enhancer Mode Selects processi...

Page 33: ...ect 3DNR Field NR Block NR or Mosquito NR 6 Select the desired parameter then ENTER CTI Provides images with clearer colour contours The CTI stands for Colour Transient Improvement Selections Off Deactivates CTI On Activates CTI Colour Space Changes the colour reproduction space Selections 1 Optimized for vivid vibrant colour reproduction 2 Standard colour reproduction Colour Management 0 0 0 0 0 ...

Page 34: ...ithout performing the adjustments or leaving the settings disabled on the After screen switch to Before and then exit Note You cannot adjust any item while on the Before screen A warning message appears When you switch to another parameter make sure to change the display from Before to After first otherwise you cannot select Before A warning message appears if you don t If you exit the selection f...

Page 35: ...setting will become effective as soon as you disconnect the headphones The effect of this function differs depending on signals Listening to audio from the sub screen using headphones With headphones connected you can listen to audio coming from the sub screen when in the 2 screen or picture in picture mode audio coming from the main screen is output from the speakers 1 Press HOME MENU 2 Select So...

Page 36: ...3 Select No Signal off then ENTER 4 Select Enable then ENTER 5 Press HOME MENU to exit the menu Note Five minutes before the system is placed into the standby mode a message appears every minute The system may not be placed into the standby mode when noise signals are present at the plasma television after a TV programme finishes No Operation off AV source only The system will be automatically pla...

Page 37: ...management Mode1 Places the system into the standby mode when no signal is received from the personal computer for eight minutes Even when you start using the computer and a signal is received again the system stays off The system is switched on again by pressing STANDBY ON on the plasma television or on the remote control unit Mode2 Places the system into the standby mode when no signal is receiv...

Page 38: ...r i PLATE A channel banner i PLATE shows the following information programme name start end time of the programme current channel number network name audio channel Mpeg or Dolby Digital Teletext current local time and date and month In addition Parental Control information is also displayed 1 Press TV DTV to select the DTV mode 2 Press p A channel banner i PLATE appears To quit banner display pres...

Page 39: ...ing channel related settings This section describes how to customize various channel related settings These settings include favourite channel registration and Parental Lock setting Registering channels in the Favourite List This function allows you to quickly tune in the desired channel by registering favourite channels and or frequently viewed channels previously selected from the channel list i...

Page 40: ...u Parental Rating options You can choose from the following options to block TV programmes No Block All programmes can be watched without any age limitation Block All All programmes are blocked General and above For general audiences Not specifically designed for children but all ages are allowed Parental Guidance and above Some material may not be suitable for children Parental guidance suggested...

Page 41: ...y region are preset in the tuner s database If the frequency is changed by the local TV station or a new channel commences broadcasting you will have to find these channels using Manual Scan see page 42 or Auto Scan Auto Scan Auto Scan searches for digital programmes on receivable channels through the VHF and UHF bands without designating the city or region you live in 1 Press HOME MENU 2 Select S...

Page 42: ... RF Channel No you have entered 8 After entering the correct RF Channel No select Start Scan then ENTER Scanning starts for the designated RF channel When scanning is completed the image on the scanned channel is displayed If scanning fails and no screen appears you can try to scan the signal again or refer to the Signal Level and Quality indicators to align the antenna to improve your signal rece...

Page 43: ...ENTER 5 Select Time Zone then ENTER 6 Select the region you live in from the list below NSW ACT New South Wales Australian Capital Territory VIC Victoria QLD Queensland SA South Australia WA Western Australia TAS Tasmania NT Northern Territory 7 Press HOME MENU to exit the menu Note You can select DTV Setup only while viewing DTV channels Selecting a digital audio format Use the following procedur...

Page 44: ...work when the broadcasting signal carries that language sound track While viewing DTV channels you can change the audio language by pressing Displaying technical information Use this function to check the hardware software version number 1 Press HOME MENU 2 Select Setup then ENTER 3 Select DTV Setup then ENTER 4 Select Setup then ENTER 5 Select Software then ENTER 6 Select Current Version and pres...

Page 45: ...restore the factory defaults for all items press to select Reset in step 4 and then press ENTER A confirmation screen appears Press to select Yes and then press ENTER Adjustments are stored separately according to input source Depending on the displayed video the image position may not change even after adjustment Adjusting image positions and clock automatically PC source only Use Auto Setup to a...

Page 46: ...system setting for each of INPUT 1 INPUT 2 INPUT 3 and INPUT 6 For the colour system setting see steps 11 and 12 under Setting up analogue TV channels manually page 27 Selecting a game mode When playing a game you can use this function to establish a preference for image quality or operability 1 Press HOME MENU 2 Select Option then ENTER 3 Select Game Control Pref then ENTER 4 Select On or Off the...

Page 47: ...he plasma television automatically detects these side masks to provide grey side masks when Natural has been selected for Auto Size or display the image full screen with the side masks removed when Wide Zoom has been selected This function does not operate when Off is selected for Auto Size 1 Press HOME MENU 2 Select Option then ENTER 3 Select Side Mask then ENTER 4 Select Detection 5 Select On 6 ...

Page 48: ...o the brightness of the screen and can reduce the possibility of image retention 6 Press HOME MENU to exit the menu Room Light Sensor This function automatically adjusts the brightness of the display panel in accordance with the brightness level of the viewing area For details use the following procedure 1 Press HOME MENU 2 Select Option then ENTER 3 Select Room Light Sensor then ENTER 4 Select On...

Page 49: ...Off cancel 30 min 60 min 90 min or 120 min 4 Press HOME MENU to exit the menu Note Five minutes before the selected time elapses the remaining time appears every minute To check the remaining time perform steps 1 and 2 After checking the time press HOME MENU to restore the previous display The SLEEP indicator on the front of the plasma television lights up in orange when the Sleep Timer is set Usi...

Page 50: ...t the menu Note Take a note of the newly set password and keep it handy Resetting the password function 1 Press HOME MENU 2 Select Setup then ENTER 3 Select Password then ENTER The password entry screen appears Enter your four digit password using buttons 0 to 9 4 Select Reset then ENTER 5 Select Yes then ENTER 6 Press HOME MENU to exit the menu Note The above procedure will reset the password to ...

Page 51: ...top box To watch a set top box image press INPUT 1 on the remote control unit or INPUT on the plasma television to select INPUT 1 Note Signal priority for the INPUT 1 terminals is 1 Component video 2 S Video 3 Video Connect only the type of video cable that will actually be used Refer to your set top box operation manual for the signal types available Connecting a DVD player Use the INPUT 2 termin...

Page 52: ...nsole or camcorder Use the INPUT 6 terminals to connect a game console camcorder and other audiovisual equipment Use either an S Video or standard video cable for the video signal Use a stereo audio cable for the audio If you re using the standard video input you can use a red white yellow audio video cable Displaying an image from the game console or camcorder To watch an image coming from the ga...

Page 53: ... For details refer to the operation manual for the audio equipment to be connected If your amplifier AV receiver has subwoofer output it is not necessary to connect the subwoofer output on the plasma television Audio signals corresponding to the currently displayed images are always output to the MONITOR OUT and SUBWOOFER terminals When signals are input from the HDMI terminals no signals are outp...

Page 54: ...it of the plasma television See Using the HDMI Control on Chapter 12 Deep Colour supported Deep Colour means the colour depth that describes the number of bits used to represent the colour of a single pixel in a bitmapped image Besides the conventional RGB YCbCr16 bit 20 bit 24 bit signals the plasma television also supports RGB YCbCr30 bit 36 bit signals This enables finer minute colour reproduct...

Page 55: ... MENU to exit the menu Note You need not activate the INPUT 4 and INPUT 5 HDMI terminals Specifying the type of input signals 1 Repeat steps 1 to 3 provided for Activating the INPUT 3 HDMI terminal 2 Select Signal Type then ENTER 3 Select Video or PC then ENTER 4 Press HOME MENU to exit the menu Caution Make sure to select PC when a PC is connected to the HDMI input terminal Note In the Video mode...

Page 56: ... to be able to operate the connected equipment via the remote control sensor on the plasma television After the CONTROL IN terminals have been connected the remote control sensors on the connected equipment do not accept commands from the remote control units Face the remote control units to the remote control sensor on the plasma television when operating the connected equipment When SR is not us...

Page 57: ...ory card or camera This system may not be able to display images modified or edited using a personal computer or other equipment This system complies with the USB Mass Storage Class SIC Still Image Capture Class PTP and Multiple LUN Logical Unit Number Class Connecting a USB device Hold the USB device s connector with its top side facing the front panel and then insert it into the USB port on the ...

Page 58: ...unction Starting a standard single image screen When the thumbnail screen is displayed press and to highlight a desired image and then press ENTER The thumbnail screen disappears and only the selected image is displayed With the above screen displayed you can use the following buttons to perform various operations P Displays the previous image in the normal or full screen P Displays the next image...

Page 59: ...Starting the Slide Show screen After setting up for Slide Show you can start Slide Show to sequentially change images 1 To start the Slide Show screen press RED when a thumbnail screen is displayed With Auto selected for Playback Mode images automatically change at the specified intervals With Manual selected for Playback Mode press P P to change images While images are automatically changing you ...

Page 60: ...r a three digit manufacture code See the manufacture code list to identify an appropriate code The mode indicator lights up for approximately one second and then goes off presetting the manufacture code is completed Note If you perform no operation for approximately one minute while a mode indicator is flashing the code presetting procedure is quitted If you enter a code not listed in the table a ...

Page 61: ... AKAI 3 507 DAEWOO 508 GRUNDIG 1 509 GRUNDIG 2 510 GRUNDIG 3 511 GRUNDIG 4 512 HITACHI 1 513 HITACHI 2 514 HITACHI 3 515 JVC 1 516 JVC 2 517 JVC 3 518 JVC 4 519 JVC 5 520 LOEWE 1 521 LOEWE 2 522 MATSUI 523 ORION 524 PANASONIC 1 525 PANASONIC 2 526 PHILIPS 1 527 PHILIPS 2 528 PHILIPS 3 529 SANYO 530 SAMSUNG 1 531 SAMSUNG 2 532 SAMSUNG 3 533 SAMSUNG 4 534 SHARP 535 SONY 1 536 SONY 2 537 SONY 3 538 S...

Page 62: ...estore the immediately previous screen 4 ENTER Press to activate the selected function Press to select items on the broadcasting menu screen or the broadcasting guide screen 5 GUIDE Press to display the broadcasting guide screen 6 SOURCE Turns the set top box on and off 7 MENU Press to display the broadcasting menu screen 8 INFO Press to display information on the current broadcasting 9 Colour RED...

Page 63: ...the next chapter 10 DISC NAVI DVD HDD recorder DVR only Press to display the Disc Navigator screen for browsing the contents of a disc 11 SOURCE Turns on and off the power of the DVD player or DVD HDD recorder DVR 12 MENU Press to display the DVD menu 13 STOP Press to stop playback or recording With some DVD players or DVD HDD recorders DVRs pressing the button twice may open the disc tray 14 I PL...

Page 64: ...numeric buttons 2 P P Press to select channels of the TV tuner on the VCR 3 REC Starts recording 4 F PAUSE STILL Sets pauses and still pictures 5 SOURCE Turns the power of the VCR on and off 6 STOP Stops playback 7 I PLAY Starts playback 8 V FF Fast forward the tape and allows picture search 9 S REW Rewinds the tape and allows picture search 1 2 5 4 3 6 8 7 9 ...

Page 65: ...On screen control Recorder player operation can be controlled on screen or with the remote control unit of the plasma television play stop fast forward reverse etc Recorder player Recording of TV programme The programme now watching can be recorded using the remote control unit of the plasma television Recorder Timer recording Timer recording using a programme list on the recorder connected Record...

Page 66: ...ol Setting is properly entered according to the connected devices Also confirm the HDMI Control related settings in the connected devices 3 Switch to the HDMI input terminals to which the devices are connected to check if audio and video images are properly output and displayed 4 Try turning off the plasma television then turn the power back on to the plasma television Connecting an AV amp DVD rec...

Page 67: ...ol may not operate properly if you do not use an HDMI cable that supports the HDMI 1 3 Specification After making connections enter the setting in Input Setting for HDMI Control Setting Be sure that the setting is entered in each HDMI input terminal to which the device is connected Settings in the connected device s are also required to use the HDMI Control functions For details see the operation ...

Page 68: ...t On then ENTER 4 Press HOME MENU to exit the menu Note The Power Off Control function is valid for the devices connected to any of HDMI terminals at the rear of the plasma television Selecting the Power On Ready You can select whether or not the plasma television is turned On when the connected Pioneer recorder or player is turned On and images are input to the plasma television factory default i...

Page 69: ...nd is output from the AV system The Playback CTRL Panel menu is selectable when the connected recorder or player is ready to operate You can also display the HDMI Control menu by pressing HDMI CONTROL on the remote control unit of the plasma television Item Description Disc Navigator Displays a title list of the connected recorder or player Timer REC DVR Displays an electronic programme guide EPG ...

Page 70: ...screen and normal image on the left screen Each time you press m the screen switches as shown to the left If you select a programme with no Teletext signal Cannot display Teletext appears Selecting and operating Teletext pages Use the following remote control buttons to select and operate Teletext pages Colour RED GREEN YELLOW BLUE You can select a group or block of pages displayed in the coloured...

Page 71: ...ation you can display it on the screen by pressing m In this case the TTX is displayed in the banner i PLATE Turning Teletext on and off 1 Select a digital TV channel providing a Teletext programme 2 Press m to display the Teletext 3 Press m again to turn the display off Selecting and operating Teletext pages Use the following remote control buttons to select and operate Teletext pages Colour RED ...

Page 72: ...of the Room Light Sensor See pages 12 and 48 No image and audio is presented Have you finished initial scanning for digital TV channels See page 27 Check if the input source for video or PC has been unintentionally selected although you want to watch a TV channel See page 21 Check if you have selected a channel blocked with Child Lock See page 28 Enter a password to temporarily cancel Child Lock S...

Page 73: ...ns See page 66 Check if you have entered the settings properly for HDMI Control Setting See page 68 Check if you have an HDMI controlled AV system connected to one HDMI terminal and the recorder or player connected to another HDMI terminal on the plasma television When connected this way audio out from the recorder player does not go through the plasma television SPDIF terminal resulting in no sou...

Page 74: ...al assignments for 15 pin D sub connector Pin No Signal assignment Pin No Signal assignment 1 R 9 5 V 2 G 10 GND ground 3 B 11 Not connected 4 Not connected 12 SDA 5 Not connected 13 HD 6 GND ground 14 VD 7 GND ground 15 SCL 8 GND ground ...

Page 75: ...8XDA Number of pixels 1365 x 768 pixels 1024 x 768 pixels Audio amplifier 17 W 17 W 1 kHz 10 6 Ω Speakers Woofer 4 8 cm x 13 cm cone type Tweeter 2 5 cm semidome type Sound Effect SRS FOCUS SRS SRS TruBass Power Requirements 240 V AC 50 Hz 369 W 0 4 W Standby 240 V AC 50 Hz 299 W 0 4 W Standby Dimensions 1224 mm W x 717 mm H x 115 mm D 1040 mm W x 679 mm H x 115 mm D Weight 35 2 kg 77 6 lbs 30 2 k...

Page 76: ...1 PIONEER EUROPE NV Haven 1087 Keetberglaan 1 B 9120 Melsele Belgium TEL 03 570 05 11 PIONEER ELECTRONICS ASIACENTRE PTE LTD 253 Alexandra Road 04 01 Singapore 159936 TEL 65 6472 7555 PIONEER ELECTRONICS AUSTRALIA PTY LTD 178 184 Boundary Road Braeside Victoria 3195 Australia TEL 03 9586 6300 PIONEER ELECTRONICS DE MEXICO S A DE C V Blvd Manuel Avila Camacho 138 10 piso Col Lomas de Chapultepec Me...

Reviews: