background image

61

En

Enjoying through External Equipment

12

En

gl

is

h

Watching a DVD image

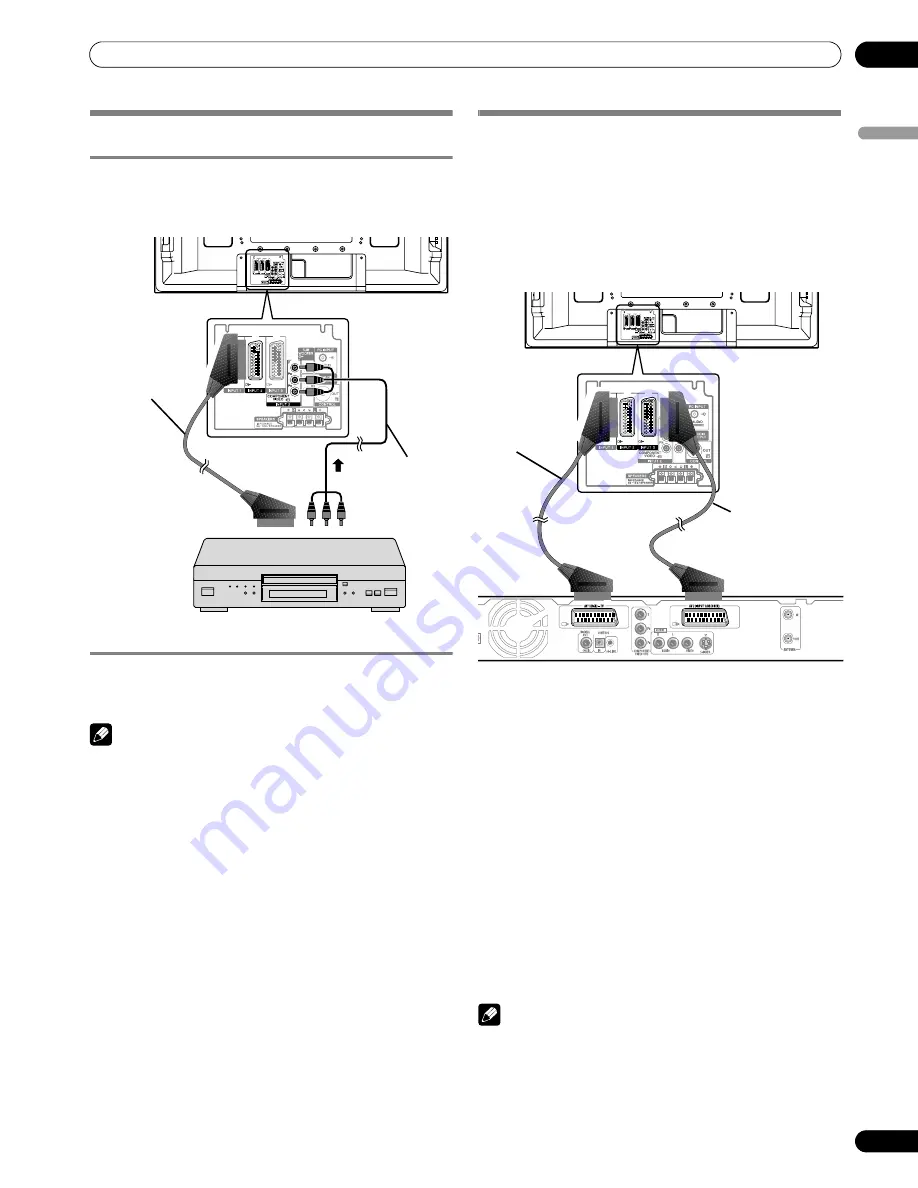
Connecting a DVD player

Use the INPUT 2 terminal when connecting to a DVD player 
and other audiovisual equipment.

Displaying a DVD image

To watch a DVD image, press 

INPUT


2

 on the remote control 

unit or press 

INPUT

 on the Plasma Television to select INPUT2.

NOTE

• If DVD images do not come in clearly, you may need to 

change the input signal type setting using the menu. See 
page 53.

• Refer to your DVD player operation manual for the signal 

type.

Using the SCART output function

This function allows you to record DTV programmes with a 
connected VCR or other recording equipment while enjoying 
watching the Plasma Television as usual. With this function, 
you can also easily enjoy timeshift playback when a DVD/HDD 
recorder (DVR) is in connection.

The following diagram assumes that you connect a Pioneer 
DVR-540H to the Plasma Television so that you can enjoy 
timeshift playback with the recorder.

In addition to the above connections, you need to perform the 
following:

• See “Switching the SCART output” (page 62) and select 

“Fixed on DTV” for “SCART Output” in the Setup menu.

• On the DVD/HDD recorder (DVR), select the video/audio 

input source matching the external input terminal to which 
the Plasma Television has been connected. For this method, 
see the operation manual that came with the recorder.

• Select the input source on the Plasma Television depending 

on the terminal to which the output of the DVD/HDD 
recorder (DVR) has been connected; for the above 
connection example, select INPUT 2.

When you complete the above connections and setups, you 
can then enjoy timeshift playback with the DVD/HDD recorder 
(DVR). You can also select the 2-screen or picture-in-picture 
mode to watch images coming from the DTV input source and 
an external input source (INPUT 2 for the above connection 
example) to which the output of the recorder has been 
connected.

NOTE

• Some DVD/HDD recorders (DVRs) may not allow timeshift 

playback. Check the operation manual that came with your 
recorder.

• For details about connection and setting procedures, see the 

operation manual that came with your DVD/HDD recorder 
(DVR).

Plasma Television (rear view)

SCART cable
(commercially 
available)

Component cable
(commercially 
available)

When using 
component 
cable, select 
“COMPONENT” 
for “Input Select” 
in the menu. See 
page 53.
At the same time 
connect a SCART 
cable to input 
audio signals.

DVD player

Plasma Television (rear view)

SCART cable
(commercially 
available)

DVR-540H

SCART cable
(commercially 
available)

Summary of Contents for PDP-427XD

Page 1: ...scover the benefits of registering your product online at www pioneer co uk or www pioneer eur com Découvrez les nombreux avantages offerts en enregistrant votre produit en ligne maintenant sur www pioneer fr ou www pioneer eur com Bitte nutzen Sie die Möglichkeit zur Registrierung Ihres Produktes unter www pioneer de oder www pioneer eur com ...

Page 2: ......

Page 3: ...ltage e g 230 V or 120 V written on the rear panel D3 4 2 1 4_A_En Before plugging in for the first time read the following section carefully WARNING This product equipped with a three wire grounding earthed plug a plug that has a third grounding pin This plug only fits a grounding type power outlet If you are unable to insert the plug into an outlet contact a licensed electrician to replace the o...

Page 4: ...alogue channels 24 Changing the volume and sound 24 Use the multiscreen functions 26 Splitting the screen 26 Freezing images 27 07 Menu Setup Using the menu 28 AV mode menus 28 PC mode menus 28 Menu operations 28 08 Basic Adjustment Settings Setting up TV channels automatically 29 Using Auto Installation 29 Setting up analogue TV channels manually 29 Using Manual Adjust 29 Reducing video noise 30 ...

Page 5: ...1 Useful Adjustment Settings Switching the vertical drive frequency AV mode only 52 Adjusting image positions AV mode only 52 Adjusting image positions and clock automatically PC mode only 52 Adjusting image positions and clock manually PC mode only 52 Selecting an input signal type 53 Colour system setting AV mode only 53 Selecting a screen size manually 54 Selecting a screen size automatically 5...

Page 6: ...ied remote control unit 64 Manufacture codes 65 STB set top box control buttons 66 DVD DVR control buttons 67 VCR control buttons 68 13 Using the Teletext Functions What is Teletext 69 Operating the Teletext basics 69 Turning on and off Teletext 69 Selecting and operating Teletext pages 70 Displaying subpages 70 Displaying TOP Over View 70 Displaying subtitle pages 70 14 Appendix Troubleshooting 7...

Page 7: ...g within AV Selection is strongly recommended However please do not use this mode for long periods of time After playing a game or displaying a PC image or any still image it is best to view a normal moving picture in the WIDE or FULL screen setting for more than 3 times the length of the previous still moving image After using the Plasma Television always switch the display to STANDBY mode Instal...

Page 8: ...ke you hear buzz sound or electrical circuit hamming from the Plasma Television Fan motor noise The rotation speed of the cooling fan motor increases when the ambient temperature of the Plasma Television becomes high You may hear the sound of the fan motor at that time Do not attach such items as labels and tape to the product This may result in the discolouration or scratch of the cabinet When no...

Page 9: ...displayed for 5 minutes to 10 minutes the system automatically turns the image off to prevent damage from screen burning To prevent screen burning the display position is automatically changed slightly when the power is switched on or the input changed Depending on the broadcast content some parts of the picture may not be visible Preventing damage from screen burning It is recommended that you en...

Page 10: ...ects from resting on them Check the cords at the plugs and product 13 The Plasma Display used in this product is made of glass Therefore it can break when the product is dropped or applied with impact Be careful not to be injured by broken glass pieces in case the Plasma Display breaks 14 Overloading Do not overload AC outlets or extension cords Overloading can cause fire or electric shock 15 Ente...

Page 11: ...ot to block the ventilation opening at the rear of the Plasma Television Be sure to install the Plasma Television on a flat surface because it contains glass The screw holes other than the above are to be used only for the specified products Never use them for mounting non specified products Do not mount or remove the Plasma Television to or from the stand with speakers attached NOTE It is strongl...

Page 12: ...he power cord that is appropriate in your country or region is supplied Speed clamp x 3 Bead band x 3 Warranty card Cleaning cloth Ferrite core Cable tie AA size battery x 2 Two operating instructions Remote control unit Terminal position sheet for use when mounting the Plasma Television on the wall for PDP 607XD only ...

Page 13: ... 12 INPUT 3 terminal SCART 13 INPUT 2 terminals COMPONENT VIDEO Y PB PR 14 SUB WOOFER OUTPUT terminal 15 AUDIO OUTPUT terminals 16 PC INPUT terminal AUDIO 17 CONTROL OUT terminal 18 SPEAKERS right left terminals 1 10 12 11 13 6 8 9 5 7 3 2 4 Front view PDP 607XD 1 POWER button 2 POWER ON indicator 3 STANDBY indicator 4 TIMER indicator 5 Remote control sensor Side view 6 STANDBY ON button 7 INPUT b...

Page 14: ...INPUT 2 terminals COMPONENT VIDEO Y PB PR 14 SUB WOOFER OUTPUT terminal 15 AUDIO OUTPUT terminals 16 PC INPUT terminal AUDIO 17 CONTROL OUT terminal 18 SPEAKERS right left terminals TIMER 5 4 6 8 9 7 10 12 11 13 ON STANDBY POWER 1 3 2 Front view PDP 507XD 1 POWER button 2 POWER ON indicator 3 STANDBY indicator 4 TIMER indicator 5 Remote control sensor Side view 6 STANDBY ON button 7 INPUT button 8...

Page 15: ...s COMPONENT VIDEO Y PB PR 14 SUB WOOFER OUTPUT terminal 15 AUDIO OUTPUT terminals 16 PC INPUT terminal AUDIO 17 CONTROL OUT terminal 6 8 9 7 10 12 11 13 5 1 TIMER ON STANDBY POWER 4 3 2 Front view PDP 427XD Viewed from below of the display Viewed from the front side of the display 1 POWER button 2 POWER ON indicator 3 STANDBY indicator 4 TIMER indicator 5 Remote control sensor Side view 6 STANDBY ...

Page 16: ...EXIT Returns to the normal screen in one step 14 Colour RED GREEN YELLOW BLUE TELETEXT mode Selects a page 15 TV External input mode Jumps to the Teletext subtitle page DTV input mode Turns subtitle on and off 16 k TELETEXT mode Displays hidden characters 17 g Sets the sound multiplex mode 18 p y INFO TV External input mode Displays the channel information DTV input mode Displays the banner inform...

Page 17: ...d with the stand Using the optional PIONEER speakers for PDP 607XD and PDP 507XD For details on installation refer to the instruction manual supplied with the speaker CAUTION Operating Environment Operating environment temperature and humidity 0 C to 40 C 32 F to 104 F less than 85 RH cooling vents not blocked Do not install this unit in a poorly ventilated area or in locations exposed to high hum...

Page 18: ... case of emergencies such as earthquakes or of accidents If you do not take these precautions the Plasma Television could fall down and cause injury The screws hooks chains and other fittings that you use to secure the Plasma Television to prevent it from overturning will vary according to the composition and thickness of the surface to which it will be attached Select the appropriate screws hooks...

Page 19: ...e to bundle them so that they are not subjected to any pressure 3 4 Europe except UK and Eire UK and Eire Attaching the ferrite core To help prevent noise attach the supplied ferrite core to the connector end of the power cord as shown Use the supplied cable tie to prevent the ferrite core from slipping on the cable AC power cord To power outlet To AC IN As close as possible Cable tie Ferrite core...

Page 20: ...e the supplied speed clamps as necessary Connecting to an antenna To enjoy a clearer picture use an outdoor antenna The following is a brief explanation of the types of connections that are used for a coaxial cable Antenna cable commercially available 3 4 OUT IN 3 4 Standard DIN45325 plug IEC169 2 75 ohm coaxial cable round cable commercially available For viewing both analogue and digital broadca...

Page 21: ... the sensor must be within 30 degrees in the right left upward or downward direction NOTE With the PDP 427XD the SR logo is located at the lower right on the speaker but the location of the remote control sensor is the same as with the PDP 607XD PDP 507XD Cautions regarding the remote control unit Do not expose the remote control unit to shock In addition do not expose the remote control unit to l...

Page 22: ...tton See Controlling other equipment using the supplied remote control unit on page 64 It is recommended not to unplug the Plasma Television from a power outlet when it is not in use When in the standby mode the Plasma Television automatically receives Electronic Programme Guide and DTV Auto Update signals When the system is placed into the standby mode the main power flow is cut and the system is...

Page 23: ...For Channel Skip for digital channels see Setting Channel Options page 42 P P cannot pick up analogue channels that are not registered as favourites For analogue favourite channel registration see steps 13 and 14 under Using Manual Adjust page 29 When in the DTV mode P P also cannot pick up digital channels that are not registered as favourites For digital favourite channel registration see Settin...

Page 24: ...ging the volume and sound NOTE Before operating with the remote control unit make sure to select the TV mode using its SELECT button See Controlling other equipment using the supplied remote control unit on page 64 Using i i on the remote control unit To increase the volume press i To decrease the volume press i NOTE VOLUME on the Plasma Television operates the same as i i Using e on the remote co...

Page 25: ... is determined by the video source DVD HDD DISC NAVI p mode pp mode MONO mode p pp MONO Using g on the remote control unit Each time you press g MTS toggles as shown below 1 AAA NICAM STEREO 10 00 1 AAA NICAM STEREO 10 00 1 AAA MONO 10 00 2 BBB NICAM p 10 00 2 BBB NICAM pp 10 00 2 BBB MONO 10 00 3 CCC NICAM MONO 10 00 3 CCC NICAM MONO 10 00 3 CCC MONO 10 00 4 DDD STEREO 10 00 4 DDD STEREO 10 00 4 ...

Page 26: ... source at the same time If you make such an attempt a warning message appears The multiscreen function cannot display images from combinations of two external input sources Input 1 to 5 PC It can display images from the following combinations of input sources Analogue TV and digital TV Analogue TV or digital TV and external source Input 1 to 5 PC When you press HOME MENU the single screen mode is...

Page 27: ...mage appears on the right screen while a moving image is shown on the left screen 2 Press d again to cancel the function NOTE You cannot freeze the picture when using the 2 screen or picture in picture mode When this function is not available a warning message appears Before operating with the remote control unit make sure to select the TV mode using its SELECT button See Controlling other equipme...

Page 28: ...remote control unit on page 64 Home Menu Item Page Picture AV Selection 32 Contrast 32 Brightness 32 Colour 32 Tint 32 Sharpness 32 Pro Adjust 33 35 Reset 33 Sound Treble 36 Bass 36 Balance 36 Reset 36 FOCUS 36 Front Surround 36 Headphone Output 37 Sub Volume 37 Power Control Energy Save 37 No Signal off 37 No Operation off 38 Sleep Timer 56 Option Position 52 Auto Size 55 4 3 Mode 55 Side Mask 55...

Page 29: ...moving to another country for example Perform the following steps 1 to 3 before starting Auto Installation Press HOME MENU Select Setup then ENTER Select Auto Installation then ENTER The password entry screen appears Enter your 4 digit password using buttons 0 to 9 If no channel is found check the antenna connections and then retry Auto Installation Setting up analogue TV channels manually This se...

Page 30: ...ing signals When using a decoder with a decoder terminal selected this function may fail to achieve a good result Setting Child Lock Child Lock inhibits selected TV channels from being tuned and watched 1 Repeat steps 1 to 6 provided for Using Manual Adjust After selecting a channel using Programme Entry perform the following steps 2 Select Child Lock 3 Select Block The selection is switched betwe...

Page 31: ... MENU 2 Select Setup then ENTER 3 Select Analogue TV Setup then ENTER The password entry screen appears Enter your 4 digit password using buttons 0 to 9 4 Select Sort then ENTER The sort screen appears 5 Select a channel to be shifted then ENTER 6 Select a new location then ENTER Sorting is executed 7 Press HOME MENU to exit the menu NOTE To change a page on the Sort screen in step 6 select on the...

Page 32: ...input sources DYNAMIC For a very sharp image with the maximum contrast This mode does not allow manual image quality adjustment This selection is shared by an external input and TV input sources MOVIE For a movie This selection is shared by an external input and TV input sources GAME Lowers image brightness for easier viewing This selection is shared by an external input and TV input sources SPORT...

Page 33: ...ment for another item press RETURN and then repeat steps 7 and 8 You may press to immediately change an item to be adjusted 9 Press HOME MENU to exit the menu Using CTI 1 Press HOME MENU 2 Select Picture then ENTER 3 Select Pro Adjust then ENTER 4 Select Colour Detail then ENTER 5 Select CTI then ENTER Item button button Contrast For less contrast For more contrast Brightness For less brightness F...

Page 34: ...R 7 Press HOME MENU to exit the menu Eliminating noise from images 1 Press HOME MENU 2 Select Picture then ENTER 3 Select Pro Adjust then ENTER 4 Select NR then ENTER 5 Select an item to be adjusted then ENTER You can select DNR MPEG NR or BNR 6 Select the desired parameter then ENTER CTI Provides images with clearer colour contours The CTI stands for Colour Transient Improvement Selections Off De...

Page 35: ...ctions Off Deactivates MPEG NR High Enhanced MPEG NR Mid Standard MPEG NR Low Moderate MPEG NR BNR Helps reduce noise appearing in high definition images The BNR stands for Block Noise Reduction Selections Off Deactivates BNR On Activates BNR Dynamic Contrast Emphasizes the contrast on images so that the difference between brightness and darkness becomes more distinct Selections Off Deactivates Dy...

Page 36: ...e for sound from the speakers after the phones are disconnected Front Surround This provides three dimensional sound effects and or deep rich bass 1 Press HOME MENU 2 Select Sound then ENTER 3 Select Front Surround 4 Select the desired parameter 5 Press HOME MENU to exit the menu NOTE WOW designates a status where the FOCUS is on and TruBass SRS has been selected for Front Surround is a trademark ...

Page 37: ...nu when the input source is a PC When you change the Energy Save mode you may notice a change in the panel sound This is normal No Signal off AV mode only The system will be automatically placed into the standby mode if no signal is received for 15 minutes 1 Press HOME MENU 2 Select Power Control then ENTER 3 Select No Signal off then ENTER 4 Select Enable then ENTER 5 Press HOME MENU to exit the ...

Page 38: ...ME MENU to exit the menu Item Description Disable factory default Does not place the system into the standby mode Enable Places the system into the standby mode if no operation is performed for three hours Item Description Off factory default No power management Mode1 Places the system into the standby mode when no signal is received from the personal computer for eight minutes Even when you start...

Page 39: ...nnels see page 42 If the channel is locked you must enter the correct password each time see page 56 While receiving DTV radio channels the screen saver automatically starts when no operation is done for 3 minutes Viewing a channel banner A channel banner shows programme names start end time of programmes and other channel information 1 Press TV DTV to select the DTV mode 2 Press p A channel banne...

Page 40: ...m first erases all channel information and then starts channel search To quit a channel search in progress press HOME MENU NOTE To complete Replace Existing Channels there must be more than 1 hour at least left to the next preset recording or preset Auto Update time The password entry screen does not appear if you have disabled the password function For details see Using a password AV mode only on...

Page 41: ...rial Power 3 Select On or Off NOTE You can select DTV Setup only when watching DTV channels Restoring the system defaults Use this function only when you wish to reset all the DTV settings to the factory defaults 1 Press HOME MENU 2 Select Setup then ENTER 3 Select DTV Setup then ENTER 4 Select Installation then ENTER The password entry screen appears Enter your 4 digit password using buttons 0 to...

Page 42: ...on and activate the Favourites function If you have selected any channel for Channel Lock set Using a password AV mode only on page 56 and set an appropriate 4 digit password NOTE The password entry screen does not appear if you have disabled the password function For details see Using a password AV mode only on page 56 You can select DTV Setup only when watching DTV channels Activating the Favour...

Page 43: ...ps 1 to 4 provided for Setting Channel Options 2 Select Channel Sort then ENTER The Sort screen appears 3 Select a channel to be shifted then ENTER 4 Select a new location then ENTER Sorting is executed 5 Press HOME MENU to exit the menu NOTE To change a page on the Sort screen in step 4 select on the screen with to select a page and then press ENTER You can select DTV Setup only when watching DTV...

Page 44: ...For Auto Update to start there must be more than 1 hour left to the start of the next preset recording watching 60 seconds before the scheduled update a message prompt appears asking if you want to carry out Auto Update or not Auto Update automatically starts if OK is selected or no selection is made after 50 seconds To quit an update in progress press HOME MENU You can select DTV Setup only when ...

Page 45: ...e CA modules supports a certain kind of encryption system Your Plasma Television supports CA modules which are made to work with the DVB standard Contact a service provider for the right type of CA module Please note that a smart card may only be valid for a single service provider and due to this a specific range of channels NOTE CA modules and smart cards are neither supplied nor optional access...

Page 46: ...mation is not displayed 1 Appears when the schedule table can be scrolled forward or backward 2 Time schedule 3 Channel list 4 Highlights the currently selected channel 5 Indicates the programme set for recording watching 6 Appears when other programmes often short ones have been scheduled for the same period 7 Programme title 8 Indicates the programme set for recording watching but another progra...

Page 47: ... programmes scheduled up to 1 week ahead depending on conditions Depending on conditions it may take some time to acquire EPG data 3 To view more information not currently displayed about the selected programme press p Detailed information appears in the schedule window If the screen contains further information More is displayed Press the BLUE button to view the entire information To quit the dis...

Page 48: ...Yes in a confirmation dialogue box then ENTER The Programme Timer screen with a list of other preset programmes information appears You can modify the presettings here then ENTER You can register the presettings here or ENTER 4 Press RETURN to return to the EPG screen The EPG screen updates with the new presettings A red clock icon appears for the preset programme A yellow triangle icon appears fo...

Page 49: ...the menu NOTE Preset recording watching begins immediately when presetting operations are performed within three minutes of the start of the programme Presettings made using the EPG are automatically shown in the scheduled table Recording may fail because of watching restrictions imposed by the CA module Priority rules for overlapped presettings When preset TV programmes are overlapped the followi...

Page 50: ...ing the menu 1 Press HOME MENU 2 Select Setup then ENTER 3 Select DTV Setup then ENTER 4 Select Programme Timer then ENTER The schedule table appears 5 Select a programme number to be edited Delete the programme presetting RED Start editing ENTER 6 Adjust the desired item 7 Press ENTER to complete the setting The screen alerts you if the preset programme being edited has already started or finishe...

Page 51: ...ecified day and time displays EPG Search 1 Press YELLOW when the EPG screen Programme List Detailed information and Search Result is displayed 2 Select Date 3 Select the day within one week to search 4 Select Time 5 Select the time of the day 0 00 a m to 23 00 p m to search 6 Select Channel 7 Select whether to search All or Favourites 8 Select Genre then ENTER 9 Select the genre s to search then E...

Page 52: ...even after adjustment Adjusting image positions and clock automatically PC mode only Use Auto Setup to automatically adjust the positions and clock of images coming from a personal computer 1 Press HOME MENU 2 Select Option then ENTER 3 Select Auto Setup then ENTER Auto Setup starts 4 Press HOME MENU to exit the menu NOTE When Auto Setup is finished Auto Setup completed appears Even when Auto Setu...

Page 53: ...eo or RGB 5 Press HOME MENU to exit the menu NOTE If no image appears or images appear in inappropriate colours specify another video signal type For the signal types to be specified check the operation manual that came with the connected equipment Colour system setting AV mode only If an image does not appear clearly select another colour system e g PAL NTSC 1 Press HOME MENU 2 Select Option then...

Page 54: ...adcasts may display 4 3 content with side masks which may cause uneven wear After viewing it is recommended to view full screen motion video AV mode PC mode except for XGA signals PC mode for XGA signals Item Description 4 3 For 4 3 standard pictures A side mask appears on each side FULL 14 9 For 14 9 squeeze pictures A thin side mask appears on each side CINEMA 14 9 For 14 9 letterbox pictures A ...

Page 55: ...Select 4 3 Mode then ENTER 4 Select WIDE or 4 3 then ENTER WIDE 4 3 5 Press HOME MENU to exit the menu Changing the brightness at both sides of the screen Side Mask With the 4 3 FULL 14 9 or CINEMA 14 9 screen size selected for the AV mode you can change the brightness of the grey side masks that appear at both sides of the screen NOTE The Auto setting adjusts the brightness of the side masks acco...

Page 56: ...hoices Entering a password If you select a channel blocked with Child Lock or Channel Lock or if password entry is requested when attempting to open the menu enter a password correctly 1 Enter a correct 4 digit password using buttons 0 to 9 NOTE If you fail password entry three times Invalid password appears and the menu is closed In order to display the password entry screen again to unlock the p...

Page 57: ...ord Setting then ENTER 5 Select Disable then ENTER 6 Press HOME MENU to exit the menu NOTE The above procedure will reset the password to the factory default 1234 After disabling the password function you cannot change the Child Lock settings For the Child Lock see page 30 After disabling the password function you cannot change or reset the password When you enable the password function again afte...

Page 58: ...n manual for the signal type Watching a VCR image Connecting a VCR Use the INPUT 2 terminals when connecting a VCR and other audiovisual equipment If your VCR supports TV VCR advanced AV link systems page 60 you can connect the VCR to the INPUT 2 or 3 terminal on the Plasma Television using the fully wired 21 pin SCART cable AV link advanced system Download tuning information directly from TV to V...

Page 59: ... ENTER 6 Press HOME MENU to exit the menu NOTE You need not activate the INPUT 4 HDMI terminal you cannot manually deactivate this terminal To specify the type of digital video signals 1 Repeat steps 1 to 3 provided for To activate the HDMI terminal 2 Select Video then ENTER 3 Select the type of digital video signals then ENTER If you select Auto an attempt will be made to identify the type of dig...

Page 60: ... of the connected VCR has the WYSIWYR button you can automatically start recording by pressing the WYSIWYR button Preset Download Automatically transfers channel preset information from the tuner on the Plasma Television to the one on the connected audiovisual equipment e g VCR via the INPUT 2 or 3 terminal To select the SCART terminal which is available for i o link A Select the INPUT terminal to...

Page 61: ...rder DVR select the video audio input source matching the external input terminal to which the Plasma Television has been connected For this method see the operation manual that came with the recorder Select the input source on the Plasma Television depending on the terminal to which the output of the DVD HDD recorder DVR has been connected for the above connection example select INPUT 2 When you ...

Page 62: ...order images Connecting a game console or camcorder Use the INPUT 5 terminals to connect a game console camcorder and other audiovisual equipment Displaying an image from the game console or camcorder To watch an image coming from the game console or camcorder press INPUT 5 on the remote control unit or press INPUT on the Plasma Television to select INPUT 5 NOTE The INPUT 5 terminals are checked f...

Page 63: ...connecting such audio equipment as an AV receiver or subwoofer NOTE For details refer to the operation manual for the audio equipment to be connected Audio signals synchronizing with currently displayed images are always output to the AUDIO OUTPUT terminals The audio accompanying images shown on the display is always output to the SUBWOOFER OUTPUT terminal While in DTV mode no signals are output i...

Page 64: ... not connect other equipment between them Controlling other equipment using the supplied remote control unit Using the supplied remote control unit you can control other equipment in connection a set top box STB DVD player DVD HDD recorder DVR or VCR Before using this function you need to preset the supplied remote control unit with the manufacture code of the equipment to be controlled When you t...

Page 65: ...CE 1 005 PACE 2 006 QUALI TV 007 SKY DIGITAL DVD 100 PIONEER 1 factory default 101 PIONEER 2 102 AKAI 103 DENON 104 HITACHI 105 JVC 106 KENWOOD 1 107 KENWOOD 2 108 PANASONIC 1 109 PANASONIC 2 110 PHILIPS 1 111 PHILIPS 2 112 SAMSUNG 113 SHARP 114 SONY 1 115 SONY 2 116 SONY 3 117 THOMSON 118 TOSHIBA 119 YAMAHA DVR 200 PIONEER 1 201 PIONEER 2 202 PIONEER 3 203 PANASONIC 204 PHILIPS 1 205 PHILIPS 2 20...

Page 66: ...cted function Press to select items on the broadcasting menu screen or the broadcasting guide screen 5 EXIT Press to exit the broadcasting menu screen or the broadcasting guide screen 6 INFO Press to display information on the current broadcasting 7 SOURCE a Turns the set top box on and off 8 MENU Press to display the broadcasting menu screen 9 GUIDE Press to display the broadcasting guide screen ...

Page 67: ...ents of a disc 10 SOURCE a Turns on and off the power of the DVD player or DVD HDD recorder DVR 11 MENU Press to display the DVD menu 12 DVD TOP MENU When this button is pressed the DVD top menu will appear 13 STOP Press to stop playback or recording With some DVD players or DVD HDD recorders DVRs pressing the button twice may open the disc tray 14 I PLAY Starts playback 15 V SCAN Press for fast f...

Page 68: ...L Sets pauses and still pictures 4 E REC Starts recording 5 SOURCE a Turns the power of the VCR on and off 6 H STOP Stops tape transport 7 I PLAY Starts playback 8 V FF Rapidly advances the tape and allows picture search 9 S REW Rewinds the tape and allows picture search 1 1 2 3 4 5 6 7 8 9 PC 0 2 3 4 INPUT INFO INPUT 5 TV DTV SELECT RETURN MENU EXIT EPG HOME MENU TV DVD TOP MENU GUIDE DVD HDD DIS...

Page 69: ...e Teletext basics NOTE Before operating with the remote control unit make sure to select the TV mode using its SELECT button See Controlling other equipment using the supplied remote control unit on page 64 Turning on and off Teletext 1 Select a TV channel or external input source providing a Teletext programme 2 Press m to display the Teletext full screen 3 Press m again to display the Teletext o...

Page 70: ...smitted Subpage screen 1 Press m to display Teletext If you open a page containing subpages the subpages are automatically displayed in sequence 2 To quit automatic subpage change press You can then manually change subpages by pressing NOTE Pressing w x causes the page to be changed and the subpage screen to disappear Pressing stops automatic subpage change and performs its respective button funct...

Page 71: ...14 Has the balance been correctly adjusted See page 36 Picture is cut off Is the image position correct See page 52 Has the correct screen size been selected See pages 54 and 55 Strange colour light colour dark or colour misalignment Adjust the picture tone See pages 32 to 35 Is the room too bright The picture may look dark in a room that is too bright Check the colour system setting See pages 30 ...

Page 72: ...t output 10 AV link control 17 Earth for Video output 4 Common earth for audio 11 Not used 18 Earth for Video input S Video input 5 Earth 12 Not used 19 Video output 6 Audio left input 13 Earth 20 Video input S Video input 7 Not used 14 Earth 21 Plug shield SCART INPUT 3 1 Audio right output 8 Audio video control 15 Red input Chroma S Video input 2 Audio right input 9 Earth for Green 16 Red Green ...

Page 73: ...x 717 mm H x 115 mm D 1040 mm W x 679 mm H x 115 mm D Weight 51 0 kg 112 5 lbs 34 7 kg 76 5 lbs 29 6 kg 65 3 lbs Colour System Analogue PAL SECAM NTSC 3 58 NTSC 4 43 PAL 60 Digital PAL SECAM TV Function Analogue Receiving System B G D K I L L Tuner VHF UHF E2 E69ch F2 F10ch I21 I69ch IR A IR Jch CATV Hyper band S1 S41ch Auto Channel Preset 99 ch Auto Preset Auto Label Auto Sort STEREO NICAM A2 TV ...

Page 74: ...d trademark of Video Electronics Standards Association HDMI the HDMI logo and High Definition Multimedia Interface are trademarks or registered trademarks of HDMI Licensing LLC Manufactured under license from Dolby Laboratories Dolby and the double D symbol are trademarks of Dolby Laboratories The names of companies or institutions are trademarks or registered trademarks of the respective companie...

Page 75: ...eil est muni d une fiche de mise à la terre masse à trois fils Comme la fiche présente une troisième broche de terre elle ne peut se brancher que sur une prise de courant prévue pour une mise à la terre Si vous n arrivez pas à insérer la fiche dans la prise de courant contactez un électricien qualifié pour faire remplacer la prise par une qui soit mise à la terre N annulez pas la fonction de sécur...

Page 76: ...ltiécran 26 Partage d écran 26 Gel d une image 27 07 Réglages par menus Utilisation du menu 28 Menus des modes AV 28 Menus de mode PC 28 Utilisation des menus 28 08 Réglages de base Réglage automatique des chaînes de télévision 29 Utilisation d Autoinstallation 29 Réglage manuel des chaînes de télévision analogiques 29 Utlisation de Réglage manuel 29 Réduction de bruit vidéo 30 Définition de Verro...

Page 77: ... Modification des priorités pour les préréglages chevauchés 50 Utilisation d autres fonctions EPG pratiques 51 Saut EPG 51 Recherche EPG 51 11 Réglages utiles Sélection de la fréquence de balayage vertical mode AV uniquement 52 Réglage des positions de l image mode AV uniquement 52 Réglage automatique des positions de l image et de l horloge mode PC uniquement 52 Réglage manuel des positions de l ...

Page 78: ...mots sur SR 64 Commande d un autre appareil avec le boîtier de télécommande fourni 64 Codes de fabrique 65 Touches de commande de terminal STB 66 Touches de commande du lecteur de DVD graveur de DVD 67 Touches de commande de magnétoscope 68 13 Utilisation des fonctions télétexte Qu est ce que le télétexte 69 Utilisation de base du télétexte 69 Mise en service ou hors service du télétexte 69 Sélect...

Page 79: ...ur il est souhaitable de passer des images animées avec les réglages LARGE ou PLEIN pendant une période supérieure à 3 fois la durée de l image fixe précédemment affichée Lorsque vous n utilisez plus le téléviseur à plasma n oubliez pas de repasser en veille STANDBY Instructions d installation Le téléviseur à plasma Pioneer PureVision PDP 607XD PDP 507XD PDP 427XD présente une très faible épaisseu...

Page 80: ...ent de la lumière en fonction des signaux vidéo reçus Ce principe peut faire que le téléviseur à plasma donne lieu à un son de bourdonnement ou de ronflement de circuit électrique Bruite de moteur de ventilateur La vitesse de rotation du moteur de ventilateur de refroidissement augmente quand la température ambiante du téléviseur à plasma devient élevée Le son du moteur de ventilateur peut alors ê...

Page 81: ...ître automatiquement pour éviter l endommagement de l écran par brûlage Pour éviter les brûlures d écran la position de l affichage est changée légèrement automatiquement quand l appareil est mis sous tension ou que l entrée est changée En fonction du contenu de l émission certaines parties de l image peuvent ne pas être visibles Prévention des dommages des brûlures d écran Il est recommandé d aff...

Page 82: ...minez soigneusement le cheminement du cordon d alimentation près de la prise secteur et au point de sortie de l appareil 13 Le panneau de l écran plasma est en verre Il peut donc être brisé par la chute de l appareil ou par un choc En cas de casse du panneau veillez à ne pas être blessé par les débris 14 Surcharge Ne surchargez pas les prises secteur ou les rallonges Cela peut entraîner un incendi...

Page 83: ... pas obstruer les évents daération qui se trouvent à larrière du téléviseur plasma Le téléviseur plasma doit être installé sur une surface plane car il comporte un verre Les trous autres que ceux mentionnés ci dessus sont uniquement destinés à des produits spécifiques Ne les utilisez pas pour effectuer le montage d appareils non spécifiés Ne montez pas le téléviseur plasma sur le support quand les...

Page 84: ...cordon d alimentation convenant pour le pays ou la région de distribution est fourni Collier rapide x 3 Collier à œil x 3 Carte de garantie Chiffon de nettoyage Noyau de ferrite Collier pour câble Pile AA x 2 Deux modes d emploi Boîtier de télécommande Étiquette de position des prises à utiliser lors du montage de l écran plasma sur le mur pour le PDP 607XD uniquement ...

Page 85: ...SCART 12 Prise INPUT 3 SCART 13 Prises INPUT 2 COMPONENT VIDEO Y PB PR 14 Prise de sortie pour caisson de graves SUB WOOFER 15 Prises de sortie audio AUDIO OUTPUT 16 Prise PC INPUT AUDIO 17 Prise CONTROL OUT 18 Prises pour enceintes gauche droite SPEAKERS 1 10 12 11 13 6 8 9 5 7 3 2 4 Vue de face PDP 607XD 1 Touche POWER 2 Témoin POWER ON 3 Témoin STANDBY 4 Témoin TIMER 5 Capteur de télécommande V...

Page 86: ...Prises INPUT 2 COMPONENT VIDEO Y PB PR 14 Prise de sortie pour caisson de graves SUB WOOFER 15 Prises de sortie audio AUDIO OUTPUT 16 Prise PC INPUT AUDIO 17 Prise CONTROL OUT 18 Prises pour enceintes gauche droite SPEAKERS TIMER 5 4 6 8 9 7 10 12 11 13 ON STANDBY POWER 1 3 2 Vue de face PDP 507XD 1 Touche POWER 2 Témoin POWER ON 3 Témoin STANDBY 4 Témoin TIMER 5 Capteur de télécommande Vue de côt...

Page 87: ...3 Prises INPUT 2 COMPONENT VIDEO Y PB PR 14 Prise de sortie pour caisson de graves SUB WOOFER 15 Prises de sortie audio AUDIO OUTPUT 16 Prise PC INPUT AUDIO 17 Prise CONTROL OUT 6 8 9 7 10 12 11 13 5 1 TIMER ON STANDBY POWER 4 3 2 Vue de face PDP 427XD Vue de dessous l écran Vue de la face avant de l écran 1 Touche POWER 2 Témoin POWER ON 3 Témoin STANDBY 4 Témoin TIMER 5 Capteur de télécommande V...

Page 88: ... de couleur ROUGE VERT JAUNE BLEU En mode TÉLÉTEXTE Sélectionnent une page 15 En mode téléviseur entrée extérieure Permet de sauter à la page de sous titres télétexte En mode d entrée DTV Permet d activer ou de désactiver les sous titres 16 k En mode TÉLÉTEXTE Affiche les caractères masqués 17 g Cette touche sélectionne le multiplexage des sons 18 p y INFO En mode téléviseur entrée extérieure Cett...

Page 89: ...ceintes PIONEER optionnelles pour le PDP 607XD et PDP 507XD Pour les détails concernant l installation reportez vous au mode d emploi fourni avec les enceintes ATTENTION Environnement d utilisation Température et humidité de l environnement d utilisation 0 C à 40 C 32 F à 104 F moins de 85 d humidité relative orifices de ventilation non obstrués N installez pas cet appareil dans un endroit mal ven...

Page 90: ... renverser en cas d urgence tel que tremblement de terre ou accident Si vous ne prenez pas ces précautions le téléviseur à plasma risque de tomber ou de se renverser et de causer des blessures Les vis crochets chaînes et autres ferrures que vous utilisez pour fixer le téléviseur à plasma pour l empêcher de se renverser diffèreront suivant la composition et l épaisseur de la surface sur laquelle il...

Page 91: ...ls ne soient soumis à aucune pression 3 4 Pour l Europe à l exception de l Eire et du Royaume Uni Eire et Royaume Uni Fixation du noyau de ferrite Pour éviter les parasites fixez le noyau de ferrite fourni au côté connecteur du cordon d alimentation comme montré Utilisez le collier pour câble fourni pour empêcher le noyau de ferrite de glisser sur le cordon Cordon d alimentation A une prise de cou...

Page 92: ...on de ne pas tendre les câbles de connexion REMARQUE Utilisez les colliers à œil fournis comme nécessaire Connexion à une antenne Pour bénéficier d une image de meilleure qualité utilisez une antenne extérieure Voici de brèves explications sur la connexion d un câble coaxial Câble d antenne disponible dans le commerce 3 4 OUT IN 3 4 Fiche DIN45325 standard IEC169 2 Câble coaxial 75 ohms câble à se...

Page 93: ...iseur à plasma La distance du boîtier au capteur doit être inférieure à 7 mètres et l angle du faisceau avec le capteur doit être à 30 degrés quelle que soit la position du boîtier dans l espace REMARQUE Sur le PDP 427XD le logo SR se trouve à la partie inférieure droite de l enceinte mais l emplacement du capteur de télécommande est le même que sur le PDP 607XD PDP 507XD Précautions relatives au ...

Page 94: ...e télévision TV avec sa touche SELECT Reportez vous à la partie Commande d un autre appareil avec le boîtier de télécommande fourni page 64 Il est conseillé de ne pas débrancher le téléviseur à plasma de la prise de courant quand il n est pas utilisé Quand il est en mode veille le téléviseur à plasma reçoit automatiquement les signaux de guide électronique d émissions EPG et de mise à jour automat...

Page 95: ...e saut de chaînes numériques reportez vous à la partie Réglage des options de chaîne page 42 P P ne peuvent pas sélectionner des chaînes analogiques qui ne sont pas enregistrées comme favorites Pour l enregistrement de chaines analogiques favorites voir les étapes 13 et 14 de la partie Utilisation de Réglage manuel page 29 De même en mode DTV P P ne peuvent pas sélectionner des chaînes numériques ...

Page 96: ...ume et du son REMARQUE Avant toute utilisation du boîtier de télécommande veillez à sélectionner le mode télévision TV avec sa touche SELECT Reportez vous à la partie Commande d un autre appareil avec le boîtier de télécommande fourni page 64 Utilisation des touches i i du boîtier de télécommande Pour augmenter le volume appuyez sur i Pour diminuer le volume appuyez sur i REMARQUE VOLUME du télévi...

Page 97: ... alors définie par la source vidéo DVD HDD DISC NAVI Mode p Mode pp Mode MONO p pp MONO Utilisation de la touche g du boîtier de télécommande Chaque pression sur la touche g provoque l adoption d un type de sons donné 1 AAA STÉRÉO NICAM 10 00 1 AAA STÉRÉO NICAM 10 00 1 AAA MONO 10 00 2 BBB NICAM p 10 00 2 BBB NICAM pp 10 00 2 BBB MONO 10 00 3 CCC MONO NICAM 10 00 3 CCC MONO NICAM 10 00 3 CCC MONO ...

Page 98: ...r l écran en même temps deux images provenant de la même source Si vous essayez d obtenir un tel affichage un message d avertissement apparaît La fonction multiécran ne peut pas afficher des images d une combinaison de deux sources d entrée externes Entrée 1 à 5 PC Elle peut afficher les images des combinaisons de sources d entrée indiquées ci dessous Télévision analogique et télévision numérique ...

Page 99: ...ie droite de l écran tandis qu une image animée occupe la partie gauche 2 Appuyez une nouvelle fois sur d pour annuler la fonction REMARQUE Le gel d une image pendant le mode deux images ou image dans l image est impossible Lorsque cette fonction n est pas disponible un message d avertissement apparaît Avant toute utilisation du boîtier de télécommande veillez à sélectionner le mode télévision TV ...

Page 100: ...ommande d un autre appareil avec le boîtier de télécommande fourni page 64 Menu Home Élément Page Image Sélection AV 32 Contraste 32 Luminos 32 Couleur 32 Teinte 32 Netteté 32 Réglage pro 33 35 Réinitial 33 Son Aigus 36 Graves 36 Balance 36 Réinitial 36 FOCUS 36 Surround avant 36 Sortie casque 37 Volume du Sub 37 Commande alimentation Économie d énergie 37 Pas de signal arrêt 37 Pas d opération ar...

Page 101: ...1 à 3 qui suivent avant de lancer l autoinstallation À Appuyez sur HOME MENU Á Sélectionnez Installation puis ENTER Â Sélectionnez Autoinstallation puis ENTER La page de saisie du mot de passe s affiche Tapez le mot de passe à 4 chiffres en vous servant des touches 0 à 9 Si aucune chaîne n est détectée vérifiez les connexions d antenne puis recommencez l autoinstallation Réglage manuel des chaînes...

Page 102: ...te fonction risque de ne pas donner de résultat satisfaisant Définition de Verrouillage enfants Verrouil Enfants interdit l accord sur les chaînes de télévision qui ont été spécifiquement marquées pour cela 1 Procédez aux opérations 1 à 6 de Utilisation de Réglage manuel Après avoir sélectionné une chaîne grâce à Entrer programme effectuez les opérations suivantes 2 Sélectionnez Verrouil Enfants 3...

Page 103: ...yez sur HOME MENU 2 Sélectionnez Installation puis ENTER 3 Sélectionnez Install TV analogue puis ENTER La page de saisie du mot de passe s affiche Tapez le mot de passe à 4 chiffres en vous servant des touches 0 à 9 4 Sélectionnez Arranger puis ENTER La page de classement apparaît 5 Sélectionnez la chaîne qui doit être déplacée puis ENTER 6 Sélectionnez sa nouvelle position puis ENTER Le tri est e...

Page 104: ...très nette présentant un contraste maximum Ce mode ne vous donne pas le moyen de régler manuellement la qualité de l image Cette sélection est commune à une source d entrée externe et à l entrée de télévision CINÉMA Pour les films Cette sélection est commune à une source d entrée externe et à l entrée de télévision JEU La luminosité de l image est diminuée afin qu elle soit plus agréable à regarde...

Page 105: ...uer le réglage d un autre élément appuyez sur RETURN puis reprenez les opérations 7 et 8 Vous pouvez utiliser pour changer immédiatement un élément à régler 9 Appuyez sur HOME MENU pour quitter le menu Utilisation de CTI 1 Appuyez sur HOME MENU 2 Sélectionnez Image puis ENTER 3 Sélectionnez Réglage pro puis ENTER 4 Sélectionnez Infos couleur puis ENTER 5 Sélectionnez CTI puis ENTER Élément Touche ...

Page 106: ...ENTER 7 Appuyez sur HOME MENU pour quitter le menu Élimination du bruit des images 1 Appuyez sur HOME MENU 2 Sélectionnez Image puis ENTER 3 Sélectionnez Réglage pro puis ENTER 4 Sélectionnez NR puis ENTER 5 Sélectionnez un élément à régler puis ENTER Vous pouvez sélectionner DNR MPEG NR ou BNR 6 Sélectionnez le paramètre désiré puis ENTER CTI Permet d obtenir des couleurs aux contours mieux défin...

Page 107: ...éduction de bruit MPEG NR accentuée Moyen Réduction de bruit MPEG NR standard Bas Réduction de bruit MPEG NR modérée BNR Contribue à réduire le bruit apparaissant dans les images haute définition BNR signifie Block Noise Reduction Sélections Arrêt BNR désactivée Marche BNR activée Contraste Dynamique Accentue le contraste sur les images de manière que la différence entre les parties lumineuses et ...

Page 108: ...s par les enceintes qu après avoir débranché le casque Surround avant Cette fonction crée des effets sonores tridimensionnels accompagnés de graves riches et profonds 1 Appuyez sur HOME MENU 2 Sélectionnez Son puis ENTER 3 Sélectionnez Surround avant 4 Sélectionnez le paramètre souhaité 5 Appuyez sur HOME MENU pour quitter le menu REMARQUE WOW fait référence à une situation pour laquelle la foncti...

Page 109: ...rdinateur personnel vous pouvez également sélectionner cette fonction grâce au menu Home Quand vous changez le mode Économie d énergie il se peut que vous remarquiez un changement de son de l écran C est normal Mise hors service en l absence de signal mode AV uniquement Cette fonction place le système en veille si aucun signal n est capté pendant 15 minutes 1 Appuyez sur HOME MENU 2 Sélectionnez C...

Page 110: ...Appuyez sur HOME MENU pour quitter le menu Élément Description Désactiver réglage par défaut Le système n est pas placé en veille Activer Le système est placé en veille si aucune opération n est exécutée pendant 3 heures Élément Description Arrêt réglage par défaut Il n y a pas de gestion de l alimentation Mode1 Le système est placé en veille si aucun signal n est reçu de l ordinateur personnel pe...

Page 111: ...e mot de passe correct à chaque fois reportez vous à la page 56 Lorsque vous recevez des chaînes radio DTV l économiseur d écran démarre automatiquement si aucune opération n est effectuée pendant 3 minutes Affichage d une bannière de chaîne Une bannière de chaîne indique les noms d émissions l heure de début fin des émissions et d autres informations 1 Appuyez sur TV DTV pour sélectionner le mode...

Page 112: ...s les informations relatives aux chaînes puis démarre la recherche Pour quitter une recherche de chaîne en cours appuyez sur HOME MENU REMARQUE Pour terminer Remplacer les chaînes existantes il doit rester plus d une heure au moins avant le prochain enregistrement programmé ou la prochaine mise à jour automatique programmée L écran d entrée de mot de passe n apparaît pas si vous avez désactivé la ...

Page 113: ... Vous pouvez sélectionner Installation DTV seulement pendant la réception de chaînes de télévision numérique Rétablissement des réglages par défaut du système N utilisez cette fonction que lorsque vous souhaitez réinitialiser tous les réglages DTV aux réglages par défaut en vigueur à la sortie de la fabrique 1 Appuyez sur HOME MENU 2 Sélectionnez Installation puis ENTER 3 Sélectionnez Installation...

Page 114: ...à la partie Utilisation d un mot de passe mode AV uniquement page 56 et validez un mot de passe à 4 chiffres REMARQUE L écran d entrée de mot de passe n apparaît pas si vous avez désactivé la fonction mot de passe Pour plus de détails reportez vous à la partie Utilisation d un mot de passe mode AV uniquement page 56 Vous pouvez sélectionner Installation DTV seulement pendant la réception de chaîne...

Page 115: ...e des options de chaîne 2 Sélectionnez Tri des chaînes puis ENTER L écran Tri apparaît 3 Sélectionnez la chaîne à déplacer puis ENTER 4 Sélectionnez le nouvel emplacement puis ENTER Le tri est exécuté 5 Appuyez sur HOME MENU pour quitter le menu REMARQUE Pour changer de page sur l écran Tri à l opération 4 sélectionnez s t sur l écran avec pour sélectionner une page puis appuyez sur ENTER Vous pou...

Page 116: ...t la mise à jour prévue un message vous demandant si vous souhaitez procéder ou non à la mise à jour automatique apparaît La mise à jour automatique est lancée automatiquement si OK est sélectionné ou si aucune sélection n est effectuée au bout de 50 secondes Pour quitter une mise à jour en cours appuyez sur HOME MENU Vous pouvez sélectionner Installation DTV seulement pendant la réception de chaî...

Page 117: ... module CA puissent varier selon le fabricant chacun des modules CA prend en charge un certain type de système de cryptage Votre téléviseur à plasma prend en charge les modules CA conçus pour fonctionner avec la norme DVB Contactez un fournisseur de service pour connaître le bon type de module CA Prenez note qu une carte intelligente pourra être valide uniquement pour un fournisseur de service et ...

Page 118: ...ne pas être affichées 1 Apparaît lorsque le tableau du planning peut être parcouru en avant ou arrière 2 Horaire 3 Liste des chaînes 4 Met en surbrillance la chaîne actuellement sélectionnée 5 Indique l émission réglée pour lenregistrement visionnement 6 Apparaît lorsque dautres émissions souvent courtes ont été prévues pour la même période 7 Titre de l émission 8 Indique l émission réglée pour l ...

Page 119: ...missions prévues dans une semaine selon les conditions Selon les conditions l acquisition des données EPG peut prendre un certain temps 3 Pour consulter davantage d informations autres que celles actuellement affichées sur l émission sélectionnée appuyez sur p Les informations détaillées apparaissent dans la fenêtre du planning Si l écran contient davantage d informations Davantage est affiché App...

Page 120: ...t 3 Sélectionnez Oui dans une boîte de dialogue de confirmation puis ENTER L écran de la minuterie de programme avec une liste des informations des autres émissions préréglées apparaît Vous pouvez y modifier les préréglages puis ENTER Vous pouvez y enregistrer les préréglages ou ENTER 4 Appuyez sur RETURN pour revenir à l écran EPG L écran EPG se met à jour avec les nouveaux préréglages Une icône ...

Page 121: ...ns 10 Appuyez sur HOME MENU pour quitter le menu REMARQUE L enregistrement visionnement préréglé commence immédiatement lorsque les opérations de préréglage sont effectuées dans les 3 minutes avant le début de l émission Les préréglages effectués avec EPG sont automatiquement affichés dans le tableau du planning L enregistrement peut échouer en raison des restrictions de visionnement imposées par ...

Page 122: ...ME MENU 2 Sélectionnez Installation puis ENTER 3 Sélectionnez Installation DTV puis ENTER 4 Sélectionnez Programmation des chaînes puis ENTER Le tableau du planning apparaît 5 Sélectionnez le numéro de l émission à modifier Supprimez le préréglage de l émission ROUGE Commencez la modification ENTER 6 Changez l élément désiré 7 Appuyez sur ENTER pour terminer le réglage L écran vous avertit si l ém...

Page 123: ...e l heure spécifiés s affiche Recherche EPG 1 Appuyez sur JAUNE lorsque l écran EPG Liste d émissions informations détaillées et résultat de la recherche est affiché 2 Sélectionnez Date 3 Sélectionnez le jour dans une semaine à chercher 4 Sélectionnez Heure 5 Sélectionnez l heure du jour 0 00 a m à 23 00 p m à chercher 6 Sélectionnez Chaîne 7 Sélectionnez la recherche entre Tous ou Favoris 8 Sélec...

Page 124: ...installation vous pouvez régler automatiquement les positions et l horloge des images provenant de l ordinateur personnel 1 Appuyez sur HOME MENU 2 Sélectionnez Options puis ENTER 3 Sélectionnez Autoinstallation puis ENTER La configuration automatique démarre 4 Appuyez sur HOME MENU pour quitter le menu REMARQUE Lorsque les réglages sont terminés Réglage automatique terminé apparaît Même si Réglag...

Page 125: ...ter le menu REMARQUE Si aucune image n apparaît ou si les couleurs sont inhabituelles choisissez un autre type de signal Pour de plus amples détails concernant les types de signal reportez vous au mode d emploi de l appareil relié Choix du système couleur mode AV uniquement Si les images ne sont pas nettes sélectionnez un autre système couleur par exemple PAL NTSC 1 Appuyez sur HOME MENU 2 Sélecti...

Page 126: ...rtaines émissions HD peuvent afficher un contenu 4 3 avec des caches latéraux qui peuvent causer une usure irrégulière de l écran Après l affichage de telles images il est recommandé d afficher des images animées en plein écran Mode AV Mode PC sauf pour les signaux XGA Mode PC pour les signaux XGA Élément Description 4 3 Pour des images standard 4 3 Un cache apparaît de chaque côté PLEIN 14 9 Pour...

Page 127: ...Sélectionnez LARGE ou 4 3 puis ENTER LARGE 4 3 5 Appuyez sur HOME MENU pour quitter le menu Modification de la luminosité de chaque côté de l écran Cache latéral Avec le format d écran 4 3 PLEIN 14 9 ou CINÉMA 14 9 sélectionné pour le mode AV vous pouvez changer la luminosité des caches latéraux gris qui apparaissent des deux côtés de l écran REMARQUE Le réglage Auto agit sur la luminosité des cac...

Page 128: ... qui ne connaît pas le mot de passe Saisie du mot de passe Si vous sélectionnez une chaîne bloquée par Verrouillage Enfants ou Blocage chaîne ou si l entrée d un mot de passe vous est demandée pour ouvrir le menu entrez le mot de passe correctement 1 Tapez le mot de passe à 4 chiffres en vous servant des touches 0 à 9 REMARQUE Si vous tapez 3 fois un mot de passe erroné Code non valide apparaît et...

Page 129: ...lectionnez Réglage mot de passe puis ENTER 5 Sélectionnez Désactiver puis ENTER 6 Appuyez sur HOME MENU pour quitter le menu REMARQUE La méthode ci dessus rétablit le mot de passe par défaut 1234 Après la désactivation de la fonction mot de passe vous ne pouvez pas changer les réglages de Verrouillage Enfants Pour le Verrouillage Enfants reportez vous à la page 30 Après la désactivation de la fonc...

Page 130: ...u un autre appareil audiovisuel Si le magnétoscope prend en compte les liaisons AV téléviseur magnétoscope récentes page 60 vous pouvez le connecter à INPUT2 ou 3 du téléviseur à plasma en utilisant pour cela un câble péritel à 21 broches toutes câblées Liaisons AV récentes Elles permettent de charger les informations d accord directement du téléviseur vers le magnétoscope chargement des préréglag...

Page 131: ...E MENU pour quitter le menu REMARQUE Il est inutile d activer la prise INPUT 4 HDMI cette prise ne peut pas être désactivée manuellement Pour spécifier le type des signaux vidéo numériques 1 Répétez les opérations 1 à 3 de la partie Pour mettre en service la prise HDMI 2 Sélectionnez Vidéo puis ENTER 3 Sélectionnez le type de signaux vidéo numériques puis ENTER Si vous sélectionnez Auto l appareil...

Page 132: ...lécommande du magnétoscope connecté est dotée de la touche WYSIWYR vous pouvez commencer automatiquement à enregistrer en appuyant sur la touche WYSIWYR Chargement des préréglages Les informations relatives aux chaînes préréglées sont automatiquement transférées du téléviseur à plasma à l appareil audiovisuel par exemple le magnétoscope connecté à la prise INPUT 2 ou 3 Pour sélectionner la prise p...

Page 133: ...on Sur le graveur de DVD HDD DVR sélectionnez la source d entrée vidéo audio qui correspond à la prise d entrée externe à laquelle le téléviseur à plasma a été connecté Pour ce faire reportez vous au mode d emploi fourni avec le graveur Sur le téléviseur à plasma sélectionnez la source d entrée en fonction de la prise à laquelle la sortie du graveur de DVD HDD DVR a été connectée pour l exemple de...

Page 134: ... caméscope Connexion d une console de jeu ou d un caméscope Utilisez la prise INPUT 5 pour connecter une console de jeu un caméscope ou un autre appareil audiovisuel Affichage des images d une console de jeu ou d un caméscope Pour regarder les images venant de la console de jeu ou du caméscope appuyez sur INPUT 5 du boîtier de télécommande ou appuyez sur INPUT du téléviseur à plasma de manière à s...

Page 135: ... appareils audio qui conviennent par exemple un récepteur audiovisuel ou un caisson de graves REMARQUE Pour de plus amples détails reportez vous au mode d emploi du matériel audio à connecter Les signaux audio synchronisés avec les images couramment affichées sont toujours sortis par les prises AUDIO OUTPUT Le son qui accompagne les images affichées à l écran est toujours sorti par la prise SUBWOO...

Page 136: ...viseur à plasma et l amplificateur Pioneer compatible SR Ne connectez aucun autre appareil entre eux Commande d un autre appareil avec le boîtier de télécommande fourni Avec le boîtier de télécommande fourni vous pouvez commander un autre appareil connecté terminal STB lecteur de DVD graveur de DVD HDD DVR ou magnétoscope VCR Pour utiliser cette fonction il vous faut d abord prérégler le boîtier d...

Page 137: ...ER 2 002 CANAL SATELLITE 003 HUMAX 004 PACE 1 005 PACE 2 006 QUALI TV 007 SKY DIGITAL DVD 100 PIONEER 1 valeur par défaut 101 PIONEER 2 102 AKAI 103 DENON 104 HITACHI 105 JVC 106 KENWOOD 1 107 KENWOOD 2 108 PANASONIC 1 109 PANASONIC 2 110 PHILIPS 1 111 PHILIPS 2 112 SAMSUNG 113 SHARP 114 SONY 1 115 SONY 2 116 SONY 3 117 THOMSON 118 TOSHIBA 119 YAMAHA DVR 200 PIONEER 1 201 PIONEER 2 202 PIONEER 3 2...

Page 138: ...Appuyez sur ces touches pour sélectionner les éléments sur l écran de menu d émission ou l écran de guide d émission 5 EXIT Appuyez sur cette touche pour quitter l écran de menu d émission ou l écran de guide d émission 6 INFO Appuyez sur cette toute pour afficher les informations sur l émission courante 7 SOURCE a Sert à mettre le terminal en service ou hors service 8 MENU Appuyez sur cette touch...

Page 139: ...e DVD ou le graveur de DVD HDD DVR sous ou hors tension 11 MENU Appuyez sur cette touche pour afficher le menu de DVD 12 DVD TOP MENU Quand on appuie sur cette touche le menu supérieur de DVD apparaît 13 H Arrêt Appuyez sur cette touche pour arrêter la lecture ou l enregistrement Avec certains lecteurs de DVD ou graveurs de DVD HDD DVR une double pression sur cette touche peut donner lieu à l ouve...

Page 140: ...ge Commande la pause et l arrêt sur image 4 E Enregistrement Démarre l enregistrement 5 SOURCE a Met le magnétoscope sous ou hors tension 6 H Arrêt Arrête le défilement de la bande 7 I Lecture Démarre la lecture 8 V Avance rapide Fait avancer la bande rapidement et permet la recherche d image 9 S Rembobinage Rembobine la bande et permet la recherche d image 1 1 2 3 4 5 6 7 8 9 PC 0 2 3 4 INPUT INF...

Page 141: ...UE Avant toute utilisation du boîtier de télécommande veillez à sélectionner le mode télévision TV avec sa touche SELECT Reportez vous à la partie Commande d un autre appareil avec le boîtier de télécommande fourni page 64 Mise en service ou hors service du télétexte 1 Sélectionnez une chaîne de télévision ou une source extérieure fournissant une émission télétexte 2 Appuyez sur m pour afficher la...

Page 142: ...puyez sur m pour afficher le télétexte Si vous ouvrez une page de laquelle découlent des pages secondaires ces dernières sont automatiquement affichées dans l ordre 2 Pour abandonner le changement automatique des pages secondaires utilisez Vous pouvez alors changer manuellement les pages secondaires au moyen des touches REMARQUE Une pression sur w x provoque le changement de page et la disparition...

Page 143: ... pages 13 et 14 La balance est elle correctement réglée Reportez vous à la page 36 L image est tronquée La position de l image est elle correcte Reportez vous à la page 52 Le format d image choisi est il correct Reportez vous aux pages 54 et 55 Couleurs surprenantes couleurs délavées couleurs sombres ou mal alignées Réglez le ton de l image Reportez vous aux pages 32 à 35 La pièce n est elle pas t...

Page 144: ...a liaison AV 17 Masse pour la sortie vidéo 4 Masse commune pour audio 11 Non utilisée 18 Masse pour l entrée vidéo l entrée S Vidéo 5 Masse 12 Non utilisée 19 Sortie vidéo 6 Entrée audio gauche 13 Masse 20 Entrée vidéo entrée S Vidéo 7 Non utilisée 14 Masse 21 Blindage de la prise Prise péritel INPUT 3 1 Sortie audio droite 8 Commande audio vidéo 15 Entrée pour le Rouge 2 Entrée audio droite 9 Mas...

Page 145: ...mm P Poids 51 0 kg 34 7 kg 29 6 kg Système couleur Analogique PAL SECAM NTSC 3 58 NTSC 4 43 PAL 60 Numérique PAL SECAM Fonction télévision Analogique Systèmes de réception B G D K I L L Tuner VHF UHF Chaînes E2 E69 F2 F10 I21 I69 IR A IR J Télévision par câble Hyper bande chaînes S1 S41 Préréglage automatique des chaînes 99 chaînes préréglage automatique repérage automatique classement automatique...

Page 146: ...Video Electronics Standards Association HDMI le logo HDMI et High Definition Multimedia Interface sont des marques de fabrique ou des marques déposées de HDMI licensing LLC Fabriqué sous licence de Dolby Laboratories Le terme Dolby et le sigle double D sont des marques commerciales de Dolby Laboratories Les noms de société ou d organisme sont des marques de commerce ou des marques déposées de leur...

Page 147: ...ose vorgesehen ist Falls der Netzstecker aufgrund einer abweichenden Ausführung nicht an die Netzsteckdose angeschlossen werden kann muss ein Elektriker mit der Installation einer vorschriftsmäßigen Netzsteckdose beauftragt werden Beim Erdungsstift handelt es sich um eine Sicherheitsvorrichtung die auf keinen Fall umgangen oder außer Kraft gesetzt werden darf D3 4 2 1 6_A_Ge WARNUNG Keine Quellen ...

Page 148: ...ng zu beachten 21 06 Fernsehempfang Ein Ausschalten 22 Kanäle ändern 23 Abrufen von Favoritenkanälen analog 24 Lautstärke und Toneinstellungen 24 Gebrauch der Multiscreen Funktionen 26 Bildschirmteilung 26 Standbild 27 07 Menüeinstellung Menü Übersicht 28 AV Modus Menüs 28 PC Modus Menüs 28 Menü Bedienung 28 08 Grundeinstellungen Automatisches Programmieren von Fernsehkanälen 29 Verwendung der Fun...

Page 149: ...en 48 Timer manuell programmieren 49 Prioritätsregeln für überlappende Voreinstellungen 49 Vorprogrammierung von TV Programmen ändern löschen 50 Prioritäten für überlappende Vorprogrammierungen ändern 50 Andere praktische EPG Funktionen 51 EPG Springen 51 EPG Suche 51 11 Praktische Einstellmöglichkeiten Umschalten der vertikalen Ansteuerungsfrequenz nur AV Modus 52 Einstellen der Bildposition Nur ...

Page 150: ...n Audio Geräten 63 Anschließen von Steuerkabeln 64 Zu SR 64 Steuerung anderer Ausrüstung mithilfe der mitgelieferten Fernbedienung 64 Herstellungscodes 65 STB Set Top Box Steuertasten 66 DVD DVR Steuertasten 67 VCR Steuertasten 68 13 Videotext Funktionen Was ist Videotext 69 Grundlegender Videotext Betrieb 69 Ein und Ausschalten von Videotext 69 Wählen und Steuern von Videotextseiten 70 Anzeigen v...

Page 151: ...Bildschirm Einstellung BREITBILD oder VOLL über mindestens die dreifache Dauer der vorherigen Standbildwiedergabe ein normales bewegtes Bild wiederzugeben Schalten Sie das Display nach Benutzung des Plasma Fernsehers stets auf den Bereitschafts Modus Standby Grundregeln zur Aufstellung Der Plasma Fernseher Pioneer PureVision PDP 607XD PDP 507XD PDP 427XD zeichnet sich durch eine sehr flache Bauwei...

Page 152: ...er wahrgenommen werden Ventilatormotorgeräusche Die Drehzahl des Kühlventilatormotors steigt bei zunehmender Umgebungstemperatur des Plasma Fernsehers In diesem Fall kann der Ventilatormotor hörbar werden Haften Sie keine Gegenstände wie z B Etiketten oder Klebebänder am Produkt an Hierdurch könnte das Gehäuse verfärbt oder verkratzt werden Bei längerem Nichtgebrauch des Produkts Durch längerzeiti...

Page 153: ...nbrennen wird die Anzeigeposition automatisch etwas verändert wenn der Strom eingeschaltet oder der Eingang umgeschaltet wird Je nach Programminhalt können gewisse Bildteile nicht zu sehen sein Vermeiden einer Beschädigung des Bildschirms durch Einbrennen Sofern keine Urheberrechte verletzt werden empfiehlt es sich den ganzen Bildschirm zur Bildwiedergabe zu nutzen Siehe Seite 54 Die Energiesparfu...

Page 154: ...or Tritten geschützt sind und keine schweren Gegenstände darauf abgestellt werden Kontrollieren Sie die Kabel insbesondere an den Steckern und am Produkt 13 Der Plasmabildschirm enthält Glasteile Er kann brechen wenn er fallen gelassen oder Druck darauf ausgeübt wird Im Falle des Falles ist Vorsicht geboten um sich nicht an Scherben oder Splittern zu verletzen 14 Überlastung Netzsteckdosen und Ver...

Page 155: ... obige Seitenansicht Achten Sie darauf die Belüftungsöffnung an der Rückseite des Plasma Fernsehers nicht zu blockieren Installieren Sie den Plasma Fernseher unbedingt auf einer ebenen Unterlage da er Glasteile enthält Andere als die oben angegebenen Schraubenöffnungen sind nur für bestimmte Produkte zu verwenden Benutzen Sie diese keinesfalls zur Montage nicht spezifizierter Produkte Von einer Mo...

Page 156: ...s für Ihr Land bzw Gebiet geeignete Netzkabel ist mitgeliefert Schnellverschlussklemme x 3 Kugelband x 3 Garantiekarte Reinigungstuch Ferritkern Kabelbinder Zwei Mignonzellen AA Zwei Bedienungsanleitungen Fernbedienung Anschlussstiftpositionsblatt für die Montage des Plasma Fernsehers an der Wand nur für das Modell PDP 607XD ...

Page 157: ...chluss INPUT 2 SCART 12 Anschluss INPUT 3 SCART 13 Anschlusse INPUT 2 COMPONENT VIDEO Y PB PR 14 Anschluss SUB WOOFER OUTPUT 15 Anschlüsse AUDIO OUTPUT 16 Anschluss PC INPUT AUDIO 17 Anschluss CONTROL OUT 18 Anschlüsse für SPEAKERS rechts links 1 10 12 11 13 6 8 9 5 7 3 2 4 Vorderansicht PDP 607XD 1 Taste POWER 2 Anzeige POWER ON 3 Anzeige STANDBY 4 Anzeige TIMER 5 Fernbedienungssensor Seitenansic...

Page 158: ... INPUT 3 SCART 13 Anschlusse INPUT 2 COMPONENT VIDEO Y PB PR 14 Anschluss SUB WOOFER OUTPUT 15 Anschlüsse AUDIO OUTPUT 16 Anschluss PC INPUT AUDIO 17 Anschluss CONTROL OUT 18 Anschlüsse für SPEAKERS rechts links TIMER 5 4 6 8 9 7 10 12 11 13 ON STANDBY POWER 1 3 2 Vorderansicht PDP 507XD 1 Taste POWER 2 Anzeige POWER ON 3 Anzeige STANDBY 4 Anzeige TIMER 5 Fernbedienungssensor Seitenansicht 6 Taste...

Page 159: ...13 Anschlusse INPUT 2 COMPONENT VIDEO Y PB PR 14 Anschluss SUB WOOFER OUTPUT 15 Anschlüsse AUDIO OUTPUT 16 Anschluss PC INPUT AUDIO 17 Anschluss CONTROL OUT 6 8 9 7 10 12 11 13 5 1 TIMER ON STANDBY POWER 4 3 2 Vorderansicht PDP 427XD Von der Unterseite des Displays gesehen Von der Vorderseite des Displays gesehen 1 Taste POWER 2 Anzeige POWER ON 3 Anzeige STANDBY 4 Anzeige TIMER 5 Fernbedienungsse...

Page 160: ...den normalen Bildschirm zurück 14 Farbentasten Rot Grün Gelb Blau VIDEOTEXT Modus Wählt eine Seite 15 TV Extern Eingangsmodus Zum Springen zur Videotext Untertitelseite DTV Eingangsmodus Schaltet die Untertitel ein und aus 16 k VIDEOTEXT Modus Zeigt verdeckte Zeichen an 17 g Zum Einstellen des Ton Multiplexmodus 18 p y INFO TV Extern Eingangsmodus Zeigt die Kanaldaten an DTV Eingangsmodus Zeigt di...

Page 161: ...delle PDP 607XD und PDP 507XD Näheres zur Installation finden Sie in der den Lautsprechern beiliegenden Anleitung VORSICHT Betriebsumgebung Temperatur und Feuchtigkeit der Betriebsumgebung 0 C bis 40 C 32 F bis 104 F weniger als 85 relative Feuchtigkeit Kühlöffnungen nicht blockiert Stellen Sie dieses Gerät nicht an einem schlecht belüfteten Platz auf und auch nicht an einer Stelle wo es hoher Feu...

Page 162: ...ht herunterfallen oder umkippen kann Wenn derartige Vorkehrungen unterlassen werden könnte der Plasma Fernseher herunterfallen und Verletzungen verursachen Die Wahl der Sicherungsmittel gegen Umkippen wie z B Schrauben Haken Ketten usw hängt von der Beschaffenheit und Dicke der Montagefläche ab Bevor Sie sich für eine Sicherungsmethode und die entsprechenden Befestigungsteile entscheiden sollten S...

Page 163: ...e Lautsprecherkabel so dass sie keinem Druck oder Zug ausgesetzt sind 3 4 Europa außer UK und Irland UK und Irland Anbringen des Ferritkerns Um Störungen zu vermeiden bringen Sie den mitgelieferten Ferritkern wie abgebildet am Steckerende des Netzkabels an Verwenden Sie den mitgelieferten Kabelbinder um den Ferritkern gegen Verrutschen am Kabel zu sichern AC Netzkabel An Netzsteckdose An AC IN Mög...

Page 164: ...den HINWEIS Verwenden Sie die mitgelieferten Schnellverschlussklemmen nach Bedarf Anschließen einer Antenne Für die Anzeige eines klaren Bilds empfiehlt sich der Anschluss einer Außenantenne Nachstehend finden Sie eine kurze Beschreibung der bei Verwendung eines Koaxialkabels vorzunehmenden Anschlüsse Antennenkabel im Fachhandel erhältlich 3 4 OUT IN 3 4 Standard DIN45325 Stecker IEC169 2 Handelsü...

Page 165: ...n und ihr Winkel zum Sensor sollte nach rechts links oben und unten innerhalb von 30 Grad liegen HINWEIS Beim PDP 427XD ist das SR Logo unten rechts am Lautsprecher angebracht der Fernbedienungssensor befindet sich jedoch an der gleichen Stelle wie beim PDP 607XD PDP 507XD Beim Umgang mit der Fernbedienung zu beachten Setzen Sie die Fernbedienung keinen Stößen aus Setzen Sie die Fernbedienung auch...

Page 166: ...nung gewählt haben Siehe Steuerung anderer Ausrüstung mithilfe der mitgelieferten Fernbedienung auf Seite 64 Auch bei Nichtgebrauch empfiehlt es sich nicht den Plasma Fernseher vom Netz zu trennen Im Standby Modus empfängt der Plasma Fernseher automatisch Signale der Elektronischen Programmführung und des DTV Auto Updates Im Bereitschaftsmodus ist die Hauptstromversorgung zum System getrennt so da...

Page 167: ...Digitalkanälen siehe Einstellen von Programmoptionen Seite 42 P P kann nicht als Favoriten gespeicherte Analogkanäle nicht abrufen Bezüglich Speicherung von Analogkanälen als Favoriten siehe Schritte 13 und 14 unter Manuelle Einstellung Seite 29 Im DTV Modus kann P P auch Digitalkanäle die nicht als Favoriten gespeichert sind nicht abrufen Bezüglich Speicherung von Digitalkanälen als Favoriten sie...

Page 168: ... der Fernbedienung ausführen vergewissern Sie sich dass Sie den TV Modus mit der Taste SELECT an der Fernbedienung gewählt haben Siehe Steuerung anderer Ausrüstung mithilfe der mitgelieferten Fernbedienung auf Seite 64 Mit i i an der Fernbedienung Drücken Sie i zum Erhöhen der Lautstärke Drücken Sie i zum Vermindern der Lautstärke HINWEIS VOLUME am Plasma Fernseher funktioniert wie i i Mit e an de...

Page 169: ... In diesem Fall wird der Ton durch die Video Programmquelle bestimmt DVD HDD DISC NAVI Modus p Modus pp Modus MONO p pp MONO Mit g an der Fernbedienung Mit jedem Druck auf g wird MTS wie unten gezeigt umgeschaltet 1 AAA NICAM STEREO 10 00 1 AAA NICAM STEREO 10 00 1 AAA MONO 10 00 2 BBB NICAM p 10 00 2 BBB NICAM pp 10 00 2 BBB MONO 10 00 3 CCC NICAM MONO 10 00 3 CCC NICAM MONO 10 00 3 CCC MONO 10 0...

Page 170: ...g angezeigt werden Wenn Sie einen derartigen Versuch unternehmen erscheint eine Warnmeldung Mit der Multiscreen Funktion können Bilder aus Kombinationen von zwei externen Eingangsquellen Eingang 1 bis 5 PC nicht angezeigt werden Bilder aus den folgenden Eingangsquellenkombinationen können angezeigt werden Analog TV und Digital TV Analog TV oder Digital TV und externe Quelle Eingang 1 bis 5 PC Wenn...

Page 171: ...dbild während der linke Bildschirm ein bewegtes Bild zeigt 2 Drücken Sie d erneut um die Funktion wieder aufzuheben HINWEIS Festhalten eines Bilds ist im Doppelbildschirm und im Bild in Bild Modus nicht möglich Wenn diese Funktion nicht verfügbar ist erscheint eine Warnmeldung Bevor Sie weitere Bedienungsschritte mit der Fernbedienung ausführen vergewissern Sie sich dass Sie den TV Modus mit der T...

Page 172: ...derer Ausrüstung mithilfe der mitgelieferten Fernbedienung auf Seite 64 Home Menu Gegenstand Seite Bild AV Wahl 32 Kontrast 32 Helligkeit 32 Farbsättigung 32 Tint 32 Schärfe 32 Profi Einstellungen 33 35 Rückstellen 33 Ton Höhen 36 Bass 36 Balance 36 Rückstellen 36 FOCUS 36 Front Surround 36 Kopfhörer Leistung 37 Sub Lautstärke 37 Energiesparmodi Energiesparmodus 37 Kein Signal aus 37 Keine Bedienu...

Page 173: ... automatischen Installation führen Sie die folgenden Schritte 1 bis 3 aus À Drücken Sie HOME MENU Á Wählen Sie Grundeinstellungen dann ENTER Â Wählen Sie Autoinstallation dann ENTER Die Passwort Eingabeanzeige erscheint Geben Sie Ihr vierstelliges Passwort mit den Tasten 0 bis 9 ein Wenn kein Kanal gefunden werden konnte prüfen Sie die Antennenanschlüsse und starten Sie die automatische Installati...

Page 174: ...es Decoders und Wahl eines Decoderanschlusses liefert diese Funktion unter Umständen kein gutes Resultat Einstellen der Kindersicherung Fernsehkanäle die durch die Kindersicherung geschützt sind können weder abgestimmt noch betrachtet werden 1 Wiederholen Sie die Schritte 1 bis 6 für Manuelle Einstellung Nach Wahl eines Kanals mit Programmplatz Eingabe führen Sie die folgenden Schritte durch 2 Wäh...

Page 175: ...cken Sie HOME MENU 2 Wählen Sie Grundeinstellungen dann ENTER 3 Wählen Sie Analog TV Konfigurieren dann ENTER Die Passwort Eingabeanzeige erscheint Geben Sie Ihr vierstelliges Passwort mit den Tasten 0 bis 9 ein 4 Wählen Sie Sortieren dann ENTER Die Anzeige für Sortieren erscheint 5 Wählen Sie den zu verlegenden Kanal dann ENTER 6 Wählen Sie die gewünschte neue Position dann ENTER Der Sortiervorga...

Page 176: ... sehr scharfes Bild mit maximalem Kontrast In diesem Modus kann die Bildqualität nicht manuell angepasst werden Diese Option wird von einem externen Eingang und Fernseh Eingangsquellen geteilt FILM Für einen Film Diese Option wird von einem externen Eingang und Fernseh Eingangsquellen geteilt SPIELE Senkt die Bildhelligkeit um das Betrachten angenehmer zu machen Diese Option wird von einem externe...

Page 177: ...N und wiederholen dann die Schritte 7 und 8 Durch Drücken von wird der Einstellposten direkt weitergeschaltet 9 Drücken Sie HOME MENU um das Menü zu verlassen Verwendung von CTI 1 Drücken Sie HOME MENU 2 Wählen Sie Bild dann ENTER 3 Wählen Sie Profi Einstellungen dann ENTER 4 Wählen Sie Farbeinstellungen dann ENTER 5 Wählen Sie CTI dann ENTER Gegenstand Taste Taste Kontrast Zum Vermindern des Kont...

Page 178: ... Wählen Sie den gewünschten Parameter dann ENTER 7 Drücken Sie HOME MENU um das Menü zu verlassen Beseitigen von Bildrauschen 1 Drücken Sie HOME MENU 2 Wählen Sie Bild dann ENTER 3 Wählen Sie Profi Einstellungen dann ENTER 4 Wählen Sie NR dann ENTER 5 Wählen Sie einen Einstellpunkt dann ENTER Sie können DNR MPEG NR oder BNR wählen 6 Wählen Sie den gewünschten Parameter dann ENTER CTI Sorgt für Bil...

Page 179: ... Einstellungen Aus Deaktiviert MPEG NR Hoch MPEG NR verstärkt Mittel Standard MPEG NR Tief MPEG NR gemäßigt BNR Trägt zur Rauschverminderung bei Bildern mit hoher Auflösung bei BNR steht für Block Noise Reduction Unterdrückung von Blockbildungsstörungen Einstellungen Aus Deaktiviert BNR Ein Aktiviert BNR Dynamischer Kontrast Betont den Bildkontrast sodass der Unterschied zwischen Helligkeit und Du...

Page 180: ...fhörers für Klangwiedergabe über Lautsprecher wirksam Front Surround Liefert dreidimensionale Klangeffekte und oder tiefe satte Bässe 1 Drücken Sie HOME MENU 2 Wählen Sie Ton dann ENTER 3 Wählen Sie Front Surround 4 Wählen Sie den gewünschten Parameter 5 Drücken Sie HOME MENU um das Menü zu verlassen HINWEIS WOW bezeichnet einen Zustand in dem FOCUS aktiviert ist und TruBass SRS für Front Surround...

Page 181: ...das Menü Home wählen wenn die Eingangsquelle ein PC ist Beim Umschalten des Energiesparmodus kann es zu einer Änderung des Panel Betriebsgeräusches kommen Dies ist normal Kein Signal aus nur AV Modus Schaltet das System automatisch in den Standby Modus wenn 15 Minuten lang kein Signal erhalten wird 1 Drücken Sie HOME MENU 2 Wählen Sie Energiesparmodi dann ENTER 3 Wählen Sie Kein Signal aus dann EN...

Page 182: ... Beschreibung Deaktiviert Werksvorgabe Schaltet das System nicht in den Standby Modus Aktiviert Schaltet das System in den Standby Modus wenn innerhalb von drei Stunden kein Vorgang ausgeführt wird Gegenstand Beschreibung Aus Werksvorgabe Kein Energiemanagement Modus 1 Schaltet das System auf den Bereitschaftsmodus wenn vom PC acht Minuten lang kein Signal erhalten wird Auch wenn Sie den Computer ...

Page 183: ...len ist jedes Mal das korrekte Passwort Seite 56 einzugeben Bei Empfang von DTV Rundfunkprogrammen startet automatisch der Bildschirmschoner wenn länger als 3 Minuten keine Bedienung erfolgt Betrachten eines Kanalbanners Ein Kanalbanner enthält Programmnamen Programm Start Endzeiten und sonstige Kanalinformationen 1 Drücken Sie TV DTV um den DTV Modus zu wählen 2 Drücken Sie p Ein Kanalbanner ersc...

Page 184: ...löscht zuerst alle Kanalinformationen und startet dann eine Kanalsuche Zum Abbrechen der laufenden Programmsuche drücken Sie HOME MENU HINWEIS Die Durchführung von Programm ersetzen erfordert einen zeitlichen Spielraum von mindestens 1 Stunde bis zur nächsten programmierten Aufnahme oder zur nächsten automatischen Aktualisierung Die Anzeige zur Eingabe eines Passworts erscheint nicht wenn die Pass...

Page 185: ...ngsversorgung 3 Wählen Sie Ein oder Aus HINWEIS DTV Konfigurierung kann nur bei DTV Empfang gewählt werden Werksvorgaben zurückrufen Mit dieser Funktion können Sie alle DTV Einstellungen auf die Werksvorgaben zurückstellen 1 Drücken Sie HOME MENU 2 Wählen Sie Grundeinstellungen dann ENTER 3 Wählen Sie DTV Konfigurierung dann ENTER 4 Wählen Sie Installation dann ENTER Die Passwort Eingabeanzeige er...

Page 186: ...nd aktivieren Sie die Favoritenfunktion Wenn Sie einen Kanal gesperrt haben lesen Sie unter Verwendung eines Passworts nur AV Modus auf Seite 56 nach und bestimmen Sie ein geeignetes vierstelliges Passwort HINWEIS Die Anzeige zur Eingabe eines Passworts erscheint nicht wenn die Passwort Funktion deaktiviert ist Einzelheiten hierzu finden Sie unter Verwendung eines Passworts nur AV Modus auf Seite ...

Page 187: ...4 von Einstellen von Programmoptionen 2 Wählen Sie Programmsortierung dann ENTER Das Sortiermenü erscheint 3 Wählen Sie den zu verlegenden Kanal dann ENTER 4 Wählen Sie die neue Position dann ENTER Der Sortiervorgang wird ausgeführt 5 Drücken Sie HOME MENU um das Menü zu verlassen HINWEIS Zum Ändern einer Seite im Sortiermenü unter Schritt 4 wählen Sie bitte auf dem Bildschirm über s t mit die Sei...

Page 188: ... dem vorgesehenen Update wird abgefragt ob Auto Aktualisierung starten soll oder nicht Wenn OK gewählt oder nicht innerhalb von 50 Sekunden geantwortet wird startet Auto Aktualisierung automatisch Zum Abbrechen einer laufenden Aktualisierung ist HOME MENU zu drücken DTV Konfigurierung kann nur bei DTV Empfang gewählt werden Update Zeit einstellen Sie können die Zeit einstellen zu der der Plasma Fe...

Page 189: ... Modul ein bestimmtes Verschlüsselungssystem unterstützt Ihr Plasma Fernseher unterstützt CA Module für den DVB Standard Bitte erkundigen Sie sich beim Dienstanbieter nach dem geeigneten CA Modul Bitte beachten Sie dass eine Smart Card eventuell nur für einen bestimmten Anbieter und damit eine begrenzte Spanne an Kanälen geeignet ist HINWEIS CA Module und Smart Cards sind bei PIONEER nicht inbegri...

Page 190: ...ezeigt werden 1 Erscheint wenn die Sendeplantabelle vorwärts oder rückwärts gescrollt werden kann 2 Zeitplan 3 Kanalliste 4 Hebt den aktuell gewählten Kanal hervor 5 Zeigt das für Aufnahme Betrachtung eingestellte Programm 6 Erscheint wenn im gleichen Zeitraum noch andere Programme häufig kurze geplant sind 7 Programmtitel 8 Zeigt das für Aufnahme Betrachtung eingestellte Programm wobei ein andere...

Page 191: ...ausliegenden Programmen prüfen Je nach Bedingungen kann die Übernahme der EPG Daten einige Zeit in Anspruch nehmen 3 Zum Einsehen weiterer Informationen momentan nicht angezeigt drücken Sie p Die Detail Informationen erscheinen im Sendeplanfenster Wenn noch weitere Informationen verfügbar sind wird Mehr angezeigt Drücken Sie die Taste BLAU um alle Informationen anzuzeigen Zum Verlassen der Detail ...

Page 192: ...ie Ja in einem Bestätigungsdialogfeld dann ENTER Die Auflistung der Timer Einstellungen mit Informationen über andere vorprogrammierte Programme erscheint Sie können die Voreinstellungen hier ändern dann ENTER Sie können die Voreinstellungen hier registrieren oder ENTER 4 Drücken Sie RETURN zum Zurückkehren zum EPG Bildschirm Der EPG Bildschirm wird mit den neuen Voreinstellungen aktualisiert Für ...

Page 193: ...10 Programme vorprogrammieren 10 Drücken Sie HOME MENU um das Menü zu verlassen HINWEIS Die vorprogrammierte Aufnahme Betrachtung startet sofort wenn das Vorprogrammieren weniger als drei Minuten vor Programmstart erfolgt Mit EPG vorgenommene Voreinstellungen werden automatisch in die Auflistung aufgenommen Bei durch das CA Modul eingeschränkter Betrachtung ist Aufnahme eventuell nicht möglich Pri...

Page 194: ...ern bzw löschen 1 Drücken Sie HOME MENU 2 Wählen Sie Grundeinstellungen dann ENTER 3 Wählen Sie DTV Konfigurierung dann ENTER 4 Wählen Sie Programm Timer dann ENTER Die Plantabelle wird angezeigt 5 Wählen Sie die zu bearbeitende Programmnummer Löschen Sie die Vorprogrammierung ROT Überarbeiten Sie die Einstellung ENTER 6 Stellen Sie den gewünschten Punkt ein 7 Schließen Sie die Einstellung mit ENT...

Page 195: ...iste für den angewiesenen Zeitpunkt erscheint EPG Suche 1 Drücken Sie GELB bei angezeigtem EPG Bildschirm Programmliste Detailinformationen und Suchergebnisse 2 Wählen Sie Datum 3 Wählen Sie den Suchtag innerhalb einer Woche 4 Wählen Sie Zeit 5 Wählen Sie die Such Uhrzeit 0 00 morgens bis 23 00 abends 6 Wählen Sie Programm 7 Wählen Sie zwischen Alles und Favoriten 8 Wählen Sie Sparte dann ENTER 9 ...

Page 196: ...nd Bildbreite Clock von Bildern von einem Personal Computer 1 Drücken Sie HOME MENU 2 Wählen Sie Weiterführende Einstellungen dann ENTER 3 Wählen Sie Automatische Einstellung dann ENTER Automatische Einstellung beginnt 4 Drücken Sie HOME MENU um das Menü zu verlassen HINWEIS Wenn Automatische Einstellung beendet ist wird Auto Setup abgeschlossen angezeigt Unter bestimmten Bedingungen kann Automati...

Page 197: ...oder RGB wählen 5 Drücken Sie HOME MENU um das Menü zu verlassen HINWEIS Wenn kein Bild erscheint oder die Bildfarben nicht stimmen geben Sie einen anderen Videosignaltyp vor Bezüglich der anzugebenden Signaltypen siehe Bedienungsanleitung für das entsprechende angeschlossene Gerät Einstellen des TV Systems nur AV Modus Wenn das Bild nicht klar herauskommt wählen Sie ein anderes TV System z B PAL ...

Page 198: ...sken an Dies kann ungleichmäßigen Verschleiß zur Folge haben Nach der Betrachtung sollte ein den ganzen Bildschirm ausfüllendes Video Programm wiedergegeben werden AV Modus PC Modus außer für XGA Signale PC Modus für XGA Signale Gegenstand Beschreibung 4 3 Für 4 3 Standard Bild An jeder Seite erscheint eine Maske VOLL 14 9 Für 14 9 komprimiertes Bild An jeder Seite erscheint eine dünne Maske KINO ...

Page 199: ...nde Einstellungen dann ENTER 3 Wählen Sie 4 3 Modus dann ENTER 4 Wählen Sie BREITBILD oder 4 3 dann ENTER BREITBILD 4 3 5 Drücken Sie HOME MENU um das Menü zu verlassen Ändern der Helligkeit an beiden Bildschirmseiten Seitenmaske Bei Wahl des Bildschirmformats 4 3 VOLL 14 9 oder KINO 14 9 für den AV Modus kann die Helligkeit der grauen Seitenmasken an den beiden Bildschirmseiten geändert werden HI...

Page 200: ...ngabe des Passworts beim Öffnen eines Menüs verlangt wird achten Sie darauf das Passwort richtig einzugeben 1 Geben Sie das korrekte vierstellige Passwort mit den Tasten 0 bis 9 ein HINWEIS Wenn dreimal ein falsches Passwort eingegeben wird erscheint Ungültiges Passwort und das Menü wird geschlossen Um die Passwort Eingabeanzeige zur Entsicherung des Passworts wieder abzurufen wählen Sie den gespe...

Page 201: ...Wählen Sie Deaktiviert dann ENTER 6 Drücken Sie HOME MENU um das Menü zu verlassen HINWEIS Durch das obige Verfahren wird das Passwort auf die Werksvorgabe 1234 rückgestellt Nachdem die Passwortfunktion deaktiviert worden ist können die Kindersicherungseinstellungen nicht geändert werden Bezüglich Kindersicherung siehe Seite 30 Nachdem die Passwortfunktion deaktiviert worden ist kann das Passwort ...

Page 202: ...Video Geräts verwenden Sie den Anschluss INPUT 2 Wenn Ihr Videorecorder fortgeschrittene AV Link Systeme Seite 60 für TV VCR Verbundbetrieb unterstützt können Sie den Videorecorder über ein voll verdrahtetes 21 Stift SCART Kabel an INPUT 2 oder 3 am Plasma Fernsehgerät anschließen Erweiterte AV Link Systeme Die Tunerdaten können vom Fernseher direkt in den Videorecorder gespeist werden Download vo...

Page 203: ...R 5 Wählen Sie Aktiviert dann ENTER 6 Drücken Sie HOME MENU um das Menü zu verlassen HINWEIS Der INPUT 4 HDMI Anschluss bedarf keiner Aktivierung dieser Anschluss kann nicht manuell deaktiviert werden Angeben des Typs der digitalen Videosignale 1 Wiederholen Sie die Schritte 1 bis 3 für Aktivieren des HDMI Anschlusses 2 Wählen Sie Video dann ENTER 3 Wählen Sie den Digital Video Signaltyp dann ENTE...

Page 204: ...e Fernbedienung des angeschlossenen Videorecorders eine WYSIWYR Taste besitzt startet die Aufnahme automatisch auf Drücken dieser Taste Download der Voreinstellungen Die vom Tuner des Plasma Fernsehers voreingestellten Kanaldaten können über INPUT 2 oder 3 automatisch an den Tuner des angeschlossenen Audio Video Geräts z B Videorecorder übertragen werden Wählen des verfügbaren SCART Anschlusses fü...

Page 205: ...abe im Konfigurationsmenü Am DVD HDD Recorder DVR wählen Sie die Video Audio Eingangsquelle die dem externen Eingangsanschluss entspricht mit dem der Plasma Fernseher verbunden ist Genaueres hierzu lesen Sie bitte in der Bedienungsanleitung des Recorders nach Wählen Sie die Eingangsquelle am Plasma Fernseher nach dem Anschluss der mit dem Ausgang des DVD HDD Recorders DVR verbunden ist im obigen A...

Page 206: ...elekonsole oder Camcorder Anschließen einer Spielekonsole oder eines Camcorders Zum Anschluss einer Spielekonsole eines Camcorders oder eines anderen Audio Video Geräts verwenden Sie INPUT 5 Wiedergeben des Spielekonsolen oder Camcorderbilds Für Wiedergabe von einer Spielekonsole oder einem Camcorder drücken Sie INPUT 5 an der Fernbedienung oder INPUT am Plasma Fernseher um EINGANG 5 zu wählen HIN...

Page 207: ... die Klangwiedergabe in neue Dimensionen führen HINWEIS Einzelheiten entnehmen Sie bitte der Bedienungsanleitung für das anzuschließende Audio Gerät Mit der momentanen Bildwiedergabe synchronisierte Audiosignale werden stets zu den Anschlüssen AUDIO OUTPUT ausgegeben Der Ton zu den auf dem Display wiedergegebenen Bildern wird ständig an den Anschluss SUBWOOFER OUTPUT ausgegeben Im DTV Modus erfolg...

Page 208: ...rer Ausrüstung mithilfe der mitgelieferten Fernbedienung Mit der mitgelieferten Fernbedienung können Sie auch andere angeschlossene Ausrüstung steuern Set Top Box STB DVD Player DVD HDD Recorder DVR oder VCR Bevor diese Funktion eingesetzt werden kann muss die mitgelieferte Fernbedienung mit dem Herstellungscode der zu steuernden Ausrüstung programmiert werden Wenn Sie die Ausrüstung dann steuern ...

Page 209: ...CANAL SATELLITE 003 HUMAX 004 PACE 1 005 PACE 2 006 QUALI TV 007 SKY DIGITAL DVD 100 PIONEER 1 Werksvorgabe 101 PIONEER 2 102 AKAI 103 DENON 104 HITACHI 105 JVC 106 KENWOOD 1 107 KENWOOD 2 108 PANASONIC 1 109 PANASONIC 2 110 PHILIPS 1 111 PHILIPS 2 112 SAMSUNG 113 SHARP 114 SONY 1 115 SONY 2 116 SONY 3 117 THOMSON 118 TOSHIBA 119 YAMAHA DVR 200 PIONEER 1 201 PIONEER 2 202 PIONEER 3 203 PANASONIC 2...

Page 210: ... der gewählten Funktion Zur Wahl von Posten bei Sendemenü oder Senderführung Bildschirmanzeige 5 EXIT Zum Verlassen der Sendemenü oder Senderführung Bildschirmanzeige 6 INFO Anzeige von Informationen zum momentanen Programm 7 SOURCE a Ein und Ausschalten der Set Top Box 8 MENU Zur Anzeige der Sendemenü Bildschirmanzeige 9 GUIDE Zur Anzeige der Senderführung Bildschirmanzeige 1 1 2 3 4 5 6 7 8 9 PC...

Page 211: ... 10 SOURCE a Zum Ein und Ausschalten des DVD Players oder DVD HDD Recorders DVR 11 MENU Zur Anzeige des DVD Menüs 12 DVD TOP MENU Mit dieser Taste wird das DVD Hauptmenü abgerufen 13 H STOPP Zum Stoppen der Wiedergabe oder Aufnahme Bei manchen DVD Playern oder DVD HDD Recordern DVR wird durch zweimaliges Drücken dieser Taste das CD DVD Fach geöffnet 14 I WIEDERGABE Startet Wiedergabe 15 V VORLAUF ...

Page 212: ...er 4 E AUFNAHME Startet Aufnahme 5 SOURCE a Ein und Ausschalten des VCR 6 H STOPP Stoppt den Bandlauf 7 I WIEDERGABE Startet Wiedergabe 8 V Bandvorlauf Bewirkt schnellen Bandvorlauf und gestattet Bildsuche 9 S Bandrücklauf Bewirkt Bandrücklauf und gestattet Bildsuche 1 1 2 3 4 5 6 7 8 9 PC 0 2 3 4 INPUT INFO INPUT 5 TV DTV SELECT RETURN MENU EXIT EPG HOME MENU TV DVD TOP MENU GUIDE DVD HDD DISC NA...

Page 213: ...ritte mit der Fernbedienung ausführen vergewissern Sie sich dass Sie den TV Modus mit der Taste SELECT an der Fernbedienung gewählt haben Siehe Steuerung anderer Ausrüstung mithilfe der mitgelieferten Fernbedienung auf Seite 64 Ein und Ausschalten von Videotext 1 Wählen Sie einen Fernsehkanal oder eine externe Eingangsquelle mit einem Videotext Programm 2 Drücken Sie m um den Videotext anzuzeigen ...

Page 214: ...eotext anzuzeigen Wenn Sie eine Seite öffnen die Unterseiten enthält werden die Unterseiten der Reihe nach automatisch angezeigt 2 Zum Verlassen des automatischen Unterseitenwechsels drücken Sie Sie können Unterseiten dann manuell wechseln indem Sie drücken HINWEIS Durch Drücken von w x wird die Seite gewechselt und die Unterseitenanzeige wird ausgeblendet Durch Drücken von wird der automatische U...

Page 215: ...XD PDP 507XD Siehe Seiten 13 und 14 Ist die Balance richtig eingestellt Siehe Seite 36 Bild ist verstümmelt Stimmt die Bildpositionierung Siehe Seite 52 Ist die richtige Bildschirmgröße gewählt Siehe Seiten 54 und 55 Verfärbung Farbe blass oder dunkel schlechter Farbabgleich Stellen Sie den Bildton ein Siehe Seiten 32 bis 35 Ist der Raum zu hell In einem zu hellen Raum kann das Bild dunkel aussehe...

Page 216: ...links 10 AV Link Steuerung 17 Erde für Ausgang Video 4 Gemeinsame Erde für Audio 11 Nicht belegt 18 Erde für Eingang Video Eingang S Video 5 Erde 12 Nicht belegt 19 Ausgang Video 6 Eingang Audio links 13 Erde 20 Eingang Video Eingang S Video 7 Nicht belegt 14 Erde 21 Steckerabschirmung SCART INPUT 3 1 Ausgang Audio rechts 8 Audio Video Steuerung 15 Eingang Rot Eingang Chroma S Video 2 Eingang Audi...

Page 217: ... mm B x 717 mm H x 115 mm T 1040 mm B x 679 mm H x 115 mm T Gewicht 51 0 kg 34 7 kg 29 6 kg TV System Analog PAL SECAM NTSC 3 58 NTSC 4 43 PAL 60 Digital PAL SECAM TV Funktion Analog Empfangssystem B G D K I L L Empfänger VHF UHF E2 E69ch F2 F10ch I21 I69ch IR A IR Jch CATV Hyperband S1 S41ch Autom Kanalvoreinstellung 99 ch Autom Kanalspeicherung Autom Kanalbezeichnung Autom Kanalsortierung STEREO...

Page 218: ...genes Warenzeichen der Video Electronics Standards Association HDMI das HDMI Logo und High Definition Multimedia Interface sind Warenzeichen oder eingetragene Warenzeichen von HDMI Licensing LLC Hergestellt unter Lizenz von Dolby Laboratories Dolby und das Doppel D Symbol sind Warenzeichen von Dolby Laboratories Namen der erwähnten Firmen oder Institutionen sind Warenzeichen oder eingetragene Ware...

Page 219: ...0 1540 U S A TEL 800 421 1404 PIONEER ELECTRONICS OF CANADA INC 300 Allstate Parkway Markham Ontario L3R OP2 Canada TEL 1 877 283 5901 PIONEER EUROPE NV Haven 1087 Keetberglaan 1 B 9120 Melsele Belgium TEL 03 570 05 11 PIONEER ELECTRONICS ASIACENTRE PTE LTD 253 Alexandra Road 04 01 Singapore 159936 TEL 65 6472 7555 PIONEER ELECTRONICS AUSTRALIA PTY LTD 178 184 Boundary Road Braeside Victoria 3195 ...

Reviews: