


FX-MG9727ZT/UC
107
5
6
7
8
5
6
7
8
C
D
F
A
B
E
Case
CD Mechanism Unit
Damper
Damper
Damper
Damper
Spring B
Spring B
Spring A
Spring A
Screw A
Screw A
Sheet
Sheet
Sheet
Sheet
Control Unit
(G2T)
Screw B
Screw B
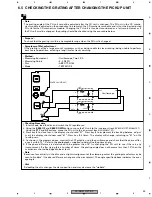
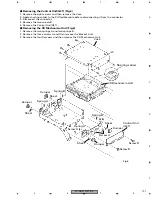
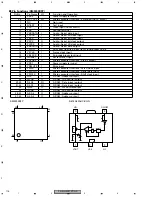
Fig.6
Shorting solder
-
Removing the CD Mechanism Unit (Fig.6)
1. Remove the two springs A and two springs B.
2. Remove the three screws A and then remove the Bracket Unit.
3. Remove the four Dampers and then remove the CD Mechanism Unit.
-
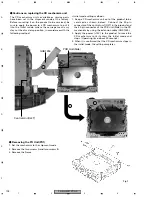
Removing the Control Unit(G2T) (Fig.6)
1. Remove the eight screws and then remove the Case.
2. Apply shorting solder to the PU flexible cable before disconnecting it from the connector.
3. Disconnect the connector.
4. Remove the two screws B.
5. Remove the Control Unit(G2T).
Summary of Contents for FX-MG9327ZT/EW
Page 7: ...FX MG9727ZT UC 7 5 6 7 8 5 6 7 8 C D F A B E ...
Page 10: ...FX MG9727ZT UC 10 1 2 3 4 1 2 3 4 C D F A B E 2 2 EXTERIOR FX MG9327ZT ...
Page 18: ...FX MG9727ZT UC 18 1 2 3 4 1 2 3 4 C D F A B E ...
Page 36: ...FX MG9727ZT UC 36 1 2 3 4 1 2 3 4 C D F A B E 3 6 KEYBOARD UNIT FX MG9727ZT MG9427ZT B ...
Page 38: ...FX MG9727ZT UC 38 1 2 3 4 1 2 3 4 C D F A B E 3 7 KEYBOARD UNIT FX MG9327ZT B ...
Page 49: ...FX MG9727ZT UC 49 5 6 7 8 5 6 7 8 C D F A B E ...
Page 54: ...FX MG9727ZT UC 54 1 2 3 4 1 2 3 4 C D F A B E A A MAIN UNIT ...
Page 55: ...FX MG9727ZT UC 55 5 6 7 8 5 6 7 8 C D F A B E A SIDE B ...
Page 57: ...FX MG9727ZT UC 57 5 6 7 8 5 6 7 8 C D F A B E B B KEYBOARD UNIT SIDE B A CN804 ...
Page 59: ...FX MG9727ZT UC 59 5 6 7 8 5 6 7 8 C D F A B E B B KEYBOARD UNIT SIDE B A CN804 ...
Page 61: ...FX MG9727ZT UC 61 5 6 7 8 5 6 7 8 C D F A B E C C CONTROL UNIT G2T SIDE B IC Q ...


