background image

8

En

*1 Compressed audio files only
*2 When you use the fast forward or reverse function while playing a VBR file, the playback time may 

be not correct.

The MIXTRAX function creates a non-stop mix of your music library, accompanied by 
illumination effects. For details on MIXTRAX settings, see page 18.

NOTES

iPhone needs to be connected with Pioneer ARC APP via USB for using this function (page 12).

This function is not compatible with an Android device connected via MTP.

Depending on the file/song, sound effects may not be available.

Turn the MIXTRAX function off if the illumination effects it produces interfere with driving.

1

Press 

3

/

MIX

 to turn MIXTRAX on/off.

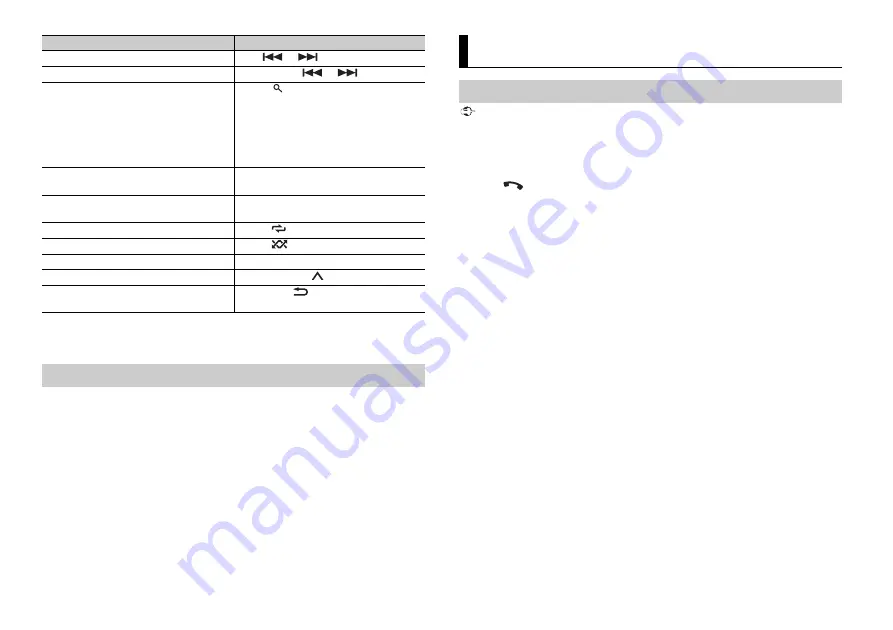
Select a track/song (chapter)

Press 

 or 

.

Fast forward or reverse*2

Press and hold 

 or 

.

Search for a file from a list (CD/USB only)

1

Press 

 to display the list.

2

Turn the 

M.C.

 dial to select the desired 

file (folder) name or category, then press 
to confirm.

3

Turn the 

M.C.

 dial to select the desired 

file, then press to confirm.
Playback starts.

View a list of the files in the selected folder/
category*1

Press the 

M.C.

 dial when a folder/category 

is selected.

Play a song in the selected folder/
category*1

Press and hold the 

M.C.

 dial when a folder/

category is selected.

Repeat play

Press 

6

/

.

Random/shuffle play

Press 

5

/

.

Pause/resume playback

Press 

4

/

PAUSE

.

Return to root folder (CD/USB only)*1

Press and hold 

1

/

.

Switch between compressed audio and CD-
DA (CD only)

Press 

BAND

/

.

About MIXTRAX (USB/iPhone only)

Purpose

Operation

 Important

If ten or more Bluetooth devices (e.g. a phone and separate audio player) are connected, they may not 
work properly.

1

Turn on the Bluetooth function of the device.

If you make a Bluetooth connection from the device, proceed to step 6.

2

Press 

 to display the phone menu.

3

Turn the 

M.C.

 dial to select [BT SETTING], then press to confirm.

4

Turn the 

M.C.

 dial to select [ADD DEVICE], then press to confirm.

The unit starts to search for available devices, then displays them in the device list.

To cancel searching, press the 

M.C.

 dial.

If the desired device is not in the list, select [RE-SEARCH].

If there is no device available, [NOT FOUND] appears in the display.

5

Turn the 

M.C.

 dial to select a device from the device list, then press to confirm.

Press and hold the 

M.C.

 dial to switch the displayed device information between the 

Bluetooth device address and device name.
If you make a Bluetooth connection from the unit, proceed to step 7.

6

Select [Pioneer BT Unit] shown in the device display.

7

Make sure the same 6-digit number appears on this unit and the device, then 
select “Yes” on the device.

NOTES

[DEVICE FULL] appears if the unit has already been paired with ten other devices. In this case, delete 
one of the paired devices. See [DEL DEVICE] in the Bluetooth settings (page 9).

Depending on the device, the PIN code is required in step 7. In this case, input [0000].

TIP

The Bluetooth connection can be also made by detecting the unit from the Bluetooth device. To do so, 
[VISIBLE] in the Bluetooth settings needs to be set to [ON]. For details on Bluetooth device operations, 
refer to the operating instructions supplied with the Bluetooth device.

Bluetooth 

Bluetooth connection

Summary of Contents for FH-S509BT

Page 1: ...English CD RDS RECEIVER FH S709BT FH S509BT Owner s Manual ...

Page 2: ...NING Do not attempt to install or service this product by yourself Installation or servicing of this product by persons without training and experience in electronic equipment and automotive accessories may be dangerous and could expose you to the risk of electric shock injury or other hazards Do not attempt to operate the unit while driving Make sure to pull off the road and park your vehicle in ...

Page 3: ...t eject AUX input jack 3 5 mm stereo jack Disc loading slot FH S509BT Remote Control Frequently used operations The available buttons vary depending on the unit Display window M C multi control dial BAND DISP display DISP OFF SRC source OFF USB port eject AUX input jack 3 5 mm stereo jack Disc loading slot SRC source VOLUME MUTE DISP display ...

Page 4: ...Press Ending a call Press Press Indication Description Appears when a lower tier of the menu or folder exists Appears when a Bluetooth telephone is connected to this unit by HFP Hands Free Profile page 8 and flashes while the telephone is on hold Appears when a Bluetooth audio player is connected to this unit by A2DP Advanced Audio Distribution Profile page 8 Appears when the button is pressed The...

Page 5: ...hen a speaker system for network mode is connected to the unit Do not use the unit in network mode when a speaker system for standard mode is connected to the unit This may cause damage to the speakers 1 Turn the M C dial to select the options then press to confirm To proceed to the next menu option you need to confirm your selection 2 QUIT YES appears when all the settings have been made To retur...

Page 6: ...ker output leads and RCA output If there is a full range speaker connected to the rear speaker output leads and the RCA output is not used you may select either REAR SUB W or REAR REAR 1 Press SRC OFF to select RADIO 2 Press BAND to select the band from FM1 FM2 FM3 AM SW1 or SW2 3 Press a number button 1 to 6 NOTE You can select a preset channel by pressing and turning the M C dial TIP The buttons...

Page 7: ...ing Android iPhone 1 Open the USB port cover 2 Plug in the USB device iPhone using an appropriate cable NOTE To automatically switch to USB source when a USB device iPhone is connected to the unit set USB AUTO to ON in the SYSTEM settings page 16 CAUTION Use an optional Pioneer USB cable CD U50E to connect the USB device as any device connected directly to the unit will protrude out from the unit ...

Page 8: ...ration Important If ten or more Bluetooth devices e g a phone and separate audio player are connected they may not work properly 1 Turn on the Bluetooth function of the device If you make a Bluetooth connection from the device proceed to step 6 2 Press to display the phone menu 3 Turn the M C dial to select BT SETTING then press to confirm 4 Turn the M C dial to select ADD DEVICE then press to con...

Page 9: ...ine is not running can drain the vehicle s battery Be sure to park your vehicle in a safe place and apply the parking brake before operation To make a phone call 1 Press to display the phone menu When two phones are connected a phone name appears first then a phone menu will display To switch to another phone press again 2 Turn the M C dial to select RECENTS or PHONE BOOK then press to confirm If ...

Page 10: ...re received while one of the phones is being used for a call Important Depending on the Bluetooth audio player connected to this unit the available operations will be limited to the following two levels A2DP Advanced Audio Distribution Profile can only play back songs on your audio player AVRCP Audio Video Remote Control Profile can perform functions such as playback pause select song etc The soun...

Page 11: ...he Bluetooth device name in the device list according to the connection order Press 1 or 2 App Mode For Android device users This function is compatible with devices that have Android OS 2 3 or later installed NOTE PIONEER IS NOT LIABLE FOR ANY THIRD PARTY APPS OR CONTENT INCLUDING WITHOUT LIMITATION THEIR ACCURACY OR COMPLETENESS THE CONTENT AND FUNCTIONALITY OF SUCH APPS ARE THE SOLE RESPONSIBIL...

Page 12: ... with Pioneer ARC APP Purpose Operation 5 Turn the M C dial to select one of the below then press to confirm Select IPHONE for iPhone Select ANDROID for Android device NOTE When the connection setting is changed a message that lets you know that the connection setting had been changed will appear in the display Press the M C dial and turn the M C dial to select SRC OFF YES then press to confirm Th...

Page 13: ...e resume playback Press 4 PAUSE Audio Adjustments Operation modes Adjusting the cut off frequency value and the slope value Purpose Operation 4 Turn the M C dial to select the speaker unit filter to be adjusted then press to confirm 5 Turn the M C dial to select HPF or LPF according to the speaker unit filter then press to confirm 6 Turn the M C dial to select an appropriate cut off frequency for ...

Page 14: ...buttons to seek the stations one by one manual tuning or select a station from the preset channels SEL DEVICE Connect a Bluetooth device in the list iPod Network mode is only available for FH S709BT S RTRV 1 effective for low compression rates 2 effective for high compression rates OFF Enhance compressed audio and restore rich sound PAUSE Pause or resume playback PLAY Start playback STOP Stop play...

Page 15: ...ve to later recall the following sound settings at their current values CROSSOVER SPEAKER LEVEL EQ SETTING POSITION TIME ALGNMNT D BASS SUBWOOFER LOAD SETTINGS Load the sound settings when you have already performed SAVE SETTINGS Menu Item Description 1 Not available when SW is selected in REAR SP in the INITIAL settings page 6 2 Not available when SUB W SUB W is selected in SP P O MODE in the INI...

Page 16: ...NE CONNECT S REMOTE 1 2 OFF PIONEER PRESET Select PIONEER or PRESET according to your wired remote control Menu Item Description 1 Depending on your car this function may not work properly In this case contact your dealer or an authorized PIONEER Service Station 2 Please use a commercially available wiring harness for each car model when PRESET mode is engaged and use a commercially available adap...

Page 17: ...g display appears 2 Set the primary color R red G green B blue and brightness level 0 to 60 You cannot select a level below 10 for all three of R red G green B blue at the same time You can also customize the preset colors Select one of the preset colors then press and hold the M C dial until the color setting display appears The CUSTOM setting is only available for KEY COLOR and DISP COLOR DIM SE...

Page 18: ... sound and bass level The flash pattern changes according to the sound level LOW PASS 1 to LOW PASS 6 The flash pattern changes according to the bass level RANDOM1 The flash pattern changes randomly according to the sound level mode and low pass mode RANDOM2 The flash pattern changes randomly according to the sound level mode RANDOM3 The flash pattern changes randomly according to the low pass mod...

Page 19: ...nd wiring that comes into contact with metal parts to protect the wiring Place all cables away from moving parts such as the shift lever and seat rails Place all cables away from hot places such as near the heater outlet Connections Installation Connections Ground wire POWER AMP Other devices Another electronic device in the car Metal parts of car s body 1 Not supplied for this unit ACC position N...

Page 20: ...ons when using the optional amplifier System remote control Connect to blue white cable Power amp sold separately Connect with RCA cables sold separately To rear output STD or middle range output NW Rear speaker STD or middle range speaker NW To front output STD or high range output NW Front speaker STD or high range speaker NW To subwoofer output Subwoofer System remote control Connect to blue wh...

Page 21: ...tely to arrange the lead NOTE Depending on the vehicle model the microphone cable length may be too short when you mount the microphone on the sun visor In such cases install the microphone on the steering column To install on the sun visor 1 Fit the microphone lead into the groove 2 Install the microphone clip on the sun visor Lowering the sun visor reduces the voice recognition rate To install o...

Page 22: ...nformation Troubleshooting Error messages FORMAT READ Sometimes there is a delay between the start of playback and when you start to hear any sound Wait until the message disappears and you hear sound NO AUDIO The inserted disc does not contain any playable files Replace the disc SKIPPED The inserted disc contains DRM protected files The protected files are skipped PROTECT All the files on the ins...

Page 23: ...D wipe the disc with a soft cloth outward from the center Condensation may temporarily impair the player s performance Let it rest for about one hour to adjust to a warmer temperature Also wipe any damp discs off with a soft cloth When using discs that can be printed on label surfaces check the instructions and the warnings of the discs Depending on the discs inserting and ejecting may not be poss...

Page 24: ...lder hierarchy Up to eight tiers A practical hierarchy is less than two tiers Playable folders Up to 1 500 This unit supports only the following iPhone models Supported iPhone software versions are shown below Older versions may not be supported Made for iPhone 7 iPhone 7 Plus iPhone SE iPhone 6s iPhone 6s Plus iPhone 6 iPhone 6 Plus iPhone 5s iPhone 5c iPhone 5 Operations may vary depending on th...

Page 25: ...enses LICENSE 2 0 Unless required by applicable law or agreed to in writing software distributed under the License is distributed on an AS IS BASIS WITHOUT WARRANTIES OR CONDITIONS OF ANY KIND either express or implied See the License for the specific language governing permissions and limitations under the License General Rated power source 14 4 V DC allowable voltage range 12 0 V to 14 4 V DC Gr...

Page 26: ...oise ratio 65 dB IEC A network AM tuner Frequency range 531 kHz to 1 602 kHz 9 kHz 530 kHz to 1 640 kHz 10 kHz Usable sensitivity 25 μV S N 20 dB Signal to noise ratio 60 dB IEC A network SW tuner Frequency range 2 300 kHz to 7 735 kHz 2 300 kHz to 2 495 kHz 2 940 kHz to 4 215 kHz 4 540 kHz to 5 175 kHz 5 820 kHz to 6 455 kHz 7 100 kHz to 7 735 kHz 9 500 kHz to 21 975 kHz 9 500 kHz to 10 135 kHz 1...

Page 27: ...27 En English ...

Page 28: ... 2017 PIONEER CORPORATION All rights reserved QRB3724 A ID ...

Reviews: