background image

34

Compatibility of this unit with progressive-scan TVs.

‘CONSUMERS SHOULD NOTE THAT NOT ALL HIGH
DEFINITION TELEVISION SETS ARE FULLY
COMPATIBLE WITH THIS PRODUCT AND MAY
CAUSE ARTIFACTS TO BE DISPLAYED IN THE
PICTURE. IN CASE OF 525 PROGRESSIVE SCAN
PICTURE PROBLEMS, IT IS RECOMMENDED THAT
THE USER SWITCH THE CONNECTION TO THE
“STANDARD DEFINITION” OUTPUT. IF THERE ARE
QUESTIONS REGRADING OUR TV SET
COMPATIBILITY WITH THIS MODEL 525p DVD
PLAYER, PLEASE CONTACT OUR CUSTOMER
SERVICE CENTER.‘

“525P DVD PLAYER is compatible with the
following Pioneer displays and monitors.”

PLASMA DISPLAY

•PDP-505HD

•PDP-502MX

PROJECTION MONITOR RECEIVER

•Pro-700HD

•Pro-710HD

•Pro-610HD

•Pro-510HD

•SD-641HD5

•SD-582HD5

•SD-532HD5

Note

If you connect a TV that is not compatible with a
progressive scan signal and choose one of the
progressive scan settings,

 you will not be able to see any

picture at all. If you accidently do this, set the 

VIDEO OUT

SELECT

 switch on the rear panel to 

COMPOSITE & S-

VIDEO

. With your TV connected using either the composite

or S-Video terminals, choose the 

[Interlace]

 setting in the

[Component Video]

 menu, then set the rear panel switch

back to 

COMPONENT

.

525 line Digital Progressive
Scan Compatible Video Output

– DVD

Connecting to a progressive scan-
compatible TV

Compared to a standard interlaced TV picture, a
progressive scan TV is capable of stable, flicker-free
images.
Set only if you connected the 

COMPONENT VIDEO

OUT

 jacks to a progressive scan-compatible TV or

monitor.
When making component video connections, make sure
to set the 

VIDEO OUT SELECT

 switch on the rear panel

of the player to the right to assign component video
output (

page 17

).

When a progressive-scan video signal is output, the

“PROGRESSIVE”

 indicator lights in the display.

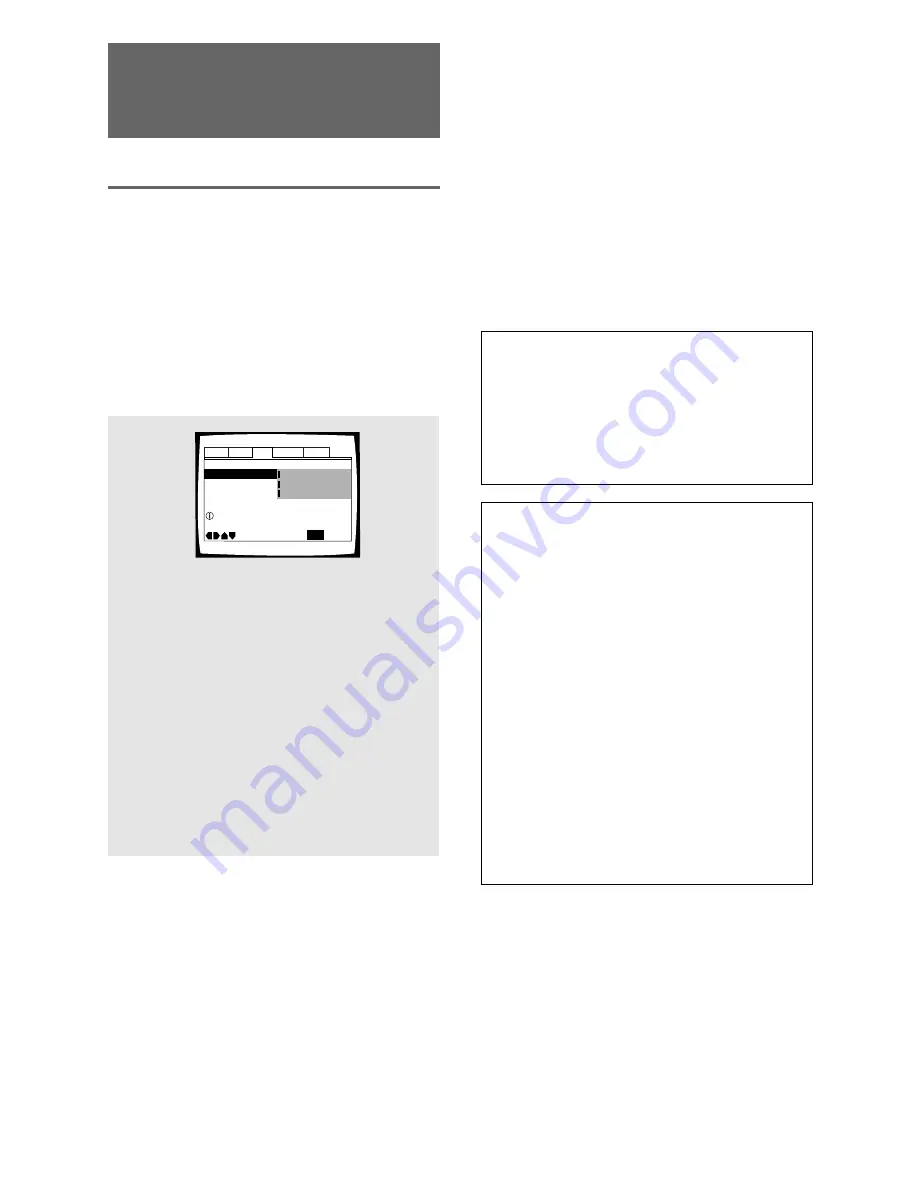
Make changes to the 

[Component Video]

 setting in the

Setup screen 

Video

 menu.

Audio1 Audio2

General

Language

Video

Picture Quality –

TV Screen –

Move

Exit

 Interlace
 Progressive
 Auto Progressive

SETUP

Select Interlace or Progressive
output Component Video

Component Video

 16:9(Wide)

Settings:

Interlace*

Use this setting with regular TVs that are not
compatible with progressive scan.

Progressive

Use this setting with TVs and monitors that
have progressive scan component video
inputs. Check the TV's instruction manual if
you are not sure about this.

Auto Progressive

Switches to progressive scan when 16:9
DVD discs are played, 4:3 DVD discs uses
interlace setting. Your TV/monitor must be
compatible with progressive scan to use this
setting.

Factory setting

Tip:

If this player is set to output progressive-scan video, it’s
possible that the picture will appear stretched when playing
discs recorded in 4:3 format. This happens when the TV’s
aspect ratio is set at 16:9. To see the picture in its correct
aspect ratio, change the TV setting to 4:3.
If your TV can be switched between 4:3 and 16:9, set this
player to 

[Interlace]

 or 

[Auto progressive]

. In Auto

progressive mode, 4:3 discs will be played in Interlace mode,
while discs that are recorded in both 4:3 and 16:9 will play in
interlace mode during the 4:3 sections, and in progressive
mode during the 16:9 parts. Switch your TV’s aspect ratio to
the most suitable setting (for more details, see the manual that
came with your TV). When set to 

[Auto progressive]

, you may

see picture disturbance when this player (and the TV) switches
between progressive and interlace modes. This is not a
malfunction of either this player or the TV. Picture disturbance
should only occur when switching from a menu screen to the
main feature, for example.

Summary of Contents for Elite DV-C36

Page 1: ...DV C36 Operating Instructions DVD PLAYER ...

Page 2: ...erence in a residential installation This equipment generates uses and can radiate radio frequency energy and if not installed and used in accordance with the instructions may cause harmful interference to radio communications However there is no guarantee that interference will not occur in a particular installation If this equipment does cause harmful interference to radio or television receptio...

Page 3: ...l only fit into a grounding type power outlet This is a safety feature If you are unable to insert the plug into the outlet contact your electrician to replace your obsolete outlet Do not defeat the safety purpose of the grounding type plug POWER CORD PROTECTION Power supply cords should be routed so that they are not likely to be walked on or pinched by items placed upon or against them paying pa...

Page 4: ...io Max 74 minutes 12 cm 5 in single sided 8 cm 3 in single sided 12 cm 5 in single sided 8 cm 3 in single sided Digital audio Max 20 minutes 1 1 525 line digital progressive scan component video output Compared to standard interlaced video progressive scan effectively doubles the amount of video information fed to your TV or monitor The result is a stable flicker free image Check your TV monitor f...

Page 5: ... 2 Spanish ANGLE 3 4 ANGLE 2 4 Easy setup and adjustment using on screen menus Press SETUP on the remote control to open the Setup screen and you ll find setting up and adjusting the system easy to do with on screen menus conveniently organized and arranged Additionally on screen information i appears to clarify the functions and explain the options available Below are just a few examples Answer a...

Page 6: ... described in the section starting on page 26 are also used in a number of other functions Learning the procedure for operating these menus will make using this player much easier and more enjoyable Play a disc When all the connections and setups have been made you are ready to play a DVD Video CD or CD with the player The section Getting Started Using Your DVD Player starting on page 21 outlines ...

Page 7: ...rogressive Scan Component Video Output 34 Selecting Picture Quality Appropriate for Program Content 35 Switching the S Video Output 35 Selecting the Type of Paused Image to Display 35 Setting the Position of the On screen Display 35 Viewing from a Desired Camera Angle Multi Angle 36 Setting the Language Options 37 Setting the on screen display OSD language 37 Setting Language and Subtitle Preferen...

Page 8: ...mote control point it at the remote sensor Î located on the player s front panel The remote control can be used up to 7 m 23 feet from the player and within a 30 angle on each side of the sensor Before Using Checking Accessories Please confirm that the following were received with the player Audio cord Video cord Power cord Remote control unit AA R6P dry cell batteries Operating instructions this ...

Page 9: ...ce enables playback to resume from a point shortly before the location where it stopped Pressing twice causes the disc to return to the beginning of the disc if playback starts again page 25 0 forward button Press to advance to chapters tracks Press and hold to perform fast forward scanning page 24 4 1 reverse button Press to go back to previous chapters tracks Press and hold to perform reverse pl...

Page 10: ... screen menu operation is being performed 0 REMAIN indicator Indicates that the remaining playback time of a title or chapter track is being displayed TOTAL indicator Indicates that the total number of titles chapters or tracks is being displayed page 55 TRK indicator Indicates a track number is being displayed CHP indicator Indicates a chapter number is being displayed Disc tray Disc indicator me...

Page 11: ...component video signal output depending on the connections you make page 17 5 AC IN power cord connection terminal Use to connect the power cord to the wall outlet page 15 6 CONTROL IN jack Use to connect this player to another component bearing the Pioneer Î mark This lets you control this unit as though it were a component in a system Player operations are then performed by pointing the remote c...

Page 12: ...revious During playback press PREV 4 to go back to a previous chapter track pages 23 24 0 STOP 7 button Press to stop playback Pressing once enables playback to resume from a point shortly before the location where it was stopped Pressing twice causes the disc to return to the beginning of the disc when playback starts again page 25 STEP SLOW e E buttons Press STEP SLOW E during playback to view s...

Page 13: ...s or to set items highlighted in a menu _ NEXT button During playback press NEXT to advance to the next chapter track pages 23 24 NAMES AND FUNCTIONS PAUSE 8 button Press to pause playback of a disc Press again to resume playback page 46 PLAY 3 button Press to start disc playback pages 21 25 1 REV FWD fast reverse forward buttons During playback of DVD and Video CD press FWD to perform fast forwar...

Page 14: ...l Confirm that the TV is responding to the programmed code On the remote press the TV button If the TV switches on or into standby if it was on previously then you have the correct code If nothing happens when you press the TV button start again from step 1 using a different code Some makers have several codes Try each one until you find the one that works Preset Code List DVD TV switch Code Manuf...

Page 15: ...ower outlet The video output on this player uses copy protect circuitry to prevent the video playback on DVDs from being copied If you connect the player to a TV via a VCR or record and play back the contents of a disc with a VCR the playback picture may not be normal Connecting Your DVD Player Unlike any other audiovisual media format DVD offers a wide array of audio and video output options whic...

Page 16: ... the digital audio settings can be adjusted manually in the Setup screen Audio 1 menu page 28 29 DIGITAL OUT Optical The digital signal is transmitted as light pulses through a fiber optic cable Use to connect to an AV amplifier or receiver with built in Dolby Digital DTS or MPEG decoder Use a fiber optic cable not supplied to connect the DIGITAL OUT OPT optical digital output on the player to the...

Page 17: ...T jack on the player to the video input on the TV or monitor Be sure to match the color of the plug with the color of the jack yellow When using this jack be sure to set VIDEO OUT SELECT to the left position COMPONENT VIDEO OUT Interlace Progressive scan Make component video connections to a TV or monitor with component inputs to produce a higher quality video image Use a component video cable or ...

Page 18: ...or button to select Auto Start Off at this time The Setup Navigator function may still be used at a later time in manual Setup screen menu operation page 26 4 Press ENTER The selection is entered and the next Setup Navigator screen appears Use steps 3 and 4 as a basis for entering selections on the all of the Setup Navigator screens described on the following pages To change the answer to a prior ...

Page 19: ...nguage OSD Language Español français English Language Audio1 Audio2 General Language Video Setting the TV screen size The TV Type screen establishes the size or more appropriately the width to height ration of your television or monitor The width to height ratio of conventional TVs is 4 3 while the width to height ratio of wide screen and high definition TVs is 16 9 This width to height ratio is c...

Page 20: ... made no digital connections select Not Connected Settings Dolby Digital Dolby Digital DTS Dolby Digital MPEG Dolby D DTS MPEG PCM Not Connected Factory setting Setting compatibility with 96 kHz output The 96 kHz PCM Audio screen establishes whether or not the AV component the player is connected to is capable of processing an audio signal with a sampling rate of 96 kHz This screen only appears if...

Page 21: ...ut if you make digital audio connections to a receiver or amplifier that does not have a built in decoder Check that the digital audio output format selected in the Audio 1 menu corresponds to the audio components you have made connections to page 28 29 The TV screen size is factory set to present the wide screen format 16 9 aspect ratio If you have a standard TV screen 4 3 aspect ratio this setti...

Page 22: ...C SKIP button Do not obstruct the movement of the disc tray 3 Press EXCHANGE The disc tray goes back in Changing discs DVD Video CD CD You can change any of the discs not in the play position using the EXCHANGE button Because the disc in the play position is unaffected you can use this button to change discs even during playback Disc number Note Always use the 0 OPEN CLOSE or EXCHANGE button to cl...

Page 23: ...ay back Video CDs without displaying menu screens When a Video CD with PBC is loaded press STOP 7 and then the number button of the track you want to play Auto Power on Function Pressing any of the below buttons when the power is standby automatically turns the power on PLAY 3 0 OPEN CLOSE DISC LAST MEMORY These buttons are provided on the main unit only 1 Highlight Clips 2 Chapter List 3 Commerci...

Page 24: ...s PLAY 3 Fast reverse scanning Press and hold REV 1 4 1 on the front panel during playback Release REV 1 when you reach the desired location Normal playback resumes When the Scan indicator on the screen changes from flashing to lit fast reverse scanning will continue even if the button is released When the desired location has been reached press PLAY 3 4 1 D VDPLA YER DVD STANDBY ON CD MODE FL DIM...

Page 25: ... the beginning when PLAY 3 is pressed again The display shows the disc type DVDs or Video CDs Press PLAY 3 Playback starts from the resume position Notes The actual restart position may be slightly before or after the resume position If you want to remove or change the disc but still want to resume playback from the last stopped position use the LAST MEMORY feature instead page 52 CAUTION When mov...

Page 26: ...lby Digital output mode Adjusting Audio and Video Settings Audio1 Audio2 General Language Video Dolby Digital Out Dolby Digital DTS Out Off 96kHz PCM Out 96kHz 3 48kHz MPEG Out MPEG 3 PCM SETUP Move Exit Setup audio Digital output format tone adjust continued Using the Setup Screen Menus The procedure on pages 26 and 27 describes how to operate the menus on the Setup screen These menus are used to...

Page 27: ...ent to know what settings are applicable to the different disc formats When the settings appear for each menu option the currently selected setting appears with the setting indicator highlighted in one of three colors blue green or yellow These colors correspond to what formats the menu option effects as shown in the table below Note If a setting applicable only to DVDs is changed while a Video CD...

Page 28: ...1 Audio2 General Language Video MPEG Out PCM Dolby Digital Out DTS Out 96kHz PCM Out Move Exit 96kHz 96kHz 3 48kHz Dolby Digital Off SETUP Change 96 kHz output mode Audio1 Audio2 General Language Video DTS Out This player is capable of outputting DTS digital audio for DVDs recorded in DTS When this player is connected to an AV component that has a built in DTS decoder select DTS If your system is ...

Page 29: ...al Language Video Dolby Digital Out DTS Out Off 96kHz PCM Out 96kHz 3 48kHz MPEG Out Move Exit MPEG 3 PCM MPEG Dolby Digital SETUP Change MPEG audio output mode Settings MPEG MPEG 3 PCM Factory setting Settings On Digital bitstream is output Off Digital bitstream is not output Factory setting Adjusting the Dynamic Range of the Audio Soundtrack DVD Audio DRC stands for Audio Dynamic Range Compressi...

Page 30: ... your personal preference If you have a wide screen TV select 16 9 Wide Widescreen 16 9 TV or monitor Standard screen format DVD When viewing a standard screen format DVD on a wide screen TV black bars may be automatically placed at the side of the screen to adjust to the DVD format Wide setting Wide screen format DVD Please note that there are some wide screen letter box formats that place black ...

Page 31: ...g the component video jacks and is set to progressive scan see the following sections for how to ajust the video quality page 32 Press VNR to turn video noise reduction on The VNR indicator lights when this function is on Press VNR again to turn video noise reduction off A B DISC 0 TOP MENU MENU STOP STEP SLOW ENTER 5 5 5 5 4 1 8 7 e E 3 REV FWD PREV NEXT RETURN VNR CLEAR C 1 2 3 4 5 6 7 8 9 0 10 ...

Page 32: ... be viewed while it is highlighted on the screen This may be useful in selecting an appropriate setting Memory1 and Memory2 are user programmable settings Refer to Adjusting the picture quality settings on the following page for more information on customizing your own picture quality settings 4 Press ENTER The new selection is set Note Each picture quality setting is defined by a number of indivi...

Page 33: ...to establish which memory location to save the new settings in Please note that if you select a location where settings have already been saved the old settings will be replaced by the new ones 7 When you are finished making adjustments press ENTER to establish the new settings To display all of the settings at once Pressing DISPLAY while the picture quality setting adjustment screen is displayed ...

Page 34: ...progressive scan video signal is output the PROGRESSIVE indicator lights in the display Make changes to the Component Video setting in the Setup screen Video menu Audio1 Audio2 General Language Video Picture Quality TV Screen Move Exit Interlace Progressive Auto Progressive SETUP Select Interlace or Progressive output Component Video Component Video 16 9 Wide Settings Interlace Use this setting wi...

Page 35: ...works when video output is set to interlace Audio1 Audio2 General Language Video On Screen Display Angle Indicator TV Screen Still Picture Move Exit 16 9 Wide Field Frame Auto SETUP Component Video Interlace S Video Out S2 Picture Quality Standard Audio1 Audio2 General Language Video Angle Indicator TV Screen Still Picture Move Exit 16 9 Wide Position Wide Position Normal Off SETUP Component Video...

Page 36: ... see clearly whether the playback picture is recorded in multiple angles or not Turn the angle indicator on or off in the Angle Indicator setting in the Setup screen Video menu in the Expert menu mode page 27 Note Even when the Angle Indicator setting is set to Off the indicator in the display panel of the player lights during multi angle playback Therefore it is possible to know when the multi an...

Page 37: ...sh français Español SETUP Select the On Screen Language Audio1 Language Note The OSD Language setting is factory set to English If you want English to be displayed it is not necessary to adjust this setting Settings English français Español Factory setting ADJUSTING AUDIO AND VIDEO SETTINGS SETTING THE LANGUAGE OPTIONS Selecting an audio language preference The audio language that you normally lis...

Page 38: ...pe for singing and accompaniment after referring to information on the disc jacket or accompanying material Audio 1 L Audio 2 R Audio Stereo Changing the Audio Language Multi Language Function DVD Dolby Digital PCM and other audio data can be recorded on DVDs in a number of languages or audio tracks letting you choose the desired language or audio Press AUDIO repeatedly to select the desired langu...

Page 39: ...t be possible with some discs In this case the mark will be displayed To clear subtitles during playback press SUBTITLE and then press CLEAR or press SUBTITLE until Off appears For some discs subtitle language selection can be made using the menu on the DVD In this case press MENU to display the DVD menu screen and then make your selection HELLO HOLA Subtitle 1 English Subtitle 2 Spanish SUBTITLE ...

Page 40: ... can be found on page 58 1 Use the cursor buttons to select Other and press ENTER The language selection screen appears 2 Use the cursor buttons 2 3 to select either List of Languages or Code 3 If you select List of Languages use the cursor buttons 5 to select the language For languages which are only shown as a code please refer to Language Code List on page 58 Audio1 Audio2 General Language Vide...

Page 41: ...e currently selected Audio Language Select Selected Subtitle to display the subtitles in the language set in the Subtitle Language setting Make changes to the Subtitle Off setting in the Setup screen Language menu in the Expert menu mode page 27 Selecting subtitles assist subtitles or no subtitles Expert Use this function to turn the subtitles on or off Additionally some DVDs provide assist subtit...

Page 42: ...he number buttons and ENTER has been pressed Audio1 Audio2 General Language Video Parental Lock Setup Menu Mode Basic Setup Navigator Move Exit Level Change Password Change SETUP Setup viewing restrictions Audio1 Audio2 General Language Video Parental Lock Register Code Number Move Exit Return SETUP Enter 4 Digit Code RETURN Audio1 Audio2 General Language Video Parental Lock Register Code Number M...

Page 43: ...up viewing restrictions Audio1 Audio2 General Language Video Parental Lock Level Change Move Exit Select 1 2 3 4 6 7 8 5 Return Level SETUP ENTER Set Parental Lock RETURN Setting the Parental Lock level Change the Parental Lock level to a higher or lower level according to the settings printed on the DVD disc jacket or accompanying documentation If you use the Condition Memory function to save the...

Page 44: ...ou like 4 Press ENTER to set the color as the background color Audio1 Audio2 General Language Video Screen Saver On Parental Lock Level 8 Setup Navigator Background Color Move Exit Blue Other Black SETUP Setup Menu Mode Expert Audio1 Audio2 General Language Video Background Color SETUP Move Exit ENTER Select Return RETURN Turning the Screen Saver On and Off Expert As a protective function against ...

Page 45: ... CD page 10 The DISC SKIP button is ineffective if all the other discs loaded are DVDs or Video CDs or if all the other disc trays are empty Although program play is not possible in CD mode it is possible to program a playlist When you start program playback however CD mode is canceled pages 50 51 Repeat and random play is possible in CD mode pages 48 49 To switch off CD mode Press CD MODE The but...

Page 46: ...back Slow playback is engaged During slow playback the speed of playback can be adjusted from 1 2 normal playback speed to 1 16 normal playback speed in four steps using STEP SLOW e and E 1 16 1 8 1 4 1 2 Press and hold STEP SLOW e during DVD playback Slow playback in the reverse direction is engaged In the reverse direction the playback speed cannot be adjusted To return to normal playback When v...

Page 47: ...orming a time search To select 21 minutes 43 seconds press 2 1 4 and 3 To select 1 hour 14 minutes press 7 4 0 and 0 3 Press PLAY 3 Playback of the selected title chapter or track starts When a time search is performed playback begins at the appointed time To perform a direct title or chapter track search using the number buttons Press the number buttons while the disc is stopped to select a title...

Page 48: ...at Off 2 To repeat random playback Press REPEAT once during random playback to repeat the random pages 49 To repeat a program Press REPEAT once during program playback to repeat the program pages 50 51 To cancel repeat play Press CLEAR Playback continues but the repeat function is canceled Repeat play of a specified section Press REPEAT A B at the beginning and end of the section you want to repea...

Page 49: ...d will play in a random order DVD discs loaded will be ignored To change titles chapters or tracks during random play Press NEXT and the next randomly selected track starts playing Press PREV 4 and playback of the current track starts again from the beginning To stop random play Press CLEAR This returns you to normal playback of chapters tracks in order from the chapter track currently playing Not...

Page 50: ...s and CDs a track number To enter title track 6 press 6 To enter title track 14 press 1 4 Notes If the current disc is a DVD and you want to program chapters proceed to the next step If the current disc is a Video CD or CD or if you want to program entire titles on a DVD proceed to step 7 5 Use the cursor buttons 3 to select the Chapter field 6 Use the number buttons to enter the chapter numbers i...

Page 51: ...lete using the PREV 4 or NEXT buttons 41 or on the front panel cannot be used to perform this operation 3 Use the cursor buttons 5 to select the step you want to delete 4 Press CLEAR 5 Press PROGRAM to exit the program screen To clear the entire program Pressing CLEAR when the disc is stopped will clear all program data To stop program play Press STOP 7 Notes If a chapter is programmed for a disc ...

Page 52: ... those points are recalled the next time they are played back With Video CDs the location in playback where LAST MEMORY was pressed is cleared when the disc is changed or ejected Resuming playback from where LAST MEMORY was pressed 1 Load a disc that has a Last Memory point memorized Some DVDs will start playback automatically when loaded In this case press STOP 7 to stop playback When a Last Memo...

Page 53: ...rased in chronological order from the least recently memorized Subsequently if you load a disc with erased settings the settings of the most recently played disc are used If you make changes to any of the settings memorized in Condition Memory press CONDITION MEMORY during playback to memorize new settings Switching of the multi language mode etc is automatic on some discs Memorizing Settings for ...

Page 54: ...display the time remaining on the disc When you release the button the information disappears Notes Depending on the format and type of disc being used not all screens may be displayed When the Angle indicator is being displayed on screen during playback of DVDs that contain multi angle information the disc number is hidden by the angle mark TITLE information Top Row disc number title and chapter ...

Page 55: ...dby to on All program memory saved settings from functions such as Last Memory and Condition Memory are cleared and all Setup screen menus are returned to factory settings Note When playing Video CDs in PBC mode or unfinalized CD Rs not all the above information is displayed CD Display off Track Information Top Row disc number track number track time Bottom Row remaining time of current track and ...

Page 56: ...ause it to malfunction Gently wipe from the inside toward the outer edge Do not wipe in a circular direction Concentric scratches in the disc groove tend to cause noise Never use discs with special shapes CD s with special shapes heart shaped CDs octagonal CDs etc cannot be played on this set Attempting to do so may damage the set Do not use such CDs After using discs store them upright After play...

Page 57: ...n this happens the player s performance will be impaired To prevent this let the player stand in its new surroundings for about an hour before switching it on or make sure that the room temperature rises gradually Condensation may also form during the summer if the player is exposed to the breeze from an air conditioner In such cases change the location of the player Switch POWER to STANDBY when n...

Page 58: ...c kl Cambodian km Kannada kn Kashmiri ks Kurdish ku Kirghiz ky Latin la Lingala ln Laothian lo Lithuanian lt Latvian lv Malagasy mg Maori mi Macedonian mk Malayalam ml Mongolian mn Moldavian mo Marathi mr Malay ms Maltese mt Burmese my Nauru na Nepali ne Norwegian no Occitan oc Oromo om Oriya or Panjabi pa Polish pl Pashto Pushto ps Quechua qu 0721 0801 0809 0818 0821 0825 0901 0905 0911 0914 0919...

Page 59: ... setting that was changed only applies to DVD performance The setting will be effective the next time a DVD is loaded Settings are canceled When the power is turned off by power failure or by unplugging the power cord settings will be canceled Before unplugging the power cord press STANDBY ON and check that OFF disappears in the display No picture The rear panel s VIDEO OUT SELECT switch setting i...

Page 60: ...kHz PCM Out in the Audio 1 menu to 96kHz 3 48 kHz pages 16 28 The disc is dirty Refer to Disc Care page 56 The connection plugs are not inserted fully into the terminals or are not connected Check that all connection plugs are firmly inserted The connection plug or terminal is dirty Check that the plugs and terminals are wiped clean of dirt etc Audio cable connection is wrong Check to make sure th...

Page 61: ... an AV amplifier or Dolby Digital decoder to enjoy the sound of Dolby Digital soundtracks DTS DTS stands for Digital Theater System DTS is a surround system different from Dolby Digital that has become a popular surround sound format for movies In order to enjoy the benefits of DTS encoded discs the digital output jack either coaxial or optical of this player needs to be connected to an AV amplifi...

Page 62: ...le languages can be recorded on a DVD disc The subtitle function can be used to select the language of your choice S video Connecting the S video output on the player to a TV or monitor with S video input via an S video cable produces clearer picture reproduction by sending separate signals for the luminance and the color These signals are then combined by the television to produce a better qualit...

Page 63: ...mes of sound So what sounds normal can actually be loud and harmful to your hearing Guard against this by setting your equipment at a safe level BEFORE your hearing adapts To establish a safe level Start your volume control at a low setting Slowlyincreasethesounduntilyoucanhearitcomfortably and clearly and without distortion Once you have established a comfortable sound level Set the dial and leav...

Page 64: ... INC 300 Allstate Parkway Markham Ontario L3R OP2 Canada PIONEER EUROPE NV Haven 1087 Keetberglaan 1 B 9120 Melsele Belgium TEL 03 570 05 11 PIONEER ELECTRONICS AUSTRALIA PTY LTD 178 184 Boundary Road Braeside Victoria 3195 Australia TEL 03 9586 6300 PIONEER ELECTRONICS DE MEXICO S A DE C V San Lorenzo 1009 3er Piso Desp 302 Col Del Valle Mexico D F C P 03100 TEL 5 688 52 90 When moving the unit B...

Reviews: