background image

Getting Started

04

20

En

Chapter 4

Getting Started

Switching on and setting up

When you switch the player on for the first time the Setup Navigator 
screen appears. We recommend using this to make a few basic 
player settings.

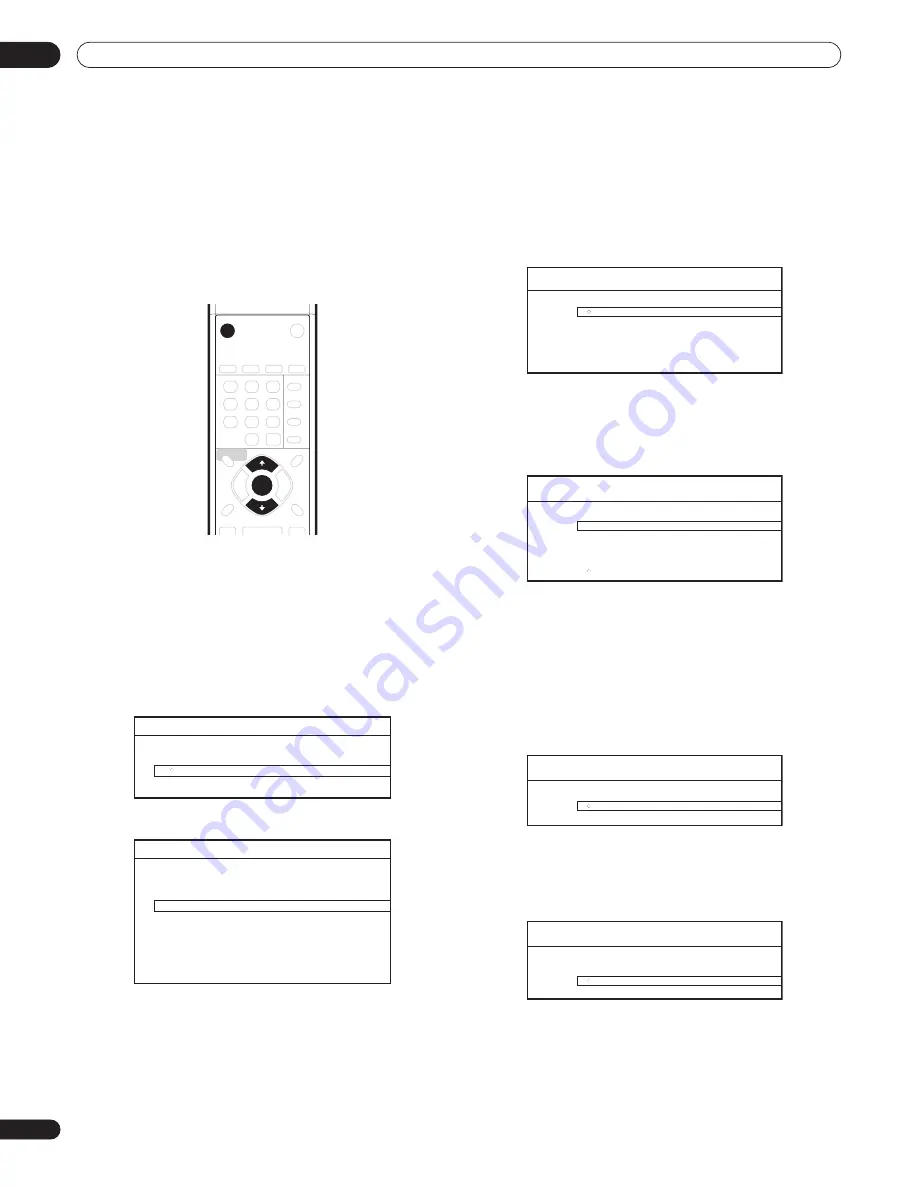
1

Switch on your TV and set the video input to this player.

2

Press the 

 STANDBY/ON button on the remote control or 

the front panel to switch on.

• It can take up to one minute for the unit to turn on.

• When you switch on for the first time, your TV should display the 

Setup Navigator screen. (If the Setup Navigator doesn’t appear, 
you can also access it from the Initial Setup menu; see page 43).

3

Use the 

/

 buttons to choose a language, then press 

ENTER.

4

Press ENTER to start setting up using the Setup Navigator.

• If you don’t want to use the Setup Navigator, press 

 to select 

Cancel

, then press 

ENTER

 to exit the Setup Navigator.

5

Use the 

/

 buttons to select the video output format 

then press ENTER.

If you connected this player to your TV using the HDMI connector, 
select from 

Auto

480i

 (interlaced), 

480p

 (progressive), 

720p

1080i

1080p

, or 

Source Direct

, then skip to step 

7

 (the aspect ratio 

will automatically be set to 

16:9 (Widescreen)

). Generally, the 

Auto


setting is recommended.

If you’re using an S-Video or composite video connection, select 

S-Video/Video only

.

If you’re using a component video connection, match the output 
setting with the capabilities of your TV. Select from: 

480i

480p

720p

1080i

 or 

Don’t Know

. If you select 

720p

 or 

1080i

, skip the 

next step since the aspect ratio will automatically be set to 

16:9 

(Widescreen)

.

6

Use the 

/

 buttons to select the aspect ratio of your TV 

then press ENTER.

If you have a widescreen TV, select 

16:9 (Widescreen)

; if you have a 

standard size TV, select 

4:3 (Standard)

.

7

Select ‘Finish Setup’ to accept the settings and exit the 

Setup Navigator, or ‘Go Back’ to go through the settings again.

You can run the Setup Navigator at any time by selecting it from the 
Options menu—see page 43.

STANDBY/ON

ENTER

Setup Navigator

Language

E n g l i s h
Fr a n ç a i s

Setup Navigator

Before using, make some simple
settings for the BD player.

S t a r t
C a n c e l

Please use the Initial Setup if you
want to make more detailed settings.

Setup Navigator

Auto

480i

480p

720p

1080i

1080p

Source Direct

Output Video Format

Setup Navigator

S-Video/Video only

480i

480p

720p

1080i

Don't Know

Output Video Format

Setup Navigator

16:9 (Widescreen)

4:3 (Standard)

TV Aspect Ratio

Setup Navigator

Finish Setup

Go Back

Setup is complete!
Enjoy using your BD player!

Summary of Contents for Elite BDP-HD1

Page 1: ...Blu ray Disc PLAYER BDP HD1 Operating Instructions RegisterYour Product on www pioneerelectronics com US www pioneerelectronics ca Canada ...

Page 2: ...rference by one or more of the following measures Reorient or relocate the receiving antenna Increase the separation between the equipment and receiver Connect the equipment into an outlet on a circuit different from that to which the receiver is connected Consult the dealer or an experienced radio TV technician for help D8 10 1 2_En Thank you for buying this Pioneer product Please read through th...

Page 3: ...t be sure the antenna or cable system is grounded so as to provide some protection against voltage surges and built up static charges Article 810 of the National Electrical Code ANSI NFPA 70 provides information with regard to proper grounding of the mast and supporting structure grounding of the lead in wire to an antenna discharge unit size of grounding conductors location of antenna discharge u...

Page 4: ... could cause a short circuit or electric shock Do not place the unit a piece of furniture etc on the power cord or pinch the cord Never make a knot in the cord or tie it with other cords The power cords should be routed such that they are not likely to be stepped on A damaged power cord can cause a fire or give you an electrical shock Check the power cord once in a while If you find it damaged con...

Page 5: ...want you listening for a lifetime We Want You Listening For A Lifetime Since hearing damage from loud noise is often undetectable until it is too late this manufacturer and the Electronic Industries Association s Consumer Electronics Group recommend you avoid prolonged exposure to excessive noise This list of sound levels is included for your protection Decibel Level Example 30 Quiet library soft ...

Page 6: ...t panel display 19 04 Getting Started Switching on and setting up 20 Using the on screen displays 21 Setting up for network use 21 Playing movies music and photos 22 Playing BD and DVD movies 22 Playback controls 22 Frequently Asked Questions 26 05 Using the Disc Navigator Introduction 27 Using the Disc Navigator 27 06 Using the Home Media Gallery Introduction 32 About network playback 32 Using th...

Page 7: ... connector HDMI is the first consumer electronics interface to support uncompressed standard enhanced or high definition video plus standard to multi channel surround sound audio all using one interface You can easily connect to an HDMI equipped AV receiver or audio visual device for high quality audio and video HDMI the HDMI logo and High Definition Multimedia Interface are trademarks or register...

Page 8: ...he remote When the batteries run down or you change the batteries the TV preset codes are automatically reset See Setting up the remote to control your TV on page 47 to reset them Disc content format playback compatibility General disc compatibility This player is compatible with a range of disc types media and formats Compatible discs will usually feature one of the following logos on the disc an...

Page 9: ...he DVD portion of a hybrid disc File compatibility Compatible media DVD R DVD RW media server on network some formats may not be supported depending on the media server type Even when they are in a supported format some files may not play or display depending on the content Even when playing a supported format some functions may not operate properly depending on the content Video file compatibilit...

Page 10: ...Discs marked ALL will play in any player The diagram below shows the various DVD regions of the world This player is REGION 1 BD ROM regions Like DVD movies BD movie discs BD ROM also carry a region mark that indicates which region s of the world the disc is compat ible with This player also has a region mark which you can find on the rear panel Discs from incompatible regions will not play in thi...

Page 11: ...sing a commercially available three way component video cable page 14 7 DIGITAL AUDIO OUT COAXIAL OPTICAL Digital audio outputs for connection to a PCM Dolby Digital and or DTS compatible AV receiver page 15 8 AUDIO OUT 5 1ch Multichannel 5 1ch analog audio outputs for connection to an AV receiver with multichannel analog audio inputs page 15 9 AUDIO OUT 2ch Stereo analog audio outputs for connect...

Page 12: ...nputs for correct stereo sound See Using other types of video output below if you want to use a different type of connection 2 Connect the supplied AC power cord to the AC IN inlet then plug into a power outlet Using other types of video output This player has standard composite S Video and component video outputs as well as an HDMI connector for digital video audio In order to be able to watch HD...

Page 13: ...or more information Use an HDMI cable not supplied to connect the HDMI OUT interconnect on this player to an HDMI interconnect on an HDMI compatible display The arrow on the cable connector body should be face up for correct alignment with the connector on the player After switching on the player you may need to set the video output format and HDMI color space for compatibility with your display S...

Page 14: ...ormat to 480i If you connected this player to your TV with the HDMI connection and the picture disappears when you switch the Output Format to 480i use the component connection with the 480i Output Format or S Video the standard composite connection instead Note that when using a Component Video connection with a TV or other AV component not using HDMI 480 60i video may be output in 480 60p 24p ou...

Page 15: ...damage the shutter the cable and or the player Coaxial connection Use a coaxial cable not supplied to connect the DIGITAL AUDIO OUT COAXIAL jack to a coaxial input on your AV receiver Note Linear PCM audio output over the DIGITAL AUDIO OUT jacks is limited to 2 ch 48 kHz Analog connections Connect the AUDIO OUT 5 1ch jacks on this player to the multi channel analog inputs on your AV receiver Use a...

Page 16: ... jack of this player with the CONTROL OUT jack of your other Pioneer component Using an external IR receiver with this player If you prefer to keep your AV equipment in a closed cabinet you can use an external IR receiver such as a Niles or Xantech unit connected to the IR IN jack You can thus have just the receiver outside of the cabinet and still be able to control the player Tip You may need to...

Page 17: ...display hide the pop up menu DVD Video Press to display the disc menu if there is one RETURN Press to return to a previous screen DISC NAVIGATOR TOP MENU Press to display the top menu of a BD ROM or DVD Video disc When playing a DVD R RW disc press to display exit the Disc Navigator HOME MENU Press to display the player s Home Menu from which you can access most of the player s functions 12 HOME M...

Page 18: ...s 13 RETURN Press to return to a previous screen 14 Playback controls Press to start reverse forward scanning PLAY Press to start or resume playback PAUSE Press to pause playback press again to restart STOP Press to stop playback you can resume playback by pressing PLAY ZOOM Press to zoom the screen when displaying a moving or still image see page 25 Press to jump to the start of the previous next...

Page 19: ...Controls and displays 03 19 En Front panel display 1 Lights during playback of a disc 2 Character display Shows various playback information disc time chapter and title number etc L 2 1 ...

Page 20: ... 16 9 Widescreen Generally the Auto setting is recommended If you re using an S Video or composite video connection select S Video Video only If you re using a component video connection match the output setting with the capabilities of your TV Select from 480i 480p 720p 1080i or Don t Know If you select 720p or 1080i skip the next step since the aspect ratio will automatically be set to 16 9 Wide...

Page 21: ...the name field 5 Select DONE to register the name and exit the input screen Select CANCEL to close the keypad without registering the name 6 Select IP Configuration then Next Screen to display the IP configuration screen 7 Set Auto set IP Address to On If there is a DHCP server on the local area network LAN this player will automatically be allocated an IP address If you re using a broadband route...

Page 22: ...4 Press PLAY to start playback Use the PAUSE and STOP buttons to pause or stop playback You can resume playback in either case by pressing PLAY See also Resuming playback on page 23 See Playback controls below for other controls available during playback of BD and DVD movie discs When playing BD ROM discs Commercially produced BD ROM movie discs often go straight to the disc menu when playback is ...

Page 23: ...ormal playback may automatically resume when a new chapter is reached on a BD or DVD movie disc When scanning a movie or song file normal playback will automatically resumes when the end or beginning of the file is reached Selecting titles and chapters directly You can select titles and chapters directly with BD and DVD movies2 1 Use the number buttons to select a title or chapter If the disc is s...

Page 24: ... select Time Search 2 Use the number buttons to enter a time in hours minutes and seconds for playback to resume from For a BD or DVD movie the time you enter should be the time into the currently playing title For a movie file it will be the playback time into the file For example press 4 5 0 0 to have playback start from 45 minutes into the title file For 1 hour 20 minutes press 1 2 0 0 0 Press ...

Page 25: ...nel to change Tip To set audio language preferences see Audio Language on page 42 Displaying disc or file information Various track chapter and title information as well as the video transmission rate for DVD and BD movies can be displayed on screen The information available depends on the type disc or file and whether it s playing or stopped Press DISPLAY to show switch the information displayed ...

Page 26: ...fer to the instruction manual of the component to do this An HDMI connection can only be made with other HDMI components or a High Definition Content Protection HDCP compatible DVI component See Connecting for HDMI output on page 13 for more on HDMI compatibility There s no picture from the HDMI output Make sure the output format of this player matches that of the component you have connected usin...

Page 27: ...patible movie files stored on the loaded DVD R RW disc non movie files are not displayed See also File compatibility on page 9 for more on compatible file types If you haven t already done so select Disc Navigator from the Home Menu then Movies You should see a list of all the movie files found on the disc together with their playing times Movie files that appear in the list with a lock icon are D...

Page 28: ...ou can see the one you re looking for Use the and ENTER buttons to select characters from the keypad Select SHFT to toggle between upper and lower case Select ALT to toggle between regular and special accented etc characters ISO 8859 1 character set Select SPC to insert a space Select DEL to delete the character at the current cursor position in the search field Select CLR to clear the search fiel...

Page 29: ... name or a few letters to search for The search results are narrowed down as you enter more letters See also Searching songs on page 30 Sort Sort songs by date oldest first or most recent first or alphabetically by song title artist album or genre A first or Z first Now Playing Display song information track name artist album genre etc and playback information See also Now playing song information...

Page 30: ...photo files found on the loaded DVD R RW disc non photo files are not displayed See also File compatibility on page 9 for more on compatible file types If you haven t already done so select Disc Navigator from the Home Menu then Photos You should see a list of folders photo files from the disc 1 Use the buttons to change the current selection highlighted in yellow 2 Select a folder and press ENTER...

Page 31: ...photos as thumbnails by date year and month Select a year then press ENTER to further browse by month Select a month and press ENTER to see the photos taken that month Quicklist Display thumbnails of all the photos currently in your Quicklist Press ENTER to display the Photo Options menu from where you can start slideshow playback or remove photos from the Quicklist Folders Display a list of folde...

Page 32: ...requires the upgrade This product is protected by certain intellectual property rights of Microsoft Use or distribution of such technology outside of this product is prohibited without a license from Microsoft DLNA DLNA CERTIFIED Audio Video Image Player The Digital Living Network Alliance DLNA is a cross industry organization of consumer electronics computing industry and mobile device companies ...

Page 33: ...lect Home Media Gallery from the Home Menu then Movies You should see a list of all the movie files found on the selected server together with their playing times Movie files that appear in the list with a lock icon are DRM protected and cannot be played Use the buttons to change the current selection highlighted in yellow On the left side of the screen you can see file information such as the gen...

Page 34: ...pace Select DEL to delete the character at the current cursor position in the search field Select CLR to clear the search field Select DONE to close the keypad and select a movie or genre from the search results select CANCEL to close the keypad and clear the search results Movie sources From the movie sources window you can see all the servers found on the network and change the selected server S...

Page 35: ...nd a song by entering a name or a few letters to search for The search results are narrowed down as you enter more letters See also Searching songs on page 36 Sort Sort songs by date oldest first or most recent first or alphabetically by song title artist album or genre A first or Z first Now Playing Display song information track name artist album genre etc and playback information See also Now p...

Page 36: ...u re looking for See Searching movies on page 34 for how to use the screen keypad Now playing song information The Now Playing screen shows detailed information about the song playing including Artist and song title Progress bar elapsed time and song length Album name Genre File format Browse menu Play status Play Mode Next Previous song names Music sources From the music sources window you can se...

Page 37: ... Album Date Quicklist or Folder See also Browsing photos below Search Find a photo by entering a name or a few letters to search for The search results are narrowed down as you enter more letters See also Searching photos on page 38 Sort Sort photos by date oldest first or most recent first or alphabetically by name A first or Z first Photo Sources Display servers on the network See also Photo sou...

Page 38: ...ct Before installing Windows Media Connect make sure that Windows XP Service Pack 2 is installed Licensed Windows XP users can download them at no charge from the Microsoft Website or via Windows Update See the Microsoft Web site for details regarding minimum system requirements and installation procedures Download the Windows Media Connect software This can be downloaded either directly from the ...

Page 39: ...an create up to three presets of your own 1 Select one of the Memory presets 2 Press to select Detailed Settings then press ENTER 3 Adjust the picture quality settings Use the buttons to select a setting Use the buttons to adjust the current setting Select a setting then press ENTER to display just that setting This gives you more screen area in which to see the effects of changes you make Press E...

Page 40: ...e material doesn t have wide variations in volume you may not notice much change Important Audio DRC is effective with the following types of audio Analog audio from the AUDIO OUT 2ch and AUDIO OUT 5 1ch jacks PCM audio from the DIGITAL AUDIO OUT and HDMI OUT jacks see also About the audio output settings on page 44 1 Press HOME MENU and select Video Audio Adjust from the on screen display 2 Selec...

Page 41: ... set to 16 9 Widescreen DVD 16 9 Video Out Letter Box If the TV Aspect Ratio setting above is set to 4 3 Standard select this if you prefer letterbox pre sentation of 16 9 format DVDs Pan Scan If the TV Aspect Ratio setting above is set to 4 3 Standard select this if you prefer Pan Scan pre sentation of 16 9 format DVDs Some discs contain only Letter Box or Pan Scan presentation so the video outpu...

Page 42: ...playback to French Other Continue to the next screen to set the default subtitle language for BD ROM and DVD Video disc playback You can select the language name or enter the code number see BD DVD language code list on page 48 for the code list Discs do not necessarily have subtitles in your selected language Also some discs override the Subtitle Language preference BD DVD Menu Language w Subtitl...

Page 43: ...kers are connected to your system This setting affects how audio is output from the multichannel analog outputs See Speaker Setup on page 45 for more detailed information Options On Screen Display On The player displays operation displays Stop Play etc on screen Off Switches off the on screen operation displays Angle Indicator On A camera icon appears on screen during multi angle scenes on a BD RO...

Page 44: ...MI is 480i or 480p output sampling rate is automatically downsampled to 48 kHz Note Output sampling rate is 48 kHz through the digital audio outputs MPEG audio is always output as linear PCM Disc audio format Analog outputs Digital outputs HDMI output 2ch 1 5 1ch 1 PCM convert 2 Bitstream 3 PCM 4 Auto 4 BD ROM Dolby Digital 2ch downmix PCM 5 1ch PCM 2ch downmix PCM Dolby Digital 11 5 1ch PCM 9 Dol...

Page 45: ...t Initial Setup 2 Select Speakers 3 Select Speaker Setup then Next Screen 4 Use the buttons to select a speaker 5 Use the buttons to change the speaker setup Specify which speakers you have in your setup C Center Yes or No Ls Rs Surround Yes or No L R Main Small or Large This setting is only applicable if the C and Ls Rs speakers are present 6 Press ENTER to save the settings and exit the Speaker ...

Page 46: ... onto the disc or use a pencil ball point pen or other sharp tipped writing instrument These could all damage the disc For more detailed care information see the instructions that come with discs Do not load more than one disc into the player at a time Damaged and odd shaped discs Discs spin at high speed inside the player If you can see that a disc is cracked chipped warped or otherwise damaged d...

Page 47: ...tandard 4 3 and widescreen 16 9 Widescreen TV users If you have a widescreen TV the TV Aspect Ratio setting page 41 of this player should be set to 16 9 Widescreen When you watch discs recorded in 4 3 format you can use the TV controls to select how the picture is presented Your TV may offer various zoom and stretch options see the instructions that came with your TV for details Please note that s...

Page 48: ...an mk 1311 Malayalam ml 1312 Mongolian mn 1314 Moldavian mo 1315 Marathi mr 1318 Malay ms 1319 Maltese mt 1320 Burmese my 1325 Nauru na 1401 Nepali ne 1405 Norwegian no 1415 Occitan oc 1503 Oromo om 1513 Oriya or 1518 SPanjabi pa 1601 Polish pl 1612 Pashto Pushto ps 1619 Portuguese pt 1620 Quechua qu 1721 Rhaeto Romance rm 1813 Kirundi rn 1814 Romanian ro 1815 Kinyarwanda rw 1823 Sanskrit sa 1901 ...

Page 49: ...me of the settings may result in the picture disappearing In this case press OUTPUT FORMAT repeatedly until the picture re appears see Changing the video output format on page 14 Some BD ROM discs output video only over HDMI The video output is set to 720p 1080i 1080p but the actual output is 480i or 480p For copy protection purposes DVD Video and some BD ROM discs output 480i 480p over the compon...

Page 50: ... play PC files check the file formats This player cannot play DRM protected content on DVD and DRM protected titles appear in the Disc Navigator with a lock icon No picture or High Definition video output when watching a BD For copy protection purposes composite S video and component video output may not possible See Connecting for HDMI output on page 13 to connect using HDMI Problem Remedy Proble...

Page 51: ...r DLNA compliant is running Restart if necessary Check if the media server is setup correctly for file sharing if the target folder has been deleted or if one or more folders has become corrupted on the server Check if the PC is operating properly Reboot the PC after confirming its specifications and setup Check that there are playable files on the media server After adding a new media server exit...

Page 52: ...ed on the server Check if there are too many files on the server Problem Remedy Problem Remedy It is taking a long time for the unit to start up It can take up to one minute for the system to start up once you press the STANDBY ON button This does not mean that the player is experiencing problems The power automatically switches off The Auto Power Off function switches the player into standby if n...

Page 53: ...e audio is Linear PCM LPCM audio activated by a BD ROM application and mixed with the primary audio It is typically used to provide dynamic sounds associated with interactive applications such as button sounds Interlaced video A method of displaying a picture in which odd numbered lines are updated in one pass then even numbered lines updated in the next See also Progressive scan video IP Internet...

Page 54: ...e SSL code The SSL documentation included with this distribution is covered by the same copyright terms except that the holder is Tim Hudson tjh cryptsoft com Copyright remains Eric Young s and as such any Copyright notices in the code are not to be removed If this package is used in a product Eric Young should be given attribution as the author of the parts of the library used This can be in the ...

Page 55: ...1 0 6 March 20 2000 are Copyright c 1998 1999 Glenn Randers Pehrson and are distributed according to the same disclaimer and license as libpng 0 96 with the following individuals added to the list of Contributing Authors Tom Lane Glenn Randers Pehrson Willem van Schaik libpng versions 0 89 June 1996 through 0 96 May 1997 are Copyright c 1996 1997 Andreas Dilger Distributed according to the same di...

Page 56: ...ight applies to the base64 code Copyright 1997 Massachusetts Institute of Technology Permission to use copy modify and distribute this software and its documentation for any purpose and without fee is hereby granted provided that both the above copyright notice and this permission notice appear in all copies that both the above copyright notice and this permission notice appear in all supporting d...

Page 57: ... from the Program is covered only if its contents constitute a work based on the Program independent of having been made by running the Program Whether that is true depends on what the Program does 1 You may copy and distribute verbatim copies of the Program s source code as you receive it in any medium provided that you conspicuously and appropriately publish on each copy an appropriate copyright...

Page 58: ... of the section is intended to apply and the section as a whole is intended to apply in other circumstances It is not the purpose of this section to induce you to infringe any patents or other property right claims or to contest validity of any such claims this section has the sole purpose of protecting the integrity of the free software distribution system which is implemented by public license p...

Page 59: ...reedom to distribute copies of free software and charge for this service if you wish that you receive source code or can get it if you want it that you can change the software and use pieces of it in new free programs and that you are informed that you can do these things To protect your rights we need to make restrictions that forbid distributors to deny you these rights or to ask you to surrende...

Page 60: ...intent is to exercise the right to control the distribution of derivative or collective works based on the Library In addition mere aggregation of another work not based on the Library with the Library or with a work based on the Library on a volume of a storage or distribution medium does not bring the other work under the scope of this License 3 You may opt to apply the terms of the ordinary GNU...

Page 61: ...the conditions of this License If you cannot distribute so as to satisfy simultaneously your obligations under this License and any other pertinent obligations then as a consequence you may not distribute the Library at all For example if a patent license would not permit royalty free redistribution of the Library by all those who receive copies directly or indirectly through you then the only way...

Page 62: ...RRANTY without even the implied warranty of MERCHANTABILITY or FITNESS FOR A PARTICULAR PURPOSE See the GNU Lesser General Public License for more details You should have received a copy of the GNU Lesser General Public License along with this library if not write to the Free Software Foundation Inc 51 Franklin Street Fifth Floor Boston MA 02110 1301 USA Also add information on how to contact you ...

Page 63: ...s 1 kHz 20 dB Number of channels 2 Jacks RCA jack Audio output multi channel L R C SW LS RS Output level During audio output 200 mVrms 1 kHz 20 dB Number of channels 6 Jacks RCA jack Audio characteristics Frequency response 4 Hz to 22 kHz S N ratio 114 dB Dynamic range 102 5 dB Total harmonic distortion 0 001 Wow and flutter Limit of measurement 0 001 W PEAK or lower Digital output Optical digital...

Page 64: ...lling the Customer Support Division at the above listed number for assistance Pioneer Electronics USA Inc Customer Support Division P O BOX 1760 Long Beach CA 90801 1760 U S A For warranty information please see the Limited Warranty sheet included with your product Should this product require service in Canada please contact a Pioneer Canadian Authorized Dealer to locate the nearest Pioneer Author...

Reviews: