background image

35

En

Disc playback

03

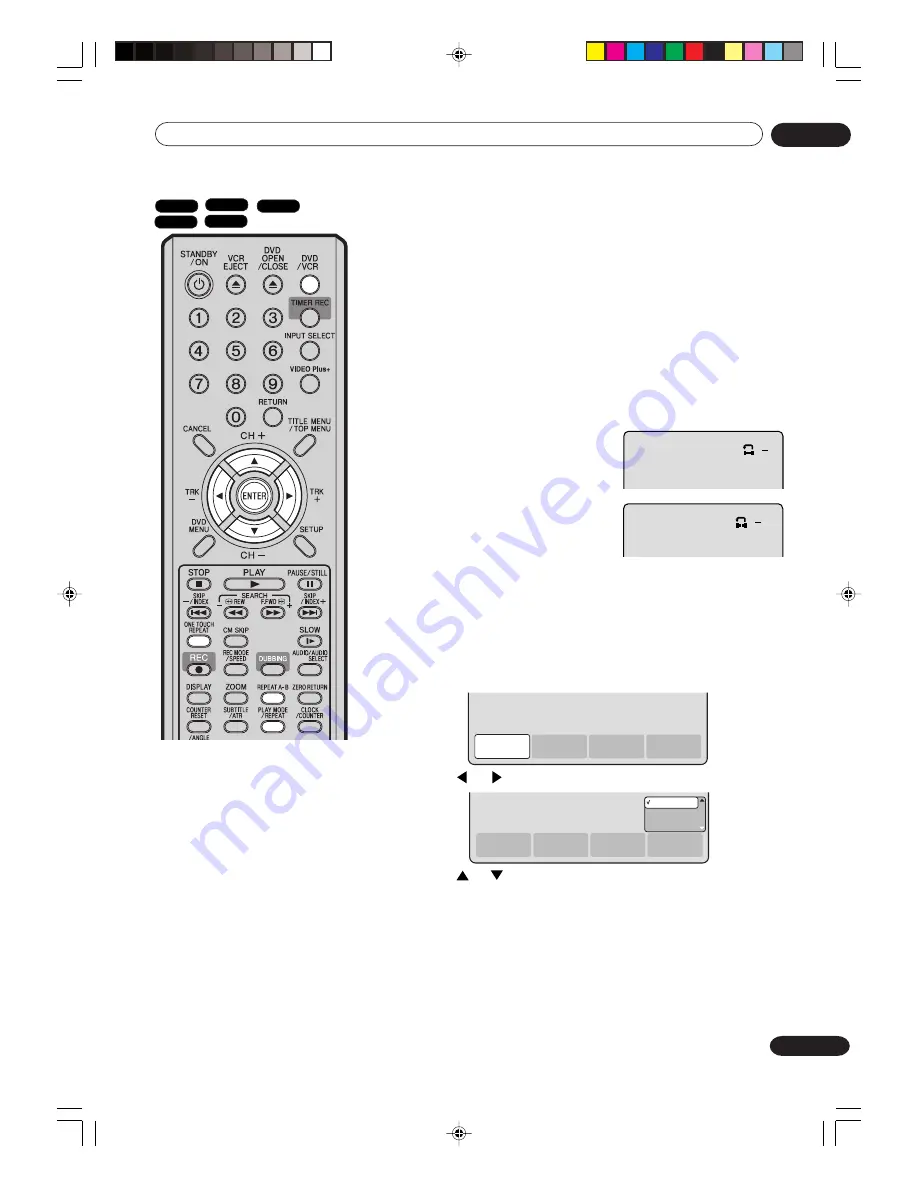
Repeat playback

) *

)

1

Press 

REPEAT A-B 

during

playback.
The start point is selected.

2

Press 

REPEAT


A-B 

again.

The end point is selected.
Playback starts at the point that
you selected. Playback stops at
the end point, returns to point A
automatically, then starts again.

To resume normal playback, press 

REPEAT


A-B 

again.

“OFF” appears on the screen.

Title, Chapter repeat playback

1

Press 

REPEAT

.

The play mode screen will appear.

2

Press 

 or 

 to select “REPEAT” and press 

ENTER

.

3

Press 

 or 

 to select “OFF”, “CHAPTER” or “TITLE” from the

list.

OFF:

Playback is not repeated.

CHAPTER:

The chapter in playback is repeatedly played back.

TITLE:

The title in playback is repeatedly played back.

4

Press 

ENTER

.

To cancel the repeat playback, select “OFF” in step 

3

.

One touch repeat

This feature can be used to repeat the last 10 seconds of viewed
material on a DVD disc - then normal playback will continue.

Press 

ONE TOUCH  REPEAT

 during playback.

The playback returns to a point 10 seconds earlier, then resumes
playing.

NOTE:

If 

ONE TOUCH  REPEAT

 is pressed less than 10 seconds after the

beginning of the current title, it will just go back to the start of that
title.

A-B repeat playback

A-B repeat playback allows you to repeat material between two
selected points.

TIME

SEARCH

CHAPTER

SEARCH

TITLE

SEARCH

REPEAT

TIME

SEARCH

CHAPTER

SEARCH

TITLE

SEARCH

REPEAT

OFF

CHAPTER

TITLE

NOTES:

• Some discs may not work with the

repeat operation.

• In A-B repeat mode, subtitles near

point A or B may not appear.

• A-B repeat does not work during

the Title and the Chapter repeat
playback.

• You may not be able to set A-B

repeat, depending on the scenes
of the DVD.

• A-B repeat and Title, Chapter

repeat does not work with a MP3/
WMA/JPEG-CD.

• You cannot switch to the VCR

mode when the play mode screen
is showing. Press 

REPEAT

 to clear

the play mode screen, then press

DVD/VCR

 to switch to the VCR

mode.

• One touch repeat and Title,

Chapter repeat playback does not
work with a CD.

VR mode

DVD-Video

Video mode

DVD-R

CD

 2H30301B_En_30_43

8/4/05, 19:21

35

Summary of Contents for DVR-RT501-S

Page 1: ...DVD Recorder VCR Operating Instructions Discover the benefits of registering your product online at www pioneer co uk www pioneer eur com DVR RT501 s 2H30301B_En_01_03 8 4 05 19 18 1 ...

Page 2: ... supply voltage of the area where this unit will be used meets the required voltage e g 230V or 120V written on the rear panel D3 4 2 1 4_A_En Before plugging in for the first time read the following section carefully This product complies with the Low Voltage Directive 73 23 EEC amended by 93 68 EEC EMC Directives 89 336 EEC amended by 92 31 EEC and 93 68 EEC D3 4 2 1 9a_En Thank you for buying t...

Page 3: ... of an AC plug on the power supply cord of this unit should be performed only by qualified service personnel If connected to an AC outlet the cut off plug can cause severe electrical shock Make sure it is properly disposed of after removal The equipment should be disconnected by removing the mains plug from the wall socket when not left unused for a long period of time for example when on vacation...

Page 4: ...ing the screen display ON or OFF 24 Setting the screen 24 TV SCREEN 24 STILL MODE 25 NO NOISE BACKGROUND 25 BRIGHTNESS 25 DVD OUTPUT 25 AV3 INPUT 25 Setting the audio 26 DRC 26 EXTERNAL AUDIO INPUT 26 NICAM 26 DOLBY DIGITAL OUTPUT 26 Setting the recording 26 INITIAL REC TO 26 INITIAL REC MODE 26 AUTO CHAPTER 27 INDEX PICTURE 27 BILINGUAL RECORDING 27 Setting the other 27 JPEG INTERVAL 27 DivX VOD ...

Page 5: ...ing the recorder 88 Hints on installation 88 Specifications 89 04 Tape playback Loading and unloading a cassette tape 46 Cassette tape playback 47 Special playback 48 Picture search 48 Still picture 48 Slow motion 48 Frame by Frame picture 48 Adjusting tracking condition 48 Repeat playback 48 Commercial skip 48 To display VCR operation status 48 ZERO RETURN function 49 Video index search system 49...

Page 6: ...wall socket and all power sources including batteries and refer servicing to qualified service personnel under the following conditions a When the power supply cord or plug is dam aged b If any liquid has been spilled onto or objects have fallen into the product c If the product has been exposed to rain or water d If the product does not operate normally even if you follow the operation manual Adj...

Page 7: ...ormers Protection Acts 1963 and 1972 and to any subsequent statutory enactments and orders Unauthorised recording of copyrighted television programs films video cassettes and other materials may infringe the rights of copyright owners and be contrary to copyright laws Copyright Remote control Two AAA R03 size batteries for the remote control 21 pin SCART cable 75 Ω coaxial cable Accessories 2H3030...

Page 8: ... them The title list appears on finalised DVD RW disc recorded in the Video mode and DVD R disc Dubbing cannot be carried out when attempting to copy a copy guarded video tape or disc Not only can you playback and record video tapes but you can also playback DVD discs or make recordings using DVD RW DVD R discs with this unit In addition you can edit the programs you have recorded A realistic powe...

Page 9: ... protected disc titles will not play Model Playable DVR 7000 DVR 3100 DVR 5100H Recordable Yes1 2 3 Yes1 No No Operating DVD Video Some operations of DVD Video may be prohibited by the manufacturer or some operation methods or functions of the DVD Video may be different from the description in this manual If you attempt an operation that is prohibited by either the disc or the unit a mark will app...

Page 10: ...rogram see page 51 When you record a TV program of a bilingual broadcast only one of the audio modes can be recorded You have to select it Format modes that can be used with each disc The usable format depends on the media type as shown in the below table DVD RW The disc can be erased and used again about 1 000 times Only the VR mode can be used for Ver 1 0 discs With Ver 1 1 1 2 discs you can rec...

Page 11: ...n but if you format the disc by erasing all the content you can again record on this disc A finalised disc may not play because of the condition of the DVD or the compatibility with the player used for playback Some players may not playback the discs recorded with this unit We cannot guarantee the playback using other players Title Chapter Track A DVD Video has large partitions called Titles and s...

Page 12: ...acks VCR EJECT button DVD S VIDEO IN AV3 jack VCR DVD button OPEN CLOSE button PLAY button STOP button FF Fast Forward button REW Rewind button REC button CHANNEL buttons Disc tray Cassette Loading Slot VCR indicator DUBBING button Display window IR Remote sensor DVD indicator 2H30301B_En_12_17 8 4 05 19 19 12 ...

Page 13: ... video mode VR does not appear Video tape is in the unit Clock display Colon flashes Counter display in hour minute second for VCR DVD minute second for CD TV channel display Track number display for CD The external input channel AV1 AV2 or AV3 display Lights during playback of DVD and CD Flashes in auto resume DVD or CD is temporarily stopped Lights during DVD recording CD CD R DVD DVD R DVD RW V...

Page 14: ... PAUSE STILL Still picture Recording pause on off 33 48 53 SKIP Skips chapters in the forward or reverse direction 33 43 72 INDEX Searches for the INDEX mark of a tape 49 REW SEARCH Rewind Review playback 33 47 48 F FWD SEARCH Fast Forward Forward search playback 33 47 48 ONE TOUCH REPEAT Skips the DVD playback back 10 seconds 35 CM SKIP Skips commercial breaks 34 48 SLOW Slow motion playback 33 4...

Page 15: ...g there is no danger of leakage To prevent damage remove the batteries if you do not use the handset for several months Damage because of leakage is not covered by the guarantee Distance of Remote Control Operation Effective angle approx 60 approx 7m Point the remote control directly at the remote sensor If bright sunlight directly beams onto the unit front If an obstacle is placed between the uni...

Page 16: ...el for playback Connecting this unit to your TV using the SCART connections Some TVs may not allow automatic switching to the AV input channel In this case you should manually select the AV input setting on your TV s controls when playing through this unit Supplied SCART cable DECODER EXTERNAL SCART Socket AV2 Playback connection The exact arrangement you use to interconnect various video and audi...

Page 17: ...ou to enjoy the highest quality DVD picture playback NOTES In connecting to a TV that are not capable of reproducing a progressively scanned video signal using the component sockets do not select progressive scanning mode If you do it the component video outputs does not feed the correct signals and you can not see any picture see page 45 When connecting to a TV using the SCART socket make sure th...

Page 18: ... 7 etc CH 4 Channel 4 If you want to change the RF output channel or switch to OFF press and hold the STANDBY ON button on the front of your unit in the Standby mode until the current RF output channel appears Press the CHANNEL buttons on your unit to select the RF channel you desire Preparation Make sure that your unit is connected properly to the TV If a satellite receiver is connected with the ...

Page 19: ... ENGLISH ENGLISH AUTOMATIC ENGLISH TIMER REC SET SYSTEM SETUP AV SETUP REC SETUP CHANNEL SETUP OTHER SETUP MENU LANGUAGE PARENTAL CLOCK DISC SETUP OTHER LANGUAGE OSD LANGUAGE DVD MENU AUDIO SUBTITLE RETURN SETUP ENTER BACK END ENGLISH ENGLISH AUTOMATIC ENGLISH SELECT ENGLISH FRANCAIS ESPANOL DEUTSCH ITALIANO OTHER AUTOMATIC OFF ENTER 1 Press SETUP while the DVD and video tape are stopped The SETUP...

Page 20: ...ct the first priority language of each disc OTHER If you want to select another language before pressing ENTER input the language code by using the numeric keys See the Language code list on page 84 Then press ENTER If you input a wrong number press CANCEL NOTE If the selected language is not recorded on the disc the first priority language is selected SUBTITLE When several subtitles languages are...

Page 21: ...E PARENTAL CONTROL LEVEL 1 PARENTAL CONTROL LEVEL CANCEL PICTURE NOTES The selected level will apply to operations executed after this The unit cannot restrict playback of some discs Some discs may not be encoded with specific rating level information though its disc jacket says adult Parental control will not work with those discs If you forget the password you can reset the recorder to its facto...

Page 22: ...ct its AV channel this may be labelled EXT AUX etc Select CLOCK from the SYSTEM SETUP section of the SETUP MENU and press ENTER For the full procedure see steps 1 to 3 in Using the SETUP MENU on page 19 Ex Setting the clock to 10 20 September 27th 2005 1 Select the desired items using or date month year hour and minute then press ENTER 2 Press or to set the value of the selected item 3 Repeat step...

Page 23: ... cursor will move repeatedly When the cancelling finalisation finished UNDO FINALISING COMPLETED PRESS ENTER will appear Press ENTER the normal TV screen will appear The cancelling finalisation process may require a few minutes to about 1 hour according to disc type or the amount of free space on the disc When the disc s finalisation cannot be cancelled you cannot select UNDO FINALISE FINALISING P...

Page 24: ...ENTER RETURN SETUP BACK END SELECT ENTER Other SYSTEM SETUP You can turn the display window and screen display ON or OFF Preparation Turn ON the TV and select its AV channel this may be labelled EXT AUX etc Select OTHER from SYSTEM SETUP For the procedure see steps 1 to 3 in Using the SETUP MENU on page 19 DIMMER Brightness of the display window You may adjust the brightness or turn off the displa...

Page 25: ...setting is ON BRIGHTNESS You can control the brightness level of the image Select BRIGHTNESS and select the level from the list below MAX The image becomes brighter STD The image is of standard brightness MIN The image becomes darker DVD OUTPUT You can select the output signal of DVD playback pic ture to the TV screen as an RGB signal a COMPO NENT VIDEO signal or a S VIDEO signal RGB RGB signal AV...

Page 26: ...und from TV s speaker we recommend that you select TV The level of Dynamic Range Reduction may differ depending on the DVD EXTERNAL AUDIO INPUT The audio mode for the audio input jack can be selected choosing either stereo or monaural Select EXTERNAL AUDIO INPUT and select from the list below see page 81 STEREO The sound is treated as stereo sound L CH The sound is treated as the monaural sound of...

Page 27: ...witching interval between played back images in the slide show mode And you can display the registration code of DivX VOD Preparation Turn ON the TV and select its AV channel this may be labelled EXT AUX etc Select OTHER For the procedure see steps 1 to 3 in Using the SETUP MENU on page 19 JPEG INTERVAL You can select the interval time for JPEG slide show page 43 Select JPEG INTERVAL and select th...

Page 28: ...c TV reception interference or power failure may result in Automatic station presetting malfunctions In such a case repeat the setting procedure from the beginning If the automatic tuning procedure has problems receiving some stations correctly you can try to preset the station manually see page 29 When the unit is in the auxiliary input mode you cannot preset channels TIMER REC SET SYSTEM SETUP A...

Page 29: ...esetting a station on program position 5 1 Select CH TUNING and press ENTER 2 Select CH and press ENTER Then select the channel position number 5 and press ENTER 3 Select TUNING tuning scale and press ENTER CH 5 SKIP OFF MOVE 5 TUNING 4 Press A rising frequency or B falling frequency once The search starts It stops at each broadcast automatically A changes to Press B or A repeatedly until the desi...

Page 30: ...ppear at the upper right of the screen This symbol means either the feature you tried is not available on the disc or the VCR DVD can not access the feature at this time This does not indicate a problem with the VCR DVD When you set a single faced disc label downwards ie the wrong way up and press PLAY or OPEN CLOSE READING will appear and then it will change to NO DISC Some playback operations of...

Page 31: ...ation see page 63 If you create a playlist an original title and playlist appear in the title menu For creating a playlist see page 64 In case the disc includes more than 10 titles you can turn to the next or the previous page Press then press or to display next previous page To return to normal use press You cannot switch to the VCR mode when the title menu is showing Press TITLE MENU to clear th...

Page 32: ...layed during recording may be different from the actual remaining time When you want to check the remaining time stop recording and display the media informa tion again 3 Press DISPLAY again while the media information above is displayed The media information will disappear TITLE 01 35 TIME 00 25 41 CHAPTER 08 38 SUBTITLE ANGLE 01 01 REC MODE SP AUDIO 01 03ENG Dolby Digital CLOCK 10 27 CH 3 Playba...

Page 33: ...ing normal playback or still playback Each press of SLOW will change the speed of the slow 1 2 1 4 1 8 To resume normal playback press PLAY To resume the still playback press PAUSE STILL Locating a chapter or track Press SKIP Forward or SKIP Reverse during playback to locate a chapter that you want to watch Each time you press the button a chapter or track is skipped NOTE There may be a slight del...

Page 34: ... number to be played back TITLE SEARCH Select the title number to be played back The screen above shows the display when CHAPTER SEARCH is selected 3 When selecting TIME SEARCH input the time until the playback is restarted with the numeric keys or When selecting CHAPTER SEARCH or TITLE SEARCH press or to select the chapter number or title number 4 Press ENTER The playback starts at the point you ...

Page 35: ...H REPEAT during playback The playback returns to a point 10 seconds earlier then resumes playing NOTE If ONE TOUCH REPEAT is pressed less than 10 seconds after the beginning of the current title it will just go back to the start of that title A B repeat playback A B repeat playback allows you to repeat material between two selected points TIME SEARCH CHAPTER SEARCH TITLE SEARCH REPEAT TIME SEARCH ...

Page 36: ...playback at the scene when you pressed TITLE MENU TOP MENU 2 Press or to select the desired title 3 Press ENTER The playback of the selected title will start DVD menu Some DVDs allow you to select the disc contents using the menu When you playback these DVDs you can select the subtitles language and soundtrack language etc using the DVD menu 1 Press DVD MENU during playback The DVD menu appears on...

Page 37: ... ANGLE during playback The current angle will appear 2 Press ANGLE repeatedly until the desired angle is selected Zooming This unit will allow you to zoom in on the frame image You can then make selections by switching the position of the frame 1 Press ZOOM during playback The center part of the image will be zoomed in Each press of ZOOM will change the ZOOM x2 x3 and x4 2 Press or to view a diffe...

Page 38: ...F The primary vocal is not output NOTES Some Karaoke discs may not have the vocal on off function The on screen display will disappear after a few seconds AUDIO 1 2 Vo OFF Dolby Digital Changing soundtrack language Karaoke playback AUDIO 1 8 ENG Dolby Digital AUDIO 2 8 FRA Dolby Digital NOTES If the desired language is not heard after pressing the button several times the language is not recorded ...

Page 39: ...n press DVD VCR to switch to the VCR mode The elapsed time and total time of the music data during playback Scroll bar The elapsed time and total time of the whole CD Current playback mode The track number during playback The music data recorded on the CD Playing back a selected track 1 Press or to select the track number you want to playback and press 2 Press or to select PLAY from the menu list ...

Page 40: ...on CD will be played back repeatedly To cancel the repeat all playback select REPEAT ALL from the menu list again and press ENTER Playing back programs You can specify the playback order yourself 1 Press or to select PROGRAM PLAYBACK from the menu list and press ENTER 2 Press or to select to the track number that you want to change the order of and press ENTER The mark will appear at the right sid...

Page 41: ...ed Preparation Turn ON the TV and select its AV channel this may be labelled EXT AUX etc Load the disc storing MP3 WMA JPEG or DivX Press DVD VCR to select the DVD mode The DVD indicator will light Using the BROWSER screen 1 Press TITLE MENU The BROWSER screen will appear 2 The MP3 WMA JPEG and DivX files and folders stored in the disc are displayed on the BROWSER screen Select a folder and press ...

Page 42: ...ecommend recording setting for a high quality sound is 44 1kHz of sampling frequency and 128kbps of constant bit rate WMA file specifications When creating a WMA disc make sure that the copyright function is off DRM Digital Rights Management files cannot be played back WMA files must have the extension letters wma Standard sampling frequency and the bit rate WMA version 7 and 8 32kHz 48kbps 44 1kH...

Page 43: ...Press ENTER to play the selected picture If you have set the interval time for JPEG slide show the pictures will be played back one after another automatically See page 27 Press ZOOM to enlarge the displayed image Press ANGLE to rotate the image by 90 degrees each time To display the next or the previous picture press SKIP 7 or 6 JPEG file specification JPEG files must have the extension letters j...

Page 44: ...ing frequencies 8kHz 48kHz Resolution Max 720 x 576 at 25fps Max 720 x 480 at 30fps If the incorrect DRM file is loaded Authorization Error This player is not authorized to play this video will appear on the screen When you attempt to play DivX VOD the number of plays is lim ited and the following message will appear on the screen If you wish to play it select YES If the number of plays goes over ...

Page 45: ... a TV progres sive scan incompatible no image will be seen on the video dis play In this case you must reset the unit by pressing STOP on the front panel for five seconds The video output will be restored to Inter lace setting and a picture will once again be seen on a conven tional analog display Different scanning modes Interlaced scan Technology that alternately displays odd numbered scanning l...

Page 46: ...l start automatically Unloading You can eject the video tape while the unit is turned off 1 Press EJECT on the unit or the remote control 2 Remove the cassette tape Automatic tape eject This VCR will automatically rewind the tape when the tape has ended And when the tape is rewound to its beginning the cassette tape will be ejected automatically To prevent accidental erasure Remove the erase preve...

Page 47: ... tape or forward it rapidly Press STOP To rewind the tape Press REW To stop the tape winding press STOP To switch to playback directly without STOP press PLAY Forward Reverse picture search mode When the tape is being wound you can switch to picture search mode see next page To do this press REW or F FWD and hold it down The unit will resume the tape winding as soon as the button is released To fo...

Page 48: ...I FI OPERATING MODE TAPE IN AUTO REPEAT HI FI STEREO Slow tracking and vertical lock adjustment If noise bars appear in the picture during slow motion press the TRK TRACKING or to reduce the noise bars If the still picture jitters excessively press TRK TRACKING or to stabilise the still picture Frame by Frame picture Press PAUSE STILL during playback Press SLOW one by one The picture advances fram...

Page 49: ...he tape whenever a recording is initiated Index search Press INDEX or during stop or play mode For Succeeding programs Press INDEX For Preceding programs Press INDEX Additional press increases the INDEX NO up to 9 When the INDEX or is pressed the unit starts searching the INDEX NO selected and finds the portion then playback starts automatically To stop the Index Search press STOP VCR NOTES for Co...

Page 50: ...ge 23 Recording modes There are 4 modes for recording on disc Recording time and quality vary according to mode Recording time above is based on a 4 7GB disc Since DVD recording is performed using VBR Variable Bit Rate recording time varies according to the recorded content To know the correct recording time stop recording and check the media information See page 32 This section explains things yo...

Page 51: ... cannot be erased nor can recorded titles be overwritten Images that cannot be recorded Some DVD Video and broadcasts contain copy restriction signals to protect copyrights There are 3 types of copy restriction signals Copy Free Copy Never and Copy Once Copy Free unrestricted recording Land based TV broadcasts and images you record yourself with a video camera allow unrestricted recording There ar...

Page 52: ...des see page 50 2 Press the numeric keys or CH to select the channel to be recorded 1 9 e g 5 press 5 10 80 e g 29 press 2 and 9 within 2 seconds 3 Press REC appears on the screen for about 4 seconds and recording will start NOTES When recording onto a DVD it takes some time from when you press REC until recording actually starts Press REC a little before your preferred starting point With a video...

Page 53: ...ding channel in the recording pause mode You cannot change a recording channel in the DVD recording pause mode Chapter marks are made when recording to a DVD in the VR Mode Auto Rewind feature This VCR will automatically rewind the tape when the tape has ended except during OTR and TIMER REC It will also eject the tape NOTES If the disc space become full the recording is stopped and RECORDING INTE...

Page 54: ...lect the channel to be recorded 3 Press REC Each additional press of REC will increase recording time as shown in the chart below up to a maximum of 6 hours The OTR and recording time will appear on the screen for about 4 seconds To cancel OTR Press STOP or turn off the power NOTE If you wish to watch the DVD playback during the VCR OTR press DVD VCR to change to DVD mode and perform the DVD playb...

Page 55: ...ording by matching up the preset channels in the recorder with guide channels You can find these guide channel numbers in your local TV guide or newspaper TV listings 1 Press SETUP and press or to select CHANNEL SETUP and press ENTER The Channel Setup menu will appear TIMER REC SET SYSTEM SETUP AV SETUP REC SETUP CHANNEL SETUP OTHER CHANNEL SETUP CH TUNING AUTO TUNING GUIDE CH SET PROCEED PROCEED ...

Page 56: ...just once or regularly and then select the DVD or the VCR for recording Note that for the VIDEO Plus system to work correctly the clock must be set to the right time and the guide channels must be setup See Checking the channel setup to use the VIDEO Plus system on page 55 1 Press VIDEO Plus If a PROGRAM FULL message appears then you ll need to delete one of the existing timer programs before cont...

Page 57: ... Any pro gram air time delays will be taken care of To make certain this works correctly always enter the exact starting time as published in the news paper orTV listing magazine When you use the VPS PDC func tion the recording start time may be delayed by around 1 minute If you use the VPS PDC function and timer recording to record con secutive programs on the same channel the 2 programs are re c...

Page 58: ...ect the program you want to cancel and press CANCEL then the selected program will be erased from the timer recording list In case Timer programs overlap Do not overlap timer programs as portions of the conflicting programs will be lost The first recording time has priority over the next recording time as shown in the diagram below In this case the next recording time is delayed a maximum of about...

Page 59: ... 1 starting at 20 00 and stopping at 23 00 on a date of 20th 1 Press SETUP The SETUP MENU screen appears NOTE In the event of a power failure the data of the automatic recording will be maintained in the built in memory for about 30 minutes Also the clock will continue to run for this period of time Thereafter the data will be deleted When the power resumes the time display will change to 0 00 tha...

Page 60: ... by around 1 minute If you use the VPS PDC function and timer recording to record consecutive programs on the same channel the 2 programs are recorded as a single title on a DVD When the programs are re corded using a VCR no VISS signal is inserted when the second program starts 5 Press or to select DATE and press ENTER Press or to select the date to be recorded and press ENTER 6 Press or to selec...

Page 61: ...ange to DVD mode automatically The VCR mode cannot be selected If the programs with VPS PDC OFF are DVD and VCR re cording the unit will turn off Also if the program with VPS PDC ON is set the unit will turn off If you want to use the unit press TIMER REC again to deactivate the timer If the clock symbol blinks in the display in spite of the pressing of TIMER REC the cassette may not have been loa...

Page 62: ...d MONO B broadcast signal is received NICAM OFF This will be displayed if a NICAM signal is received when NICAM OFF is selected in the AV SETUP MENU Playback Press AUDIO SELECT to select either stereo mono or bilingual playback where applicable See the table below for more information This VCR DVD is capable of recording Hi Fi quality sound When recording on a video cassette a broadcast which is t...

Page 63: ...se your viewing preferences and choose to delete it the original titles will not be affected It is recom mended to create and edit the playlist to prevent important titles from being erased accidentally If you create a playlist both the original title and playlist will be displayed on the title menu Editable items The items that can be edited are different between original title and playlist For t...

Page 64: ...laylist 1 Press TITLE MENU The title menu will appear 2 Press or to select the original title which will be used as the base of a playlist 3 Press The editing menu of original title will appear 4 Press or to select NEW PLAYLIST 5 Press ENTER The editing menu closes and the created playlist appears at the bottom of the list DISC NAME 1 T 1 25 11 2005 10 03 11 SP 29 11 2005 11 30 09 SP 01 12 2005 06...

Page 65: ...nu Family 1 2 a b c 3 d e f CANCEL Back RETURN Exit Caps 0 Space bar 4 g h i 5 j k l 6 m n o 7 q p r s 8 t u v 9 w x y z DISPLAY OK DISPLAY OK Numbers Signs Letters RETURN ENTER BACK SET END SELECT TITLE MENU ENTER DISC NAME 23 11 2005 08 41 06 EP 25 11 2005 10 03 11 SP 29 11 2005 11 30 09 SP 01 12 2005 06 52 06 XP 23 11 2005 08 41 06 EP PL REC DATE 11 23 2005 TIME 08 41 LENGTH 00 30 17 CHANNEL 00...

Page 66: ...ress ENTER The EDIT TITLE screen appears 4 Press ENTER to playback the playlist on the EDIT TITLE screen Use each operation button F FWD REW SKIP 6 6 6 6 6 SKIP 7 7 7 7 7 PLAY PAUSE STILL SLOW CM SKIP for the playback to search the starting point of the scene you want to erase RETURN ENTER BACK SET END SELECT TITLE MENU ENTER DISC NAME 23 11 2005 08 41 06 EP 25 11 2005 10 03 11 SP 29 11 2005 11 30...

Page 67: ...r to select SET END at the end point of the scene you want to erase and press ENTER The still image at the end point appears at the right small screen 7 Check the erased scenes Select Preview and press ENTER Then the video where the scenes between the start and end points are erased is played back Each operation button F FWD REW SKIP 6 6 6 6 6 SKIP 7 7 7 7 7 PLAY PAUSE STILL for playback also can ...

Page 68: ... total recording time is displayed RETURN ENTER BACK SET END SELECT TITLE MENU ENTER DISC NAME 23 11 2005 08 41 06 EP 25 11 2005 10 03 11 SP 29 11 2005 11 30 09 SP 01 12 2005 06 52 06 XP Title 1 PL Family REC DATE 11 23 2005 TIME 08 41 LENGTH 00 30 17 CHANNEL 006 REC MODE SLP TITLE MENU PLAY EDIT TITLE DELETE PLAYLIST RENAME TITLE TITLE COMBINE TITLE COMBINE RETURN ENTER BACK END SELECT TITLE MENU...

Page 69: ...isplay the editing menu of the playlist Press or to select DELETE PLAYLIST 3 Press ENTER The selected playlist will be erased RETURN ENTER BACK SET END SELECT TITLE MENU ENTER DISC NAME 23 11 2005 08 41 06 EP 25 11 2005 10 03 11 SP 29 11 2005 11 30 09 SP 01 12 2005 06 52 06 XP Family REC DATE 11 23 2005 TIME 08 41 LENGTH 00 30 17 CHANNEL 006 REC MODE SLP TITLE MENU PLAY EDIT TITLE DELETE PROGRAM R...

Page 70: ...up to 99 chapter marks to one title 1 Press TITLE MENU to display the title menu 2 Select the original title where a chapter mark is added Press or to select the original title Press to display the editing menu of the original title Press or to select ADD CHAPTER MARK 3 Press ENTER The ADD CHAPTER MARK screen will appear 4 Press PLAY to search a scene where you want to add the chapter mark Search ...

Page 71: ...to display the editing menu of original title Press or to select COMBINE CHAPTERS 3 Press ENTER The COMBINE CHAPTERS screen will appear At the begin ning the top still image in the chapter 2 is displayed ADD CHAPTER MARK 17 NAME 23 11 2005 08 41 CHAPTER 2 4 LENGTH 00 03 08 00 30 17 The added chapter mark RETURN ENTER BACK SET END SELECT TITLE MENU ENTER DISC NAME 23 11 2005 08 41 06 EP 25 11 2005 ...

Page 72: ...eps 4 and 5 of Changing a title name in Editing a playlist page 65 and enter the title name See also page 76 for more about the keyboard screen SELECT RETURN ENTER BACK END TITLE MENU ENTER COMBINE CHAPTERS NAME 23 11 2005 08 41 CHAPTER 2 4 LENGTH 00 02 03 00 30 17 RETURN ENTER BACK SET END SELECT TITLE MENU ENTER DISC NAME 23 11 2005 08 41 06 EP 25 11 2005 10 03 11 SP 29 11 2005 11 30 09 SP 01 12...

Page 73: ...tle where a scene you want to erase is included Press or to select the original title Press to display the editing menu of original title Press or to select EDIT TITLE RETURN ENTER BACK SET END SELECT TITLE MENU ENTER DISC NAME 23 11 2005 08 41 06 EP 25 11 2005 10 03 11 SP 29 11 2005 11 30 09 SP 01 12 2005 06 52 06 XP Family REC DATE 11 23 2005 TIME 08 41 LENGTH 00 30 17 CHANNEL 06 REC MODE EP TIT...

Page 74: ... erase the titles you can increase the disc space 1 Press TITLE MENU to display the title menu 2 Select the original title you want to erase Press or to select the original title Press to display the editing menu of original title Press or to select DELETE TITLE RETURN ENTER BACK SET END SELECT TITLE MENU ENTER DISC NAME 23 11 2005 08 41 06 EP 25 11 2005 10 03 11 SP 29 11 2005 11 30 09 SP 01 12 20...

Page 75: ... k l 6 m n o 7 q p r s 8 t u v 9 w x y z CANCEL RETURN DISPLAY OK DISPLAY OK Space bar NOTES The disc name can be a maxi mum of 30 characters Long names will be shortened in the title menu For using the keyboard screen see Using the keyboard screen page 76 RENAME DISC can only be used with DVD R discs and video mode DVD RW discs before they have been finalized 23 11 2005 08 41 06 EP 25 11 2005 10 ...

Page 76: ...ISPLAY OK DISPLAY OK There are two methods for inputting characters Character input 1 1 Press or to select the character to be input 2 Press ENTER The selected character will be input Character input 2 Example Explained here is the procedure when you input F and J 1 Press the numeric keys where a character you want to input is assigned 3 d e f 2 Press the numeric keys continuously and select the c...

Page 77: ... Upper Lower Auto caps CANCEL RETURN DISPLAY OK DISPLAY OK Space bar Selecting between uppercase and lowercase letters You can select either uppercase or lowercase letters when modifying your titles using the keyboard screen with the Letters tab 1 Press STOP Or press or to select Caps then press ENTER 2 Press or to select the type of letters in the list below and press ENTER Auto caps Determines u...

Page 78: ...ion tab of the source video tape to prevent the data from accidentally being erased Confirm the disc space before operation 1 Press DVD VCR to set this unit to DVD mode The DVD indicator will light 2 Press REC MODE SPEED and select the recording mode SP LP EP or XP The recording mode is indicated on both the TV screen and the display window For the details of the recording mode see page 50 3 Press...

Page 79: ...ode SP or LP The recording mode is indicated on both the TV screen and the display window For the details of the recording mode see page 46 3 Press DVD VCR and set the unit to DVD mode NOTE Confirm that the DVD indicator lights 4 Press DUBBING The DVD is waiting for playback and the VCR is waiting for recording Then the following message appears 5 Press DUBBING or or to select YES and press ENTER ...

Page 80: ...sc Dubbing using other equipment VR mode Video mode DVD R VCR 2 Press REC MODE SPEED and select the recording mode VCR SP or LP See page 46 DVD SP LP EP or XP See page 50 3 Press REC on this unit 4 Press the PLAY button on the playback device 5 To stop dubbing press STOP When a video is recorded using this unit Preparation Turn ON the TV and select its AV channel this may be labelled EXT AUX etc L...

Page 81: ...Video output a superior picture will be achieved using an S Video cable connected to the S Video input AV3 on the front panel with S Video cable In this case you must select S VIDEO mode in AV3 INPUT setting on page 25 If you select VIDEO only the composite video signal will be input S Video input signal will be cut The S Video input can be used only for recording on the disc The S Video input can...

Page 82: ...os are trademarks of DivXNetworks Inc and are used under license Dolby Digital With multichannel audio this high quality surround system is used in many movie theaters around the world Manufactured under licence from Dolby Laboratories Dolby and the double D symbol are trademarks of Dolby Laboratories DTS DTS stands for Digital Theater System DTS is a surround system different from Dolby Digital t...

Page 83: ... Title Menu on some DVD discs track A song on a music CD is called a track TRACK INFO screen The screen that appears when TITLE MENU is pressed if an Audio disc is in the unit Video mode This recording format is compatible with commer cially available DVD players VR mode This recording format is the basic DVD RW recording format and lets you enjoy the various editing functions available with this ...

Page 84: ...rani Gujarati Hausa Hebrew Hindi Hungarian Icelandic Indonesian Interlingua Irish Italian Japanese Javanese Kannada Kashmiri Kazakh Kirghiz Korean Kurdish Laothian Code 2211 2232 2224 2230 2321 2317 2329 2322 2330 2319 2328 2325 2324 2411 2415 2425 2528 2611 2629 2622 2630 2731 2823 2825 2831 2923 2911 1714 2928 2918 2924 Language Latin Latvian Lettish Lingala Lithuanian Macedonian Malagasy Malay ...

Page 85: ...d to record the Copy Once program onto a disc Video mode You tried to record the Copy Once program onto a disc without CPRM Erase unnecessary chapters or load another disc You cannot record the video con taining copy guard signal You cannot record the video con taining copy guard signal Load a DVD RW Ver 1 1 1 2 VR mode with CPRM Load a DVD RW Ver 1 1 1 2 VR mode with CPRM 51 NO DISC PROCESSING PL...

Page 86: ...isc is not a DVD RAM DVD R RW dual disc DVD CD hybrid disc or other incompatible format disc Some discs may not do some of the functions Check the disc space using the disc information Check the disc for protection Check if the video to be recorded is not copy guarded Check that the number of recorded titles is 99 or less using the disc information Check that the total number of chapters for the r...

Page 87: ...ed Multi angles are not recorded on the DVD disc The function is prohibited with the unit or the disc VCR OTHER Good Picture Snowy Picture Video Head Clogging The video heads record and playback pictures and sound on the video tape In the event that they become dirty you won t be able to do a perfect recording and the playback picture will be extremely snowy Also keep in mind that a poor tape qual...

Page 88: ...ugh to support all four of the unit s feet Other Additional information Handling discs When holding discs of any type take care not to leave fingerprints dirt or scratches on the disc surface Hold the disc by its edge or by the center hole and edge Damaged or dirty discs can affect playback and record ing performance Take care also not to scratch the label side of the disc Although not as fragile ...

Page 89: ... C to 35 C Less than 80 RH SCART socket Video 1 Vp p 75 Ω Audio 500 mV 50k Ω Audio IN jack 500 mV 50k Ω SCART socket Video 1 Vp p 75 Ω Audio 500 mV 1k Ω Audio OUT jack 500 mV 1k Ω 12 programs 1 month Approx 30 min PAL NTSC tape playback with PAL 60 Hz 4 Rotary Heads Hi Fi Sound 2 Tracks MONO Sound 1 Track 21 69 UHF channel 36 23 to 69 Approx 1 minute and 12 seconds with E 180 Cassette Tape at 25 C...

Page 90: ...Additional information 08 90 En 2H30301B_En_82_Back 8 4 05 19 27 90 ...

Page 91: ...Additional information 08 91 En 2H30301B_En_82_Back 8 4 05 19 27 91 ...

Page 92: ... 1540 U S A TEL 800 421 1404 PIONEER EUROPE NV Haven 1087 Keetberglaan 1 B 9120 Melsele Belgium TEL 03 570 05 11 PIONEER ELECTRONICS ASIACENTRE PTE LTD 253 Alexandra Road 04 01 Singapore 159936 TEL 656 472 1111 PIONEER ELECTRONICS AUSTRALIA PTY LTD 178 184 Boundary Road Braeside Victoria 3195 Australia TEL 03 9586 6300 PIONEER ELECTRONICS DE MEXICO S A DE C V Blvd Manuel Avila Camacho 138 10 piso ...

Reviews: