background image

Before you start

Loading the batteries in the 
remote control

Open the battery compartment.

Insert 2 batteries (AAA/R03 size 
battery) with correct polarity (

 / 

as indicated.

Close the battery compartment.

WARNING

Do not use or store batteries in direct sunlight or other 

excessively hot place, such as inside a car or near 

a heater. This can cause batteries to leak, overheat, 

explode or catch fire. It can also reduce the life or 

performance of batteries.

NOTE

• 

When inserting the batteries, make sure not to 

damage the springs on the battery’s (

) terminals.

• 

Do not use any batteries other than the ones 

specified. Also, do not use a new battery together 

with an old one.

• 

When loading the batteries into the remote control, 

set them in the proper direction, as indicated by the 

polarity marks (

 and 

).

• 

Do not heat batteries, disassemble them, or throw 

them into flames or water.

• 

Batteries may have different voltages, even if they 

are the same size and shape. Do not use different 

types of batteries together.

• 

To prevent leakage of battery fluid, remove the 

batteries if you do not plan to use the remote 

control for a long period of time (1 month or more). 

If the fluid should leak, wipe it carefully off the 

inside of the case, then insert new batteries. If a 

battery should leak and the fluid should get on your 

skin, flush it off with large quantities of water.

• 

When disposing of used batteries, please comply 

with governmental regulations or environmental 

public institution’s rules that apply in your country/

area.

Connections

Player’s rear panel

HDMI OUT

DIGITAL OUT

• 

Be sure to turn off the power and unplug the power 

cord from the power outlet whenever making or 

changing connections.

• 

Connect the power cord after all the connections 

between devices have been completed.

• 

Signals can be transferred to an HDMI-compatible 

TV without loss of picture or sound quality using 

an HDMI cable. 

Follow the TV instructions after the connections, 

then set 

HDMI Resolution

 (page 7).

• 

This player’s interface is designed according to the 

High-Definition Multimedia Interface specifications.

• 

When an HDMI-compatible device is connected, 

the resolution is displayed on the front panel 

display.

• 

The resolution of the video signals output from the 

HDMI OUT

 terminal can be changed manually. 

Change the 

HDMI Resolution

 setting (page 7). 

Settings for two units can be stored in the memory.

• 

This player is designed for connecting to 

HDMIcompatible devices. It may not operate 

properly if connected to DVI devices.

Playable audio signals through the HDMI 
OUT terminal

• 

44.1 kHz to 96 kHz, 16-bit/20-bit/24-bit 2-channel 

linear PCM audio (including 2-channel downmixing)

• 

Dolby Digital 5.1-channel audio

• 

DTS 5.1-channel audio

• 

MPEG audio

Connecting using commercially available 
cables

• 

The player can be connected to an AV amplifier, 

etc., using commercially available digital audio 

cables.

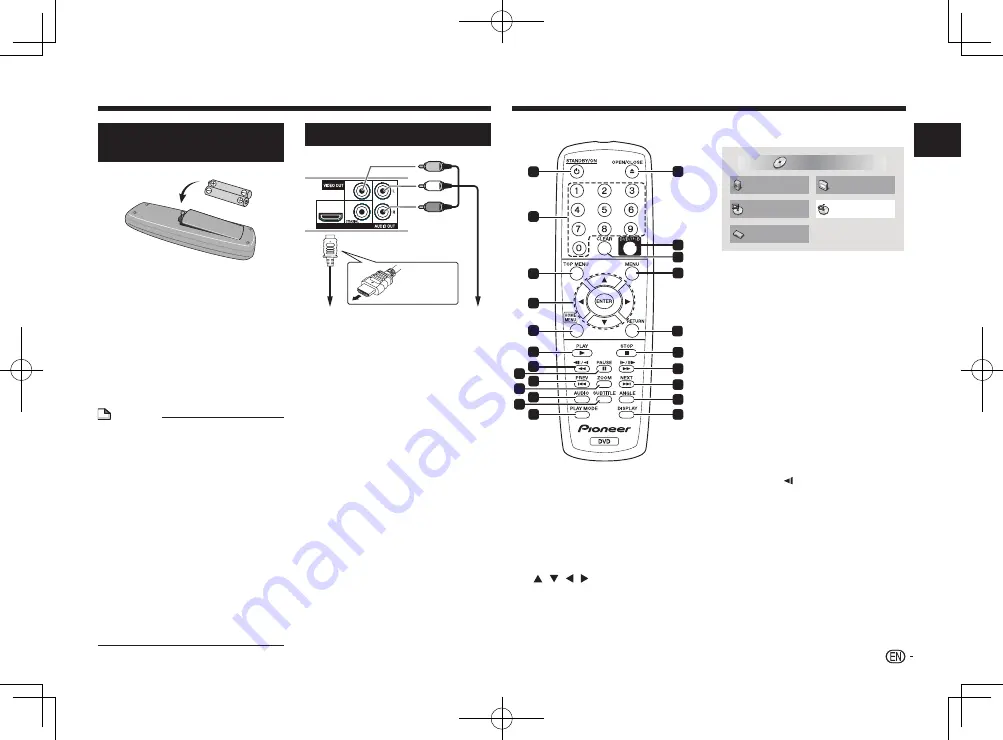
Part names and functions

3

2

11

4

5

1

6
7

8

9

10

11

12

11

13

14

15
16
17

18

19
20
21
22
23

Remote Control

u

 STANDBY/ON


Press to turn the power on and off.

Number buttons (0 to 9)


Use these to specify and play the title, chapter, 

track or file. Also use to select items on 

MENU


screens, etc.

TOP MENU


Press to display the top menu of the DVD-Video.

 /   /   / 


Use these to select items, change settings and 

move the cursor.

 ENTER


Use this to implement the selected item or enter 

a setting that you have changed.

HOME MENU


Press to display/hide 

HOME MENU

.

Audio Settings

Play Mode

Disc Navigator

Initial Settings

Video Adjust

HOME MENU

DVD

•  Audio Settings

 (page 7)

•  Video Adjust

 (page 7)

•  Play Mode

•  A-B Repeat

The specified section within a single title 

or track is played repeatedly.

•  Repeat

Plays titles, chapters, tracks or files 

repeatedly.

•  Random

Plays titles, chapters or tracks in random 

order.

•  Program

See page 6 for details.

•  Search Mode

Plays the specified number or time within 

the title, chapter, track or file.

The 

Play Mode

 function may not work for some 

discs or files.

•  Disc Navigator

 (see 

MENU

 on page 4)

•  Initial Settings

 (page page 7)

 PLAY


Press to start playback.

 / 

 / 

• 

Press during playback to fast-reverse.

• 

Press in the pause mode to move backward 

frame-by-frame.

• 

Press and hold in the pause mode to play 

back slowly (reverse).

 PAUSE


Press to stop playback temporarily. Press again 

to resume.

 PREV


Press to return to the beginning of the currently 

playing title, chapter, track or file. Press twice to 

move back to the beginning of the previous title, 

chapter, track or file.

Intr
oduction

Match the direction of 

the plug to the terminal 

and insert straight.

TV or AV receiver

HDMI cable 

(commercially available)

Audio/video cable

(supplied) 

Yellow

White

Red

TV or AV receiver

 3

Summary of Contents for DV-3052V

Page 1: ......

Page 2: ...old purposes such as long term use for business purposes in a restaurant or use in a car or ship and which requires repair will be charged for even during the warranty period K041_A1_En Operating Environment Operating environment temperature and humidity 5 C to 35 C 41 F to 95 F less than 85 RH cooling vents not blocked Do not install this unit in a poorly ventilated area or in locations exposed t...

Page 3: ...put from the HDMI OUT terminal can be changed manually Change the HDMI Resolution setting page 7 Settings for two units can be stored in the memory This player is designed for connecting to HDMIcompatible devices It may not operate properly if connected to DVI devices Playable audio signals through the HDMI OUT terminal 44 1 kHz to 96 kHz 16 bit 20 bit 24 bit 2 channel linear PCM audio including 2...

Page 4: ...e play press STOP again while playback is stopped 20 Press during playback to fast forward Press in the pause mode to move forward frame by frame Press and hold in the pause mode to play back slowly forward 21 NEXT Press during playback to skips ahead to the beginning of the next title chapter track or file 22 ANGLE On DVD Video discs containing multiple angles the angle can be changed during play...

Page 5: ...contact the dealer The player may not be able to play discs recorded using a computer or a BD DVD recorder if burn quality is not good due to characteristics of the disc scratches dirt on the disc dirt on the recorder s lens etc Playable files Only discs recorded in ISO9660 Level 1 Level 2 and Joliet can be played Files protected by DRM Digital Rights Management cannot be played Files other than t...

Page 6: ...rogram screen then press ENTER To resume normal playback select Playback Stop from the program screen then press ENTER The program remains in the memory To cancel the entire program select Program Delete from the program screen then press ENTER NOTE Programs can be played repeatedly Select Program Repeat from Repeat on the Play Mode screen during programmed playback Programs cannot be played in ra...

Page 7: ... according to the connected unit 96 kHz PCM Out Select whether to output 96 kHz audio signals 96kHz or to convert them into linear PCM signals 96kHz 48kHz according to the connected unit MPEG Out Select whether to output MPEG audio signals MPEG or to convert them into linear PCM signals MPEG PCM according to the connected unit Playback Setting Options settings Control Select whether to operate the...

Page 8: ...EG files Black bars may be displayed along the top and bottom or sides when JPEG files with different aspect ratios are played Troubleshooting When a USB device is connected Problem Possible causes and solutions USB device is not recognized Turn the power off then disconnect and reconnect the USB device This player does not support USB hubs Connect the USB device directly This player only supports...

Page 9: ...ug the power cord from the power outlet when cleaning the player Clean the player using a soft cloth For tough dirt apply some neutral detergent diluted in 5 to 6 parts water to a soft cloth wring out thoroughly wipe off the dirt then wipe again with a soft dry cloth Alcohol thinner benzene insecticides etc could cause the print or paint to peel off Also leaving rubber or vinyl products in contact...

Page 10: ...ingue ie 0905 Oromo om 1513 Tonga to 2015 Bashkir ba 0201 Inupiak ik 0911 Oriya or 1518 Turkish tr 2018 Byelorussian be 0205 Indonesian in 0914 Panjabi pa 1601 Tsonga ts 2019 Bulgarian bg 0207 Icelandic is 0919 Polish pl 1612 Tatar tt 2020 Bihari bh 0208 Hebrew iw 0923 Pashto Pushto ps 1619 Twi tw 2023 Bislama bi 0209 Yiddish ji 1009 Quechua qu 1721 Ukrainian uk 2111 Bengali bn 0214 Javanese jw 10...

Page 11: ...1 Vp p 75 Ω Output terminal RCA terminal HDMI output Output terminal 19 pin Audio output stereo L R Audio output level 200 mVrms 1 kHz _20 dB Output terminal RCA terminal Frequency response 4 Hz to 44 kHz Digital audio output Coaxial digital output RCA terminal USB USB port A type Appendix Specifications NOTE The specifications and design of this product are subject to change without notice This p...

Page 12: ...t 2 Markham Ontario L3R 2Z5 Canada TEL 1 877 283 5901 905 479 4411 PIONEER EUROPE NV Haven 1087 Keetberglaan 1 B 9120 Melsele Belgium TEL 03 570 05 11 PIONEER ELECTRONICS ASIACENTRE PTE LTD 253 Alexandra Road 04 01 Singapore 159936 TEL 65 6472 7555 PIONEER ELECTRONICS AUSTRALIA PTY LTD 5 Arco Lane Heatherton Victoria 3202 Australia TEL 03 9586 6300 PIONEER ELECTRONICS DE MEXICO S A DE C V Blvd Man...

Reviews: