background image

Before you start

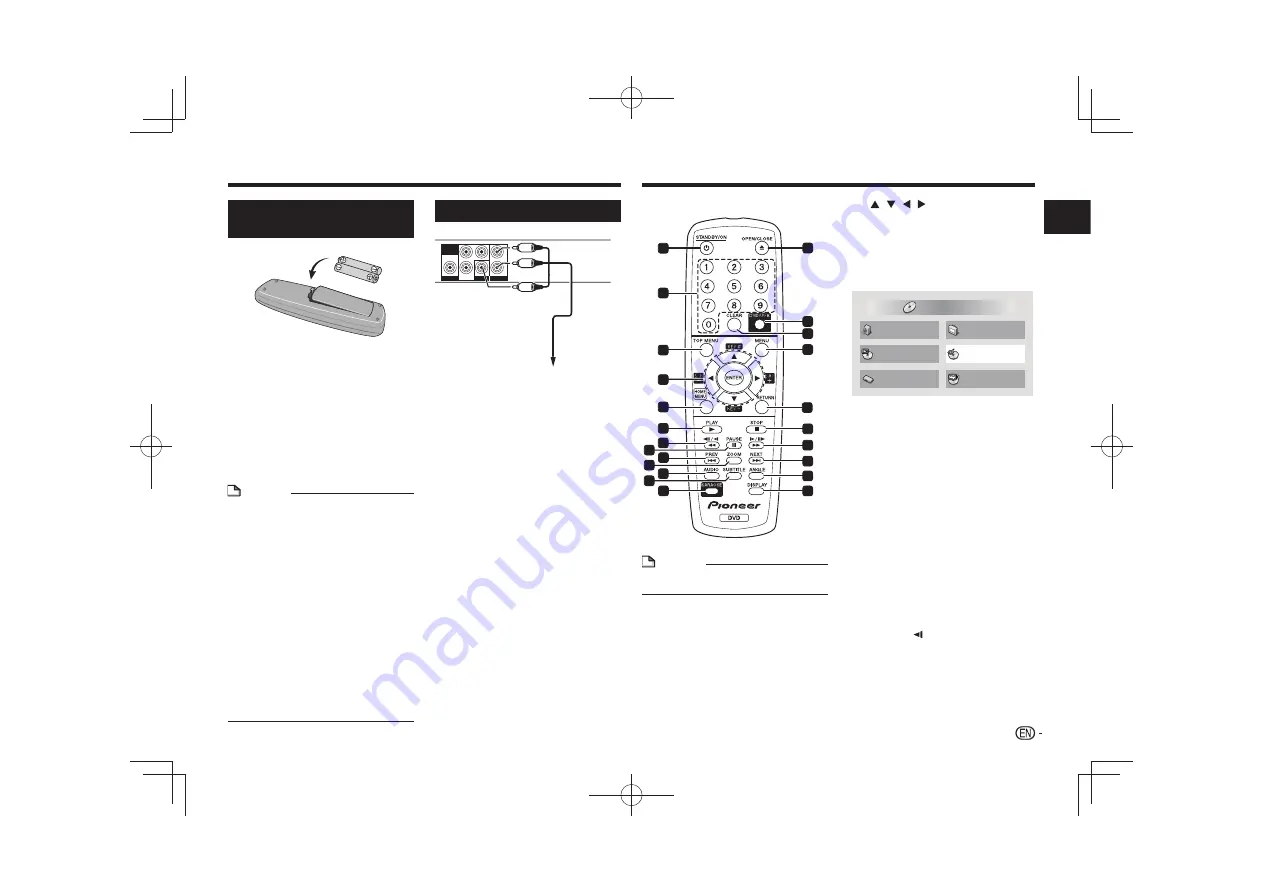
Loading the batteries in the 
remote control

Open the battery compartment.

Insert 2 batteries (AAA/R03 size 
battery) with correct polarity (

 / 

as indicated.

Close the battery compartment.

WARNING

Do not use or store batteries in direct sunlight or other 
excessively hot place, such as inside a car or near 
a heater. This can cause batteries to leak, overheat, 
explode or catch fire. It can also reduce the life or 
performance of batteries.

NOTE


When inserting the batteries, make sure not to 
damage the springs on the battery’s (

) terminals.


Do not use any batteries other than the ones 
specified. Also, do not use a new battery together 
with an old one.


When loading the batteries into the remote control, 
set them in the proper direction, as indicated by the 
polarity marks (

 and 

).


Do not heat batteries, disassemble them, or throw 
them into flames or water.


Batteries may have different voltages, even if they 
are the same size and shape. Do not use different 
types of batteries together.


To prevent leakage of battery fluid, remove the 
batteries if you do not plan to use the remote 
control for a long period of time (1 month or more). 
If the fluid should leak, wipe it carefully off the 
inside of the case, then insert new batteries. If a 
battery should leak and the fluid should get on your 
skin, flush it off with large quantities of water.


When disposing of used batteries, please comply 
with governmental regulations or environmental 
public institution’s rules that apply in your country/
area.

Connections

Player’s rear panel

CONPONENT

VIDEO OUT

DIGITAL OUT

COAXIAL

L

R

AUDIO OUT

P

B

P

R

Y

VIDEO OUT

Yellow

White

Red

Audio/videocable 
(supplied)

TV or AV receiver

•  Be sure to turn off the power and unplug the power 

cord from the power outlet whenever making or 
changing connections.

•  Connect the power cord after all the connections 

between devices have been completed.

Connecting using commercially available 
cables

•  The player can be connected to an AV amplifier, 

etc., using commercially available digital audio 
cables and component video cables.

Part names and functions

3

2

11

4

5

1

6
7

8

9

10

11

12

11

13

14

15

16
17

18

19
20
21
22
23

Remote Control

DV-2042K

NOTE


The illustrations used in this operating instructions 
are DV-2042K.

 STANDBY/ON


Press to turn the power on and off.

Number buttons (0 to 9)


Use these to specify and play the title, chapter, 
track or file. Also use to select items on 

MENU


screens, etc.

3 TOP 

MENU


Press to display the top menu of the DVD-Video.

 /   /   / 


Use these to select items, change settings and 
move the cursor.

 ENTER


Use this to implement the selected item or enter 
a setting that you have changed.

5 HOME 

MENU


Press to display/hide 

HOME MENU

.

Audio Settings

Play Mode

Disc Navigator

Initial Settings

Video Adjust

HOME MENU

DVD

CD –> USB Rec


Audio Settings

 (page 7)


Video Adjust

 (page 7)


Play Mode


A-B Repeat

The specified section within a single title 
or track is played repeatedly.


Repeat

Plays titles, chapters, tracks or files 
repeatedly.


Random

Plays titles, chapters or tracks in random 
order.


Program

See page 6 for details.


Search Mode

Plays the specified number or time within 
the title, chapter, track or file.

The 

Play Mode

 function may not work for some 

discs or files.


Disc Navigator

 (see 

MENU

 on page 4)


Initial Settings

 (page 6)


CD -> USB Rec (DV-2042K)

 (page 6)

 PLAY


Press to start playback.

 / 

 / 


Press during playback to fast-reverse.


Press in the pause mode to move backward 
frame-by-frame.


Press and hold in the pause mode to play 
back slowly (reverse).

DV-2042K

Intr
oduction

 3

Summary of Contents for dv-2042k

Page 1: ...Operating Instructions DVD PLAYER ...

Page 2: ...e for business purposes in a restaurant or use in a car or ship and which requires repair will be charged for even during the warranty period K041_A1_En Operating Environment Operating environment temperature and humidity 5 C to 35 C 41 F to 95 F less than 85 RH cooling vents not blocked Do not install this unit in a poorly ventilated area or in locations exposed to high humidity or direct sunligh...

Page 3: ... or AV receiver Be sure to turn off the power and unplug the power cord from the power outlet whenever making or changing connections Connect the power cord after all the connections between devices have been completed Connecting using commercially available cables The player can be connected to an AV amplifier etc using commercially available digital audio cables and component video cables Part n...

Page 4: ...to play back 18 RETURN Press to return to the previous screen 19 STOP To resume play press STOP once during playback If you press PLAY after that playback starts from the point you last stopped To cancel resume play press STOP again while playback is stopped 20 Press during playback to fast forward Press in the pause mode to move forward frame by frame Press and hold in the pause mode to play back...

Page 5: ...tact the dealer The player may not be able to play discs recorded using a computer or a BD DVD recorder if burn quality is not good due to characteristics of the disc scratches dirt on the disc dirt on the recorder s lens etc Playable files Only discs recorded in ISO9660 Level 1 Level 2 and Joliet can be played Files protected by DRM Digital Rights Management cannot be played Files other than the ...

Page 6: ...ecognize the USB device play files or supply power to the USB device For details see When a USB device is connected on page 9 Pioneer does not support that all files recorded on all USB devices will play or that power will be supplied to the USB device Also note that Pioneer will accept no responsibility whatsoever for loss of files on USB devices caused by connection to this player 1 Switch to US...

Page 7: ...r files with the extension wma or mp3 The effect depends on the file Try different settings and choose the one providing the good effect Equalizer Off Rock Pop Live Dance Techno Classic Soft Select according to the genre of music to be listened to Audio DRC High Medium Low Off This makes loud sounds weaker and weak sounds louder This setting only affects Dolby Digital sound The effect depends on t...

Page 8: ...e between DVD and CD The volume may sound different due to differences in how the signals are recorded on the disc Disc cannot be played or disc tray opens automatically If the disc is dirty wipe the dirt off the disc page 10 Set the disc with the printed side facing up Check the disc s region number and if the number is compatible for playback on the player page 5 Only the discs with the appropri...

Page 9: ...nal conditions striped patterns may appear on a TV screen and noise may enter the sound of radio broadcasts when the player s power is on If this happens turn the player s power off About condensation If the player is moved suddenly from a cold place into a warm room in winter for example or if the temperature in the room in which the player is installed rises suddenly due to a heater etc water dr...

Page 10: ...plets off the surface of the disc before loading it About trademarks Manufactured under license from Dolby Laboratories Dolby and the double D symbol are trademarks of Dolby Laboratories Language Code Table Language names codes an input codes Japanese ja 1001 Bhutani dz 0426 Kirghiz ky 1125 Sinhalese si 1909 English en 0514 Esperanto eo 0515 Latin la 1201 Slovak sk 1911 French fr 0618 Estonian et ...

Page 11: ...Tolerable operating humidity 5 to 85 no condensation Video output Output level 1 Vp p 75 Output terminal RCA terminal Component video output Y CB PB CR PR DV 2042K Y output level 1 Vp p 75 CB PB CR PR Output level 0 7 Vp p 75 Output terminal RCA terminal Audio output stereo L R Audio output level 200 mVrms 1 kHz 20 dB Output terminal RCA terminal Frequency response 4 Hz to 44 kHz Digital audio out...

Page 12: ...am Ontario L3R 2Z5 Canada TEL 1 877 283 5901 905 479 4411 PIONEER EUROPE NV Haven 1087 Keetberglaan 1 B 9120 Melsele Belgium TEL 03 570 05 11 PIONEER ELECTRONICS ASIACENTRE PTE LTD 253 Alexandra Road 04 01 Singapore 159936 TEL 65 6472 7555 PIONEER ELECTRONICS AUSTRALIA PTY LTD 5 Arco Lane Heatherton Victoria 3202 Australia TEL 03 9586 6300 PIONEER ELECTRONICS DE MEXICO S A DE C V Blvd Manuel Avila...

Reviews: