background image

DEH-3300R-2,3330R-2

7

Mark No. Description

Part No.

Mark No. Description

Part No.

1 Control Unit

CWX2481

2 Connector(CN701)

CKS1959

3 Connector(CN101)

CKS3486

4 Screw

BMZ20P025FMC

5 Screw

BSZ20P040FMC

6 Screw(M2x4)

CBA1362

7 Screw(M2x3)

CBA1527

8 Screw

CBA1545

9 Washer

CBF1037

10 Washer

CBF1038

11 Washer

CBF1039

12 Washer

CBF1060

13 Spring

CBH2378

14 Spring

CBH2379

15 Spring

CBH2380

16 Spring

CBH2381

17 Spring

CBH2382

18 Spring

CBH2383

19 Spring

CBH2384

20 Spring

CBH2385

21 Spring

CBH2386

22 Spring

CBH2387

23 Spring

CBH2390

24 Spring

CBH2391

25 Spring

CBH2392

26 Spring

CBH2426

27 Spring

CBH2444

28 Spring

CBL1494

29 Spring

CBL1495

30 Shaft

CLA3845

31 Roller

CLA3910

32 Frame

CNC8946

33 Lever

CNC8948

34 Lever

CNC8949

35 Arm

CNC8951

36 Arm

CNC9016

37 Arm

CNC9017

38 Bracket

CNC9123

39 Frame

CNC9263

40 Belt

CNT1086

41 Gear

CNV6315

42 Gear

CNV6316

43 Gear

CNV6317

44 Gear

CNV6318

45 Gear

CNV6319

46 Gear

CNV6320

47 Arm

CNV6322

48 Arm

CNV6323

49 Arm

CNV6324

50 Arm

CNV6325

51 Arm

CNV6326

52 Guide

CNV6327

53 Arm

CNV6328

54 Guide

CNV6329

55 Rack

CNV6330

56 Clamper

CNV6331

57 Arm

CNV6332

58 Guide

CNV6333

59 Cover

CNV6334

60 Arm

CNV6335

61 Guide

CNV6336

62 Roller

CNV6338

63 Damper

CNV6339

64 Damper

CNV6340

65 Guide

CNV6484

66 Chassis Unit

CXB5898

67 Arm Unit

CXB5899

68 Arm Unit

CXB5900

69 Arm Unit

CXB5901

70 Motor Unit(M2)

CXB5903

71 Screw Unit

CXB5904

72 Gear Unit

CXB5905

73 Bracket Unit

CXB6006

74 Motor Unit(M1)

CXB6007

75 Arm Unit

CXB6237

76 Screw(M2x5)

EBA1028

77 Screw

JFZ20P020FMC

78 Screw

JGZ17P020FZK

79 Washer

YE15FUC

80 Washer

YE20FUC

81 Pickup Unit(Service)(P9) CXX1480
82 Screw

IMS26P030FMC

83 Guide

CNV6832

-

CD MECHANISM MODULE SECTION PARTS LIST

Summary of Contents for DEH-3300R-2

Page 1: ...in Japan ORDER NO CRT2669 Service Manual HIGH POWER CD PLAYER WITH RDS TUNER DEH 3300R 2 X1B EW X1P EW DEH 3330R 2 X1B EW X1P EW This is the unit which has been replaced S8 1 CXK5201 CD mechanism module with S9 CXK5500 This service manual should be used together with the manual s listed below For the parts numbers adjustments etc which are not shown in this manual refer to the following manual s M...

Page 2: ...ered by this manual Improperly performed repairs can adversely affect the safety and reliability of the product and may void the warranty If you are not qualified to perform the repair of this product properly and safely you should not risk trying to do so and refer the repair to a qualified service technician 1 Safety Precautions for those who Service this Unit When checking or adjusting the emit...

Page 3: ...A2397 7 Polyethylene Bag E36 615 CEG 127 CEG 127 8 Polyethylene Bag CEG 162 UEG 012 UEG 012 9 Carton CHG4270 UHG4376 UHG 154 10 Contain Box CHL4270 UHL4376 UHL 107 11 Protector CHP2251 UHP2101 UHP2101 12 Protector CHP2252 UHP2102 UHP2102 13 1 Polyethylene Bag CEG1116 UEG1116 UEG1116 13 2 Owner s Manual CRD3304 URD 173 URD 173 13 3 Owner s Manual CRD3305 URD 174 URD 174 13 4 Installation Manual CRD...

Page 4: ... CRY1013 CRY1014 CRY1014 13 6 Warranty Card CRY1157 URY1087 URY1087 EXTERIOR Page 5 EXTERIOR SECTION PARTS LIST Part No DEH 3300R X1B EW Mark No Description DEH 3300R X1N EW DEH 3300R X1P EW 5 Cord Assy CDE6435 UDE6435 7 Cable CDE6444 CDE6610 12 Holder CNC8659 UNC8659 16 Tuner Amp Unit CWM7384 UWM7384 25 Connector CN501 CKS4398 CKS3835 32 FM AM Tuner Unit CWE1562 UWE1562 35 Detach Grille Assy CXB6...
Page 5: ...15 RS1 16S473J Not used R516 RS1 16S473J RS1 16S104J R518 RS1 16S222J Not used R519 RS1 16S222J RS1 16S102J R520 RS1 16S681J RS1 16S0R0J R521 RS1 16S102J RS1 16S222J R522 R524 R534 R535 RS1 16S0R0J Not used R523 RS1 16S102J RS1 16S0R0J R525 R526 R527 Not used RS1 16S222J R529 Not used RS1 4PU0R0J R530 Not used RS1 16S0R0J R536 RS1 16S0R0J RS1 16S102J R537 Not used RS1 16S104J CN701 D CONTROL UNIT ...

Page 6: ...6 DEH 3300R 2 3330R 2 CD MECHANISM MODULE D F ...

Page 7: ...8951 36 Arm CNC9016 37 Arm CNC9017 38 Bracket CNC9123 39 Frame CNC9263 40 Belt CNT1086 41 Gear CNV6315 42 Gear CNV6316 43 Gear CNV6317 44 Gear CNV6318 45 Gear CNV6319 46 Gear CNV6320 47 Arm CNV6322 48 Arm CNV6323 49 Arm CNV6324 50 Arm CNV6325 51 Arm CNV6326 52 Guide CNV6327 53 Arm CNV6328 54 Guide CNV6329 55 Rack CNV6330 56 Clamper CNV6331 57 Arm CNV6332 58 Guide CNV6333 59 Cover CNV6334 60 Arm CN...

Page 8: ...D F 8 DEH 3300R 2 3330R 2 1 2 3 4 1 2 3 4 D C B A CD MECHANISM MODULE M1 CXB6007 M2 CXB5903 LOADING CARRIAGE SPINDLE RF AMP S ACT MOTOR DRIVER 5V REGULATOR CN101 CONTROL UNIT PICKUP UNIT SERVICE P9 D F ...

Page 9: ... 9 16 934MHz SERVO CONTROL DSP DAC LPF ER CN701 SWITCHES CONTROL UNIT S901 HOME SWITCH ON OFF S902 CLAMP SWITCH ON OFF S903 DSCSNS SWITCH ON OFF S904 12EJ SWITCH ON OFF S905 8EJ SWITCH ON OFF The underlined indicates the switch position A CN501 F ...

Page 10: ...f GND Mode Normal Ref VREF Mode Normal Ref VREF Mode Normal Ref VREF Mode Normal Ref VREF Mode Normal Ref VREF Mode Normal Ref VREF Mode Normal Ref VREF Mode Normal Ref VREF Mode Test Ref VREF Mode Normal Ref VREF Mode Normal 500ms div 0 CH1 TE 500mV div 8 CH2 FE 500mV div When setting up Source On 200ms div 1µs div CH1 LRCK 2V div CH2 DOUT 2V div During Play 10µs div 7 CH1 MD 500mV div During Pla...

Page 11: ...H1 DSCSNS 5V div 2 CH2 CLCONT 5V div 3 CH3 LOEJ 5V div When Eject 8cm CD 200ms div CH1 LOUT 2V div CH2 ROUT 2V div Play in 1kHz 0dB 200µs div CH1 TEY 500mV div CH2 SD 2V div During inside outside search 200ms div 1 CH1 DSCSNS 5V div 2 CH2 CLCONT 5V div 3 CH3 LOEJ 5V div When Eject 12 cm CD 200ms div CH1 RFO 2V div CH2 DFCT 5V div 5 CH3 FD 1V div CH4 TD 2V div When reproducing black dots 800µm 500µ...

Page 12: ...12 DEH 3300R 2 3330R 2 1 2 3 4 1 2 3 4 D C B A CD MECHANISM MODULE CONTROL UNIT SIDE A VREF E F HOME 12EJ DSCSNS M2 LOADING CARRIAGE MOTOR M1 SPINDLE MOTOR PICKUP UNIT SERVICE P9 A CN501 D F D F ...

Page 13: ...DEH 3300R 2 3330R 2 1 2 3 4 1 2 3 4 D C B A 13 SIDE B CONTROL UNIT CLAMP 8EJ DF D F ...

Page 14: ...S332J R 304 RS1 16S514J R 306 RS1 16S102J R 307 RS1 16S102J R 312 RS1 16S103J R 313 RS1 16S473J R 315 RD1 4PU334J R 321 RS1 16S331J R 322 RS1 16S0R0J R 323 RS1 16S332J R 401 RS1 16S684J R 402 RS1 16S103J R 403 RS1 16S103J R 404 RS1 16S183J R 405 RS1 16S123J R 407 RS1 16S622J R 408 RS1 16S622J R 409 RS1 16S113J R 410 RS1 16S752J R 701 RS1 16S102J R 702 RS1 16S221J R 703 RS1 16S221J R 704 RS1 16S221...

Page 15: ...SRYB221K50 C 403 CKSRYB153K25 C 404 CKSRYB103K50 C 405 CEV101M10 C 702 CKSRYB104K16 C 703 CKSRYB104K16 C 801 10µF 10V CCH1349 C 802 CEV101M10 C 803 CKSRYB224K16 Miscellaneous Parts List Pickup Unit Service P9 CXX1480 M 1 Motor Unit SPINDLE CXB6007 M 2 Motor Unit LOADING CARRIAGE CXB5903 Circuit Symbol and No Part Name Part No ...

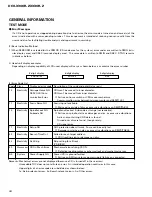
Page 16: ...e minute to allow the circuits to stabi lize Since the protective systems in the unit s software are rendered inoperative in test mode be very careful to avoid mechanical and or electrical shocks to the sys tem when making adjustment The RFI and RFO signals are easy to oscillate because of a wide band When observing them insert a resis tor of about 1 kΩ to the series This equipment will not guaran...

Page 17: ... Mode 2 Automatic adjustment value display switching 3 TRK MIN SEC 1 T CLS and F T AGC and RF AGC and Applicable servomechanism TRKxxMINxxSECxx 6 T Close and Applicable servomechanism TRKxxMINxxSECxx 3 RF AGC RF AGC coefficient display TRK MIN SEC CRG TRK8x MIN8x SEC8x or TRK9xMIN9xSEC9x CRG TRK8xMIN8xSEC8x or TRK9xMIN9xSEC9x 2 T Balance adjustment T Balance coefficient display TRK MIN SEC 1 F T R...

Page 18: ...PU unit to the innermost track 3 Press key 3 to close focus the display should read 91 Press key 2 to implement the tracking balance adjust ment the display should now read 81 Press key 3 The display will change returning to 81 on the fourth press 4 As shown in the diagram above monitor the LPF outputs using the oscilloscope and check that the phase differ ence is within 75 Refer to the photograph...

Page 19: ...DEH 3300R 2 3330R 2 19 Grating waveform Ech Xch 20mV div AC Fch Ych 20mV div AC 45 0 75 60 30 90 ...

Page 20: ...CRG move mechanism Communication error between microcomputer and SERVO LSI 11 Electricity Focus Servo NG Focusing not available Stains on rear side of disc or excessive vibrations on REWRITABLE 12 Electricity Spindle Lock NG Spindle not locked Sub code is strange not readable Subcode NG Failure on spindle stains or damages on disc or excessive vibrations A disc not containing CD R data is found Tu...

Page 21: ...t mode by turning on the reset start 2 Key Correspondence Key Test mode New test mode Regulator Off Regulator On In play Error Production BAND To regulator on To regulator off Time Err No switching FWD Kick FF TR REV Kick REV TR 1 Tracking Close Scan 2 Tracking Open Mode 3 Focus Close Focus Open Jump Off 6 To new test mode Jump mode switching Auto Manu Note Eject and CD on off is performed in the ...

Page 22: ...g close start Spindle stationary servocontrol setting Focus slips off 33 Tracking close 2 Focus slips off 34 Tracking close 3 Focus slips off 35 Focus Tracking AGC start Focus slips off 36 Focus Tracking AGC 2 Focus slips off 37 Focus Tracking AGC 3 Focus slips off 38 Focus Tracking AGC 4 Focus slips off 39 Focus Tracking AGC 5 Focus slips off 40 Focus Tracking AGC 6 Focus slips off 41 Focus Track...

Page 23: ...rmal mode 3 When a Protection Error Occurred A Error display A B C BAND key 8 digit display 6 digit display 4 digit display ERROR xx ERR xx E xx B Error occurrence timing display in track no B C Auto Manual key 8 digit display 6 digit display 4 digit display Auto setting TNO Min Sec TNO 10 40 05 10 C Error occurrence timing display in absolute time B C Auto Manual key 8 digit display 6 digit displ...

Page 24: ... slowly pulling up the part 4 Now the top frame has been removed and under this state fix the genuine Connector again and eject the disk Caution When you reassemble the Carriage Mechanical part apply a bit of alcohol to Dampers How to remove the Guide Arm Assy 1 Unlock the spring 1 piece at the right side of the assembly 2 Unscrew screws 2 pieces then remove the Screw Gear Bracket 3 Shift the Guid...

Page 25: ...the spring 1 piece and remove the E ring 1 piece of the Fulcrum Shaft 2 Shift the arm to the left side direction and unlock pins 2 pieces How to remove the Pickup Unit 1 Unscrew 2 pieces of screws then remove the Pulley Cover 2 Remove the Feed Screw unit from the pawl of the Feed Screw Guide The pawl is located inside the guide 3 Remove the belt from the Pulley then remove the Pickup unit Caution ...

Page 26: ...EO O Tracking error signal generation amplifier output terminal 15 SBAD O Sub beam addition signal output terminal 16 FEO O Focus error signal generation amplifier output terminal 17 FEN I Focus error signal generation amplifier reverse phase input terminal 18 SEB I RFRP generation circuit mode switching terminal 19 VRO O Reference voltage VREF output terminal 20 RFRP O Signal generation amplifier...

Page 27: ...e bit DAC zero detection flag output terminal 28 PDO O Phase error signal issue between the EFM and PLCK signals 29 TMAXS O TMAX detection result output terminal 30 TAMX O TMAX detection result output terminal 31 LPFN I Reverse input terminal of amplifier for lowpass filter 32 LPFO O Output terminal of amplifier for lowpass filter 33 PVREF PLL system only VREF terminal 34 VCOREF I VCO center frequ...

Page 28: ...tor circuit 78 XI I System clock oscillator circuit input terminal 79 XO O System clock oscillator circuit output terminal 80 XVDD For system clock oscillator circuit power supply terminal 81 DVSR R channel D A converting unit power supply terminal 82 RO O R channel data forward rotation output terminal 83 DVDD D A converting unit power supply terminal 5 V 84 DVR Reference voltage terminal 85 LO O...

Page 29: ...er supply pin for CH1 CH2 and CH3 at Power stage 11 VO1 Driver CH1 Negative output 12 VO1 Driver CH2 Positive output 13 VO2 Driver CH2 Negative output 14 VO2 Driver CH2 Positive output 15 VO3 Driver CH2 Positive output 16 VO3 Driver CH2 Negative output 17 VO4 Driver CH4 Positive output 18 VO4 Driver CH4 Negative output 19 POWVCC2 Power supply pin for CH4 at Power stage 20 GND Ground pin 21 CNT Con...

Reviews: