40
BDP-120
1
2
3
4
A
B
C
D
E
F
1
2
3
4
8
. EACH SETTING AND ADJUSTMENT
8
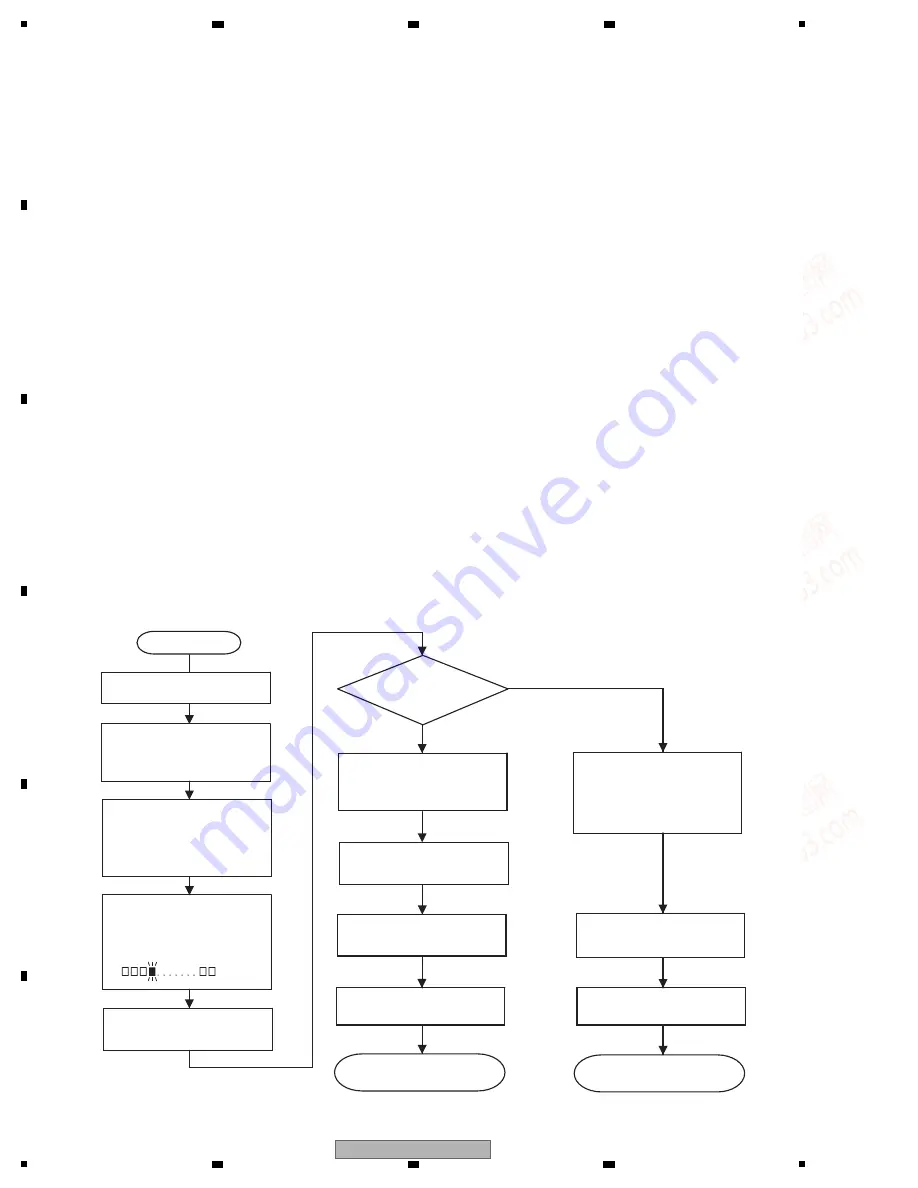
.1 UPDATING SOFTWARE
NOTE
: Be sure to update the firmware after the MAIN PWB unit is replaced.
(Updating can also be performed using the User menu. For details, refer to the operating instructions of the unit.)
1. Press [STA
N
DBY/O
N
] button to turn the switch on, then wait till the BD/D
V
D/CD disc indicator changes from blinking to lit.
2. Press [OPE
N
/CLOSE] button to open the Tray, put the update disc on the tray and close the tray.
3. The power automatically turns off. Then it turns on again and the updating with the disc will start.
4. During the updating, the mode indicator stays blinking in white as "
V
-up" message keeps blinking on LCD.
"
N
OW UPDATI
N
G DO
N
OT U
N
PLUG AC CORD" appears on the monitor screen. And the version updating progress is
expressed in %.
5. When updating with the disc is completed, the Tray automatically opens.
* If the front-end software was updated, the STA
N
DBY/O
N
indicator lights up halfway as well as the mode indicator starts
blinking alternately in white and blue.; the Tray will open after the updating is completed and the power will turn off. (Go to
step
8
.)
6. When the updating is completed, the following appears on the monitor screen. : "SOFTWARE UPDATE IS COMPLETE"
If the version updating fails, "FAILED TO COMPLETE UPDATE RETRY SOFTWARE UPDATE" is displayed. Take out the
disc, turn off the power and take the procedure again starting from [1] above.
7. Remove the disc from the Tray and press any other button of the Main Unit than [STA
N
DBY/O
N
], then the Tray will close and
the power will automatically turn off. (Confirm the power-off by stop of the Cooling Fan.)
* If [STA
N
DBY/O
N
] button is pressed, the power will turn off with the Tray open.
8
. Press [STA
N
DBY/O
N
] button to turn the power on, then wait till the STA
N
DBY/O
N
indicator changes from blinking to lit.
9. Press the [HOME ME
N
U] button on the remote controller, and the menu screen shows up (if the wallpaper screen is used).
* There is no need to take this step, because just after the power is turned on, the menu screen shows up.
10. Select [SETTI
N
GS] first and then [
V
ERSIO
N
]. (Press the E
N
TER button.)
11. The version of the currently installed software appears on the monitor screen. Compare with the version of this updated
software, make sure the version is just the same. If the version is not updated, take the procedure again from Step [2].
12. Press [STA
N
DBY/O
N
] button to turn the power off. (Confirm the power-off by stop of the cooling fan.)
NOTE
: Do not unplug the AC cord during version updating.
*The version updating cannot be made on the menu screen. Make the wallpaper onscreen.
Monitor: "CA
NN
OT UPDATE. FI
N
ISH PLAYBACK OR EDIT A
N
D SET A DISC"
Start
Turn the power on.
20%
Updating
completed
N
o
Yes
End
Restart
Updating successful.
Updating unsuccessful.
The power automatically
turns off. Then, the power
turns on automatically and
the updating starts.
Monitor:
"FAILED TO COMPLETE
UPDATE RETRY
SOFTWARE UPDATE"
The tray opens
automatically.
ex.
Open the tray, put the
update disc and close the
tray.
Monitor:
"SOFTWARE UPDATE IS
COMPLETE"
Remove the disc and turn
the power off.
Turn the power on and
confirm the version.
Remove the disc and turn
the power off.
www. xiaoyu163. com
QQ 376315150
9
9
2
8
9
4
2
9
8
TEL 13942296513
9
9
2
8
9
4
2
9
8
0
5
1
5
1
3
6
7
3
Q
Q
TEL 13942296513 QQ 376315150 892498299
TEL 13942296513 QQ 376315150 892498299


