background image

12

Virtual Theater Quick Tour

Menu Structure

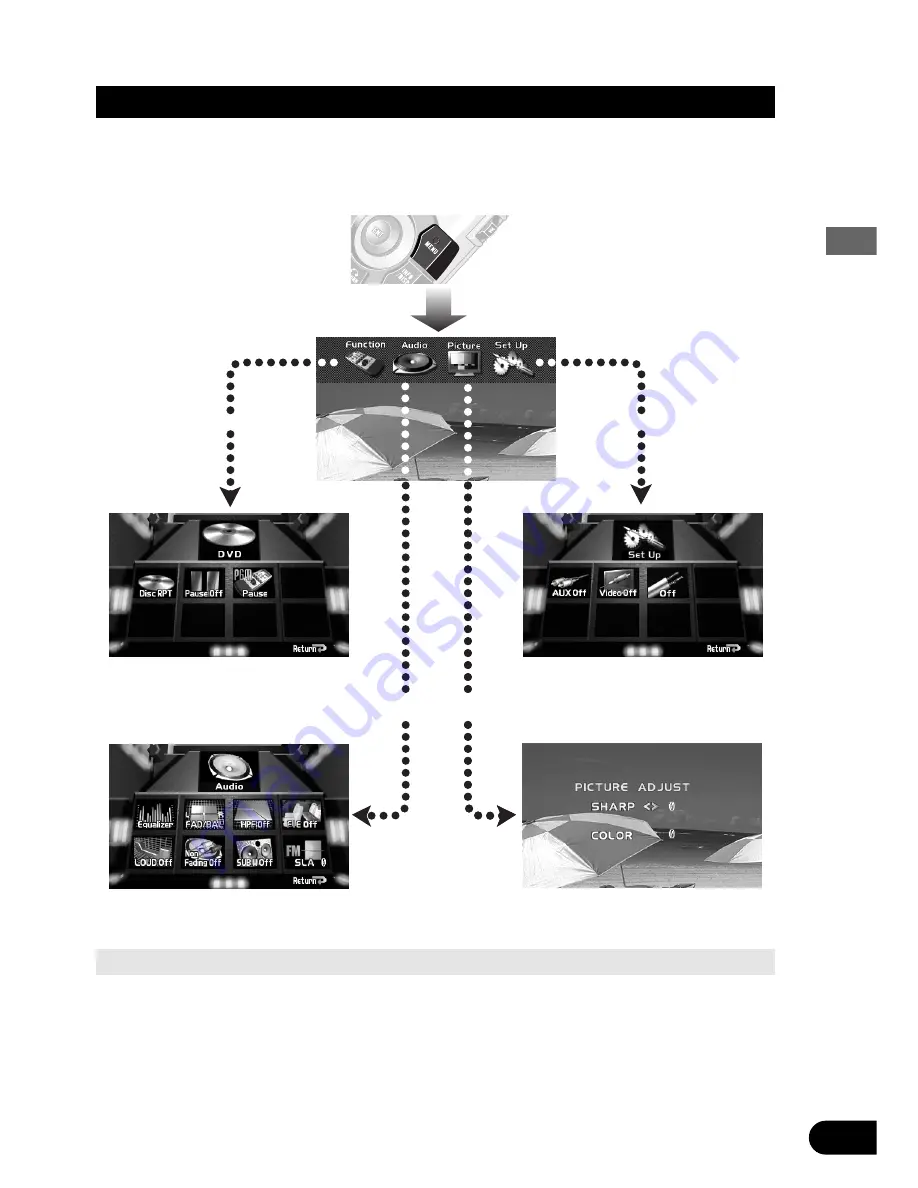
The setting and adjusting operation of this product is done from the Main Menu. Press the
MENU button, and four main menu icons appear on the screen: “Function”, “Audio”,
“Picture” and “Set Up”. The selected function is highlighted in green. Move to each menu
screen from this opening screen. 

Select “Function”, then click the joy-
stick to display the Function Menu
Screen. The menu varies depending on
the source.

Select “Set Up”, then click the joystick
to display the Set Up Menu.

Select “Audio”, then click the joystick
to display the Audio Setting Menu.

Select “Picture”, then click the joystick
to display the Picture Adjust Menu.

Animation

Animation

Animation

Returning to the Center Room

You can return to the Center Room after you are finished in any of the sub-rooms quite simply with either
of 2 options. Either use the joystick to select the Return option in that rooms screen, then click the joy-
stick, or simply press the RETURN button on the remote controller. In either case, you are brought back
to the Center Room.

Click the joystick

Click the joystick means to press the center of the joystick down and release one time.

• The Picture icon appears only when the selected source is a visual medium.

Summary of Contents for AVM-P8000R

Page 1: ...Before Using This Product Audio Visual Master Unit Owner s Manual AVM P8000R This product conforms to new cord colors ENGLISH ...

Page 2: ...mory BSM Local Seek Tuning TA function News Program Interruption Setting AF function Regional Function PGM button Display the Flip Down Plate 24 Recalling Preset Stations by Preset Station List 24 Using the RDS Functions 25 What is RDS 25 Displaying the Frequency 25 AF Function 26 Activating Deactivating the AF Function PI Seek Function 27 PI Seek Auto PI Seek for preset station Regional Function ...

Page 3: ...eset Service List 64 Adjusting Audio 65 Accessing the Audio Menu 65 Equalizer Curve 66 Selecting the Equalizer Curve Equalizer Curve Adjustment Balance Adjustment 68 High Pass Filter 69 Front Image Enhancer Function 69 Loudness Adjustment 70 Non Fading Output 71 Subwoofer Output 72 Switching the Subwoofer Output ON OFF Subwoofer Setting Adjustment Source Level Adjustment SLA 74 Changing the Initia...

Page 4: ...hose mentioned above cannot be used when the NAVI setting is selected This remote control can also be used as a Multi DVD player remote control Refer to the Multi DVD player s manual 1 Joystick OK button 2 NAVI button 3 MENU button 4 button 5 button 6 NEXT OPTION button 7 TALK button 8 RETURN button 9 Remote control operation mode switch 10 ON OFF button SOURCE button 2 Small joystick BAND button ...

Page 5: ...rstand the basic structure of the Virtual Theater you will be able to navigate quite easily throughout it The basic structure of the Virtual Theater is actually quite simple Everything is centralized around a base location known as the Center Room Refer to Virtual Theater Quick Tour on page 11 Video System of a Connected Component This product is NTSC PAL system compatible When connecting an exter...

Page 6: ...an be output About This Manual This product features a number of sophisticated functions ensuring superior reception and operation All are designed for the easiest possible use but many are not self explanatory This operation manual is intended to help you benefit fully from their potential and to maxi mize your listening enjoyment We recommend that you familiarize yourself with the functions and ...

Page 7: ...fe vehicle operation do not operate this product during driving If you try to view pictures from a DVD Video disc or other sources on the front display while the parking brake is not engaged this warning will appear When you park your car in a safe place and apply the parking brake the picture appears on the screen When Using a Display connected to Rear Video Output This product s Rear video outpu...

Page 8: ...ual handy as a reference for operating procedures and precautions Always keep the volume low enough for outside sounds to be audible Protect this product from moisture If the battery is disconnected the preset memory will be erased and must be repro grammed In Case of Trouble Should this product fail to operate properly contact your dealer or nearest authorized PIONEER Service Station When using t...

Page 9: ...fall onto the floor where it may become jammed under the brake or accelerator pedal Batteries Remove the cover on the back of the remote controller and insert the batter ies with the and poles pointing in the proper direction Precaution Use only AAA or IEC R03 1 5 V batteries Remove the batteries if the remote controller is not used for a month or longer Do not attempt to recharge the supplied bat...

Page 10: ... select External Unit 1 or External Unit 2 When two External Units are connected the allocation of them to External Unit 1 or External Unit 2 is automatically set by this product In the following cases the sound source will not change When the sound source from another product is not connected to this product When no magazine is set in the Multi CD player When no magazine is set in the Multi DVD p...

Page 11: ...deo source selected with the TV Tuner is displayed To select the VIDEO mode switch the VIDEO mode ON in the Set Up Menu See page 15 3 Raise or lower the volume 4 Turn the source OFF When connecting a Multi DVD player You can switch on and off the Multi DVD player independently from other units Switching this product off independently does not switch the Multi DVD player off You have to switch the ...

Page 12: ...n If you click the joystick you switch to the Function Menu Screen Further explana tion on how to use the Function Menu Screen will follow Move the joystick right to move to the Power Band Room This screen provides a visual image of the volume settings Click the joystick to change the power band dis play as below Monaural display j 4 band display When the power is turned on the Center Room screen ...

Page 13: ...ct Audio then click the joystick to display the Audio Setting Menu Select Picture then click the joystick to display the Picture Adjust Menu Animation Animation Animation Returning to the Center Room You can return to the Center Room after you are finished in any of the sub rooms quite simply with either of 2 options Either use the joystick to select the Return option in that rooms screen then cli...

Page 14: ... as fol lows The title list appears on the plate and you can input disc titles here You can also switch the titles displayed on the Flip Down Plate Entered title is displayed 7 When playing a CD TEXT disc The Disc Title and Track Title are dis played 7 When playing a CD TEXT disc Pressing the DISPLAY button switches the display as follows 1 Track Title Disc Title 2 Disc Artist Name Disc Title 3 Tr...

Page 15: ...Source Plate Display Flip Down Plate Display No Plate 7 External Devices External Devices are VIDEO AUX Speaker Input and External Units Source Plate Display No Plate For visual sources the Source Plate Display disappears after about 8 seconds Each press of the DISPLAY button switches the display on the Source Plate as follows 1 Disc Title Track Title 2 Track Title Disc Title Pressing the DISPLAY ...

Page 16: ...it is switched on If while NAVI is selected as source you switch off your navigation unit you can confirm it on the display Selecting the Video Source Switching the Video ON OFF Mode You can select the video unit when one is connected to the video input on this product To select the Video mode switch the Video in the Set Up Menu On 1 Press the MENU button The main menu icons whirl down with Functi...

Page 17: ...efore performing operations Refer to the video unit manual Select Video by pressing the SOURCE but ton Selecting the BGTV BGVTR You can switch the picture separately from the audio of the TV or Video to another source while listening to the sound from the current source Switch the power to your video unit ON before performing operations Refer to the video unit manual Select BGTV or BGVTR by pressi...

Page 18: ... power to your video unit ON before performing operations Refer to the video unit manual Press the V SEL button for 2 seconds Each press of the V SEL button for 2 seconds selects the source in the following order OFF Link to Front Display Source F SRC Video VTR Note The rear display will only display audiovisual sources i e Multi DVD TV Tuner etc Audio only sources MD CD FM MW LW Tuner cannot be h...

Page 19: ...TURE ADJUST screen appears 5 Select an option by moving the joystick up down The selected option is highlighted in yellow You can adjust the selected option Option Adjustment SHARP You can adjust the sharpness of the picture The display changes as the distinction of the picture changes from sharp to dull COLOR You can adjust the color of the picture The display changes as the distinction of the pi...

Page 20: ... can also use the small joysitck up down to recall broadcast stations memorized in buttons 1 through 6 Manual and Seek Tuning You can select the tuning method by changing the length of time you hold the small joystick left right Manual Tuning step by step Less than 0 5 seconds Seek Tuning More than 0 5 seconds Note If you continue to hold the small joystick left right for longer than 0 5 seconds y...

Page 21: ...is highlighted in green 4 Click the joystick Refer to detailed operation of each function Exit from the Tuner Function Menu Press the RETURN button 20 Built In Tuner 7 FM Tuner Function Menu 7 MW LW Tuner Function Menu Best Stations Memory See page 21 Local Seek Tuning See page 21 AF Function See page 22 TA Function See page 22 News Program Interruption Setting See page 22 Best Stations Memory See...

Page 22: ...der buttons 1 6 and in order of their signal strength To Cancel the process click the joystick before memorization is complete Local Seek Tuning When Local is ON you can only select broadcast stations providing strong reception 1 Select Local by moving the joystick Local is highlighted in green 2 Click the joystick Each click selects the desired Local Seek Sensitivity in the following order FM Off...

Page 23: ... joystick News is highlighted in green 2 Click the joystick Each click toggles NEWS On Off in an FM band AF Function You can switch AF Alternative Frequencies search on off See page 26 1 Select AF by moving the joystick AF is highlighted in green 2 Click the joystick Each click toggles AF On Off while in an FM band Regional Function You can switch Regional function on off See page 27 1 Select REG ...

Page 24: ...time do the following 1 Select PGM by moving the joystick PGM is highlighted in green 2 Click the joystick Each click changes the PGM mode in the following order BSM Local Press the PGM button in the Tuner source Function name Display Press Hold for 2 seconds Best Stations Memory BSM OFF ON Local Seek Tuning Local Switch the Local Seek Sensitivity Built In Tuner ...

Page 25: ... too weak for proper reception of an RDS station the program service name PS disappears and the current tuned frequency appears Recalling Preset Stations by Preset Station List 1 Press the DISPLAY button for the Preset Station List to appear 2 Select the band by pressing the BAND button 3 Select the preset station by moving the joystick up down Selected staion is highlighted 4 Click the joystick S...

Page 26: ...dby are only active when your radio is tuned to RDS stations Displaying the Frequency When you want to know the frequency of the current station you can switch frequency dis play ON Display the Preset Station List by pressing the DISPLAY button Program Service Name The Program Service Name is the name of networks stations providing RDS Service PTY Information PTY Program Type ID code information f...

Page 27: ...n the FM1 and FM2 bands No preset number appears on the display if the RDS data for the station received dif fers from that for the originally stored station Sound may be temporarily interrupted by another program during an AF frequency search When the tuner is tuned to a non RDS station the AF Car icon disappears AF can be switched ON or OFF independently for each FM band The AF Car icon lights w...

Page 28: ...witch Auto PI Seek ON OFF Regional Function When AF is used to retune the tuner automatically REG regional limits the selection to sta tions broadcasting regional programs Note Regional programming and regional networks are organized differently depending on the country i e they may change according to the hour state or broadcast area The preset number may disappear on the display if the tuner tun...

Page 29: ...that the tuner is waiting for traffic announcements Repeat the preceding operation when no traffic announcement is being received to deactivate the TA function Note You can also switch the TA Function ON OFF in the Function Menu The system switches back to the original source following traffic announcement reception The TA function can be activated from sources other than tuner if the tuner was la...

Page 30: ...ing reception of a traffic announcement The newly set volume is stored in memory and recalled for subsequent traffic announcements TP Alarm Function About 30 seconds after the Car icon indicator disappears due to a weak signal a 5 second beep sounds to remind you to select another TP or EON TP station If you are listening to the tuner tune in another TP station or EON TP sta tion In sources other ...

Page 31: ...r NARROW by moving the joystick right 3 Click the joystick Each click changes the PTY Search method in the fol lowing order WIDE NARROW 4 Highlight PTY picture by moving the joystick left 5 Select one from among the PTY by moving the joystick up down You can select NARROW classification of program type within the selected WIDE classification 6 Click the joystick The tuner searches for a station br...

Page 32: ... is tuned to a news program PTY Alarm PTY Alarm is a special PTY code for announcements regarding emergencies such as natural disasters When the tuner receives the radio alarm code ALARM appears on the display and the volume adjusts to the TA volume When the station stops broadcasting the emergency announcement the system returns to the previous source Note The system switches back to the original...

Page 33: ...c based programs Oldies Oldies music Golden age based programs Folk Mus Folk music based programs Classics L Class Light classical music Classic Serious classical music Others Educate Educational programs Drama All radio plays and serials Culture Programs concerned with any aspect of national or regional culture Science Programs about nature science and technology Varied Light entertainment progra...

Page 34: ... received replacing text from the least recent reception with new text when it is received You can store data from up to six Radio Text transmissions in buttons 1 6 Radio Text Display 1 Display the Radio Text Display by pressing the DISPLAY button Note When no Radio Text is currently being received NO TEXT is displayed 2 Select either or by moving the joy stick left right 3 Click the joystick Each...

Page 35: ...y 2 Press one of buttons 1 6 for 2 seconds to store the desired Radio Text e g Press button 4 for 2 seconds The Radio Text is stored in memory under the selected button Recalling Preset Radio Text 1 Display the Radio Text Display by pressing the DISPLAY button 2 Press one of buttons 1 6 to recall a Radio Text preset under that button e g Press button 4 ...

Page 36: ...the Multi DVD player can be operated Audio can be heard You can use Multi DVD player to play DVDs Video CDs and CDs When the source is switched to Multi DVD player player plays the disc selected at that time This unit may not be available to operate the Multi DVD player momentarily depending on discs and the playing status You can operate the Multi DVD player by using this product s remote control...

Page 37: ...ion Menu 1 Press the MENU button The main menu icons whirl down with Function highlighted in green 2 Click the joystick The DVD Function Menu appears offering you the following options 3 Select the option by moving the joystick The selected option is highlighted in green 4 Click the joystick Refer to detailed operation of each function Exit from the DVD Function Menu DVD Video CD Press the RETURN ...

Page 38: ...ick the joystick Each click changes repeat range in the following order 7DVD Disc RPT Chapter RPT Title RPT Display Repeat range Chapter RPT Chapter Repeat Title RPT Title Repeat Disc RPT Disc Repeat 7Video CD Disc RPT Track RPT Display Repeat range Track RPT Track Repeat Disc RPT Disc Repeat Pause Pause pauses the currently playing track 1 Select Pause by moving the joystick Pause is highlighted ...

Page 39: ...tion Menu each time do the following 1 Select PGM by moving the joystick PGM is highlighted in green 2 Click the joystick Each click changes the PGM mode in the following order Pause RPT Mode Press the PGM button when playing a DVD or Video CD in the Multi DVD source Function name Display Press Hold for 2 seconds Pause Pause ON OFF Repeat play RPT Mode Switch repeat range ...

Page 40: ... Press the MENU button The main menu icons whirl down with Function highlighted in green 2 Click the joystick The DVD Function Menu appears offering you the following options 3 Select the option by moving the joystick The selected option is highlighted in green 4 Click the joystick Refer to detailed operation of each function Exit from the DVD Function Menu CD Press the RETURN button Repeat Play S...

Page 41: ...stick Each click changes the Repeat mode in the following order Disc RPT Track RPT Display Repeat range Track RPT Track repeat Disc RPT Disc repeat Note If you perform Track Search Repeat Play is automatically canceled Random Play Random Play plays the tracks on a CD in random order for variety 1 Select Random by moving the joystick Random is highlighted in green 2 Click the joystick Each click to...

Page 42: ... select the Scan in the Function Menu again Note Scan Play is canceled automatically after all the tracks on a disc have been scanned ITS Play ITS Play plays the memorized track Refer to ITS Programming ITS on page 53 1 Select ITS by moving the joystick ITS is highlighted in green 2 Click the joystick Each click toggles the ITS Play On Off Note If no track in the current range is programmed for IT...

Page 43: ...se without needing to go to the Function Menu each time do the following 1 Select PGM by moving the joystick PGM is highlighted in green 2 Click the joystick Each click changes the PGM mode in the following order Pause RPT Mode Random ITS Press the PGM button when playing a CD in the Multi DVD source Function name Display Press Hold for 2 seconds Pause Pause ON OFF Repeat play RPT Mode Switch repe...

Page 44: ...DVD Video CD and CD With DVD Title Edit ITS MEMO and ITS Clear are not displayed With Video CD ITS MEMO and ITS Clear are not displayed Disc Title Input for CD and Video CD You can input Titles up to 10 letters long Using this function lets you easily search for and select a desired disc for play You can store Disc Title data discs in memory Note For detailed operation refer to the operation of Di...

Page 45: ...1 Press the DISPLAY button for the Flip Down Plate to appear 2 Select the desired disc title by moving the joy stick up down CD or VIDEO CD is displayed for disc whose titles have not been input 3 Click the joystick The selected disc is indicated in yellow and begins play 44 Continued overleaf Multi DVD Player ...

Page 46: ... of a disc or reading disc information when the power is turned ON or a new disc is selected for play back READY is displayed If the Multi CD player cannot operate properly an error message such as ERROR 14 is dis played Refer to the Multi CD player owner s manual If there are no discs in the Multi CD player magazine NO DISC is displayed Disc Search You can select discs by moving the small joystic...

Page 47: ... offering you the following options 3 Select the option by moving the joystick The selected option is highlighted in green 4 Click the joystick Refer to detailed operation of each function Exit from the Multi CD Function Menu Press the RETURN button 46 Repeat Play See page 47 Random Play See page 47 Pause See page 49 Scan Play See page 48 ITS Play See page 48 Compression and DBE See page 49 PGM bu...

Page 48: ...k RPT One track Repeat Disc RPT Disc Repeat Multi RPT Multi CD player Repeat Random Play Tracks are played at random within the selected repeat play range as explained in Repeat Play above 1 Select Random by moving the joystick Random is highlighted in green 2 Click the joystick Each click toggles Random play On Off After selecting the desired repeat play range from those referred to in Repeat Pla...

Page 49: ...utomatically select the Scan in the Function Menu again Display Play range DISC SCAN Disc Repeat MULTI SCAN Multi CD player Repeat Note Scan Play is canceled automatically after all the tracks or discs have been scanned One track Repeat changes to the Disc Repeat when you switch the Scan Play ON ITS Play ITS Play plays the memorized track Refer to ITS Programming ITS on page 53 ITS play of tracks ...

Page 50: ...tep adjust ment 7COMP The COMP Compression function adjusts imbalances between loud and subdued sounds at higher volumes 7DBE DBE Dynamic Bass Emphasis boosts bass levels to give a fuller sound COMP DBE ON OFF Switching 1 Select COMP by moving the joystick COMP is highlighted in green 2 Click the joystick Each click changes the mode in the following order COMP Off COMP 1 COMP 2 COMP Off D B E 1 D ...

Page 51: ...use Pause ON OFF Repeat play RPT Mode Switch repeat range Random play Random ON OFF ITS play ITS ON OFF Display the Flip Down Plate You can display input titles and titles recorded on CD TEXT compatible CDs For CD TEXT up to 12 letters of a title can be seen at a time If the title is longer than 12 let ters the remaining letters can be viewed by scrolling Press the DISPLAY button Each press of the...

Page 52: ...rt from the beginning 1 Press the DISPLAY button for the Flip Down Plate to appear 2 Play the disc you wish to input the disc title 3 Select Title Edit by moving the joystick Title Edit is highlighted in green 4 Click the joystick Title Edit is highlighted in yellow and the display changes to show the left most character position highlighted 5 Select the desired character type by pressing the butt...

Page 53: ...back for the longest time Getting Text Displayed for CD TEXT compatible type You can use these functions when playing a CD TEXT disc on a CD TEXT compatible Multi CD player Title Display Switching Select the desired title display by pressing the DISPLAY button Refer to Information Screen on page 13 Note If certain text information is not recorded on a CD TEXT disc NO TITLE is displayed Title Scrol...

Page 54: ...n allows you to search for the track you wish to play You can use ITS to pro gram automatic playback of up to 24 tracks per disc from up to 100 discs You can store ITS program and Disc Title data for up to 100 discs in memory ITS Programming ITS Programmed tracks are played within the selected repeat play range in the Repeat Play on page 47 1 Press the DISPLAY button for the Flip Down Plate to app...

Page 55: ...ck Erase the track program and playback of the next ITS programmed track begins If there are no more programmed tracks in the current range ITS EMPTY is displayed and normal play resumes Erase a Disc Program 1 Press the DISPLAY button for the Flip Down Plate to appear 2 Select the disc you wish to erase while the disc is playing 3 Select ITS Clear by moving the joystick ITS Clear is highlighted in...

Page 56: ...ick changes the band in the following order TV1 TV2 Preset Tuning You can recall memorized stations by moving the small joystick up down Channel The following explains how to use this product to control TV tuners For details of TV tuner specific operations features see your TV tuner s manual Band Manual and Seek Tuning You can select the tuning method by changing the length of time you hold the sm...

Page 57: ...ion Menu appears offering you the following options 3 Select the option by moving the joystick and click the joystick The selected option is highlighted in green Exit from the TV Tuner Function Menu Press the RETURN button 7 TV Tuner Function Menu 1 Best Station Sequential Memory BSSM Switch the BSSM ON by clicking the joystick 2 PGM button For TV you cannot memorize functions other than BSSM in t...

Page 58: ...layTime Track Search and Fast Forward Reverse You can select between Track Search or Fast Forward Reverse by changing the length of time you hold the small joystick left right Track Search Less than 0 5 seconds Fast Forward Reverse Continue pressing The following explains how to use this product to control CD players For details of CD player specific operations features see your CD player s manual...

Page 59: ...nter titles refer to Disc Title Input on page 51 Exit from the CD Player Function Menu Press the RETURN button 7 CD Function Menu 1 Repeat Play Each click changes the Repeat mode in the following order Disc RPT Disc Repeat Track RPT Track Repeat 2 Random Play Each click toggles Random play On Off 3 Scan Play Each click toggles Scan play On Off 4 Pause Each click toggles Pause On Off 5 Compression ...

Page 60: ...scs directly with the 1 to 6 buttons Just press the number corresponding to the disc you want to listen to The following explains how to use this product to control Multi MD players For details of Multi MD player specific operations features see your Multi MD player s manual Track Search and Fast Forward Reverse You can select between Track Search or Fast Forward Reverse by changing the length of ...

Page 61: ...f the Disc Title and Track Title Also with text longer than 12 letters you can see the rest of the text by scrolling Refer to Information Screen on page 13 Exit from the Multi MD Function Menu Press the RETURN button 60 7 Multi MD Function Menu 1 Repeat Play Each click changes the Repeat mode in the following order Multi RPT Multi MD player Repeat Track RPT One track Repeat Disc RPT Disc Repeat 2 ...

Page 62: ... can memorize desired Services in buttons 1 through 6 for easy one touch recall Preset Service recall Less than 2 seconds Desired Service preset memory More than 2 seconds Note Up to 18 DAB stations 6 in DAB1 DAB2 and DAB3 can be stored in memory You can also use the small joystick up down to recall Services memorized in buttons 1 through 6 Selecting the Ensemble and the Service You can select the...

Page 63: ...h refer to Searching the PTY on page 30 Exit from the DAB Tuner Function Menu Press the RETURN button 62 7 DAB Tuner Function Menu 1 News Flash Each click toggles News On Off 2 Area Weather Flash Each click toggles Weather On Off 3 Announcement Each click toggles Announce On Off 4 Service Follow Each click toggles SF On Off 5 Primary Secondary Each click switches Service Component 6 Program button...

Page 64: ...ffic Road Traffic Flash or Transport Flash If the set Announcement Support is received the icon lights 7 Swithcing the Road Traffic Flash and Transport Flash ON OFF Swtich Road Traffic Flash and Transport Flash ON OFF by pressing the TA button DAB status Indications Indicator Status EXTRA The currently received Service has a Secondary Service Component TEXT The currently received Service has a Dyn...

Page 65: ...els you cannot switch to Dynamic Label Display When Dynamic Labels are displayed clicking the joystick updates Dynamic Label informa tion Recalling Preset Services by Preset Service List 1 Press the DISPLAY button for the Preset Service List to appear 2 Select the band by pressing the BAND button 3 Select the preset service by moving the joystick up down Selected service is highlighted 4 Click the...

Page 66: ...ect the option by moving the joystick The selected option is highlighted in green 5 Click the joystick Refer to detailed operation of each function Exit from the Audio Menu Press the RETURN button Adjusting Audio 7 Audio Menu Equalizer Curve See page 66 Balance Adjustment See page 68 Loudness Adjustment See page 70 High Pass Filter See page 69 Front Image Enhancer Function See page 69 Subwoofer Ou...

Page 67: ...either EQ or EQ by moving the joystick up down 4 Click the joystick Each click changes EQ curve in the following order With EQ selected Powerful Natural Vocal Custom Flat Super Bass With EQ selected Powerful Super Bass Flat Custom Vocal Natural Note CUSTOM stores an equalizer curve you have made adjustments to Refer to Equalizer Curve Adjustment on page 67 You can create a different CUSTOM curve f...

Page 68: ...Click the joystick The Graphic Equalizer Menu appears with Band highlighted in green 3 Select the band by clicking the joystick Each click changes band in the following order Low Mid High 4 Select Level Frequency or Q Factor by moving the joystick Selected option is highlighted in green 5 Adjust the selected option by moving the joy stick up down The selectable options are adjustable in the follow...

Page 69: ... all occupied seats 1 Select FAD BAL by moving the joystick FAD BAL is highlighted in green 2 Click the joystick The Audio Setting Menu appears with FAD BAL highlighted in green 3 Click the joystick The FAD BAL Setting Menu appears 4 Adjust speaker balance by moving the joy stick The display shows F 15 R 15 as it moves from front to rear The display shows L 09 R 09 as it moves from left to right 5...

Page 70: ...te When the F I E function is ON you cannot switch to the H P F mode Front Image Enhancer Function The F I E Front Image Enhancer function is a simple method of enhancing front imaging by cutting mid and high range frequency output from the rear speakers limiting their output to low range frequencies You can select the frequency you want to cut 1 Select FIE by moving the joystick FIE is highlighte...

Page 71: ... setting is Sub Woofer you cannot switch the F I E mode See page 77 Switch the F I E function OFF when using a 2 speaker system Loudness Adjustment The Loudness function compensates for deficiencies in the low and high sound ranges at low volume You can select a desired Loudness level 1 Select LOUD by moving the joystick LOUD is highlighted in green 2 Click the joystick The Audio Setting Menu appe...

Page 72: ...e Initial Settings Menu you can switch Non Fading Set See page 77 1 Select Non Fading by moving the joystick Non Fading is highlighted in green 2 Click the joystick The Audio Setting Menu appears with Non Fading Set highlighted in green 3 Click the joystick and shows indicating that you are ready to select a level 4 Switch the Non Fading Output ON OFF by moving the joystick up down 5 Increase or d...

Page 73: ... case this setting is not necessary See page 77 Select the OFF setting when you do not want the Subwoofer to operate When the Subwoofer output is OFF you cannot change the phase of Subwoofer output 1 Select SUB W by moving the joystick SUB W is highlighted in green 2 Click the joystick The Audio Setting Menu appears with SUB W Setting highlighted in green 3 Click the joystick and shows indicating ...

Page 74: ...highlighted in green 2 Click the joystick The Audio Setting Menu appears with SUB W Setting highlighted in green 3 Move the joystick down SUB W Detail SET is highlighted in green 4 Click the joystick and shows indicating that you are ready to select a level 5 Select the frequency to 50 Hz 80 Hz or 125 Hz by moving the joystick left right 6 Increase or decrease the output level by mov ing the joyst...

Page 75: ...e joystick SLA is highlighted in green 2 Click the joystick The SLA Setting Menu appears with the selected source s level highlighted in green 3 Increase or decrease the level by moving the joystick up down The display shows 8 8 4 In a similar manner adjust the volume level of other sources You can perform SLA independently for each of the following groups Display Source TUN MW LW CD CD player Mul...

Page 76: ... Refer to detailed operation of each function Exit from the Initial Settings Menu Press the RETURN button Exit from the Initial Settings Menu and switch power off Changing the Initial Settings 7 Initial Settings Menu Changing the FM Tuning Step See page 76 Setting the DAB Priority Function See page 76 Setting the Subwoofer Controller See page 77 Switching the Auto PI Seek See page 76 Setting the R...

Page 77: ...m the Hide away DAB tuner takes precedence over this product s RDS Traffic Announcement TA function When it is ON During DAB reception when the selected Service Component supports Road Traffic Flashes and Transport Flashes reception is not interrupted by this product s RDS Traffic Announcement TA When it is OFF Interruption is by the first received news flash from among this product s RDS and the ...

Page 78: ... Subwoofer Controller When rear speaker leads are connected to full range speakers when Full Range is selected you can connect the RCA Subwoofer output to a Subwoofer In this case you can select whether to use the Subwoofer controller s Low Pass Filter Phase built in Internal or the auxiliary External 1 Select Internal by moving the joystick Internal is highlighted in green 2 Click the joystick Ea...

Page 79: ...on page 79 Adjusting the Display Position You can adjust the position of the display 1 Select DISP POSI by moving the joystick DISP POSI is highlighted in green 2 Click the joystick 3 Adjust the display position by moving the joy stick 4 Click the joystick The adjusted display position is memorized Changing the Pattern of Plate You can change the pattern of the Source Plate and Flip Down Plate in ...

Page 80: ...screen in the following order Video clips Simple source information Time display 2 Select a desired video clip by moving the joy stick down when the video clip is playing Note A simple source information shows nothing when the Source Plate is displayed Switching the Color of the Spectrum Analyzer You can select a color for the spectrum analyzer from among 6 options 1 Move the joystick up The spect...

Page 81: ...e See page 81 Switching the Speaker Input Mode See page 81 7 Set Up Menu Switching the AUX Source An IP BUS RCA Interconnector such as CD RB20 sold separately enables you to connect this product to auxiliary equipment featuring an RCA output For more details refer to the IP BUS RCA Interconnector s Owner s Manual 1 Check to see AUX is currently highlighted If not select that option by moving the j...

Page 82: ...ess the RETURN button You go back to the Center Room 4 Select the Video by pressing the SOURCE button Switching the Speaker Input Mode When connecting auxiliary equipment to the speaker input terminal switch the Speaker Input mode ON 1 Select Off by moving the joystick Off is highlighted in green 2 Click the joystick Each click toggles SP Input Off 3 Press the RETURN button You go back to the Cent...

Page 83: ...nt speakers are muted automatically When the guidance audio is output from Mobile Navigation Unit connected to this product The guidance audio is output with muted source sound When you operate the Mobile Navigation Unit connected to this product by voice When the guidance audio from the Mobile Navigation Unit cannot be heard such as when the Multi DVD Player is selected as the source or no sounds...

Page 84: ... Check whether the cables are plugged in correctly and firmly Remove the cause of the break ing of the fuse then replace the fuse Be very sure the same rated proper fuse is installed Replace the batteries See page 8 Switch the remote control to the proper mode See page 3 Connect the cables correctly Increase the volume See page 10 Adjust the relative levels between the speakers correctly See page ...

Page 85: ...e from the DVD player only The remote control is not in the correct operation mode The optical cable has become detached The DVD player is not properly set for output Switch the remote control to the proper mode See page 3 Connect the cable correctly Make the correct output setting See the manual for the DVD player ...

Page 86: ...ating When replacing fuse be sure to use only fuse of the rating prescribed on the fuse holder Since a unique BPTL circuit is employed never wire so the speaker leads are directly grounded or the left and right speaker leads are common Speakers connected to this unit must be high power types with minimum rating of 45 W and impedance of 4 to 8 ohms Connecting speak ers with output and or impedance ...

Page 87: ...ound this lead separately from the ground of high current products such as power amps If you ground the products together and the ground becomes detached there is a risk of damage to the products or fire Cords for this product and those for other products may be different colors even if they have the same function When con necting this product to another product refer to the supplied Installation ...

Page 88: ...terminal always supplied with power regardless of ignition switch position Orange To lighting switch terminal Yellow black If you use a cellular telephone connect it via the Audio Mute lead on the cellular telephone If not keep the Audio Mute lead free of any connections Parking brake switch Fuse holder Fuse resistor Note The position of the parking brake switch depends on the vehicle model For de...

Page 89: ...are not connected to speakers Front speaker Rear speaker White Gray Left Right White black Green Green black Violet black Gray black Violet Blue white To system control terminal of the power amp or Auto antenna relay control terminal max 300 mA 12V DC Front speaker Rear speaker Antenna cable supplied 6 m ...

Page 90: ...bles sold separately Perform these connections when using a different amp sold separately System remote control System remote control Power amp sold separately Blue white To system control terminal of the power amp or Auto antenna relay control terminal max 300 mA 12V DC Subwoofer output Rear speaker Subwoofer Front speaker Front speaker Subwoofer Rear speaker Power amp sold separately Power amp s...

Page 91: ... This product also can be connected to a car stereo without RCA output jacks by using the speaker input jack 90 This Product Speaker input terminal Front speaker White Gray Left Right White black Gray black Car stereo with speaker output jacks ...

Page 92: ... Front video output Blue Black Red Yellow Black Black 6 m Blue 3 m Multi DVD player sold separately Red 1 5 m Yellow black To Yellow black lead GUIDE ON on the navigation system RGB cable supplied Yellow FRONT VIDEO OUTPUT STAND ALONE IP BUS IP BUS cable supplied with the Multi DVD player DVD control cable supplied 3 m IP BUS cable supplied ...

Page 93: ...d separately IP BUS cable supplied with the TV tuner 1 Blue Blue Blue Black Black Display with an IP BUS cable sold separately Red Green Gray Gray Green 20 pin cable supplied with the display FM MODULATOR IP BUS MAIN UNIT IP BUS AV MASTER When connecting a Display featuring non IP BUS connection connections within the dotted lines are not necessary So please connect the two IP BUS connectors 1 dir...

Page 94: ...ont video output Blue Red Yellow Black Black IP BUS cable supplied 6 m Blue STAND ALONE IP BUS 3 m Yellow FRONT VIDEO OUTPUT 3 m IP BUS cable supplied with the Multi DVD player Multi DVD player sold separately Red 1 5 m Yellow black To Yellow black lead GUIDE ON on the navigation system RGB cable supplied Black DVD control cable supplied ...

Page 95: ...er sold separately IP BUS cable supplied with the display 1 Blue Blue Black Display with an IP BUS cable sold separately Gray Green 20 pin cable supplied with the display When connecting a Display featuring non IP BUS connection connections within the dotted lines are not necessary So please connect the two IP BUS connectors 1 directly to each other Navigation System sold separately Green ...

Page 96: ...eo output To audio outputs AV input Display with RCA input jacks This Product Left White Right Red When other products such as a Single CD player are connected to this product ejecting a disc will turn this product off If you wish to enjoy DVD viewing on the Rear Display without deactivation connect the Rear Display directly to the Multi DVD player instead of using the external video connection of...

Page 97: ...eater outlet where it would be affected by heat or near the doors where rainwater might splash onto it Before drilling any mounting holes always check behind where you want to drill the holes Do not drill into the gas line brake line electri cal wiring or other important parts If this unit is installed in the passenger com partment anchor it securely so it does not break free while the car is movi...

Page 98: ...t clicks into place Installation Using the Mounting Base Precaution To avoid it being a hindrance to driving always install the remote control unit to the passen ger s side not the driver s side Before using double sided tape clean off any dirt on the surface to which the double sided tape is to be attached Mounting Base Double sided tape Passenger seat ...

Page 99: ...y 11 dBf 1 0 µV 75 Ω mono S N 30 dB 50 dB quieting sensitivity 16 dBf 1 7 µV 75 Ω mono Signal to noise ratio 70 dB IEC A network Distortion 0 3 at 65 dBf 1 kHz stereo Frequency response 30 15 000 Hz 3 dB Stereo separation 40 dB at 65 dBf 1 kHz MW tuner Frequency range 531 1 602 kHz 9 kHz Usable sensitivity 18 µV S N 20 dB Selectivity 50 dB 9 kHz LW tuner Frequency range 153 281 kHz Usable sensitiv...

Page 100: ...8 184 Boundary Road Braeside Victoria 3195 Australia TEL 03 9586 6300 PIONEER ELECTRONICS OF CANADA INC 300 Allstate Parkway Markham Ontario L3R 0P2 Canada TEL 905 479 4411 PIONEER ELECTRONICS DE MEXICO S A de C V San Lorenzo Num 1009 3er piso Desp 302 Col Del Valle Mexico D F C P 03100 TEL 5 688 52 90 Published by Pioneer Corporation Copyright 2000 by Pioneer Corporation All rights reserved Publi...

Reviews: