background image

11

Appendix

Appendix

Handling and Care of the Disc

Some basic precautions are necessary when 
handling your discs.

Discs you can use

• Do not use discs other than those intended for this 

product. Use only discs approved by Pioneer.

DVD-ROM drive and care

• Use only normal, round discs, if you insert irregular, 

non-round, shaped discs they may jam in the DVD-
ROM drive or not play properly.

• Check all discs for cracks, scratches or warping before 

playing. Discs that have cracks, scratches or are warp-
ing may not play properly. Do not use such discs.

• Avoid touching the recorded (non-printed side) surface 

when handling the disc.

• Store discs in their cases when not in use.
• Keep discs out of direct sunlight and do not expose the 

discs to high temperatures.

• Do not attach labels, write on or apply chemicals to 

the surface of the discs.

• To clean dirt from a disc, wipe the disc with a soft cloth 

outward from the center of the disc.

• If the heater is used in cold weather, moisture may 

form on components inside the DVD-ROM drive. Con-
densation may cause the DVD-ROM drive to not oper-
ate properly. If you think that condensation is a 
problem turn off the DVD-ROM drive for an hour or so 
to allow the DVD-ROM drive to dry out and wipe any 
damp discs with a soft cloth to remove the moisture.

• Road shocks may interrupt disc playback.

Ambient conditions for playing disc

• At extremely high temperatures, a temperature cutout 

protects the Navigation System by switching it off 
automatically.

• Despite our careful design of the product, as a result 

of mechanical wear, ambient conditions for use, or 
handling of the disc, small scratches that do not affect 
actual operation may appear on the disc surface. This 
is not a sign of the malfunction of the unit. Consider it 
to be normal wear and tear.

Resetting the System

On occasion, you may need to reset your Naviga-
tion System.

For details, refer to “About the Data being 
Deleted” in “Operation Manual”.

When a reset is necessary

You should reset the system in the following situations:
• After installation of this unit in your vehicle.
• If there appear to be problems with the operation of 

the system.

• If there are problems with the display.
• When changing the combination of the equipment.

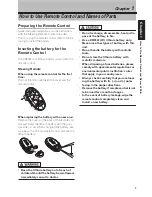
Using the reset button

The reset button is recessed in the front of the main unit 
to prevent it being pressed accidentally. Look for it at the 
top right-hand corner of the front panel.
Insert a pointed implement such as a ballpoint pen into 
the small hole and push.

If you have connected other equipment (for example, a 
display or AV Head Unit) to this by cable, be sure to reset 
that equipment too.

Reset button

Summary of Contents for AVIC-88DVD - Navigation System With DVD-ROM

Page 1: ...Hardware Manual DVD Navigation Unit AVIC 88DVD ENGLISH ...

Page 2: ......

Page 3: ...evel Set the dial and leave it there Taking a minute to do this now will help to prevent hearing damage or loss in the future After all we want you listening for a lifetime We Want You Listening For A Lifetime Used wisely your new sound equipment will provide a lifetime of fun and enjoyment Since hearing damage from loud noise is often undetectable until it is too late this manufacturer and the El...

Page 4: ...is played on the screen are referred to like this e g Destination Settings Extra information alternative use and other notes are presented like this e g PC card can be set or removed regardless of the power ON OFF of the main unit ON OFF of the engine The references are indicated like this e g Resetting the System Page 11 Introduction This chapter describes precautions for the use of the Navigatio...

Page 5: ...he system or reading the display park your vehicle in a safe location and make neces sary adjustments Never allow others to use the system unless they have read and understood the operating instructions Never use this Navigation System to route to hospitals police stations or similar facilities in an emergency Please call 911 Route and guidance information displayed by this equipment is for refere...

Page 6: ...D STATUS AND MUST BE CONNECTED TO THE POWER SUPPLY SIDE OF THE PARKING BRAKE SWITCH IMPROPER CONNECTION OR USE OF THIS LEAD MAY VIOLATE APPLICABLE LAW AND MAY RESULT IN SERIOUS INJURY OR DAMAGE Protect this product from moisture If the battery is disconnected or discharged the memory will be erased and must be repro grammed Handling the cord on this product or cords associated with accessories sol...

Page 7: ... s manuals order product cat alogues research new products and much more Update DVD Updated Navigation DVDs are available for purchase from your local Pioneer dealer that includes the most current map and point of interest information Contact your local Pio neer dealer for details About DVD map disc You can only use discs intended for use with this product Use only discs approved by Pioneer For de...

Page 8: ...6 ...

Page 9: ...n changing the battery use a probe with a fine non metallic tip to remove the lithium battery Keep the lithium battery out of reach of children Should the battery be swallowed immediately consult a doctor Do not recharge disassemble heat or dis pose of the battery in fire Use a CR2032 3V lithium battery only Never use other types of battery with this unit Do not handle the battery with metallic to...

Page 10: ...NAVI AUDIO button Pressing this button switches the Operation mode 2 VOICE button You can use the VOICE button to start voice rec ognition allowing you to operate the Navigation System by speech 3 SRC SOURCE button Switches between sources and switches power ON OFF Depending on the connected units operation may differ slightly Refer to Switching the Sources in the connected unit s instruc tions 4 ...

Page 11: ... display of the map of your surroundings 6 GUIDE TRAFFIC button Press this button if you want to hear the voice guidance again 7 Transmitter See Main DIN mode 8 button The volume of the navigation guide voice can be adjusted Microphone 1 Microphone After pressing the VOICE button to start voice operation this microphone hears your com mands Main unit 1 Disc loading slot 2 Reset button If the syste...

Page 12: ...y for use Removing the PC Card Do not remove the PC card while the PC card lock lamp is red It may damage the main unit of the Navigation System or the PC card Open the cover on the front of the main unit Slide the PC card lock lever to the right 1 and hold it there Check that the PC card lock lamp has changed to green and then press the PC card eject button 2 Keep holding the PC card lock lever t...

Page 13: ...y out and wipe any damp discs with a soft cloth to remove the moisture Road shocks may interrupt disc playback Ambient conditions for playing disc At extremely high temperatures a temperature cutout protects the Navigation System by switching it off automatically Despite our careful design of the product as a result of mechanical wear ambient conditions for use or handling of the disc small scratc...

Page 14: ...d Ground type Negative type GPS antenna Antenna Micro strip flat antenna right handed helical polar ization Antenna cable 5 0 m 16 ft 5 in Dimensions Main unit 178 W 50 H 178 D mm 7 2 7 in GPS antenna 34 W 13 H 36 D mm 1 3 8 1 2 1 3 8 in Steering remote control 38 W 67 H 18 D mm 1 1 2 2 3 5 7 10 in Weight Main unit 1 5 kg 3 3 lbs GPS antenna 105 g 0 23 lbs Steering remote control 37 g including ho...

Page 15: ...NV Haven 1087 Keetberglaan 1 B 9120 Melsele Belgium TEL 0 3 570 05 11 PIONEER ELECTRONICS ASIACENTRE PTE LTD 253 Alexandra Road 04 01 Singapore 159936 TEL 65 6472 7555 PIONEER ELECTRONICS AUSTRALIA PTY LTD 178 184 Boundary Road Braeside Victoria 3195 Australia TEL 03 9586 6300 PIONEER ELECTRONICS OF CANADA INC 300 Allstate Parkway Markham Ontario L3R OP2 Canada TEL 1 877 283 5901 PIONEER ELECTRONI...

Reviews: