9
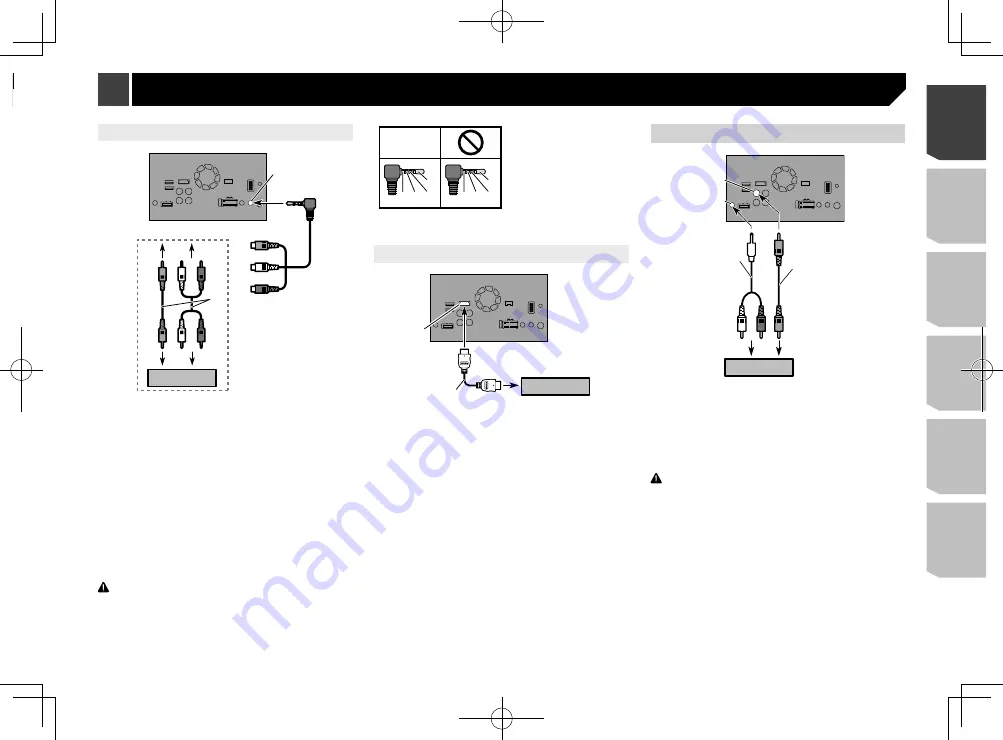
Using an AUX input
1
6
7
9
a
b
8
2
5
3
4
1
This product
2
AUX input
3
Yellow
4
Red, white
5
Mini-jack AV cable (CD-RM10) (sold separately)
6
To Yellow
7
To Red, white
8
RCA cables (sold separately)
9
To video output
a
To audio outputs
b
External video component (sold separately)
p
The appropriate setting is required to use the external video
component.
Refer to the operation manual.
p
When connecting an external video component using a mini-
jack AV cable, use a separately sold AUX extension cable as
necessary.
CAUTION
Be sure to use a mini-jack AV cable (CD-RM10) (sold
separately) for wiring. If you use other cables, the wiring
position might differ resulting in disturbed images and
sounds.
OK
G
V
R
L
G
R
V
L
L : Left audio (White)
R : Right audio (Red)
V : Video (Yellow)
G : Ground
Using an HDMI input
4
1
2
3
1
This product
2
HDMI port
3
High Speed HDMI
®
Cable (sold separately)
4
HDMI device (sold separately)
p
When you connect the High Speed HDMI
®
Cable, use the
lock tie to fix it securely.
Refer to
Securing the High Speed HDMI
®
Cable
on page 7
Rear display
1
6
7
8
2
3
4
5
1
This product
2
Yellow (
V OUT
)
3
Rear audio output
4
Mini pin plug cable (sold separately)
5
RCA cables (sold separately)
6
To audio inputs
7
To video input
8
Rear display with RCA input jacks (sold separately)
WARNING
NEVER install the rear display in a location that enables the
driver to watch video images while driving.
This product’s rear video output is for connection of a display
to enable passengers in the rear seats to watch the video
source.
External video component
Using AV input
3
4
1
6
7
9
2
8
5
1
This product
2
Yellow (
VIDEO INPUT
) 15 cm
3
Red, white (
AUDIO INPUT
) 23 cm
4
To Yellow
5
To Red, white
6
RCA cables (sold separately)
7
To video output
8
To audio outputs
9
External video component (sold separately)
p
The appropriate setting is required to use the external video
component.
Refer to the operation manual.
9
< CRD4940-A >
Connection
Connection


