17
4
THIS
COMPLIES WITH THE EUROPEAN NORMS:
EN 71/1
EN 71/2
EN 71/3
Safety requirements:
Please check regularly that the screws are well tightened. The screws should not be loose, as children could squeeze certain parts of their body or catch
items of clothing (e.g. laces, necklaces, bands, dolls etc.). These might present the hazard of strangulation.
Take into consideration the risks of open fires and other strong heat sources like electric heaters, gas stoves etc. in the close proximity of the
.
Do not use the
if single parts are broken, torn or missing. Synthetic bags or other synthetic elements/wrappings should be
immediately removed or kept out of the reach of children.
Keep the assembly plan and the hex key for future disassembly or assembly.
Please use only a screwdriver for the assembly.
Please note:
Use only original accessories and spare parts from the producer or from the providers.
Assembly instructions:
Maintenance:
If necessary, clean the
with a damp cloth and mild soapsuds, and dry the wood afterwards.
What else you should know:
The
is made of solid wood. Wood is a natural product; irregularities in structure and colour are typical features of this natural
product and will thus not constitute a flaw.
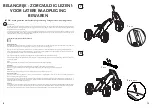
MINI-BALANCE TRAINING TRICYCLE
mini balance
training tricycle
mini-balance training tricycle
mini-balance training tricycle
mini-balance training tricycle
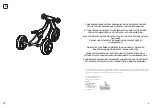
To avoid damaging the product, do not use an electric screwdriver for tightening the screws!
Please take into consideration that the parts should be assembled on an even, flat surface. Make sure that the article is not inclined.
In order to protect the article and the floor, we recommend using the packaging of the article as underlay during the assembly.
In producing our furniture and toys we only use oils, varnishes and glazes that do not pose a health hazard and are appropriate for children's furniture. As a
result of the production process, new furniture can sometimes retain a specific odor. To counter this harmless inconvenience we recommend repeated
venting.
For service cases:
If, despite constant supervision of the production process, a flaw should turn up, please mark the respective part clearly in this assembly plan. Print the
Customer Service contact form from our website, www.pinolino.de. Shortly describe the flaw or the problem. Send the complete assembly plan, a copy of
the receipt and the Customer Service contact form, which you have filled in, with the specification of the serial number (it can be found on the packaging,
on the assembly instructions and on the article), to our address below.
Dear clients,
We are glad that you have chosen this premium product made of solid wood. We, the Pinolino staff, have manufactured this item with greatest care. In
doing so, we have exclusively used European timbers from certified forest stands. The lacquers, oils, glues and fabrics that were used are eco-friendly and
comply with the strict European safety standards.
To spare you unnecessary effort, carefully read the assembly instructions first. Check whether you have all the parts and study the illustrations carefully
before you start the assembly. Improper handling or assembly and especially construction alterations will void all warranty claims.
CAUTION:
“
”
Protective equipment should be worn. Not to be used in traffic
.
IMPORTANT -
CAREFULLY! -
KEEP FOR FUTURE REFERENCE
PLEASE READ
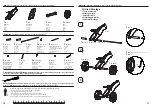
Umbau zum
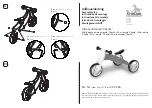
Converting to a
Conversion en un
• Entfernen Sie die Schrauben, die Muttern, und den Sitz. Drehen Sie das hintere Rad und den Rahmen
um 180°. Schrauben Sie dann alle Teile wieder zusammen.
•
Remove the screws, the nuts and the seat. Rotate the hind whell and the frame by 180º. Reassemble all the parts.
•
Trike
Trike
Trike
Transformamiento en Trike
Transformazione in Trike
Ombouwen tot een Trike
•
Apartar los tornillos, tuercas e asiento. Girar la rueda detrás también el cuadro con 180
°
. Después reensamblar todas las piezas.
•
Rimuovete le viti, i dadi e la seduta. Ruotate la ruota posteriore e il telaio a 180°. Poi rimontate tutti i pezzi.
•
Verwijder de schroeven, moeren en de zitting. Draai het achterwiel en het frame 180° om. Dan vastschroeven alle stukjes weer.
Retirez les vis, les écrous et le siège. Tournez le roue arrière et le cadre de 180°. Puis revisser de nouveau tous les éléments.
D
180°

