background image

WARNINGS 

Physipro Inc. lower limb supports are reserved exclusively for use on mobility

aids (manual or power wheelchairs).

Always use the provided mounting hardware to install your lower limb

support.

Never push or lift wheelchair with a lower limb support, doing so may cause


the

device to detach from the wheelchair which may result in damage or


injury.

Always lift wheelchair with the rigid parts of the frame.

Installing a new product on a wheelchair may affect the wheelchair’s center


of

gravity and may cause the wheelchair to become unstable. To ensure

optimal stability of your wheelchair after the addition of a new component,

always assess for the potential need for anti-tips or amputee axle adapter

brackets to be added or adjusted.

New lower limb supports should be tested before prolonged use. To avoid

redness due to pressure points, it is necessary to regularly check for redness


in

the various critical pressure areas, especially around bony prominences.

Before use, let the lower limb support get to room temperature to limit

discomfort caused by excessively hot or cold surfaces.

Avoid exposing your lower limb support to extreme cold or heat and avoid

prolonged contact to fluids or moisture. Never place near open flame.

Crash tests have not been conducted on this product and even if the mobility aid

in which it is installed has obtained the ISO-717619, it will not be

maintained.

INSTALLATION 

Installing the multi

-

adjustable mechanism 

Required tools

: 3mm Allen key and an 8mm wrench 

1.

Drill ¼" holes into the rigid seat

plate to install the piano hinge.

2.

Secure screws 

A

 with a 3mm

Allen key while holding nuts in

place with an 8mm wrench.

3.

Determine the location of the

multi

-

adjustable mechanism and


drill

two ¼" holes into the rigid


seat

plate.

4.

Secure screws 

B

 with a 3mm

Allen key while holding nuts in

place with an 8mm wrench.

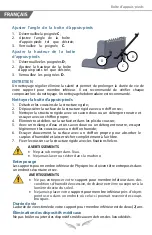
Adjusting the angle of the foot box 

1.

Unlock handle 

C

;

2.

Position the foot box at the


desired angle.

3.

Lock handle 

C

.

Foot box 

4

Summary of Contents for FOOT BOX

Page 1: ...tains important information about this product Please give to the owner upon delivery BO TE D APPUIS PIEDS Manuel d utilisation Ce livret contient d importantes informations relatives ce produit Veuil...

Page 2: ...ions made to the product without the prior written consent of Physipro Inc PRODUCT INFORMATION Date of purchase _____________________________________________________ Supplier _________________________...

Page 3: ...oam or 1 Viscose Cover Vinyl Velcro fasteners Mounting Hardware Multi adjustable mechanism RECOMMENDATIONS To ensure the longevity of your lower limb support the following precautions should be applie...

Page 4: ...ss in the various critical pressure areas especially around bony prominences Before use let the lower limb support get to room temperature to limit discomfort caused by excessively hot or cold surface...

Page 5: ...padding surface and between seams and folds 5 With a mix of water and a soft soap or neutral detergent gently wipe clean the padding 6 Remove excess moisture by lightly wiping the surface with a clea...

Page 6: ...duct as soon possible Please refrain from using your product until an inspection has been made by a qualified technician In the event you do not receive satisfactory warranty service please write dire...

Page 7: ...odification apport e sans son consentement crit Pour Physipro Inc votre satisfaction demeurera toujours une priorit INFORMATIONS SUR LE PRODUIT Date d achat ___________________________________________...

Page 8: ...elcro Quincaillerie d installation M canisme multi r glable RECOMMANDATIONS Pour prolonger la dur e de vie votre support pour membre inf rieur les pr cautions ci dessous devraient tre appliqu es Avant...

Page 9: ...es points de pression il est n cessaire de v rifier r guli rement si des rougeurs apparaissent au niveau des diff rentes zones critiques de pression notamment autour des protub rances osseuses Avant u...

Page 10: ...ace et dans les plis du coussin 5 Avec un m lange d eau et un savon doux ou un d tergent neutre essuyer l g rement les coussins avec un chiffon humide 6 Essuyer doucement la surface avec un chiffon pr...

Page 11: ...ez imm diatement le revendeur aupr s duquel vous avez achet votre produit Le produit ne doit pas tre utilis ou modifi avant l inspection du r parateur d sign Dans le cas o vous ne recevez pas un servi...

Page 12: ...nue Sud Sherbrooke Qu bec J1G 2R7 Canada T 1 800 668 2252 F 819 565 3337 info physipro com order physipro com Europe Importateur SASU PHYSIPRO IMPORT T 02 41 69 38 01 F 02 41 69 43 32 contact physipro...

Reviews: