5.4 PHOTOCENTRIC STUDIO SET-UP
A 32GB
USB flash drive is supplied with your LC
Magna. On this drive you can find a license number
for Photocentric Studio. This allows you to activate
a perpetual license for up to two PCs. Photocentric
Studio can be downloaded from this
On this page, you can also find guidance on the
following:
- The minimum system requirements
for Photocentric Studio
- Installing the software
- Getting started
- Adding supports and slicing files
- Updating the software
To prepare files for printing, please follow the below
steps:
1. Upon opening Photocentric Studio, select LC
Magna/LC Magna V.2/LC Magna V.2 Fast Printing*
from the machine profile drop down menu. Then,
select the desired resin profile from the material drop
down menu, click ‘Apply’ for the software to load.
* LC Magna V.2 Fast Printing machine profile only works for
specific applications and resin. For more information, visit the
Magna V.2 Fast Printing section on the Magna resource hub.
Network Page
LC Magna can be connected to a network to
facilitate the uploading and removal of print files and
to monitor prints in progress remotely.
5.5 CONNECTING TO A NETWORK
Once your Liquid Crystal Magna is switched on, plug
in the ethernet cable or Wi-Fi dongle to establish a
network connection. This allows print file uploads
and remote monitoring. These instructions are a
guide to setting up the connection and uploading a
print file.
5.5.1 Connecting to a Network via Ethernet
Switch on LC Magna using the power switch at the
front. Plug an ethernet cable into the designated
socket at the back of the printer. Once the ethernet
cable is connected, the IP address will be displayed
in the top left corner of the Main GUI page.
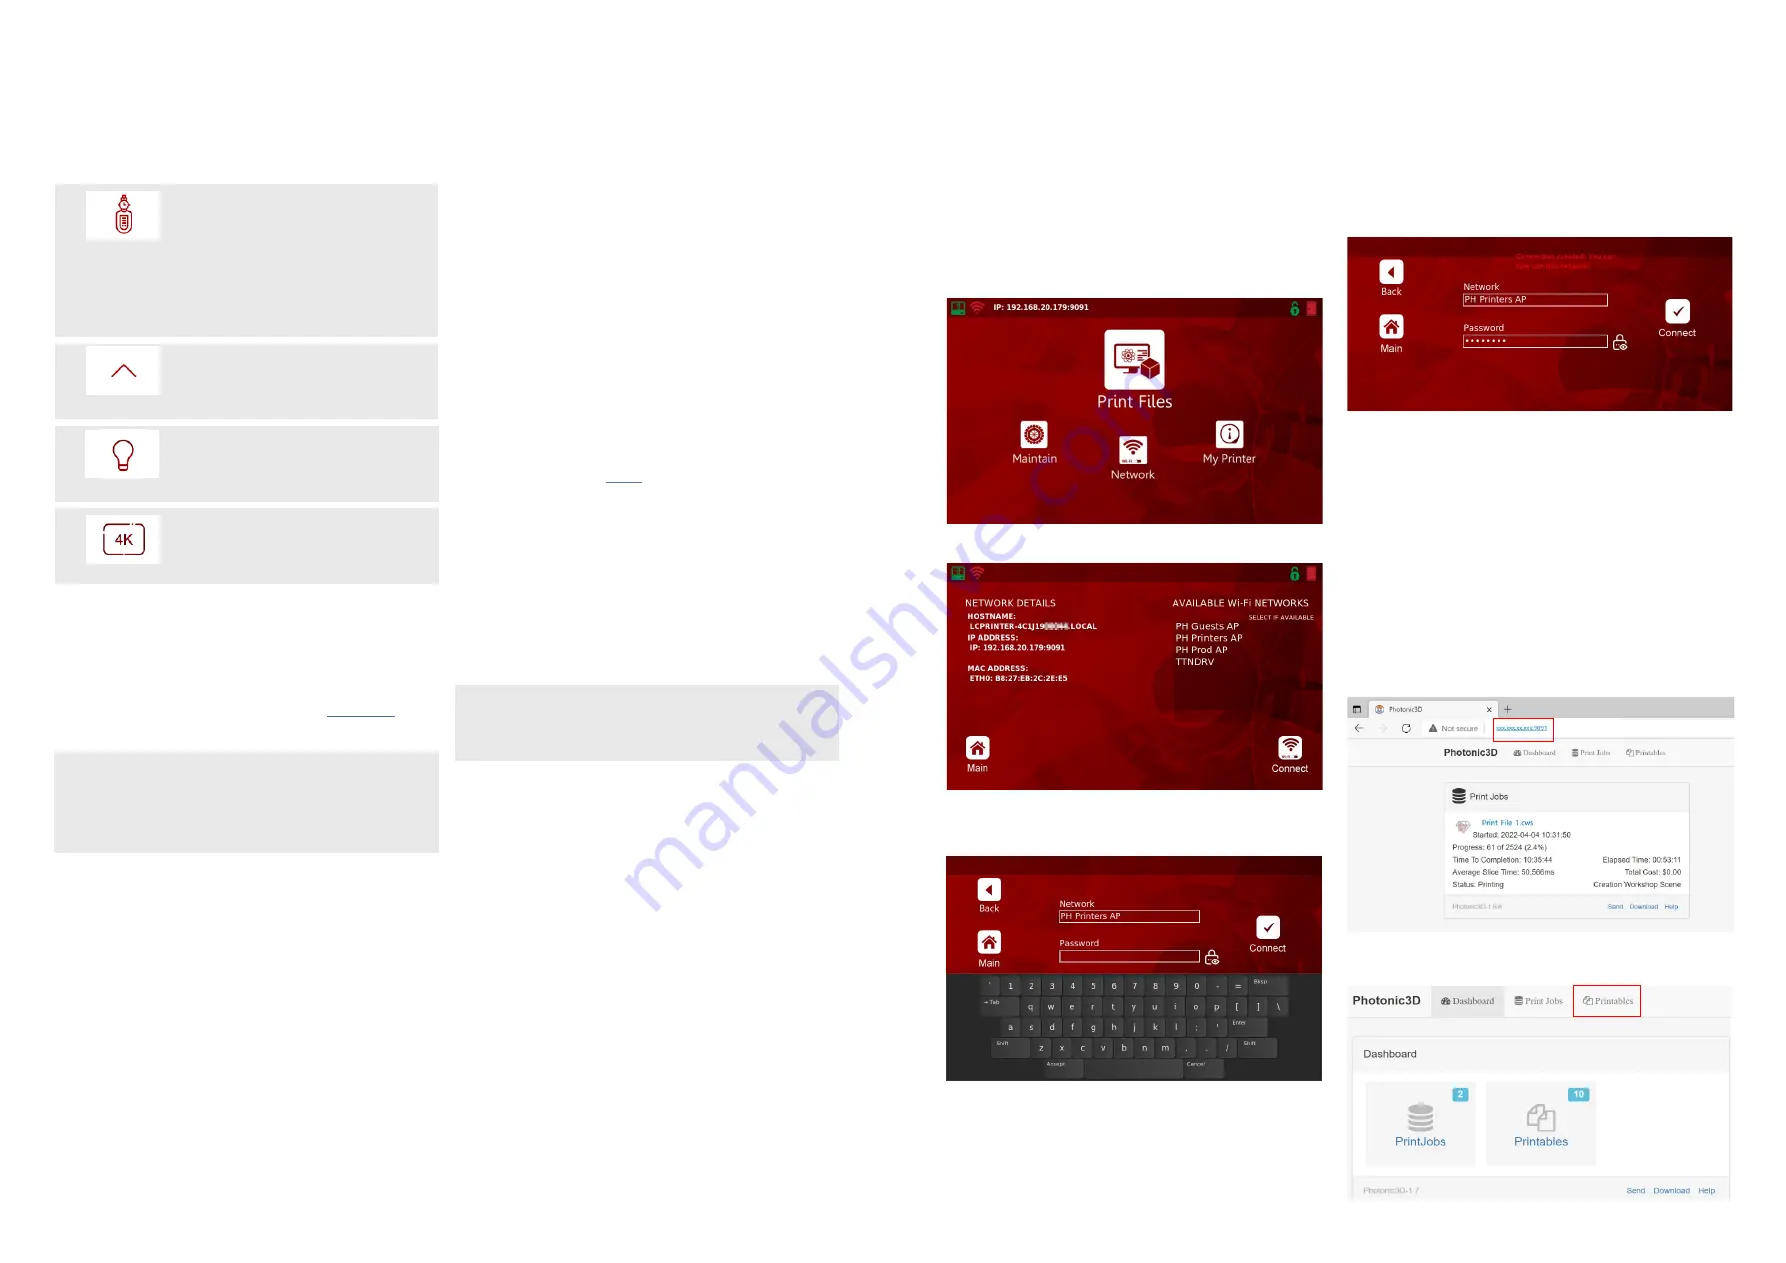
5.5.2 Connecting to a Network via Wi-Fi
1. Plug in the Wi-Fi dongle to the USB port at the
back of the printer.
2. On the ‘Main’ screen, select ‘Network’.
3. Select the desired network from the list.
7. Select ‘Connect’ and wait for the connection to be
established.
8. Select ‘Main’.
9. The Wi-Fi icon at the top left of the main page
should now be green. The IP address should be
displayed next to it.
4. Select ‘Connect’.
5. Select ‘Password’.
4. Select ‘Printables’ from the tabs at the top of the
screen.
6. Enter the password for this network by using the
on-screen keyboard. Password characters can be
displayed by selecting the lock icon to the right of
the text frame.
2. Import the desired file to Photocentric Studio and
support as necessary. Please refer to the Photocentric
Studio Support software videos for further guidance
by following the link
3. Once satisfied, record the resin volume required
to print from the tool panel for use when setting up
the print.
4. Slice the file and save to a specified location on
your PC.
5. Upload the file to LC Magna via USB or web
transfer.
5.6 FILE TRANSFER
5.6.1 Online File Transfer
1. Connect to a Network.
(See Section 5.5 for further guidance).
2. Open a web browser on your PC.
3. Type the printers’ IP address into the search bar.
10
9
To lift the print platform to its homing location.
Lift Platform
Once you select ‘Light On’, you can turn it
off by pressing ‘Light Off’. Or, light will go off
automatically after 10 seconds.
To check the printer screen function, select ‘Test
LCD’. Photocentric logo will be displayed in the
centre of the screen.
Light OFF
Display
NOTE:
Photocentric recommends saving the license
file locally on your PC in case the USB provided
is misplaced or damaged.
NOTE:
See Section 5.5 for further guidance on network
connection.
MAGNA
Liquid Crystal
MAGNA
Liquid Crystal
LC Magna works with patented peel release
technology called Blow-Peel. We suggest
testing the functionality of this feature weekly
and immediately after a vat leak in accordance
with maintenance schedule (Section 10). During
this procedure, air will be pumped between
the screen and vat film, causing the vat film to
inflate. The vat film should remain inflated until
the pump starts vacuuming the air out.
Pump


