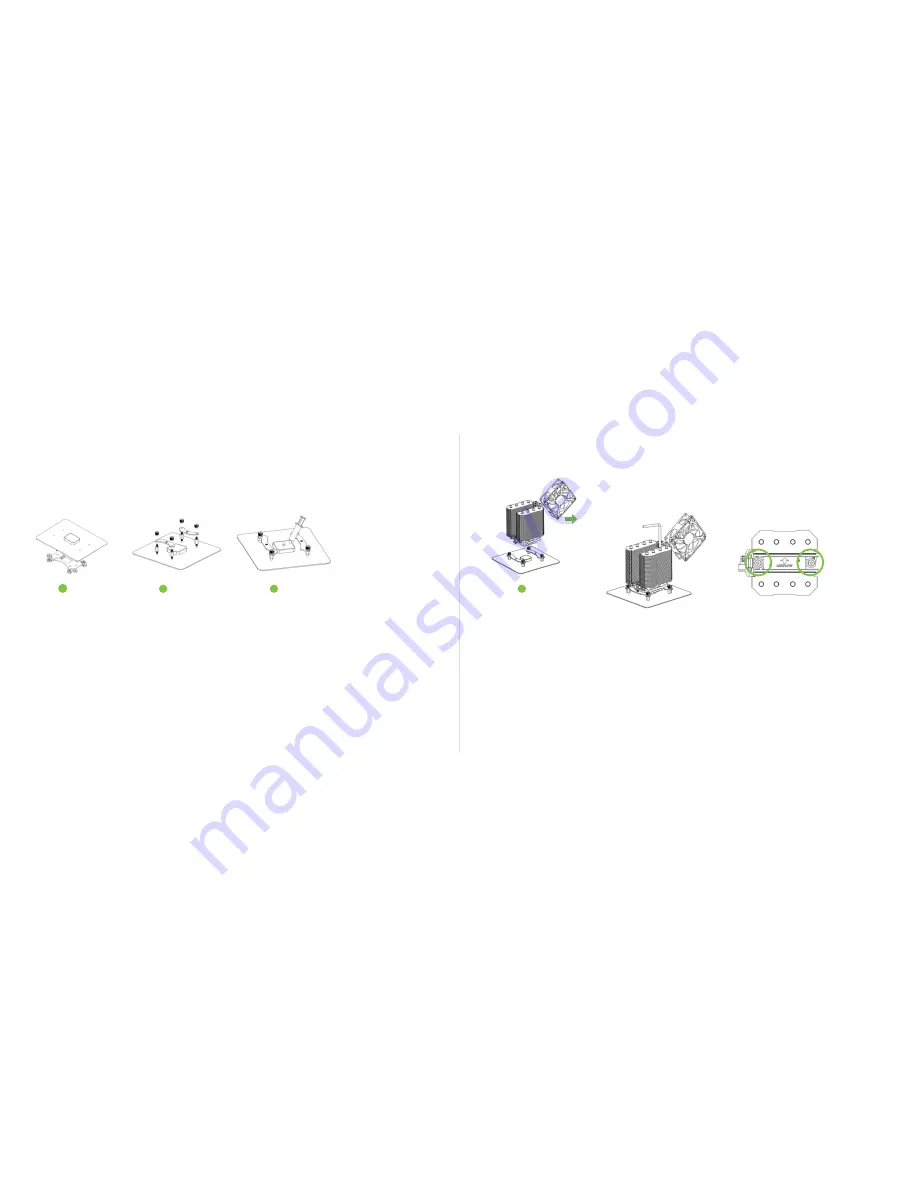
Phononic HEX 2.0 Quick Start Manual Download Page 6

INSTALL GUIDE

AMD

ATTACHING 

BACKPLATE

Attach backplate (B) 

to the back of the 

motherboard using 

included large standoffs 

(D). Note the side 

labeled “This side facing 

AMD board” should 

face the motherboard.

INSTALLING 

BRACKETS


On the frontside of the 

motherboard, attach the 

AMD mounting brackets 

(E) to the standoffs 

using the knurled nuts 

(G). 

Note that curve of 

bracket should be  

facing inward.

APPLYING  

THERMAL PASTE


Clean off any residual 

paste or thermal pads. 

Apply included thermal 

paste (H) in the center 

of CPU package – use a 

4-5mm circle. Excessive 

thermal paste can actually 

hinder performance.

STEP


STEP


2

3

10 

 HEX 2.0 

Quick Start Guide

STEP


1

4b

4c

STEP


4

ATTACH COOLER  

TO BRACKETS


Remove fan shroud and 

fan to provide access to 

the bolts that attach to 

the brackets. 

4a

Use a screwdriver to 

screw the bolts into the 

brackets, alternating 

between screws every 

half-turn.

Summary of Contents for HEX 2.0

Page 1: ...Quick Start Guide HIGH PERFORMANCE ACTIVE CPU COOLER For quick start user guides in additional languages please visit Phononic com hex HEX 2 0...

Page 2: ...ore installation Intel Sockets LGA2011 LGA1156 LGA1155 LGA1150 AMD Sockets AM3 3 AM2 2 COMPATIBILITY Socket LGA2011 LGA115x AM2 AM3 MAX TDP 140W Max OC 95W Max OC 220W Intel AMD HARDWARE FAN AMD BRACK...

Page 3: ...wever it can be removed by unplugging the 4 pin fan connector from the pin connection on the PC board inside the cooler STEP STEP STEP STEP 1 2 3 4 Air flow direction is important for peak performance...

Page 4: ...kets alternating between screws every half turn APPLYING THERMAL PASTE Clean off any residual paste or thermal pads Apply included thermal paste H in the center of CPU package use a 4 5mm circle Exces...

Page 5: ...orientation you desire is fine but cooler performance is maximized when airflow direction through the cooler matches the direction of the PC case STEP STEP STEP 2 1 3 4b 4c STEP 4 ATTACH COOLER TO BRA...

Page 6: ...Note that curve of bracket should be facing inward APPLYING THERMAL PASTE Clean off any residual paste or thermal pads Apply included thermal paste H in the center of CPU package use a 4 5mm circle E...

Page 7: ...ompletely removed plug 4 pin fan connector into the pin connection on the PC board inside the cooler Slide fan in between fin sets STEP 5 SHROUD INSTALL Re attach the fan shroud and close it over the...

Page 8: ...ions per header USB connection is not required for operation but enables customization via the HEX 2 0 dashboard software application STEP STEP 1 2 4 pin fan extension cable J Connect other end to CPU...

Page 9: ...the HEX 2 0 to your motherboard unlocks customization options like LED color and cooling performance when you visit phononic com hex to download the software application You can also check the status...

Page 10: ...and or need support Go to phononic com hex to contact customer support or call 844 476 4202 Mon Fri during business hours 6 My HEX 2 0 LED is flashing red What does this mean If the HEX 2 0 LED is fla...

Page 11: ...er is designed by Phononic Durham NC 27713 USA Made in China PRODUCT REGISTRATION Thank you for purchasing the HEX 2 0 To register your product please visit phononic com hex The HEX 2 0 has a 1 year l...

Page 12: ...NOTES...

Page 13: ...2016 Phononic Inc...

Reviews: