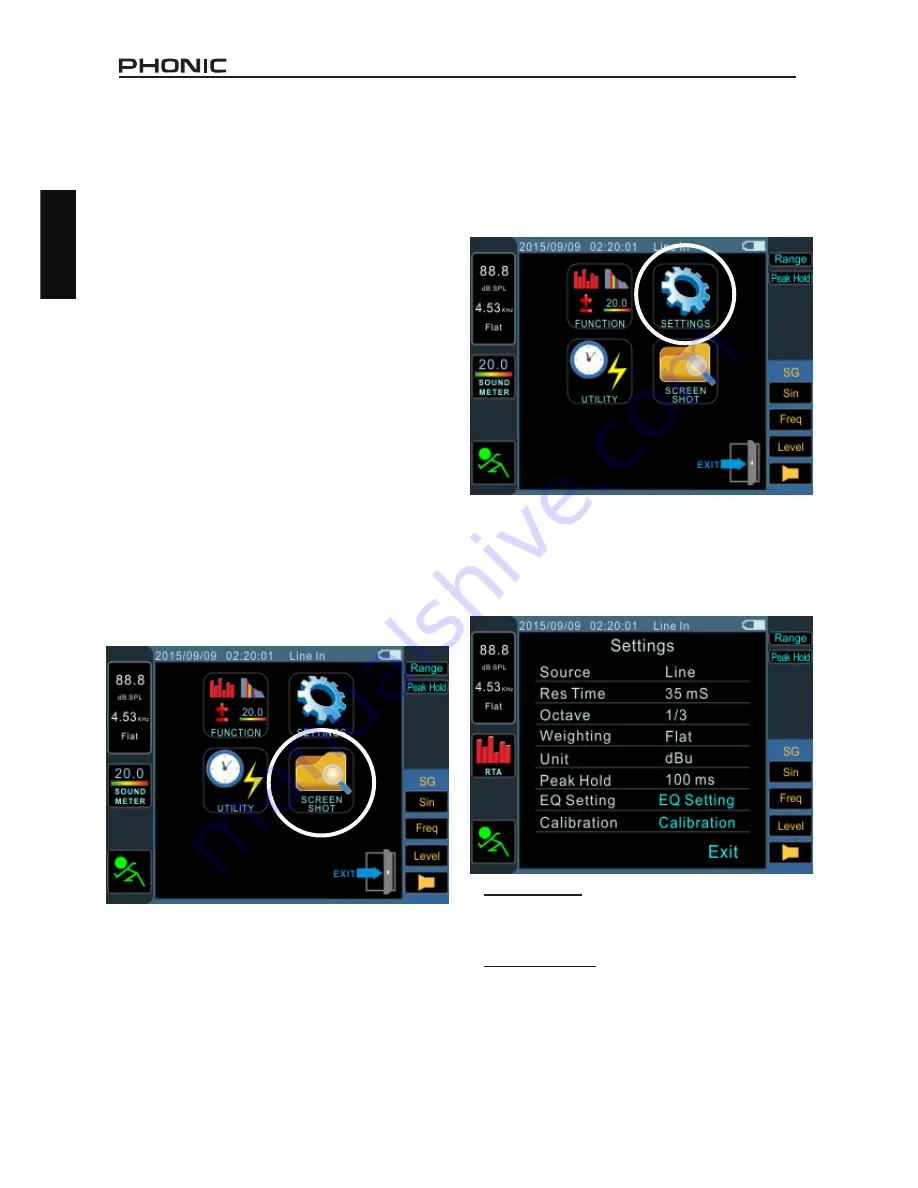
Phonic PAA3X User Manual Download Page 16

PAA3X

12

English


SCREEN CAPTURE

Regardless of the function, the PAA3X can 
always save screen shots of the current screen 
to recall at later dates. These are saved on an 
external SD card. Users can also load or delete 
their previously stored measurements. 

Capture:
1. 

Insert an appropriately formatted SD card to 
the PAA3X’s SD card slot. SD cards must be 

formatted as FAT-32 file systems.

2. 

In any function, on any screen, simply push 
the Capture button.

3.

  That’s all there is to it. The screen will be 

instantly  captured  and  a  BMP  file  will  be 

saved to your SD card.

Recall:
1. 

Enter the Main menu by selecting the ap-
propriate icon to the left of the screen.

2. 

Select Screen Shot from the main menu (as 
shown below). This option is only available 
when an SD card is inserted. If no SD card 
is present, the option will be grayed out. 

SETTINGS

Every  one  of  the  PAA3X’s  functions  offers  its 

own variable settings. To access the settings 
menu, select the Menu icon that is found to the 
left of the screen.

Once in the main menu, select the Settings op-
tion to access the Settings menu. The settings 

menu offers options for input source, units, re

-

sponse time, peak hold, and weighting - among 
other important features. 

Input Source

 – This setting allows users to 

switch between the built-in microphones (Mic) 
and the XLR inputs (Line) as their input source.

Response Time

 – This feature allows users to 

select the speed at which their calculations are 
made and displayed on screen. The response 
time can be selected between 35 ms (for explo-
sive sounds), 125 ms (fast), 250 ms (medium) 
and 1 second (slow).

3. 

Select the “View” icon to view the previously 

captured files. You can press the 

↑/←

 and 

↓/→ 

buttons to scroll through all captured 

files.

4,  Selecting the file name on screen allows you 

to scroll through all saved files. Please note 
that a list of captured files will not appear on 

screen.

Summary of Contents for PAA3X

Page 1: ...PAA3X User s Manual Manual del Usuario...

Page 2: ...English Espa ol Audio Analyzer with Color LCD Analizador de Audio con LCD Colorizado ENGLISH I ESPA OL II APPENDIX III V1 3 11 15 2016 PAA3X...

Page 3: ...Time Analyzer RTA 6 Reverb Time RT60 8 Meter 10 Polarity 11 SCREEN CAPTURE 12 SETTINGS 12 MICROPHONE CALIBRATION 13 SIGNAL GENERATOR 14 UTILITY 14 FIRMWARE UPDATE 15 OPERATING TIPS 15 SPECIFICATIONS 1...

Page 4: ...ring lighting storms or when unused for long periods of time 14 Refer all servicing to service personnel Servicing is required when the apparatus has been damaged in any way such as power supply cord...

Page 5: ...easurements and guarantee the best pos sible quality of sound that any professional would expect We at Phonic took the utmost of care in ensuring the PAA3X is an extremely accurate and effective means...

Page 6: ...ed using the on board controls or the jog control on the side 4 Enter Button Press this button to move from Real Time Spec trumAnalyzer RTA display to the PAA3X s main menu After moving the cursor to...

Page 7: ...used for charging the PAA3X s built in battery Please use the included power adapter only 5VDC 2A 12 Balanced XLR Input This balanced input allows users to feed signals from external devices to the P...

Page 8: ...range you will need to scroll up or down The peak hold icon allows users to activate a peak hold on the current function The peak hold function will cause the highest signal peaks to be held for a sho...

Page 9: ...ed here The PAA3X has 4 weightings to choose from Flat A B and C To change the weighting select the Menu icon followed by the Settings icon in the subsequent menu The weighting settings can be found h...

Page 10: ...ber of separate bands in 1 3rd or 1 6th octave resolution Each frequency band is graphed as a vertical bar on the RTA the height of which represents the level whether in dB SPL dBu etc of the individu...

Page 11: ...e dB SPL in real time for center frequencies of that particular band The rightmost bar is the ALL frequency level To the left of the screen you will find a boxes with signal properties listed The top...

Page 12: ...ted equalizer band settings updated in real time With perfect equalizer settings ideally the EQ Setting function would display a flat line with no suggested frequency adjustments This will allow for g...

Page 13: ...o level received by the PAA3X is greater than 30 dB over the background noise This will trigger the RT60 function Quickly mute the system to get your RT60 reading as ac curate as possible 7 After the...

Page 14: ...it may be necessary to adjust the measurement range This is done by simply clicking the range values on the level meter itself The measurement range will depend on the unit selected in the settings Ea...

Page 15: ...l is not at a suitable level The above procedure is for checking the polar ity of speakers The same method can be used to check the wiring of cables themselves you simply need to select the Line In as...

Page 16: ...SETTINGS Every one of the PAA3X s functions offers its own variable settings To access the settings menu select the Menu icon that is found to the left of the screen Once in the main menu select the S...

Page 17: ...of time giving a better visual representation of these high peaks This is represented by a small red line dot at the top of the frequency bar This red mark will remain for as long as the peak hold ti...

Page 18: ...1 6 1 3 2 3 and 1 octave intervals selectable by the user Alternatively users can choose Select and adjust the sweep range manually Once users choose Select the Sweep signal s Start and Stop fields wi...

Page 19: ...he power button for 3 seconds to turn the unit on and off In the unlikely event that the PAA3X crashes push and hold the power button for 10 seconds to turn it off Using the jog wheel is the fastest w...

Page 20: ...130 60 to 120 50 to 110 dB scale setting 5dB steps on Y Axis Unit dB SPL dBu dBV Volt Octave 1 3 1 6 Weight A B C Flat RT 60 Unit dB SPL dBu dBV Volt Trigger Internal External Weight A B C Flat 1 Oct...

Page 21: ...the date of purchase You will need it for any warranty service No returns or repairs will be accepted without a proper RMA number return merchandise authorization In order to keep this warranty in ef...

Page 22: ...PAA3X 1 Appendix DIMENSIONS DIMENSION Measurements are shown in mm inches Todas las medidas est n mostradas en mm pulgadas 156mm 6 14 37 5mm 1 5 mm 1 5 90mm 3 54...

Page 23: ...2 PAA3X Appendix NOTES...

Page 24: ......

Reviews: