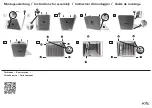
Step 3
Secure the carrier:
Add the second set of screws and nuts to the bottom six corner clips. This will
secure the sides of the carrier to the back of the carrier (Fig 3-1).
Using the hex nut driver and a Philips screw driver, install six clips onto the front
edge of both side pieces. The edge of the clips should be in line with the long
edge of the side pieces (Fig 3-2).
Fig 3-1
Fig 3-2
Step 4
To assemble the front piece:
Open the door, place the front piece onto the carrier and gently press the pegs into
the plugs. Take two screws and secure the two perches extending from the back
piece into place.
Install the door jam on the inside of the carrier. The door jam goes on the inside of
the carrier, but it is screwed on from the outside
(Fig 4-1)
Install the door knob onto
each door. Tighten the screw from the back of the door
(Fig 4-2).
Add the second set of screws and nuts to the front six corner clips. This will secure
the sides of the carrier to the front of the carrier.
Fig 4-1
Fig 4-2


