background image

8

Your phone

2

Your phone

Congratulations on your purchase and welcome to Philips!

To fully benefit from the support that Philips offers, register your product at 
www.philips.com/welcome.

2.1

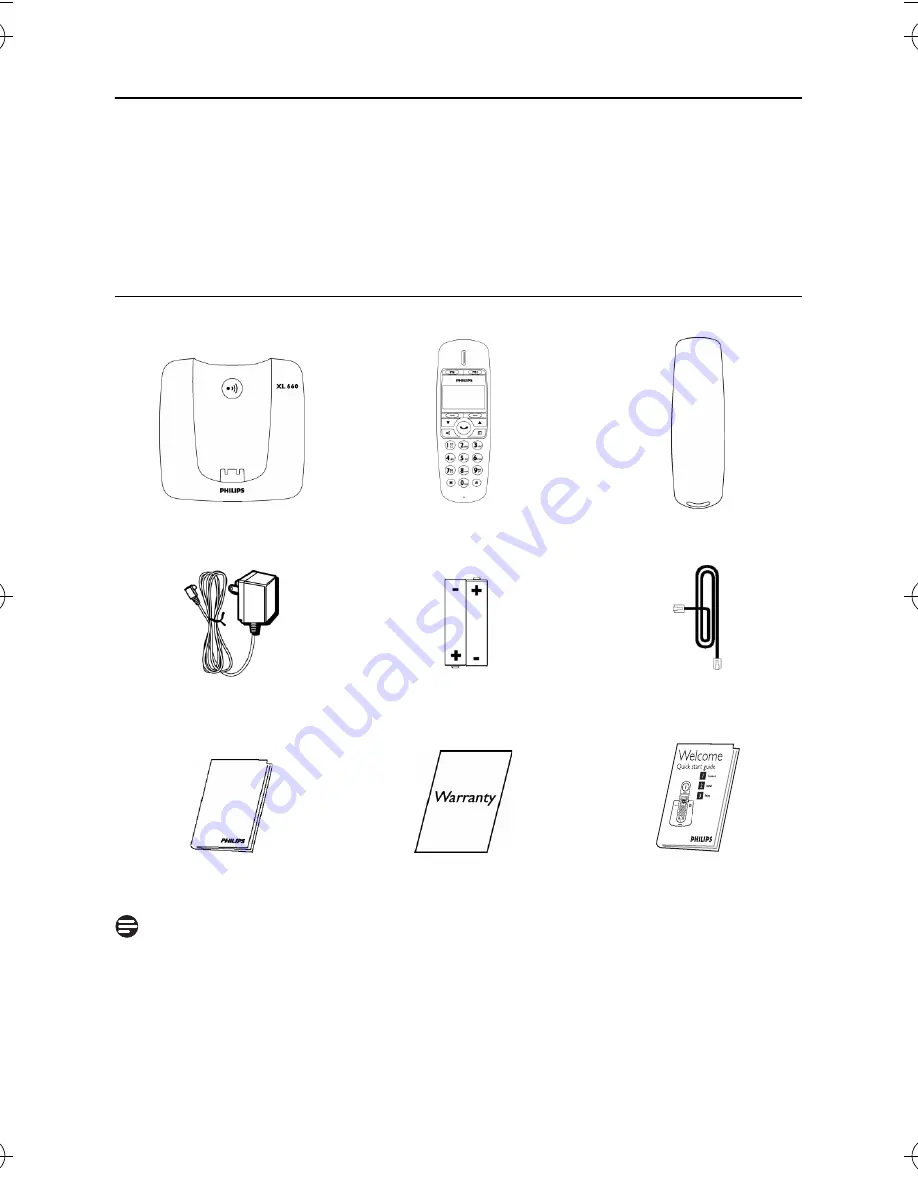
What’s in the box

Note

*The line adapter may not be attached to the line cord. You may find the line adapter 
in the box. In this case, you have to connect the line adapter to the line cord first before 
plugging the line cord to the line socket.

In multi-handset packs, you will find one or more additional handsets, chargers with 
power supply units and additional rechargeable batteries.

 Handset

Base station 

Battery door

Guarantee

NiMH AAA Rechargeable 

Batteries x 2

Power supply

User Manual

Line Cord*

Quick start 

guide

XL660_IFU_master.book  Page 8  Wednesday, October 14, 2009  12:46 PM

Summary of Contents for XL 660

Page 1: ...AUS EN Telephone Warning Use only rechargeable batteries Charge the handset for 24 hours before use XL 660 Register your product and get support at www philips com welcome To insert with ...

Page 2: ......

Page 3: ...tation 12 3 2 Connect your charger 12 3 3 Install your handset 12 3 4 Checking the battery level 13 3 5 Welcome mode 13 3 6 Setting the clock 14 3 7 What is standby mode 15 3 8 Checking the signal strength 15 3 9 Missing handset s 15 3 10 Menu structure 16 4 Call 17 4 1 Making a call 17 4 2 Ending a call 17 4 3 Answering a call 18 4 4 During a call 18 4 5 Using handsfree 18 4 6 Using quick dial 18...

Page 4: ... all call records 25 9 Redial List 26 9 1 Viewing the redial records 26 9 2 Redialing a call 26 9 3 Saving a redial record to your phonebook 26 9 4 Deleting a redial record 26 9 5 Deleting all redial records 26 10 Custom Options 27 10 1 Personalizing your phone s display 27 10 2 Personalizing your phone s sounds 27 10 3 Auto conference 27 11 Advanced Settings 28 11 1 ECO mode 28 11 2 Registering h...

Page 5: ...Table of contents 3 12 Default pre programmed settings 31 13 Technical Data 32 14 Frequently asked questions 33 15 Index 35 ...

Page 6: ...the charging contacts or the battery to come into contact with conductive materials There is a slight chance that your product could be damaged by an electrical storm We recommend that you unplug the product from the power supply and telephone socket during a storm Do not use the handset in an explosive hazard area such as where there is gas leaking It is recommended that this product is not used ...

Page 7: ...rtened in low temperature conditions Warning Metallic objects may be retained if placed near or on the handset receiver 1 2 Using GAP standard compliance The GAP standard guarantees that all DECT GAP handsets and base stations comply with a minimum operating standard irrespective of their make XL660 handset and base station are GAP compliant which means they guarantee the minimum functions registe...

Page 8: ...ection facilities If you purchase a replacement product hand your complete old product back to the retailer The shop should accept it as required by the WEEE directive Disposal instructions for batteries Batteries should not be disposed of with general household waste Packaging information Philips has marked the packaging with standard symbols designed to promote the recycling and appropriate disp...

Page 9: ... intended use they are safe to use according to scientific evidence available today 5 Philips plays an active role in the development of international EMF and safety standards enabling Philips to anticipate further developments in standardisation for early integration in its products ...

Page 10: ...o the line cord You may find the line adapter in the box In this case you have to connect the line adapter to the line cord first before plugging the line cord to the line socket In multi handset packs you will find one or more additional handsets chargers with power supply units and additional rechargeable batteries Handset Base station Battery door Guarantee NiMH AAA Rechargeable Batteries x 2 P...

Page 11: ...ction displayed on the handset screen directly above it Access main menu Exit menu operation E Down key Scroll down menu Decrease earpiece and loudspeaker volume F Up key C Scroll up menu Increase earpiece and loudspeaker volume G Talk End key Make and receive calls End call H Speaker key v Turn speaker on off I Phonebook key e Enter phonebook J Star key Dial K Intercom Conference key 0 Dial 0 Mak...

Page 12: ...10 Your phone N Loudspeaker O Battery door 2 3 Overview of the base station A Paging key _ Find handset s Enter registration mode ...

Page 13: ...e menus Your phone offers a variety of features and functions grouped in the menus 2 5 1 Browsing the menus The main menu includes the Date Time Ring Tones Language Key Beep and Conference menus From standby mode you can Press the right softkey MENU to enter the main menu Press the left softkey CALLS to enter the received calls and redial lists Press e to enter the phonebook Tip Use C or to naviga...

Page 14: ...y Connect the AC power adapter to a standard wall outlet 3 3 Install your handset Warning CAUTION RISK OF EXPLOSION IF BATTERY IS REPLACED BY AN INCORRECT TYPE Use only with Philips type no Multi Life 600mAh 2x 1 2V AAA 600mAh Ni MH rechargeable battery Use only the recommended type supplied with this product Dispose of used batteries according to the instructions Note Charge the handset s for 24 ...

Page 15: ...handset you may need to configure it according to the country of use After inserting the batteries Welcome appears in various languages Press OK You can now set the country to start using the phone By default the outgoing message language 1 is displayed 2 Battery full Battery empty Require charging Country Default outgoing message language Outgoing message language available Germany German 1 Germa...

Page 16: ...l need to reset your phone see Default pre programmed settings on page 31 3 6 Setting the clock Your phone has a digital clock Set the clock before initial use of the phone 3 6 1 Setting the date and time Press MENU Select DATE TIME Press OK to enter SET DATE mode Use the digit keys to enter the date Country Default outgoing message language Outgoing message language available Sweden English 1 Swe...

Page 17: ...y icon means your handset and the base station are linked A flashing icon means your handset and the base station are not linked If you move too far away from the base station while you are on the phone you will hear warning tones notifying you that your handset is almost out of range lost link Take your handset closer to the base station or your call may be cut off shortly after the warning Note ...

Page 18: ... exit the menu or operation press the right softkey BACK MENU DATE TIME RING TONES CHOICE Melody list RING VOLUME OFF LEVEL 1 LEVEL 2 LEVEL 3 LEVEL 4 LEVEL 5 LANGUAGE Language list KEY BEEP ON OFF CONFERENCE ON OFF ADV SETTING ECO ON OFF REGISTRATION RECALL TIME SHORT MEDIUM LONG DIAL MODE TONE PULSE AREA CODE ON OFF CARRIER CODE RESET CALLS REDIAL LIST Redial list VIEW SAVE NUMBER DELETE DELETE A...

Page 19: ...aling lets you view and edit the number before making the call Enter the phone number The number displays on the screen You can make changes before dialing out Press to dial out the call Tip Press CLEAR to erase a digit Press and hold to enter a pause P displays on the screen 4 1 2 Calling from the redial list Press CALLS Select REDIAL LIST Press OK Select the record you want to call Press to dial...

Page 20: ... volume Press C or to adjust the volume during a call The volume is adjusted and the phone goes back to the call screen 4 4 2 Muting the microphone The mute feature allows you to speak to someone in the house privately Press MUTE during a call to mute the microphone The caller cannot hear you but you can still hear his voice Press UNMUTE to un mute the microphone You can now communicate with the c...

Page 21: ...Call 19 4 6 1 Viewing quick dial number Press M or N The stored number is displayed Note Press to dial out the viewing number 4 6 2 Calling from quick dial Press Press Mor Nto dial out the call 1 1 2 ...

Page 22: ...econds during the call The external caller is automatically being put on hold Select or press the desired handset number Press OK Wait for the called handset to answer your call 5 1 2 To toggle between the calls Press 0 to switch between the outside call and the intercom call 5 2 Transferring a call Press and hold 0 during a call Select or press the desired handset number Press OK Press after the ...

Page 23: ...ercom mode Tip Auto Conference You can join an ongoing external call with another handset by pressing See Auto conference on page 27 During the conference call Press INT to put the external call on hold and go back to the internal call The external call is put on hold automatically Note Any handset hangs up during a conference call will leave the other handset still in connection with the external...

Page 24: ...character you want Tip Editing Use CLEAR to delete and C or to move the cursor Input table Example to write PAUL Press 7 once P Press 2 once A Press 8 two times U Press 5 three times L Key Characters Upper case 0 0 1 Space 1 _ 2 A B C 2 À Â Æ Á Ã Ă Ä Å Ą Ç Ć Č 3 D E F 3 Ď Đ Ě È É Ê Ë Ę Φ 4 G H I 4 Ğ Í Ì Î Ï İ Γ 5 J K L 5 Λ Ł Ĺ Ľ 6 M N O 6 Ñ Ň Ń Ó Ô Õ Ö Ő 7 P Q R S 7 Ř Ş Š Ś β Π Θ Σ 8 T U V 8 Ţ Ť Ù...

Page 25: ...ll 7 1 1 2 Searching by the first character While in the phonebook press the digit key that contains the character you want to search by 7 1 2 During a call You can access the phonebook and view your records during a call Press e during a call Select the contact you want to view 7 2 Calling from the phonebook See Calling from the phonebook on page 17 7 3 Adding a record Note Memory Full If your ph...

Page 26: ...ber if necessary Press SAVE to confirm The record is saved 7 5 Deleting a record Press e Select the contact you want to delete Press OPTION Select DELETE Press OK The record is deleted 7 6 Deleting all records Press e Press OPTION Select DELETE ALL Press OK The handset displays a confirmation request Press OK to confirm All records are deleted 1 2 3 4 1 2 1 2 3 ...

Page 27: ...S if all calls have already been viewed before Select RECEIVED CALLS and then press OK to enter the incoming call log Select the record you want to view Press OPTION Select VIEW Press OK 8 2 Returning a call To call from the incoming call log see Calling from the call log on page 17 8 3 Saving a call record to your phonebook Enter the RECEIVED CALLS list Select the record you want while browsing t...

Page 28: ...record to your phonebook Enter the REDIAL LIST Select the record you want while browsing the list Press OPTION Select SAVE NUMBER Press OK Enter and edit the name if necessary Press OK Enter and edit the number if necessary Press SAVE The record is saved 9 4 Deleting a redial record Enter the REDIAL LIST Select the record you want while browsing the list Press OPTION Select DELETE Press OK The rec...

Page 29: ...ard ring melodies Press MENU Select RING TONES CHOICE Press OK Select the new setting Press OK The setting is saved 10 2 2 Setting your handset s ringer volume There are 6 ringer volume levels including ringer off Press MENU Select RING TONES RING VOLUME Press OK Select the new setting Press OK The setting is saved 10 2 3 Setting the key tone Key tone is the sound you hear when you press a key on ...

Page 30: ...for registering or unregistering handsets 11 2 1 Auto registration Place the handset on the base station The handset will detect the base and start to register automatically Registration shall be completed in less than 2 minutes The base automatically assigns a handset number to the handset 11 2 2 Manual registration If the base station is of a different make from XL660 the handset and base linkin...

Page 31: ... For details consult your service provider 11 4 1 Setting the dial mode Press MENU Select ADV SETTING DIAL MODE Press OK Select the new setting Press OK The setting is saved Tip Temporary Tone If your phone is in pulse dialing press and hold during a call for temporary tone mode d displays Digits entered after d are sent out as tone signals for this call only 11 5 Area code management This feature...

Page 32: ...6 1 Activating carrier code Press MENU Select ADV SETTING CARRIER CODE Press OK Enter the carrier code Press OK The setting is saved 11 6 2 Deactivating carrier code Press MENU Select ADV SETTING CARRIER CODE Press OK Use CLEAR to delete all the digits Press OK The setting is saved 11 7 Restoring default settings You can reset your phone settings to the original factory settings Press MENU Select ...

Page 33: ...M DD Time 00 00 Time Format 12 hour Phonebook List Unchanged Auto Hang Up On Recall Time Country dependent Area Code Empty Carrier Code Empty Handset Speaker Volume Level 3 Conference Country dependent Receiver Volume Volume 3 Handset Ring Volume Level 3 Handset Ring Melody Melody 1 Handset Key Beep On Incoming Call Log Empty Redial List Empty Dial Mode Country dependent ...

Page 34: ...nebook list with 100 entries Redial list with 10 entries Call log with 20 entries Battery 2 x AAA NiMH Rechargeable 600mAh batteries Power consumption Power consumption at idle mode around 600mW Weight and dimensions Handset 138 4 grams 174 0 x 56 3 x 30 0 mm H x D x W Base 103 7 grams 100 5 x 99 5 x 72 5 mm H x D x W Temperature range Operation 0 C to 35 C 32 F to 95 F Storage 20 C to 45 C 4 F to...

Page 35: ...ain Charging contacts may be dirty Disconnect the power supply first and then clean contacts with a damp cloth Product behaviour I cannot change the settings of my voice mail Operator voice mail is managed by your operator and not the phone itself Please contact your operator should you want to change the settings Handset on the charger does not charge Check that the batteries are inserted correct...

Page 36: ...thheld or is unavailable Cannot make answer a 2nd call Service may not be activated Check with your service provider Check that the recall selection is correct See page 29 The handset loses connection with the base or the sound is distorted during a call Check if the ECO mode is activated Turn it off to increase the handset range and enjoy the optimal call conditions Note If the above solutions do...

Page 37: ... 29 Display icons 11 Display language 27 E Ending a call 17 Entering text and numbers 22 F Frequently asked questions 33 H Handset locator 15 Handsfree 18 I Intercom 20 K Key tone 27 M Making a call 17 Making a conference call 20 Menu structure 16 Muting the microphone 18 O Overview of the base 10 Overview of the handset 9 P Personalizing your phone s display 27 Personalizing your phone s sounds 2...

Page 38: ...36 Index S Setting the clock 14 T Transferring a call 20 W Wall mounting 12 ...

Page 39: ...ENGLISH UFZZ01236JZ 0 ...

Page 40: ...2008 Koninklijke Philips Electronics N V All rights reserved Reproduction in whole or in part is prohibited without the written consent of the copyright owner Document number 01236JZ 0 Printed in Vietnam ...

Reviews: