background image

38

 EN

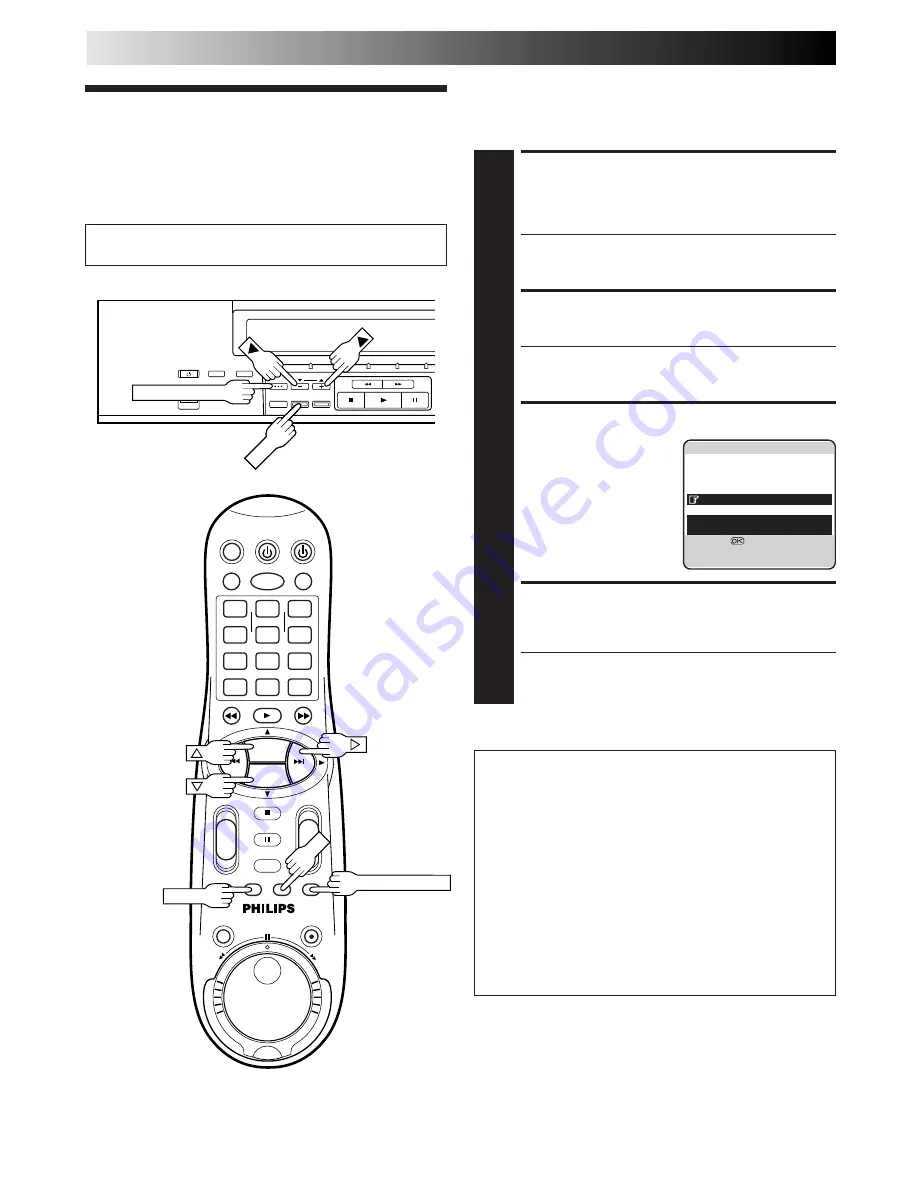
TAPE MANAGER

Tape Manager

Functions

LOAD A RECORDED

CASSETTE

1

Insert a recorded cassette.

While "– – – –" is blinking on the front display panel,
the tape will run for a few seconds to search for the
tape number.

ACCESS TITLE SCREEN

2

Press 

TAPE MANAGER

.

After pressing 

TAPE MANAGER

, it may take a few

seconds to access the title screen while the recorder
searches for the programme information.

CHOOSE A PROGRAMME

3

Press 

%fi

 (or 

5∞

) to

move the highlight bar
(pointer) to the
programme you want to
watch.

START PLAYBACK

4

Press 

OK

. Playback begins automatically after the

selected programme is located.

If you press 

#

 instead of 

OK

, the editing screen will

appear. You can edit the programme title and
category (

Z

 pg. 41).

Turn on the TV and select the AV mode.

This function is useful when you wish to quickly find out what
programmes you have recorded on a tape with this recorder.
This function allows you to select a programme to watch, and
then automatically searches for the start of the programme.

To start recording on the

blank portion of a tape

If you do not record programs consecutively, two tape
numbers will be recorded on one tape and the recorder
will not be able to search for the correct programme.  To
continue recording on the blank portion of a tape, follow
the procedure described below:

1

Press 

%fi

, and select a "BLANK" item on the program

title screen.

2

Press 

OK

. The recorder automatically searches for a

blank portion on the tape.

3

After confirming that this is the tape on which you
really wish to record, begin recording.

1

3

5

0

9

6

7

-

+

-

+

+

+

-

-

PROG. +

PROG. –

O

K

MENU

TAPE MANAGER

TAPE MANAGER

TV PROG

OK

OK

OK

]

0013 FOOTBALL '98

1/  3

BLANK

1:25 (LS3)

22 : 00 26.02.99

BBC1

20 : 00 27.02.99

BBC2

BLANK 0 : 30 (LS3)

21 : 00 28.02.99

I-1

22 : 15 28.02.99

PR.07

21 : 00

=

22 : 30

1 : 30 (STD)

WORLD CUP '98

/SPORTS

[

5∞

[

3

]

 : 

EDIT

[TAPE MANAGER]

 : 

EXIT

Summary of Contents for VR20D/07

Page 1: ...t programmes you have recorded on a tape with this recorder This function allows you to select a programme to watch and then automatically searches for the start of the programme To start recording on the blank portion of a tape If you do not record programs consecutively two tape numbers will be recorded on one tape and the recorder will not be able to search for the correct programme To continue...

Page 2: ... D VHS STD mode 30 min for the D VHS LS3 mode 8 min for the S VHS VHS SP mode or 15 min for the S VHS VHS LP mode Tape Manager may not work properly depending on the cassette being used If the recorder finds two tape numbers in one tape while playing back or searching for the beginning of a programme then when you remove the tape the tape will be assigned just one number smaller number The program...

Page 3: ... pointer to EDITING then press OK or SELECT TAPE NO 4 Press fi to move the highlight bar pointer to the number of the tape whose title you want to edit then press OK or The mark indicates the tape number of the cassette that is currently in the recorder SELECT TAPE TITLE 5 Press fi to move the highlight bar pointer to the tape number then press OK or The mark indicates the current position on the ...

Page 4: ...30 1 30 STD TITLE CATEGORY 5 EDIT CLEAR DELETE MENU EXIT 0114 18 03 99 1 3 20 00 27 02 99 BBC2 22 00 26 02 99 BBC1 21 00 28 02 99 I 1 22 15 28 02 99 PR 07 8 15 15 01 00 PR 99 20 00 21 30 1 30 STD WORLD CUP 98 SPORTS 5 SELECT OK MENU EXIT Entering Character Press NUMBER key then press to enter each character Refer to the example below Ex Enter NEWS 1 Press 6 MNO twice to enter N then press 2 Press ...

Page 5: ...move the highlight bar pointer to YES then press OK or RETURN TO NORMAL SCREEN 3 Press MENU Perform steps 1 to 4 of Edit Tape Title on page 40 before continuing 0114 18 03 99 1 3 20 00 27 02 99 BBC2 22 00 26 02 99 BBC1 21 00 28 02 99 I 1 22 15 28 02 99 PR 07 8 15 15 01 00 PR 99 5 EDIT CLEAR DELETE MENU EXIT 0114 18 03 99 DELETE YES NO 5 MENU EXIT 1 4 2 3 5 8 0 9 6 7 PROG PROG OK MENU CLEAR ...

Page 6: ...NOTES When you delete data only the tape and or programme information is deleted The actual recording on the tape is not erased If the recorder s memory becomes full the recorder registers the tape in the library under the smallest tape number that is still available 0114 18 03 99 1 3 20 00 27 02 99 BBC2 22 00 26 02 99 BBC1 21 00 28 02 99 I 1 22 15 28 02 99 PR 07 8 15 15 01 00 PR 99 20 00 21 30 1 ...

Page 7: ...00 24 11 99 0996 RA11 915 26 12 99 2 3 PAGE MEMU EXIT 5 EDIT ACCESS SORTING SCREEN 3 Press fi to move the highlight bar pointer to SORTING then press OK or ACCESS TAPE NO SCREEN 4 Press fi to move the highlight bar pointer to BY TAPE NO then press OK or SELECT TAPE NO 5 Press fi to move the highlight bar pointer to the tape number you want to select then press OK The editing screen will appear You...

Page 8: ... 99 0980 GUNDAM3 23 12 98 0979 GUNDAM2 21 12 98 0975 GUNDAM1 30 10 99 0960 ZDF 2100 28 11 97 0960 PR99 1000 01 01 00 0951 GODILLA 25 11 97 0926 CNN 115 06 06 98 0910 RA11 930 05 02 99 2 3 PAGE MEMU EXIT 5 EDIT ACCESS DATE SCREEN 1 Press fi to move the highlight bar pointer to BY DATE then press OK or SELECT TAPE NO 2 Press fi to move the highlight bar pointer to the tape number you want to select ...

Page 9: ...the camcorder s S VIDEO OUT and AUDIO OUT connectors to the recorder s front panel S VIDEO and AUDIO input connectors A C If the camcorder has a DV OUT connector connect the camcorder s DV OUT connector to the recorder s DV IN connector See DV Sound Setting Z pg 47 for the DV sound selection When using a mono camcorder connect its AUDIO OUT connector to the AUDIO L input connector on your recorder...

Page 10: ...o specify which two channels to record 1 Press MENU to access the Main Menu screen 2 Move the highlight bar pointer to MODE SET by pressing fi then press OK or 3 Move the highlight bar pointer to DV SOUND by pressing fi then press OK or to select SOUND1 SOUND2 or FULL When there are four DV audio channels 32kHz SOUND 1 Records the two channels L R of DV SOUND 1 SOUND 2 Records the two channels L R...

Page 11: ... to another recorder With C connection When using your recorder as the recording deck set AV1 SELECT to S VIDEO and AV2 SELECT to AV2 Z pg 50 When using your recorder as the source player set the AV1 OUT switch on the rear panel to Y C Z pg 6 SET RECORDING MODE 2 Set the appropriate recording mode D VHS S VHS or VHS Z pg 22 23 SET RECORDING DECK S INPUT MODE 3 Set to AUX With this video recorder p...

Page 12: ...r panel S VIDEO and AUDIO output connectors to the recording deck s S Video and Audio input connectors When Using Your Video Recorder As The Recording Deck connect its rear panel S VIDEO and AUDIO input connectors to the source player s S Video and Audio output connectors Then set the recorder s input mode to S 1 Another recorder Another recorder Recorder 21 pin SCART Cable provided Player Your re...

Page 13: ...default setting is AV2 if the recorder s memory backup has expired due to a power cut or because the AC was removed from the recorder AV2 will be automatically selected when the power is restored to the recorder If you are using a satellite tuner or a decoder be sure to set AV2 SELECT back to appropriate mode If the AV1 OUT switch on the rear panel is set to Y C it is impossible to set AV2 SELECT ...

Page 14: ...amcorder and pause playback when you find the point where you want to start editing Press and hold PAUSE and press RECORD on your recorder so that the recorder enters the Record Pause Mode START SYNCHRO EDITING 5 Press SYNCHRO EDIT PAUSE SYNCHRO EDITING 6 Press SYNCHRO EDIT again Repeat steps 4 6 as necessary NOTES The Synchro Editing function is impossible with the connec tion using DV connector ...

Page 15: ...52 EN INFORMATION ON J TERMINAL J Terminal JLIP Joint Level Interface Protocol Connector The J Terminal is used for service purposes ...

Page 16: ...Timer mode in Stop mode recording or turned off When the recorder is in Stop mode or recording press VCR TV on the remote control to turn off the VCR indicator on the display panel In this case be sure to set the AV1 OUT switch on the rear panel to COMP AV1 OUT switch NOTES Set AV2 SELECT to AV2 or SAT Z pg 50 You can use Automatic Satellite Program Recording function Z pg 37 with this connection ...

Page 17: ...onnector Then connect the satellite tuner and TV Mains outlet TV Aerial cable Aerial connector Satellite Tuner Unit Satellite Cable Outdoor Unit Aerial Back of TV 21 pin AV input connectors SCART RF OUT ANT IN Back of Recorder NOTES Set AV2 SELECT to AV2 Z pg 50 You can use Automatic Satellite Program Recording function Z pg 37 with this connection To record a programme via the satellite tuner sel...

Page 18: ...ITIAL SET then press OK or ACCESS GUIDE PROG SET SCREEN 3 Press fi to move the highlight bar pointer to GUIDE PROG SET then press OK or ENTER GUIDE PROG NUMBER 4 Press fi or NUMBER keys to enter the Guide Program number for the desired station as shown in the TV listings Then press OK or Ex When inputting the Guide Program number 4 for CH4 ENTER RECEIVING CHANNEL POSITION NUMBER 5 Press fi or NUMB...

Page 19: ...ons without going through any vacant channel TURN ON THE RECORDER 1 Press VCR POWER ACCESS MAIN MENU SCREEN 2 Press MENU ACCESS AUTO CH SET SCREEN 3 Press fi to move the highlight bar pointer to AUTO CH SET then press OK or twice The Auto Set screen appears and remains on screen while the recorder searches for receivable stations As Auto Channel Set progresses the mark on the screen moves from lef...

Page 20: ...rrectly and auto Guide Program Number Set may not work properly If the Guide Program numbers are not set properly when you timer record a TV programme using the VIDEO Plus system the recorder will record a TV programme of a different station When programming the timer using the VIDEO Plus system be sure to check whether the channel position on which your recorder receives the broadcasting station ...

Page 21: ...lt setting When AV2 SELECT is set to AV2 or SAT the DECODER setting cannot be changed Z pg 50 ENTER NEW CHANNEL INFORMATION 6 Press OK and the Confirmation screen appears Repeat steps 3 through 6 as necessary CLOSE CONFIRMATION SCREEN 7 Press MENU To change positions see Change Station Channel Position Z pg 59 If you wish to set station names other than the ones registered in your recorder Z Set S...

Page 22: ...hen press OK twice CHANGE DECODER SETTING 4 Press until OFF decoder setting begins blinking and set it to ON by pressing fi RETURN TO CONFIRMATION SCREEN 5 Press OK Repeat steps 3 through 5 as necessary CLOSE CONFIRMATION SCREEN 6 Press MENU NOTE Scrambled programmes are not currently broadcasted in the U K When Receiving A Scrambled Broadcast ATTENTION If channel positions are changed or deleted ...

Page 23: ... want to tune begins blinking ACCESS MANUAL CHANNEL SET SCREEN 2 Press OK twice The Manual Channel Set screen appears PERFORM TUNING 3 Press until begins blinking then press fi until the picture is its clearest Then press OK The Confirmation screen appears Repeat steps 1 through 3 as necessary CLOSE CONFIRMATION SCREEN 4 Press MENU Fine Tuning Channels Already Stored 1 4 2 3 5 8 0 9 6 7 PROG PROG ...

Page 24: ...nking ACCESS MANUAL CHANNEL SET SCREEN 2 Press OK twice SELECT NEW STATION 3 Press until the station name ID begins blinking then press fi until the new station s name ID you want to store begins blinking Registered station names Z pg 62 appear as you press fi SWITCH STATIONS 4 Press OK The Confirmation screen appears Repeat steps 1 through 4 as necessary CLOSE CONFIRMATION SCREEN 5 Press MENU Set...

Page 25: ...PR07 RAI1 RAI1 RAI2 RAI2 RAI3 RAI3 RB1 RB1 RB3 RB3 Rikisutvarpid S RKPS RTBF 1 RTB1 RTBF 2 RTB2 RTE 1 RTE1 RTL RTL RTL 2 RTL2 RTP RTP STATION NAME ID SAT SAT SAT 1 SAT1 Scottish TV SCOT SC4 SC4 SDR SDR SDR1 SDR1 SFB1 SFB1 SFB3 SFB3 SKY SKY Sky One SKY1 Sky Net SKYN Sport SPRT SR 1 SR1 Super RTL SRTL STV Test STVT STV 1 STV1 STV 2 STV2 Suedwest3 SWR SWF 1 SWF1 Schweiz4 SWZ4 TYNE TEES TEES Text TEXT...

Page 26: ...nds Ridge Hill 22 28 25 32 35 Sutton Coldfield 46 40 43 50 37 The Wrekin 26 33 23 29 35 Waltham 58 64 61 54 35 North Belmont 22 28 25 32 56 Emley Moor 44 51 47 41 37 BBC1 BBC2 ITV CH4 CH5 North West Caldbeck 30 34 28 32 56 Winter Hill 55 62 59 65 48 North East Bilsdale West Moor 33 26 29 23 35 Chatton 39 45 49 42 Pontop Pike 58 64 61 54 68 Scotland Angus 57 63 60 53 Black Hill 40 46 43 50 37 Sanda...

Page 27: ... SET DATE AND TIME 5 Press fi to set the time then press OK or The date display begins blinking Repeat the same procedure to set the date and year When you set the time press and hold fi to change the time by 30 minutes When you set the date press and hold fi to change the date by 15 days Clock Set IMPORTANT If you performed Auto Set Up Z pg 8 Preset Download Z pg 10 or Auto Channel Set Z pg 56 wi...

Page 28: ...usted at the start end of Summer Time Just Clock may not function properly depending on the reception condition SET JUST CLOCK 6 The default setting is ON Set as desired by pressing fi then press OK or For the Just clock function Z Just Clock on page 64 If you set to OFF you can disregard the next step as you won t be able to receive regular clock adjustments SET CLOCK DATA SOURCE CHANNEL POSITION...

Page 29: ...Automatic tracking is engaged CORRECTIVE ACTION If you are using the AV or S VIDEO connection set the TV to its AV mode Try manual tracking Z pg 17 Consult your PHILIPS dealer Engage and adjust tracking manually Z pg 17 or set the soundtrack to NORM Z pg 21 POSSIBLE CAUSE is displayed on the display panel The tape is already fully rewound or fast forwarded CORRECTIVE ACTION Insert a cassette or us...

Page 30: ...gaged Timer recording is in progress The timer is engaged but there s no cassette loaded The loaded cassette has had its Record Safety tab removed The end of the tape was reached during timer recording The recorder s channel positions have been set incorrectly CORRECTIVE ACTION Position the camcorder so its microphone is away from the TV Turn the TV s volume down If you need the skipped channels r...

Page 31: ...en an attempt is made to play back a D VHS recorded tape that has been found to be invalid When a signal which cannot be digitally converted by the recorder has been input It is not possible to record a digitally copy protected signal It is not possible to record a digitally copy protected signal Sometimes a programme can be recorded but not played back because the signal system is not supported b...

Page 32: ... Can the video recorder indefinitely remain in the Record Pause mode A No The video recorder goes to its Stop mode automatically after 5 minutes to protect the heads Q What happens if the tape runs out during recording A The video recorder automatically rewinds it to the beginning TIMER RECORDING Q and remain lit on the display panel Is there a problem A No This is a normal condition for a timer r...

Page 33: ...O S VIDEO 1 2 3 4 1 S VIDEO VIDEO AUDIO Input Connectors Z pg 46 2 Cassette Loading Slot OFF B A REMOTE VIDEO MONO L R AUDIO Pull the front panel to access covered buttons connectors 3 Display Panel Z pg 73 4 Infrared Beam Receiving Window ...

Page 34: ...SHUTTLE SP LP R E W I N D F O R W D ON REC LINK DIGITAL TBC NR STD LS3 STANDBY SMARTPICTURE EJECT DISPLAY TAPE MANAGER COUNTER RESET OK PROGRAMME SYNCHRO EDIT REC LINK INDEX DIGITAL TBC NR RECORD u r e 3 t 1 2 6 7 8 9 0 y i 5 4 q w SHUTTLE Ring Z pg 16 17 PROGRAMME Dial Z pg 22 JOG Dial Z pg 16 EJECT Button Z pg 15 TAPE MANAGER Button Z pg 38 COUNTER RESET Button Z pg 25 q OK Button Z pg 9 w SYNCH...

Page 35: ...ctor Z pg 6 48 53 54 6 SYNCHRO EDIT Connector Z pg 51 7 J terminal JLIP Joint Level Interface Protocol Connector Z pg 52 8 ANT IN Connector Z pg 6 9 DV IN Connector i Link Z pg 46 i Link refers to the IEEE1394 1995 industry specifi cation and extensions thereof The logo is used for products compliant with the i Link standard 0 AV2 IN DECODER Connector Z pg 48 53 54 AUDIO OUT L R Connectors AUDIO I...

Page 36: ...IABLE SEARCH 7 Tape Speed Indicators Z pg 23 EP is only for NTSC playback 8 Audio Mode Indicator Z pg 21 9 Tape Remaining Time Indicator Z pg 25 0 Cassette Loaded Mark PDC Indicator Z pg 31 33 VPS Video Programme System recording is not currently available in the U K and not possible with this recorder VCR Indicator Z pg 53 Counter Remain Display If the counter exceeds 20 hours 20 00 00 the displa...

Page 37: ...Z pg 16 JOG Dial Z pg 16 AUDIO Button Z pg 21 VCR POWER Button Z pg 8 SMARTPICTURE Button Z pg 20 START Buttons Z pg 32 STOP Buttons Z pg 32 DATE Buttons Z pg 32 q WEEKLY Button Z pg 31 33 w DAILY Button Z pg 31 33 e CLEAR Button Z pg 30 35 41 43 r Fast Forward FF Button Z pg 15 17 t PLAY Button Z pg 15 y Buttons Z pg 16 u TV CH Button Z pg 75 i PAUSE STILL Button Z pg 16 o TAPE MANAGER Button Z p...

Page 38: ...TV s brand code again Operating TV You can use this remote control to operate your TV To use this remote control for operating the TV you first need to set the TV s brand code properly The default setting of the TV s brand code is PHILIPS 01 NOTE Though this remote control can operate most of the PHILIPS TVs as well as many other manufacturers some of the TVs will not operate or some functions ava...

Page 39: ...word shuffling 6 tracks Modulation system SI NRZI VIDEO AUDIO S VHS VHS Format S VHS VHS PAL standard Signal system PAL type colour signal and CCIR monochrome signal 625 lines 50 fields Recording system DA4 Double Azimuth head helical scan system Signal to noise ratio 45 dB Horizontal resolution 250 lines VHS 400 lines S VHS Frequency range 70 Hz to 10 000 Hz Normal audio 20 Hz to 20 000 Hz Hi Fi ...

Page 40: ...M Manual Channel Setting 58 Manual Tracking 17 N Next Function Memory 17 O One Touch Recording OTR 24 On Screen Display 11 Operating TV 75 P PDC 33 Power Save 12 Preset Download 10 R Recording 22 Record One Programme While Watching Another 24 Repeat Playback 20 Replace Timer Programme 34 S Scrambled Broadcast 59 Set Stations 61 Slow Motion Playback 17 SmartPicture 20 Soundtrack Selection 21 Still ...

Page 41: ...MEMO ...

Page 42: ...MEMO ...

Page 43: ...VR20D 07 3103 166 2562 1 LPT0359 001A ...

Reviews: