background image

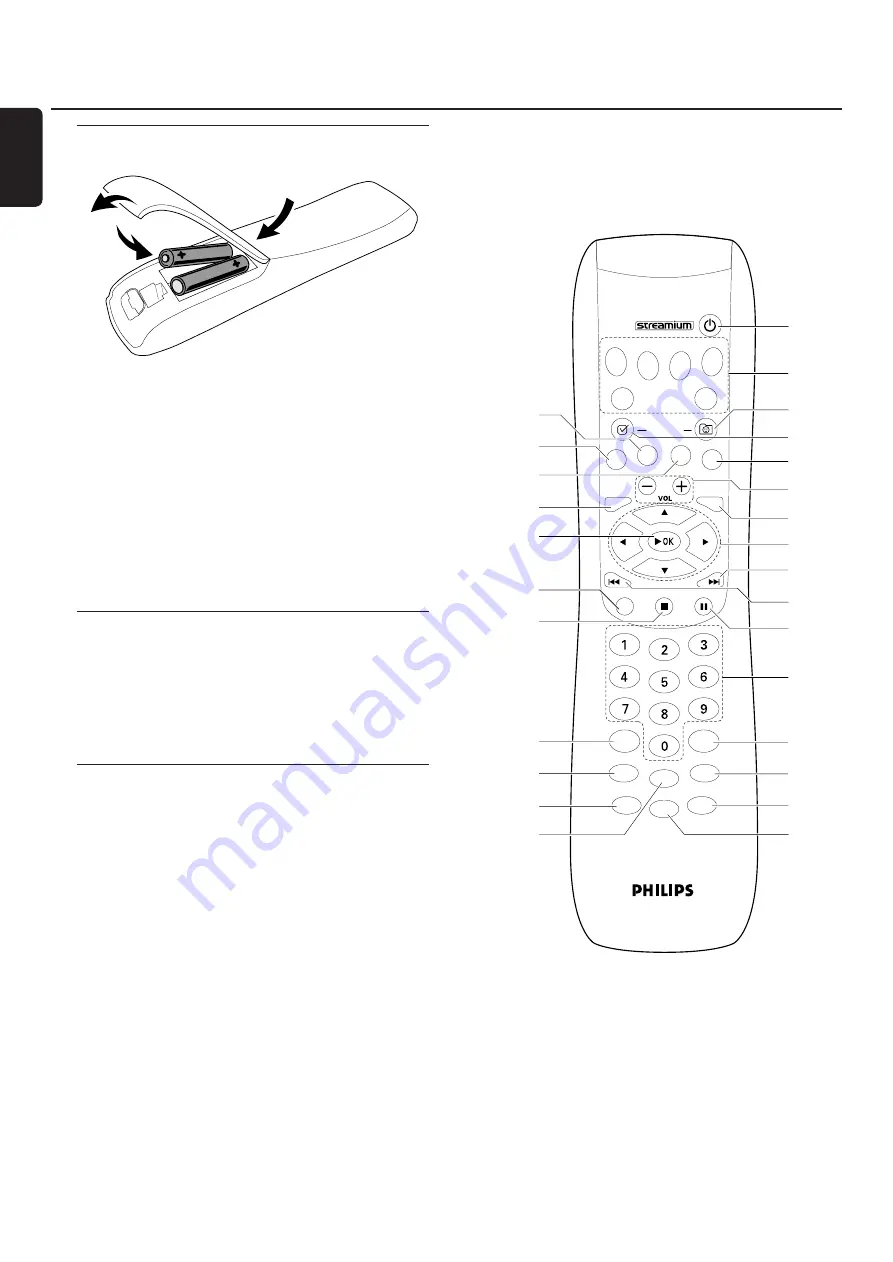
Inserting the batteries

1

Open the battery compartment of the remote control.

2

Insert two alkaline batteries, type 

AA

(R06, UM-3),

according to the + and – indications.

3

Close the battery compartment.

Do not combine old and new or different types of
batteries.

Remove batteries if they are discharged or if the remote
control will not be used for a long time.

Batteries contain chemical substances, so they should
be disposed of properly.

Using the remote control

1

Aim the remote control directly at the remote sensor of
the Streamium System.

2

Select the source you wish to control by pressing one of
the source buttons on the remote control, e. g.TV,TUNER.

3

Next, select the desired function, e. g.

2

OK.

Using the remote control to

control a Philips TV

When TV is selected, the remote control will control some
functions on your Philips TV, e. g.
– 0–9 select a TV channel.
– SYSTEM MENU switches the system menu of the TV

on/off.

1

,

2

,

3

,

4

navigate in the system menu.

S

,

T

select the previous/next TV channel.

9

exits the system menu of the TV.

– MUTE mutes the sound on the TV.
– INFO! switches TV text on/off.

To control the TV, aim the remote control directly at the TV.

Remote control

8

English

MUTE

USER

REPEAT

SHUFFLE

INFO !

RECENT

SOUND

SURROUND

.@

PQRS

TUV

WXYZ

GHI

JKL

MNO

ABC

DEF

–-

RETURN

RESUME

MENU

MENU

SYSTEM

DISC

SUBTITLE

ANGLE

ZOOM

AUDIO

FAVORITES

(UN) MARK

VIEW

TV

AUX

DVD

INTERNET

PC LINK

TUNER

1

2

3
4
5
6
7
8
9

0

@

#

$

%

&

)

¡

§

*

£

!

^

(

Summary of Contents for Streamium MX6000i

Page 1: ...ns First time Setup or any of the Features We want you to start enjoying your new product right away CALL US BEFORE YOU CONSIDER RETURNING THE PRODUCT 1 800 531 0039 or Visit us on the web at www philips com S EE WHY INSID E I M PORTAN T Return yourWarranty Registration Card within 10 days MX6000i MX6000i Wireless Home Entertainment System ...

Page 2: ...e enclosed card guaran tees that your date of purchase will be on file so no additional paper work will be required from you to obtain warranty service Product Safety Notification By registering your product you ll receive notification directly from the manufacturer in the rare case of a product recall or safety defect Additional Benefits of Product Ownership Registering your product guarantees th...

Page 3: ...the cart apparatus combination to avoid injury from tip over 13 Unplug this apparatus during lightning storms or when unused for long periods of time 14 Refer all servicing to qualified service personnel Servicing is required when the apparatus has been damaged in any way such as power supply cord or plug is damaged liquid has been spilled or objects have fallen into the apparatus the apparatus ha...

Page 4: ...interference will not occur in a particular installation If this equipment does cause harmful interference to radio or television reception which can be determined by turning the equipment off and on the user is encouraged to try to correct the interference by one or more of the following measures Reorient or relocate the receiving antenna Increase the separation between the equipment and the rece...

Page 5: ...Volume and sound Adjusting theVolume 19 Adjusting Bass Treble Loudness and ClearVoice 19 Listening through Headphones 19 Adjusting the Surround Sound 19 Internet and PC Link General information on INTERNET and PC LINK 20 Requirements to use Internet media services 20 Requirements to use PC LINK 20 How to ensure a good wireless connection 20 Network name SSID 20 WEP encryption 20 Before connecting ...

Page 6: ... forget your Pin 39 System Menu Picture settings Adjusting the Picture Settings 40 Color Settings 40 Brightness 40 Contrast 40 Sharpness 40 Saturation 40 Video Shift 40 System Menu Audio settings Night Mode 41 Analogue Output 41 Digital Output 41 Speaker layout speaker distances and volume balance 42 System Menu Additional features Help Line and Status window 43 Sleep timer 43 Adjusting the displa...

Page 7: ...s to humidity rain sand or excessive heat caused by heating equipment or direct sunlight Always keep the trays of your unit closed to protect the lens from dust Do not use any commonly available lens cleaning discs as they may damage the optical lens of the unit The lens may cloud over when the unit is moved from cold to warm surroundings Playing a disc is not possible then Leave the unit in a war...

Page 8: ... of the source buttons on the remote control e g TV TUNER 3 Next select the desired function e g 2OK Using the remote control to control a PhilipsTV WhenTV is selected the remote control will control some functions on your PhilipsTV e g 0 9 select aTV channel SYSTEM MENU switches the system menu of theTV on off 1 2 3 4 navigate in the system menu S T select the previous nextTV channel 9 exits the ...

Page 9: ...ches backward if pressed longer than 2 seconds Press again for various search speeds TV selects a lower channel pauses playback 0 9 to enter numbers 0 9 and characters to enter a number with two or more digits press 0 9 repeatedly within 2 seconds SURROUND selects the different sound settings multi channel surround Hall or stereo mode RECENT INTERNET PC LINK displays the last 20 items played USER ...

Page 10: ...s favorite radio stations 7 9 stops playback 8 p 6 3 mm headphones jack 9 VOLUME adjusts the volume 0 pauses playback 2OK starts playback resumes playback or confirms a selection SOURCE selects a source DISC 1 5 TV TUNER AUX DIGITAL AUX ANALOG INTERNET PC LINK INTERNET TUNER shows your favorite Internet media services and radio stations same function as RECENT on the remote control INTERNET PC LIN...

Page 11: ...Video input of theTV 8 COMPONENT PR PB Y connect to the corresponding Component video inputs of theTV 9 P SCAN to switch on or off progressive scan 0 ANTENNA AM connect the AM loop antenna ANTENNA FM connect the FM antenna cable MAINS After all other connections have been made connect the power cable to the power outlet ETHERNET connect to router broadband Internet or PC DIGITAL OUT connect to the...

Page 12: ...rear speaker using the supplied screws Attaching the rear speakers to the wall 1 Attach the supplied bracket firmly to the rear of the rear speaker using the supplied screws 2 Hook the speaker carefully onto a screw in the wall using the hole in the bracket Positioning of the speakers and the subwoofers 1 Place the subwoofers with the front speakers at an equal distance to yourTV The distance betw...

Page 13: ...ght red black Center green black Surround Left blue black Surround Right grey black Subwoofer Left purple black Subwoofer Right purple black How to use the click fit connectors 1 Press down the clip and fully insert the stripped portion of the speaker cable into the socket 2 Release the clip again Connecting the tuner antennas Connecting the FM antenna 1 Connect the supplied FM antenna cable to th...

Page 14: ... jack to the video input jack or labelled as A V In Video In Composite on theTV 2 To hear the sound of theTV through this Streamium System use the audio cable white red to connectTV IN L R on the Streamium System to the corresponding AUDIO OUT jacks on theTV 3 Set the P SCAN switch to OFF Using S Video 1 Use an S Video cable not supplied to connect the Streamium System s S VIDEO jack to the S Vide...

Page 15: ...UDIO IN L R jacks on the digital equipment 0 0 Refer to the Instruction Manual of the digital equipment on recording Recording is permissible insofar as copyright or other rights of third parties are not infringed upon When playing an MP3 CD on the Streamium System no signal will be available using DIGITAL OUT This product incorporates Macrovision copyright protection technology that is protected ...

Page 16: ...let it cool down before reusing it Switching on the system Press STANDBY ON on the Streamium System or one of the source buttons on the remote control DVD TV TUNER AUX INTERNET PC LINK to switch on the Streamium System Selecting a source Turn SOURCE on the Streamium System or press DVD INTERNET PC LINK TUNER TV or AUX on the remote control to select a source The selected source will be displayed O...

Page 17: ...Streamium System CVBS if you have connected theTV to CVBS or S Video on the Streamium System 6 Press 2OK to confirm the setting 7 Next press SYSTEM MENU to exit the system menu TV Shape You may set the Streamium System to display a DVD movie in one of three formats Letterbox Panscan or Widescreen TheTV Shape you select must be supported by the movie If not theTV Shape settings will not affect the ...

Page 18: ...ork similarly Most of the illustrations in this manual show the System menu when DVD is selected 1 Press SYSTEM MENU on the remote control to enter the System menu 2 Press 1 2 3 4 on the remote control to navigate in the menu to select a feature or to change the setting of a feature 3 Press 2OK to confirm a setting 0 0 To exit the System Menu press SYSTEM MENU Using the System Menu 18 English PQRS...

Page 19: ...ulti channel sounds include DTS Digital Theater Systems Surround Dolby Digital Dolby Surround and Dolby Pro Logic 2 A sursound sound effect will only be available if it is supported by the disc the media file or the media service you are playing The number of speakers that play a sound depends on the selected surround sound and the sound available on the disc e g when Stereo is selected only the f...

Page 20: ...ng this manual subject to change Music MP3 and MP3pro streams bit rates 32 320 kbit sec variable bit rate Pictures JPEG JPEG2000 bmp gif Video MPEG 1 MPEG 2 MPEG 4 DivX 4 0 5 03 Please visit My Philips com for the latest information on supported operating systems and file formats How to ensure a good wireless connection Place your wireless router as close as possible to the center of the area you ...

Page 21: ...th a network interface Ethernet card Check the illustrations at the beginning of each section to find out which of the 4 cases describes your home network best A Wireless home network with wireless router Follow these instructions if you have a wireless router and broadband Internet access 1 Press INTERNET on the remote control The Streamium System tries to connect automatically to a wireless netw...

Page 22: ...obtained automatically Would you like to enter your network settings manually appears your Internet service provider is using a proxy Continue with If The system could not connect to the server appears If An IP address could not be obtained automatically Would you like to enter your network settings manually appears 1 Press the red button SUBTITLE on the remote control to connect again to the Inte...

Page 23: ... WEP encrypted continue with If the network is WEP encrypted If Are you using a wireless WiFi 802 11 or a wired Ethernet network connection appears Press the red button SUBTITLE on the remote control to connect to a wireless network If Enter wireless network name SSID appears 1 Press the red button SUBTITLE on the remote control to search again for all available networks or use the number buttons ...

Page 24: ...mium System does not connect to the Internet press the green button ANGLE on the remote control to enter the IP settings manually Please contact your Internet service provider to get all the information you need below Next you will be asked to enter the IP address for the Streamium System the netmask Make sure all computers in your network as well as the Streamium System have the same netmask If y...

Page 25: ... connect the Streamium System directly to the PC 2 If necessary switch on your PC 3 Wait for 10 seconds then press PC LINK on the remote control If the Streamium System connects to the PC the computer name of your PC will be displayed If the Streamium System does not connect to the PC The Streamium System may not connect to the PC because a connection error has occurred Press PC LINK again you hav...

Page 26: ...s find links to background information and online support download PC Link software purchase media Prerequisites for My Philips com a Streamium System a computer access to the Internet an Internet browser an email address To access My Philips com open your Internet browser and type in http my philips com Reviewing and changing network settings The Streamium System tries to connect automatically to...

Page 27: ...usic pictures video stored on the PCs of your home network and play them on your Streamium System Select the media files directly on the Streamium System For the latest information on the supported media formats please visit My Philips com To use PC LINK your PC must be switched on the Philips Media Manager software must be installed on the PCs of your home network Please refer to the installation...

Page 28: ...O INFO AVAILABLE appears FAVORITES To handle the large amount of Internet services easily you can add Internet services to your favorites The favorites feature is available for INTERNET services only Adding a service to your favorites 1 Select an Internet service Internet radio station movie indicates that the service is already a favorite indicates that the service is not a favorite yet 2 Press U...

Page 29: ...r 4 Press 2 OK to confirm 5 If you entered the email address of a user already registered with My Philips com Use the number buttons to enter the user s password Next press OK If you entered the email address of a user who has not registered yet An email will be sent to the new user with further instructions on how to register The user will be available on this Streamium System shortly after regis...

Page 30: ...e do not use any accessories such as disc stabilizer rings or disc treatment sheets etc as offered on the market because they may cause jamming of the changer mechanism 2 Do not load more than one disc into one disc tray Region Codes DVDs must be labelled for ALL regions or for Region 1 in order to play on this system You cannot play discs that are labelled for other regions The number inside the ...

Page 31: ... tray the first disc tray will close automatically before the second disc tray can be opened Selecting next disc 0 0 Press DVD on the remote control or rotate SOURCE on the Streamium System to select the next disc you wish to play Resume DVD VCD The resume feature is available with the last five DVDs and Super Video CDs you played 1 Press 9 on the remote control to stop playback Resume feature is ...

Page 32: ...al speed press and hold S or T for about two seconds during playback Sound will be intermittent To search at eight times the normal speed press and hold S or T again The sound will be muted 2 To end the search press 2OK to resume playback or press 9 to stop playback Note This feature is available in the System Menu as Fast Searching in the System Menu In the system menu additional search features ...

Page 33: ...ol repeatedly to choose a repeat mode 0 0 To repeat the current chapter track press REPEAT once REPEAT CHPT or REPEAT TRK will appear on the display of the Streamium System 0 0 To repeat the current title press REPEAT repeatedly until REPEAT TITL appears on the display of the Streamium System 0 0 To repeat the entire disc press REPEAT repeatedly until REPEAT DISC appears on the display of the Stre...

Page 34: ...ram Program Press 2 repeatedly to select off Next press 2OK FTS off appears Reviewing Deleting programmed tracks Playlist allows you to view the tracks chapters or titles of your program 1 Press 4 repeatedly to select Playlist Next press 2 2 Press 3 or 4 repeatedly to scroll through the tracks chapters or titles of your program 0 0 To delete a track chapter or title from your program press 3 or 4 ...

Page 35: ... abbreviated or numbered Subtitles will appear after a few seconds 3 Press 2OK to exit Note Subtitle is also available in the System Menu Camera Angle DVD Some DVDs include scenes recorded from different angles You can watch these different angles if the angle symbol F ANGLE appears during DVD playback If the DVD was not recorded with different angles this feature is not available Check the DVD ca...

Page 36: ...n the disc will be selected Press 3 or 4 to select the desired default subtitle language then press 2OK Playback Control PBC VCD This feature is available only for Super Video CDs compatible with PBC Super Video CDs with Playback Control offer additional features Check the Super Video CD case for details Switching PBC on off VCD 1 Press SYSTEM MENU on the remote control 2 Select Setup Features PBC...

Page 37: ... unfinalized discs discs recorded in UDF format 1 Insert a disc with MP3 files It may take the Streamium System several seconds to recognize the MP3 disc MP3 text may appear on theTV screen or the display of the Streamium System This could be the song title artist name track number etc depending on how you recorded the MP3 files 2 Press 3 or 4 or use the number buttons to select an album 3 If you ...

Page 38: ...e in 90 degree steps Rotate only affects the selected picture 1 Select a picture and press 2OK to display the picture 2 Press SYSTEM MENU 3 Select Toolbar View Rotate 4 Press 2 to enter the menu Next press 1 or 2 to select the rotation angle 5 Press 2OK to confirm The current picture will rotate 6 Press SYSTEM MENU to exit the menu Playing a slide show Play all the pictures of the inserted disc in...

Page 39: ...he same rating or lower will play Higher rated discs or scenes will not play unless you enter your four digit code Follow the directions given by the disc to enter your code and start playback Note The rating numbers compare to standard U S movie ratings as follows 7 for NC 17 6 for R 4 for PG 13 3 for PG and 1 for G Change PIN 1 Use the number buttons to enter the current Pin Enter New Pin appear...

Page 40: ...ide which you prefer If you selected Personal adjust the brightness contrast sharpness and saturation settings manually Brightness Press 1 or 2 to adjust to the desired picture brightness then press 2OK Contrast Press 1 or 2 to adjust to the desired picture contrast then press 2OK Sharpness Press 1 or 2 to adjust to the desired picture sharpness then press 2OK Saturation Press 1 or 2 to adjust the...

Page 41: ...i channel Hall or Stereo Next press 2OK to confirm Note If you connected any equipment e g a tape deck to LINE OUT on the Streamium System and the equipment is suited for stereo signals only set Analogue output to Stereo Digital Output Adjust Digital Output if you have connected the Streamium System s DIGITAL OUT to external digital equipment 1 Press SYSTEM MENU on the remote control 2 DVD Select ...

Page 42: ...ker Layout Next press 2 to enter the menu 4 Press 4 or 3 to select the speaker layout which resembles the speaker arrangement in your home Rectangular 1 Rectangular 2 Trapezoid 1 Trapezoid 2 or select Personal to adjust the speaker distances and the volume balance individually 5 Press 2 to enter the selected speaker layout Next use 1 2 3 4 to select your listening position in the layout 6 Press 2O...

Page 43: ...res Sleep timer INTERNET PC LINK Select Preferences Smart Power Off 3 Press 2 repeatedly to switch the sleep timer on or off Next press 2OK to confirm Adjusting the display brightness 1 Press SYSTEM MENU on the remote control 2 INTERNET PC LINK Select Preferences Dim Level 3 Press 1 or 2 to select one of the levels for the display brightness 4 Next press 2OK to confirm Online upgrade The system ch...

Page 44: ...ength will be stored automatically When all the available radio stations are stored or the memory for 40 presets is used the last preset radio station will be played To stop storing the automatic preset Press 9 Storing favorite radio stations manually You can store up to 40 favorite radio stations in the memory 1 Tune to your desired radio station refer to Tuning to radio stations 2 Press UN MARK ...

Page 45: ... radio stations 1 WhileTUNER is selected press and hold UN MARK FAVORITES for more than 5 seconds DO YOU WANT TO DELETE ALL TUNER FAVOURITES is displayed 2 Press the red button SUBTITLE on the remote control to confirm All the preset stations will be deleted Changing the order of favorite radio stations 1 Press 3 or 4 on the remote control to select the desired preset radio station from the favori...

Page 46: ...heck the speaker connections and settings Disconnect the headphones Press 2OK to resume normal playback Press the corresponding source button on the remote control DVD INTERNET to choose the source you want to hear through the Streamium System No sound from the center and or Make sure the center and surround speakers are connected correctly surround speakers Press SURROUND on the remote control to...

Page 47: ...or photo The file format of the media file may not be supported by the does not play or in poor quality only Streamium System Play a media file with a supported file format Visit http My Philips com for the latest information on supported file formats The wireless reception is low Change the position of your wireless equipment to improve the reception The media has been recorded in low quality e g...

Page 48: ...hints above do not help the Streamium System may need a reinstallation of the software 1 Make sure the Streamium System has access to the Internet through a wired connection If necessary connect the Streamium System to a free LAN port on your router see page 24 Do not use a wireless connection 2 Disconnect the Streamium System from the power supply 3 Press and hold the red button SUBTITLE on the r...

Page 49: ...cases Auto IP may be deactivated on your computer completely and you will be asked if you want to enable Auto IP on your PC Click on OK Please be aware that your PC will restart Continue with step 2 A list with all network adapters found on your computer will appear The list may include old adapters that were not properly uninstalled 4 Click on the adapter which you want to use for the communicati...

Page 50: ... JPEG JPEG2000 bmp gif Video MPEG 1 MPEG 2 MPEG 4 DivX 4 0 5 03 Analog audio connections Analog in AUX IN TV IN 500 mV 2V 22 kΩ Analog out LINE OUT Stereo 1 5V 1 kΩ S N 105 dB Video connections Video out ComponentVideo Y 1 0Vp p 75 Ω PB PR 0 7Vp p 75 Ω Video out S VIDEO Y 1 0Vp p 75 Ω C 0 286Vp p 75 Ω Video out CVBS 1 0Vp p 75 Ω Digital connections Digital Input Output SPDIF Sony Philips digital i...

Page 51: ...e local Philips service organization will attempt to provide service although there may be a delay if the appropriate spare parts and technical manual s are not readily available MAKE SUREYOU KEEP Please keep your sales receipt or other document showing proof of purchase Attach it to this owner s manual and keep both nearby Also keep the original box and packing material in case you need to return...

Page 52: ... Connect the speaker cables to the base of the subwoofers Connect the composite video input jack on theTV labelled A V In Video In Composite to VIDEO CVBS on the Streamium System with the supplied composite video cable yellow For Component or S Video connections see page 14 of the user s manual Connect the audio output jacks on theTV toTV IN L R on the Streamium System with the supplied RCA style ...

Page 53: ...ple Macintosh Mac OS 10 1 5 or higher First make sure all computers of your network connect to the Internet and to each other 4 Install the tuner 1 PressTUNER on the remote control 2 Press and hold VIEW FAVORITES on the remote control for 5 seconds AUTO PROGRAM FAVORITE STATIONS is displayed 3 Press the red button SUBTITLE on the remote control to start the installation of radio stations It may ta...

Page 54: ...left menu press 1 0 0 To stop playback press 9 1 Press DVD on the remote control 2 Press DISC 1 OPEN CLOSE to open tray 1 3 Insert a disc into tray 1 4 Press DISC 1 OPEN CLOSE to close tray 1 5 Press 2OK to start playback Some discs will start automatically 0 0 To skip to previous or following chapters tracks press S or T repeatedly FAVORITES UN MARK VIEW TV AUX DVD INTERNET PC LINK TUNER RETURN R...

Page 55: ...English PHILIPS CONSUMER ELECTRONICS NORTH AMERICA Knoxville Tennessee 37914 1810 U S A W Printed in China CLASS 1 LASER PRODUCT 3103 306 1975 3 IB 8459E003 VieChr0415 ...

Reviews: