background image

Great user manuals database on 

UserManuals.info

C

LOSED

C

APTIONING

31 

C

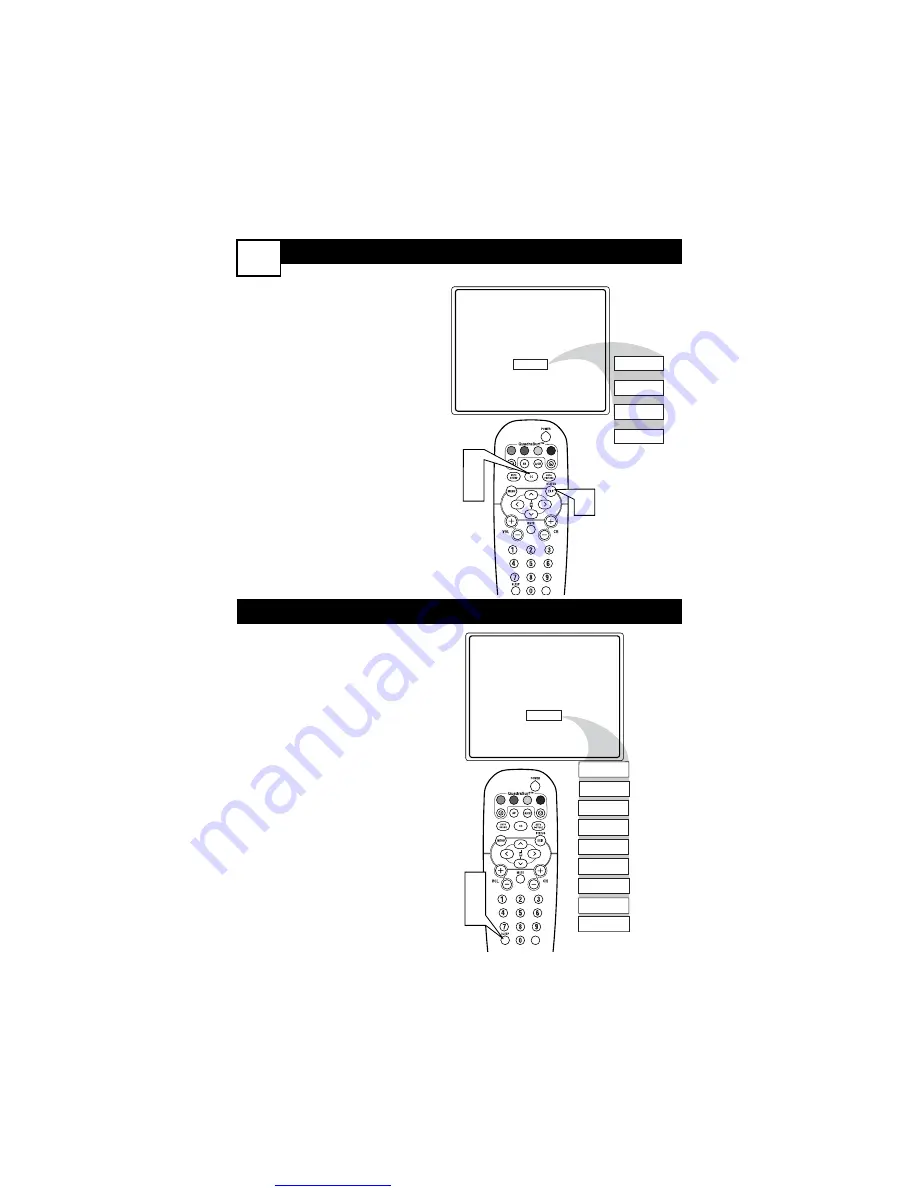
losed Captioning (CC) allows
you to read the voice content of

television programs on the TV
screen. Designed to help the hear-
ing impaired, this feature uses on-
screen “text boxes” to show dia-
logue and conversations while the
TV program is in progress. 

1

Press the CC button 

on the

remote to display the current
Closed Caption setting.

2

Press the CC button repeat-
edly 

to choose from the four

Closed Caption options (CC
Off, CC1, CC2, CC Mute).

3

When finished, press the STA-
TUS /EXIT button 

to remove

the menu from the TV’s screen.

CC Mute

CC Off

CC1

CC2

CC Off

VOL

1

2

3

Y

our TV can be set to automati-
cally turn itself off at a given

amount of time. 

1

Press the SLEEP button 

on

the remote control and the
SLEEP timer display will
appear on the screen.

2

Press the SLEEP button

repeatedly to pick the amount
of time (15, 30, 45, 60, 90, 120,
180, or 240 minutes) before the
TV will turn itself off.

NOTE:

An on-screen count down

will appear during the last minute
before the TV shuts itself off. If any
button is pressed during the last
minute of the countdown, the
Sleeptimer setting will be cancelled.

Sleep 15 

Sleep 30 

Sleep 45

Sleep 60 

Sleep 90 

Sleep 120 

Sleep 180 

Sleep 240 

Sleep 15 

Sleep off 

VOL

1

2

S

LEEPTIMER

Summary of Contents for ST2200/27

Page 1: ...nk you for choosing Philips Need help fast Read your User Manual first for quick tips that your using your Philips product more enjoyable If you have read your instructions and still need assistance you may access our online help at www p4c philips com or call 1 888 PHILIPS 1 888 744 5477 while with your product 27PT5441 37 27PT6441 37 27PT6442 37 ST2200 27 ...

Page 2: ...tures for which you should read the enclosed literature closely to prevent operating and maintenance prob lems WARNING To reduce the risk of fire or electric shock this apparatus should not be exposed to rain or moisture and objects filled with liquids such as vases should not be placed on this apparatus CAUTION To prevent electric shock match wide blade of plug to wide slot fully insert ATTENTION...

Page 3: ...pped or the enclosure damaged 17 Tilt Stability All televisions must comply with recommended international global safety stan dards for tilt and stability properties of its cabinet design Do not compromise these design standards by applying excessive pull force to the front or top of the cabinet which could ultimately overturn the product Also do not endanger yourself or children by placing electr...

Page 4: ...er 2Connect the Cable TV cable or Antenna cable or 300 to 75 ohm adapter to the 75Ω plug on the TV If you have a Cable Converter Box Connect the OUT put plug from the Converter to the 75Ω plug on the TV After using the AutoProgram Control press the CH and buttons to scroll through all the channels stored in the television s memory HELPFUL HINT 75 1 2 ANT 75 L Mono Monitor out VIDEO S VIDEO AV1 in ...

Page 5: ...hannel 3 or 4 change channels until the picture appears Cable Box w Audio Video Outputs This connection will supply Stereo sound 4Connect the Cable Company supplied cable to the cable sig nal IN put plug on the back of the Cable Box 5Using a RCA type Video Cable connect one end of the cable to the Video or ANT your cable box may be labeled differently Out jack on the cable box and the other end to...

Page 6: ...trol toward the remote sensor win dow on the TV when operating the TV with the remote REMOTE CONTROL To load the supplied batteries into the remote 1 Remove the battery compart ment lid on the back of the remote 2 Place the batteries 2 AA in the remote Be sure the and ends of the batteries line up correct ly inside of case is marked 3 Reattach the battery lid Battery Compartment 2 AA Batteries Bat...

Page 7: ...output jacks Both the AV1 and AV2 Input Jack connections are shown on this page but either one can be connected alone Follow the easy steps below to connect your accessory device to the AV1 and AV2 IN Jacks located on the back of the TV 1Connect the VIDEO yellow cable to the VIDEO AV1 IN or AV2 IN jack on the back of the TV 2Connect the AUDIO red and white cables to the AUDIO left and right AV1 IN...

Page 8: ...ed and white CABLES to the AV1 in AUDIO L and R left and right jacks on the rear of the TV 2Connect other end of the S VIDEO CABLE to the S VHS S Video OUT jack on the back of the VCR Then connect the other ends of the AUDIO red and white CABLES to the AUDIO left and right OUT jacks on the rear of the VCR 3Turn the VCR and the TV ON 4Press the AV button or the CH or CH buttons on the remote to scr...

Page 9: ...tton or the CH or CH buttons to scroll the available channels until CVI appears in the upper left corner of the TV screen 5Insert a DVD disc into the DVD player and press the PLAY button on the DVD Player The description for the component video connectors may differ depending on the DVD player or accessory digital source equipment used for example Y Pb Pr Y B Y R Y Y Cr Cb Although abbrevia tions ...

Page 10: ... following steps allow you to connect a second VCR to record the program while your watching it 3Connect one end of the yellow Video Cable to the Monitor Out VIDEO plug Connect the other end to the VIDEO IN plug on the second VCR 4Connect one end of the red and white Audio cable from the Monitor Out AUDIO L and R plugs on the TV to the AUDIO IN plugs on the VCR 5Turn the Second VCR ON insert a VHS...

Page 11: ...Button Press to display the on screen menu Also can be used to back out of the on screen menu until it disappears from the TV s screen CC Button Press to activate the Closed Captioning options Repeatedly pressing the CC but ton will scroll the available options on the TV screen VOL ume or Buttons Press the VOL button to increase the TV s sound level Press the VOL button to decrease the TV s sound ...

Page 12: ... video games STATUS EXIT Button Press to display the current channel number If the on screen menu is displayed press the Status Exit button of remove it from the TV s screen 3 4 1 and 2 Buttons Press to navigate select and adjust controls within the on screen menu Also use the CUR SOR 3 or CURSOR 4 to activate or deacti vate the EXPAND 4 3 screen formatting con trol CH annel or CH annel Buttons Pr...

Page 13: ...nish 1Press the MENU button on the remote control to show the on screen menu 2Press the CURSOR UP 3 or DOWN 4 buttons to scroll though the on screen menu until the word Install is high lighted 3Press the CURSOR RIGHT 2 button to display the Install menu features 4Press the CURSOR UP 3 or DOWN 4 buttons to scroll through the Install features until the word Language is high lighted 5Press the CURSOR...

Page 14: ... features until the words Tuner Mode is high lighted 5Press the CURSOR RIGHT 2 button to select either Antenna Cable or Auto mode 6When finished press the STATUS EXIT button to remove the on screen menu from the TV s screen Main Picture Sound Features Install Brightness Color Picture Sharpness Tint More Main Picture Sound Features Install Language Tuner Mode Auto Program Channel Edit Install Langu...

Page 15: ... remote to show the on screen menu 2Press the CURSOR UP 3 or DOWN 4 buttons to scroll through the on screen menu until the word Install is highlighted 3Press the CURSOR RIGHT 2 button to display the Install menu features 4Press CURSOR UP 3 or DOWN 4 buttons to scroll the Install features until the words Auto Program are highlighted 5Press the CURSOR RIGHT 2 button to start the Auto Program scannin...

Page 16: ...ectly to a specific numbered channel that you want to add or skip Or you can also use the CH or CH to quickly scan through the channels that have not been skipped 7Using the CURSOR DOWN 4 button scroll the menu to highlight the word SKIPPED 8Now use the CURSOR RIGHT 2 to toggle between On or Off If ON is selected the channels is skipped when scrolling channels with the CH or CH buttons If OFF is s...

Page 17: ... lightest parts of the picture show good detail 4Sharpness Control CURSOR RIGHT 2 or LEFT 1 buttons to improve detail in the picture 5Tint Control Press the CUR SOR RIGHT 2 or LEFT 1 buttons to obtain natural skin tones 6Color Temp Control Press the CURSOR RIGHT 2 or LEFT 1 buttons to select Normal Cool or Warm picture preferences Normal will keep the whites white Cool will make the whites bluish ...

Page 18: ...hanges 5Incr Surround Press the CUR SOR RIGHT 2 or LEFT 1 but tons to select between Dolby Virtual or Stereo settings If Stereo or select Spatial or Mono If Mono 6SAP Press the CURSOR RIGHT 2 or LEFT 1 buttons to toggle this control to On or Off SAP is short for SecondaryAudio Programming and is sent as a third audio channel a SAP signal can be heard apart from the cur rent TV program sound Note I...

Page 19: ... is shown in movie theaters when shown on a TV screen the image will have areas of black on top and bottom of the screen 1Press the CURSOR UP 3 or DOWN 4 buttons to select one of the two options 4 3 or Expand 4 3 4 3 Standard format for the TV Expand 4 3 Enlarges the picture to fill out the entire screen area eliminating the letter box effect HOW TO USE THE 4 3 EXPAND FORMAT CONTROL 17 ...

Page 20: ...r PM setting 7When finished press the STATUS EXIT button to remove the on screen menu from the TV s screen VOL Main Picture Sound Features Install Brightness Color Picture Sharpness Tint More Main Picture Sound Features Install Timer AutoLock Active Control Digi Pic Demo Timer Time Start Time Stop Time Channel Activate Display AM 7 3 4 6 1 Timer Time Start Time Stop Time Channel Activate Display 1...

Page 21: ... menu from the TV s screen NOTE The Activate Control must be set to Once or Daily for the tele vision to turn On or Off at the speci fied time See panel 21 for more details VOL Main Picture Sound Features Install Brightness Color Picture Sharpness Tint More Main Picture Sound Features Install Timer AutoLock Active Control Digi Pic Demo Timer Time Start Time Stop Time Channel Activate Display AM Ti...

Page 22: ...or CURSOR LEFT 1 or the CH or CH buttons repeatedly to enter the start up channel you want NOTE The Activate Control must be set to Once or Daily for this Channel control to take effect 7When finished press the STATUS EXIT button to remove the on screen menu from the TV s screen VOL Main Picture Sound Features Install Brightness Color Picture Sharpness Tint More Main Picture Sound Features Install...

Page 23: ...eatedly to select Once Daily or Off 8When finished press the STA TUS EXIT button to remove the on screen menu from the TV s screen VOL Main Picture Sound Features Install Brightness Color Picture Sharpness Tint More Main Picture Sound Features Install Timer AutoLock Active Control Digi Pic Demo Timer Time Start Time Stop Time Channel Activate Off Display 8 3 5 7 1 Timer Time Start Time Stop Time C...

Page 24: ...h lighted 5With Timer highlighted press the CURSOR RIGHT 2 button to display the Timer menu 6Press the CURSOR UP 3 or CURSOR DOWN 4 buttons to highlight the Display Control 7Press the CURSOR RIGHT 2 or CURSOR LEFT 1 but tons repeatedly to select On or Off 8When finished press the STATUS EXIT button to remove the on screen menu from the TV s screen VOL Main Picture Sound Features Install Brightness...

Page 25: ... on screen menu until the word Features is highlighted 3Press the CURSOR RIGHT 2 button to display the Features menu 4Press the CURSOR UP 3 or DOWN 4 buttons to repeatedly until Active Control is highlighted 5Press the CURSOR RIGHT 2 or CURSOR LEFT 1 buttons to toggle the Active Control On or Off 6When finished press the STATUS EXIT button to remove the on screen menu from the TV s screen VOL Main...

Page 26: ... This programming contains material that parents may find unsuitable for children under the age of 13 MOVIE RATINGS Continued R Restricted This is programming is specifically designed for adults Anyone under the age of 17 should only view this programming with an accompanying par ent or adult guardian NC 17 No one under the age of 17 will be admitted This type of programming should be viewed by ad...

Page 27: ...u to enter a New Code Enter a new 4 digit code using the NUMBERED buttons The screen will then ask you to CONFIRM the code you just entered Enter your new code again XXXX will appear when you enter your new code and then display the AutoLock menu options Proceed to the next panel to learn more Main Picture Sound Features Install Timer Rotation AutoLock Active Control Digi Pic Demo Features Timer S...

Page 28: ...hat channel When ON is selected the channel will be blocked 3Press the CH or CH but ton to select other channels you wish to block Repeat steps 2 3 to block the new channel 4When finished press the STATUS EXIT button to remove the menu from the screen NOTE If you ever forget your code the 0 7 1 1 code is the fac tory default and can be used to enter and create a new access code AutoLock Block Chan...

Page 29: ... all blocked channels All channels will be viewable If Block All is selected press the CURSOR RIGHT 2 button to turn the control On or Off When On is selected ALL available channels will be blocked from viewing 3When finished press the STATUS EXIT button to remove the menu from the screen NOTE If you ever forget your code the 0 7 1 1 code is the fac tory default and can be used to enter and create...

Page 30: ...ovie Rating options When highlighted all these options can be turned On which will allow blocking or Off which will allow viewing 4Use the CURSOR RIGHT 2 button on the remote to turn the rating option On or Off When a rating level is chosen to be blocked any higher level rating will also be blocked from viewing i e If R is selected to be blocked NC 17 and X will auto matically be blocked NOTE If y...

Page 31: ...g NOTE Some TV RATING options also have sub ratings The ratings of TV Y7 TV PG TV 14 TV MA can be customized to block V violence FV fantasy violence S sexual situa tions L coarse language or D sug gestive dialogue 4Press the CURSOR RIGHT 2 button on the remote to turn the TV Y or TV G rating On or Off Or press the CURSOR RIGHT 2 button to enter the sub menus for the TV Y7 TV PG TV 14 or TV MA rati...

Page 32: ...et to On and the Blocking feature is set to OFF No Rating ALL programming with NO con tent advisory data can be blocked if set to On and the Blocking feature is set to OFF 3Press the CURSOR UP 3 or DOWN 4 buttons to highlight the desired fea ture 4When highlighted each feature can be turned On or Off using the CURSOR RIGHT 2 or the CURSOR LEFT 1 buttons on the remote AutoLock Setup Code ClearAll B...

Page 33: ...STA TUS EXIT button to remove the menu from the TV s screen CC Mute CC Off CC1 CC2 CC Off VOL 1 2 3 Your TV can be set to automati cally turn itself off at a given amount of time 1Press the SLEEP button on the remote control and the SLEEP timer display will appear on the screen 2Press the SLEEP button repeatedly to pick the amount of time 15 30 45 60 90 120 180 or 240 minutes before the TV will tu...

Page 34: ...ting events Weak Signal Preset picture options for watching programs where the reception is not at its best Multimedia Preset picture options for use with video gam ing The Auto Sound feature allows the listener to select between four different factory set sound options 1Press the AUTO SOUND button on the remote control The current Auto Sound set ting will appear in the middle of the screen 2Press...

Page 35: ...at button s Surf list Up to ten channels per button can be stored Repeat steps 1 through 3 to add additional channels up to 10 to each of the the SURF lists To remove a channel from one of the SURF lists 4Press the COLORED Quadra Surf button until the desired channel appears The screen will display the channel number with a colored Smiley face to indicate the Colored button it relates to 5While th...

Page 36: ...till appears on the screen press the same COL ORED button on the remote to tune the second channel pro grammed for that specific surf list 3Repeatedly pressing the same COLORED button while the smiley face appears will tune all the programmed channels Pressing the COLORED button again will return you to the first channel in the list If the smiley face disappears from the screen and the same COLORE...

Page 37: ...e MUTE button on the remote control If you re attempting to hook up auxiliary equipment check the audio jack connections located on the front of the TV Remote Does Not Work Check the batteries If necessary replace them with AA Heavy Duty Zinc Chloride or Alkaline batteries Clean the remote control and the remote control sensor window on the TV Check the TV power cord Unplug the TV wait 10 seconds ...

Page 38: ...re less likely to cause uneven aging of the picture tube Stock market tickers presented at the bottom of the TV screen Shopping channel logos and pric ing displays bright and shown constantly or repeatedly in the same location on the TV screen Placement of the TV To avoid cabinet warping cabinet color changes and increased chance of set failure do not place the TV where temperatures can become exc...

Page 39: ...Great user manuals database on UserManuals info NOTES 37 ...

Page 40: ...repair or other cause not within the control of Philips A product that requires modification or adaptation to enable it to operate in any country other than the country for which it was designed manufactured approved and or authorized or repair of products damaged by these modifi cations Damage occurring to product during shipping when improperly packaged or cost associated with packaging Product ...

Reviews: