background image

9

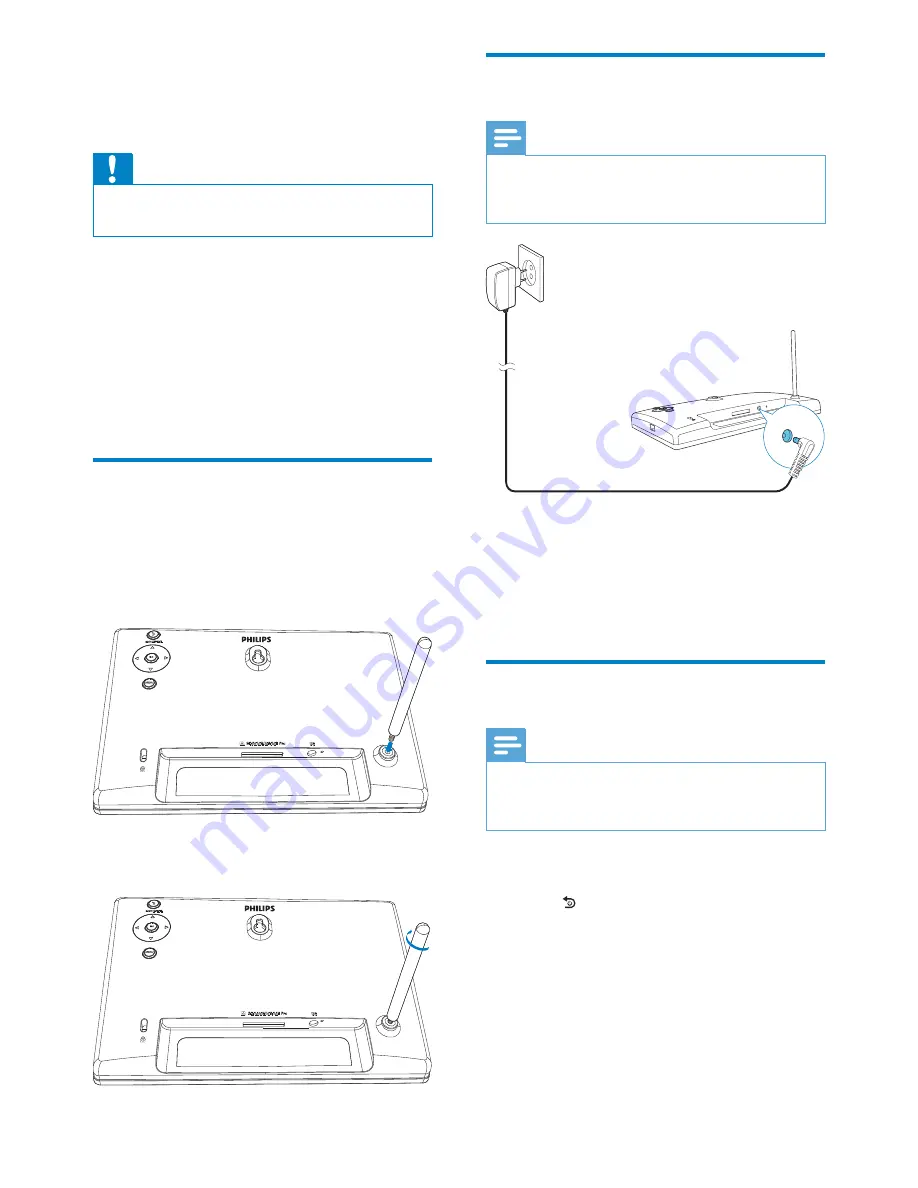
Connect power

Note


When you position the PhotoFrame, make 
sure that the power plug and outlet are easily 
accessible.


Connect the supplied power adaptor to:

the 

DC

 socket of the PhotoFrame

the AC outlet


»

 A few seconds later, the PhotoFrame 
turns on automatically.

Turn on the PhotoFrame

Note


When you connect the PhotoFrame to a 
power supply, the PhotoFrame turns on 
automatically. 

1

  When the PhotoFrame is turned off and 

connected to the power supply, you can 
press 

 BACK|POWER

 to turn on the 

PhotoFrame.


»

A few seconds later, the home screen 
is displayed.

3 Get 

started

Caution


Use the controls only as stated in this user 
manual.

Always follow the instructions in this chapter in 
sequence.
If you contact Philips, you will be asked for the 
model and serial number of this apparatus. The 
model number and serial number are on the 
back of the apparatus. Write the numbers here:
Model No. __________________________
Serial No. ___________________________

Install the stand


attach the supplied stand to the back of the 
PhotoFrame.

1

  Insert the stand into the PhotoFrame.


2

  Screw the stand into the stand hole 

!$


EN

Summary of Contents for SPF1237

Page 1: ...Register your product and get support at www philips com welcome EN User Manual SPF1237 PhotoFrame ...

Page 2: ...9 Transfer photos 10 4 Display photos 12 Manage slideshow and photos 12 5 Browse and manage photos 13 6 Clock and calendar 14 7 Setup 15 Select an on screen language 15 Adjust display brightness 15 Set time and date 15 Set display auto on off 16 Select slideshow frequency 16 Select a slideshow transition effect 16 View the status of the PhotoFrame 16 Restore factory defaults 17 Need help Please vi...

Page 3: ...l regulations For additional information on recycling contact www eia org Consumer Education Initiative 1 Important Safety Safety precautions and maintenance Never touch push rub or strike the screen with hard objects as this may damage the screen permanently When the product is not used for long periods unplug it Before you clean the screen turn off and unplug the power cord Only clean the screen...

Page 4: ...r Customers Philips establishes technically and economically viable objectives to optimize the environmental performance of the organization s product service and activities From the planning design and production stages Philips emphasizes the importance of making products that can easily be recycled At Philips end of life management primarily entails participation in national take back initiative...

Page 5: ... ADVARSEL NÅR DETTE UTSTYRET PLASSERES MÅ DU PASSE PÅ AT KONTAKTENE FOR STØMTILFØRSEL ER LETTE Å NÅ Banned Substance Declaration This product complies with RoHS Norge Observer Nettbryteren er sekundert innkoplet Den innebygde netdelen er derfor ikke nettkontakten støt skal apparatet ikke utsettes for regn eller fuktighet EN ...

Page 6: ...ct and get support at www philips com welcome PhotoFrame User Manual MENU OK b a d c 2 Your PhotoFrame Congratulations on your purchase and support that Philips offers register your product at www philips com welcome Introduction With Philips Digital PhotoFrame you can display JPEG photos in high quality directly from your memories cards What s in the box Philips Digital PhotoFrame Stand AC DC pow...

Page 7: ...oFrame Press to go to the home screen Press to go back b Press to select the upper lower right left option c OK Press to play pause slideshow d MENU Press to enter exit a menu e Kensington lock f SD MMC MS MS Pro Slot for an SD MMC MS MS Pro card g DC Socket for the AC DC power adaptor i a c b d e f g h EN ...

Page 8: ...y you can press BACK POWER to turn on the PhotoFrame A few seconds later the home screen is displayed 3 Get started Caution Use the controls only as stated in this user manual Always follow the instructions in this chapter in sequence If you contact Philips you will be asked for the model and serial number of this apparatus The model number and serial number are on the back of the apparatus Write ...

Page 9: ...ypes of storage device media 1 Insert a storage device into the slot PhotoFrame The screen prompts you to select a language Press to select a language and then press OK Turn off the PhotoFrame Note You can only turn off the PhotoFrame after all copy and save actions are complete To turn off the PhotoFrame press and hold BACK POWER for 2 seconds Transfer photos Caution Do not remove a storage devic...

Page 10: ...1 To copy photos to the PhotoFrame 1 Select Yes and then press OK to To display photos directly 1 Select No and then press OK to 2 Select Play and then press OK To remove a storage device pull it out EN ...

Page 11: ...select Play and then press OK Photos are displayed in slideshow mode During slideshow press to display the next previous photo Manage slideshow and photos You can take the following steps to manage a photo in slideshow 1 During slideshow press MENU A menu bar is displayed 2 Press to select an icon and then press OK Zoom in a photo Rotate a photo Select a display mode EN ...

Page 12: ... thumbnails are displayed To manage photos 1 Select a photo and then press MENU A menu bar is displayed 2 Press to select an icon and then press OK Play photos in slideshow Rotate a photo Change source device Save a photo from the connected USB storage device to the PhotoPhrame Delete a photo To exit the menu bar press MENU again EN ...

Page 13: ...ay clock and calendar in slideshow or display the clock separately 1 Ensure that you have set the time and date correctly 2 In the home menu press to select Clock and then press OK 3 Press to select different clock calendar display mode EN ...

Page 14: ...ress OK 2 Press to set time time format or date and then press OK 7 Setup 1 In the home menu press to select Settings and then press OK Select an on screen language 1 Select Language and then press OK 2 Select a language and then press OK Adjust display brightness 1 Select Brightness and then press OK EN ...

Page 15: ...te If the PhotoFrame is disconnected from the power supply for a long time you need set time and date again after you turn on the PhotoFrame Set display auto on off With the SmartPower feature you can on or off the display automatically Note Ensure that you set the current time and date of the PhotoFrame correctly before you set the auto on off function 1 Select Set Off Time Set On Time and then p...

Page 16: ...17 The information of the PhotoFrame is displayed on the right of the screen Restore factory defaults 1 Select Default Settings and then press OK 2 Select Yes and then press OK EN ...

Page 17: ...upgrade your PhotoFrame The earlier software is unavailable on line 1 Visit www philips com support 2 Search for your PhotoFrame and go to the software section 3 Download the latest software onto the root directory of an SD card 4 Insert the SD card into the PhotoFrame 5 Turn on the PhotoFrame 6 Select Yes and then press OK to When the upgrade is complete the PhotoFrame reboots EN ...

Page 18: ... 40 C 32 F 104 F Storage 10 C 60 C 14 F 140 F 9 Product information Note Product information is subject to change without prior notice Picture Display Viewing angle C R 10 120 H 100 V Lifetime to 50 brightness 20000 hr Aspect ratio 16 10 Panel visible resolution 432 x 234 Brightness typical 160 cd m Contrast ratio typical 300 1 Photo format supported Up to 64 Megapixels Progressive JPEG photo Up t...

Page 19: ...PhotoFrame automatically turn off If you enable the SmartPower function the PhotoFrame automatically turns off at the preset time For details see section Set display auto on off 10 Frequently asked questions Is the LCD screen touch enabled The LCD screen is not touch enabled Use the buttons on the back to control the PhotoFrame Can I switch different slideshow photos by using different memory card...

Page 20: ...refers to the length to height ratio of TV screens The ratio of a standard or wide TV is 16 9 The letter box allows you to enjoy a picture with a wider perspective on a standard 4 3 screen J JPEG A very common digital still picture format A still picture data compression system proposed by the Joint Photographic Expert Group which features small decrease in image quality in spite of its high compr...

Page 21: ... 2011 Koninklijke Philips Electronics N V All rights reserved UM_V1 0 ...

Reviews: