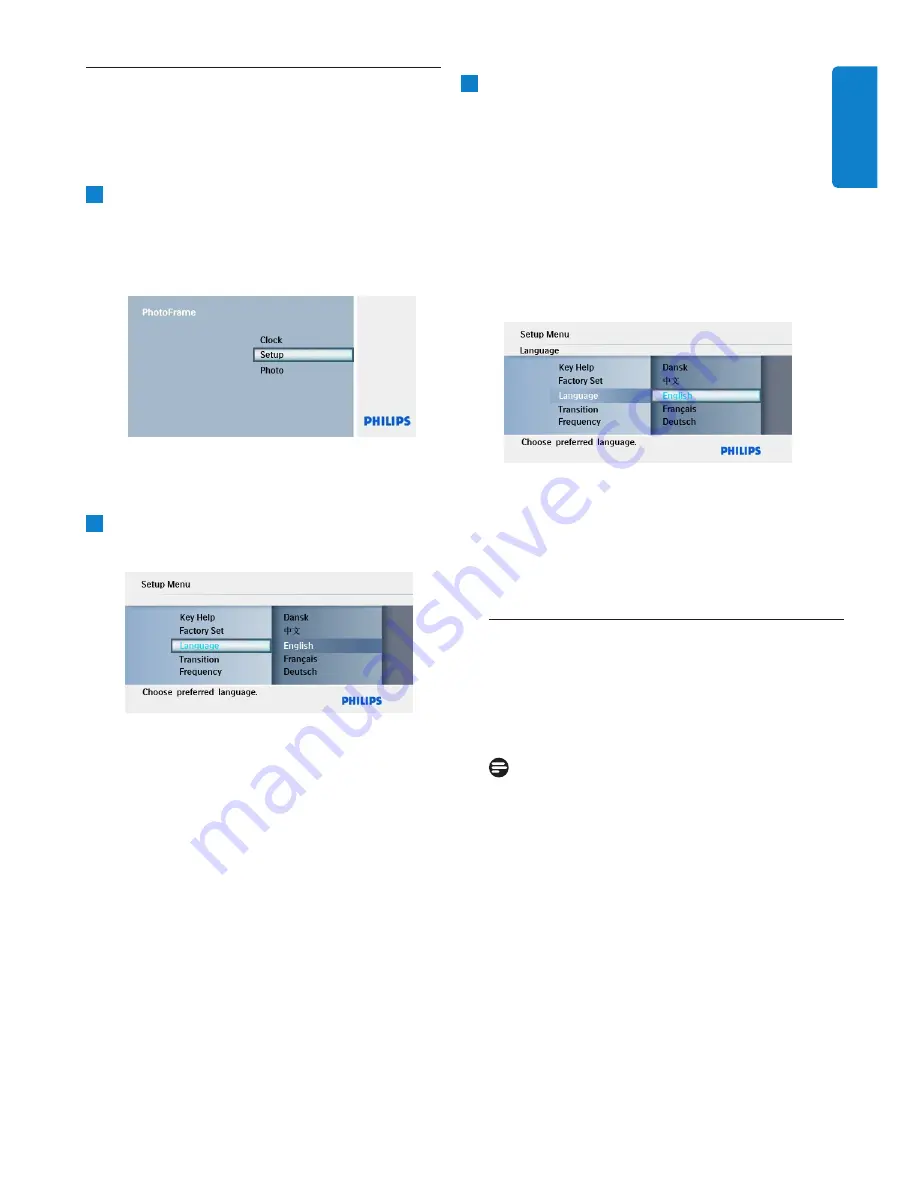
background image

1

Settings

6.7 

Language

Use this section to choose the menu language of 
the PhotoFrame.

1

  •  Press the 

Mode

 button to access the  


Main Menu

.

•  Press  

Up/Down


to Setup  and press the  


Play/OK

 button. 

2

 Press 

Down

 to go to 

language.


3

  •  Press 

Right

 to enter the 

Language


      menu.

•  Press 

Up

 and 

Down

 to select your  

  preferred language (select between  
 

English, French, German, Italian,  


 Simplified Chinese,  

  Spanish, 

Dutch, 

and 

Danish

). 

•  Press the 

Play/OK

 button to confirm  

  your selection. The new setting will be  
  effective immediately.

    Press the 

Mode

 button to leave this menu  

    and play the slideshow.

6.8       AutoDim Timer Function 


Depending on your lifestyle and schedule, 
you may want to have the PhotoFrame to 
automatically turn ON and OFF for you.

  Note: 

Local time must be set correctly before setting 
up this feature (see time and date section in the 
setup menu).

ENGLISH

Summary of Contents for SPF1007

Page 1: ...EN User manuals 1 PhotoFrame Register your product and get support at www philips com welcome SPF1007 ...

Page 2: ...up 4 Using your PhotoFrame 4 1 View Photos 4 2 Find a Photo 5 Use More of your PhotoFrame 5 1 Menu Selection 5 2 Photo Menu 6 Settings 6 1 Slideshow Sequence 6 2 Transition Effects 6 3 Frequency 6 4 Collage 6 5 Background Color 6 6 Brightness 6 7 Language 6 8 Timer Function Auto On Off 6 9 Check the Status of your Photoframe 6 10 Key Help 7 Technical data 8 Frequently asked questions 9 Service and...

Page 3: ...ins power supply 1 Important When positioning the PhotoFrame make sure the power plug and outlet are easily accessible To avoid the risk of shock or permanent damage to the set do not expose the PhotoFrame to rain or excessive moisture 1 2 Care of the PhotoFrame 1 Do not drop PhotoFrame is a complicated electronic device and cannot withstand shock from being dropped 2 Do not expose to moisture Pho...

Page 4: ...er adapter What else you ll need AC Power outlet Digital Photos on memory card Quick start guide Quick start guide User Manual Stand PhotoFrame SPF1007 PhotoFrame SPF1007 Register your product and get support at www philips com welcome EN User manuals 1 Connect Setup 1 2 3 Enjoy ...

Page 5: ...ry card will display and a slideshow will start DO NOT remove the memory card immediately after inserting it in to the PhotoFrame or when PhotoFrame is counting the Photos Wait until the screen is stable Removing a memory card To remove the xD SD SDHC MMC or Memory Stick card push the card again to unlock and then pull out the card Your PhotoFrame Note For able to delete photo from the memory devi...

Page 6: ...e Press the Mode button to toggle to the Main Menu select the Setup and Up Down to Language 1 Press Up and Down to select your preferred language select between English French Spanish Italian German Dutch Danish Simplified Chinese 2 Press the Play OK button to confirm your selection The new setting will be effective immediately Press the Mode button to leave this menu and play the slideshow Gettin...

Page 7: ... press the Play OK button Getting Started 3 3 3 Choosing Clock Mode The clock can be viewed in Slideshow displays the clock in the bottom right of the screen There are two ways to display photo in the clock mode 1 To quick access the clock when in slideshow press Play OK 2 To access the clock from the Main menu 1 Press the Mode button to access the Main Menu Press Down to highlight Clock and press...

Page 8: ... easily editable from slideshow mode by pressing the Menu button To go directly to thumbnail mode form read the photo menu section thumbnail mode form read the photo menu section 4 2 3 Calendar Mode To display photos in clock mode 1 In slideshow mode use the Left and Right to move quickly through the photos 2 Press Play OK to the access Browse Mode press again to go to the calendar mode 4 2 4 Thum...

Page 9: ...he menu buttons When in a menu follow the onscreen instructions in the bottom right of the screen for details on how to navigate The Key Left and Right to cycle through the menus Press Down and Up to select options Press the Menu button to go to the main menu Press the Play OK button to make a selection Press the Mode button to exit the current menu and play a slideshow 5 2 Photo Menu There are tw...

Page 10: ...Menu button to leave this menu and play the slideshow Zooming and Cropping Note 1 To retain image quality it is recommended that zooming and cropping is carried out before the image is stored in the PhotoFrame Note 2 All photos processed by the PhotoFrame will be resized for optimal display on PhotoFrame and to save storage space 1 Press the Mode button to access the Main Menu Press Up to Photo an...

Page 11: ... Mode button to leave this menu and play the slideshow 10 Using more of your PhotoFrame 5 2 2 Frames 1 Press the Mode button to access the Main Menu Press Up to Photo and press the Play Ok button 2 Press Down to select the media to browse and press Play OK Press the Up Down Left or Right keys to find the image you want to add the frame to 3 Press the Menu button and navigate Up to Frames Press Pla...

Page 12: ...s Right Press Up and Down to select either Sequential or Random Press Play OK to confirm Press the Mode or Menu button to leave this menu and play the slideshow 6 2 Transition Effects The photos can appear on the screen using special transitions 1 Press the Mode button to access the Main Menu Press Up Down to Setup and press the Play OK button 2 Press Down to Transition and press Right Press Up an...

Page 13: ...he Mode button to leave this menu and play the slideshow Note This function applies to all the slideshows stored on all media 6 4 Collage To show multiple photos arranged on the screen at the same time select collage 1 Press the Mode button to access the Main Menu Press Up Down to Setup and press the Right Play OK button 2 Press Down to access Collage and press Right Play Ok Press Up and Down to s...

Page 14: ... OK to confirm Press the Mode or Menu button to leave this menu and play the slideshow 6 6 Brightness Change the brightness settings of the PhotoFrame to achieve the best visibility depending on the light conditions 1 Press the Mode button to access the Main Menu Press Up Down to Setup and press the Right Play OK button 2 Press Down to access Brightness and press Right Play Ok Press Up and Down to...

Page 15: ...lect between English French German Italian Simplified Chinese Spanish Dutch and Danish Press the Play OK button to confirm your selection The new setting will be effective immediately Press the Mode button to leave this menu and play the slideshow 6 8 AutoDim Timer Function Depending on your lifestyle and schedule you may want to have the PhotoFrame to automatically turn ON and OFF for you Note Lo...

Page 16: ...Press the Mode button to access the Main Menu Press Up to Setup and press the Play OK button 2 Press Down to Auto Dim 3 Press Right to select AutoDimTimer Navigate Up or Down to select either On or Off Press Play OK to apply the settings Press the Mode button to leave this menu and play the slideshow Press the Play OK to Toggle to Slideshow Browse or Calendar mode Note 1 Digital PhotoFrame will au...

Page 17: ...Frame it will give you the status of the card card type and free memory left Firmware PhotoFrame software version 6 10 Key Help When the PhotoFrame first starts a description of the control buttons is displayed for 10 seconds or until the press of any of the buttons If you would like to turn this function off follow the instructions below 1 Press the Mode button to access the Main Menu Press Down ...

Page 18: ...how mode in Browse mode or in Calender mode 1 key each to go Up Down Right or Left 1 Mode to toggle to Slideshow mode Thumbnail mode or Main menu 1 Menu key to toggle photo menu Slideshow mode Browse or toggle to Calendar mode Clock Menu USB Pen Drive Playback mode Full screen browse Slideshow Thumbnail browse Photo effects Frames Zoom and Crop Rotate Slideshow setting Collage Random Sequential Tr...

Page 19: ... bring the system back to ON status Why doesn t my Digital PhotoFrame show some of my photos Digital cameras take photos and store them in JPEG GIF TIFF and BITMAP format according to camera industry standards Digital PhotoFrame is designed to show photos following the same industry standards Some images such as web images scanned images or photos in RAW format from professional cameras are not st...

Page 20: ... Sweden and Denmark Banned Substance Declaration This product comply with RoHs and Philips BSD AR17 G04 5010 010 requirements 1 Service and Warranty CE Declaration of Conformity Philips Consumer Lifestyle declare under our responsibility that the product is in conformity with the following standards EN60950 2000 Safety requirement of Information Technology Equipment EN55022 1998 Radio Disturbance ...

Page 21: ...and to minimize the amount to be disposed of Please find out about the local regulations on how to dispose of your old monitor from your local Philips dealer 0 Service and Warranty Waste Electronics and Electrical Equipment WEEE This product is labelled with this symbol in accordance with European Directive 2002 96 EC to indicate that it must not be disposed of with your other household waste Plea...

Page 22: ......

Page 23: ...All rights reserved 2008 Koninklijke Philips Electronics N V ...

Reviews: