background image

8.


Certifications

FCC Warning Statement

Changes or modifications not expressly approved by the
party responsible for compliance could void the user’s au-
thority to operate the equipment.

FCC Compliance Statement

This device complies with part 15 of the FCC Rules. Opera-
tion is subject to the following two conditions:

(1) This device may not cause harmful interference, and

(2) this device must accept any interference received, in-
cluding interference that may cause undesired operation.

This equipment has been tested and found to comply with
the limits for a Class B digital device, pursuant to Part 15 of
the FCC Rules. These limits are designed to provide reason-
able protection against harmful interference in a residential
installation. This equipment generates uses and can radiate
radio frequency energy and, if not installed and used in ac-
cordance with the instructions, may cause harmful interfer-
ence to radio communications. However, there is no guar-
antee that interference will not occur in a particular installa-
tion.

If this equipment does cause harmful interference to radio
or television reception, which can be determined by turning
the equipment off and on, the user is encouraged to try to
correct the interference by one or more of the following
measures:

• Reorient or relocate the receiving antenna.
• Increase the separation between the equipment and re-

ceiver.

• Connect the equipment into an outlet on a circuit different

from that to which the receiver is connected

• Consult the dealer or an experienced radio/TV technician

for help.

Industry Canada (IC) regulatory infor-
mation

This device contains licence-exempt transmitter(s)/receiv-
er(s) that comply with Innovation, Science and Economic
Development Canada’s licence-exempt RSS(s). Operation is
subject to the following two conditions:

(1) This device may not cause interference.

(2) This device must accept any interference, including in-
terference that may cause undesired operation of the de-
vice.

Open source software

Products mentioned in this manual may contain open
source software.

Speech Processing Solutions GmbH hereby offers to deliver,
upon request, a copy of the complete corresponding source
code for the copyrighted open source software packages
used in this product for which such offer is requested by the
respective licenses. This offer is valid up to three years after
product purchase. To obtain the source code, please write
in English to: [email protected].

Neither Speech Processing Solutions GmbH nor its affiliates
shall be liable to the purchaser of this product or third par-
ties with respect to claims for damages, losses, costs or ex-
penses incurred by purchaser or third parties as a result of
an accident, misuse or abuse of this product or unauthor-
ized modifications, repair, modification of the product or
failure to meet the operating and maintenance instructions
provided by the manufacturer.

This user manual is a document with no contractual nature.
We accept no liability for changes, mistakes or printing er-
rors.

28

Summary of Contents for SpeechMike Premium

Page 1: ...User manual SpeechMike Premium Air SMP4010 ...

Page 2: ...le mode 12 Locate your docking station 12 Resetting the wireless connection 12 4 Use your SpeechMike 13 Create a recording 13 Customize the SpeechMike 13 Hands free dictating with a Philips foot control 15 Upgrading the firmware 16 5 Button modes 18 Switch between button modes 18 Event mode 19 Keyboard mode 20 Browser mode 21 Windows speech recognition mode 22 Dragon for Mac mode 23 Dragon for Win...

Page 3: ...ufacturer of the medical device to determine if they are adequately shielded from external RF energy or if you have any questions Switch off your device in health care facilities when any reg ulations posted in these areas instruct you to do so Hospi tals or health care facilities may be using equipment that could be sensitive to external RF energy Implanted medical devices This device contains co...

Page 4: ...n be recycled and reused For recycling information please contact your local waste management facilities or visit www recy cle philips com This appliance contains a rechargeable NiMH battery which must be disposed of properly Contact your local town or city officials for battery dispos al information You can also call 1 800 822 8837 or visit www call2recycle org for battery drop off locations For ...

Page 5: ...CAUTION This symbol warns of damage to the device and possible data loss Damage can be caused by im proper handling 5 ...

Page 6: ...ads warranty information and more www philips com dictation Product highlights Wireless recording and playback Wireless charging Long lasting battery Superior recording quality Noise canceling microphone Ergonomic design What s in the box Dictation micro phone Docking sta tion Micro USB cable x2 Power supply unit and outlet adapters Quick start guide 6 ...

Page 7: ...y button 7 Insert overwrite button 8 Instruction button 9 Fast forward button 10 Slide switch REC record STOP stop PLAY play V rewind 11 Left mouse button 12 Touch navigation left mouse button 13 Right mouse button 14 Programmable function buttons 15 Speaker 16 Power button 17 Command button 18 Left mouse button 19 Micro USB port for charging 7 ...

Page 8: ...Overview of the docking station 1 Charging LED 2 Wireless connection LED 3 Foot control port 4 Micro USB port for PC connection 5 Micro USB port for charging 6 Kensington Security Slot 8 ...

Page 9: ...NOTE The included USB power supply unit is a US standard power supply Depending on your re gion you might need to use the supplied outlet adapters to fit regional power outlets CAUTION Use only the original power supply unit Using a different power supply unit may damage the de vice Charge via USB power supply unit X During charging the battery LED glows orange X When charging is complete the batt...

Page 10: ...connect the dock ing station to the computer X During charging the battery LED glows orange X When charging is complete the battery LED glows green Learn about the battery status Immediately after turning the SpeechMike on or when the SpeechMike is removed from the docking station the bat tery LED indicates the battery status For more information see LED colors and meanings Battery LED Battery sta...

Page 11: ...nnection problems see LED colors and meanings for more information Change paired devices If your desired docking station is already connected to a different SpeechMike the wireless connection LED on this docking station glows green if the connected device is in range or red if the connected device is out of range To disconnect this existing connection and pair your own SpeechMike with the desired ...

Page 12: ...connection is immediate ly reestablished TIP You can change and customize these default set tings with Philips SpeechControl driver and con figuration software Download the software at www dictation philips com speechcontrol For more information see Customize the Speech Mike 13 Locate your docking station If there are several docking stations in the room and you don t know which docking station is...

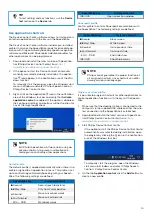
Page 13: ...to suit individual user needs The software allows to assign different functions to each key enable or disable certain features and also to start and control applications with the SpeechMike Customize SpeechMike keys and settings 1 Make sure that the docking station is connected to the computer via the supplied USB cable and that the wire less connection to the SpeechMike is established 2 Download ...

Page 14: ...to control Dragon NaturallySpeaking with your Speech Mike The following settings are defined SpeechMike key Assigned shortcut g Record Record push to dictate e Play Stop Play from cursor position V Rewind Move cursor backwards W Fast forward Move cursor forwards EOL PRIO Mark backwards SpeechMike key Assigned shortcut INS OVR Open correction window Powerpoint profile Use this profile to control Po...

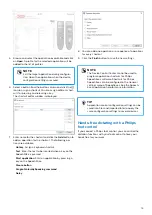
Page 15: ...eechMike is pressed Start application Start an application by pressing a key on the SpeechMike Mouse button Dragon NaturallySpeaking command Delay 8 You can add one operation or a sequence of operations for every shortcut 9 Click the Finish button to save the new settings NOTE The Device Control Center cannot be used to program application shortcuts for Philips SpeechExec software Shortcuts for Ph...

Page 16: ...10 and 2320 have three pedals By default the foot controls 2310 and 2320 have the fol lowing configuration ACC2310 ACC2320 Foot control ACC2330 The Philips foot control 2330 has four pedals By default the foot control 2330 has the following configuration ACC2330 Upgrading the firmware Your device is controlled by an internal program called firm ware As a part of ongoing product maintenance the fir...

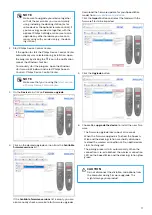
Page 17: ...ter 3 On the Device tab click on Firmware upgrade 4 Click on the desired upgrade version from the Available firmware versions list If the Available firmware versions list is empty you can also manually check our website for firmware upgrades Download the firmware update for your SpeechMike model from www philips com dictation Click the Import button and select the folder with the firmware files to...

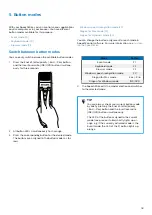
Page 18: ...OVR button simultane ously for three seconds 2 All button LEDs simultaneously flash orange 3 Press the corresponding button for the desired mode The buttons are assigned to the button modes as fol lows Mode Button Event mode F1 Keyboard mode F2 Browser mode F3 Windows speech recognition mode F4 Dragon for Mac mode EoL Prio Dragon for Windows mode INS OVR 4 The SpeechMike exits the mode selection a...

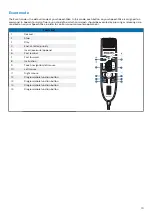
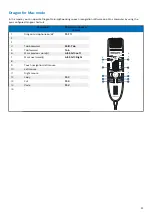
Page 19: ...ing or releasing a de sired button on your SpeechMike in order to control various computer applications Command 1 Record 2 Stop 3 Play 4 End of letter priority 5 Insert overwrite append 6 Fast rewind 7 Fast forward 8 Instruction 9 Touch navigation left mouse 10 Left mouse 11 Right mouse 12 Programmable function button 13 Programmable function button 14 Programmable function button 15 Programmable ...

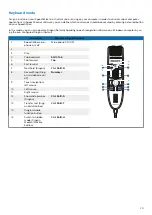
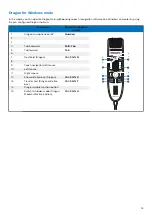
Page 20: ...on a Windows computer by us ing the pre configured Dragon shortcuts Command Shortcut in SpeechControl 1 SpeechMike micro phone on off Microphone ON OFF 2 3 Play 4 Tab backward Shift Tab 5 Tab forward Tab 6 Fast rewind 7 Next field Dragon Ctrl Shift N 8 Record Stop Drag on microphone on off NumKey 9 Touch navigation left mouse 10 Left mouse 11 Right mouse 12 Show dictation box Dragon Ctrl Shift D 1...

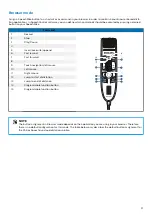
Page 21: ... 5 Insert overwrite append 6 Fast rewind 7 Fast forward 8 9 Touch navigation left mouse 10 Left mouse 11 Right mouse 12 Jump to start of dictation 13 Jump to end of dictation 14 Programmable function button 15 Programmable function button NOTE The button assignment in Browser mode depends on the application you are using in your browser Therefore there is no default configuration for this mode The...

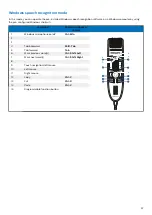
Page 22: ...igured Windows shortcuts Command Shortcut in Speech Control 1 Windows microphone on off Ctrl Win 2 3 4 Tab backward Shift Tab 5 Tab forward Tab 6 Mark previous word s Ctrl Shift Left 7 Mark next word s Ctrl Shift Right 8 9 Touch navigation left mouse 10 Left mouse 11 Right mouse 12 Copy Ctrl C 13 Cut Ctrl X 14 Paste Ctrl V 15 Programmable function button 22 ...

Page 23: ...using the pre configured Dragon shortcuts Command Shortcut in Speech Control 1 Dragon microphone on off F11 2 3 4 Tab backward Shift Tab 5 Tab forward Tab 6 Mark previous word s Alt Shift Left 7 Mark next word s Alt Shift Right 8 9 Touch navigation left mouse 10 Left mouse 11 Right mouse 12 Copy C 13 Cut X 14 Paste V 15 23 ...

Page 24: ...in Speech Control 1 Dragon microphone on off NumKey 2 3 4 Tab backward Shift Tab 5 Tab forward Tab 6 7 Next field Dragon Ctrl Shift N 8 9 Touch navigation left mouse 10 Left mouse 11 Right mouse 12 Show dictation box Dragon Ctrl Shift D 13 Transfer text Dragon dictation box Ctrl Shift T 14 Programmable function button 15 Switch to hidden mode Dragon Medical Practice Edition Ctrl Shift H 24 ...

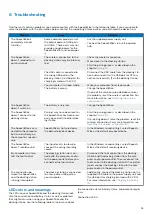
Page 25: ...ck ing station Start the pairing process as described in the chapter Pairing 11 If re pairing doesn t solve the problem reset the wireless connection For more information see Resetting the wireless connection 12 The SpeechMike is con nected to the computer but sound will play on the computer s speaker only SpeechMike is not selected as the default playback device In the Windows sound settings sele...

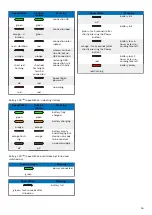
Page 26: ...en battery fully charged orange orange battery charging orange flash ing orange battery empty and charging but device not ready to be used yet off off no power supply Battery LED SpeechMike out of docking station and switched on Docking station Meaning green power connected SpeechMike Meaning green for 5 seconds after turned on battery full SpeechMike Meaning off battery full green for 5 seconds a...

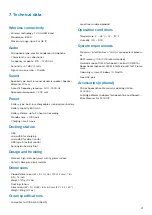
Page 27: ...USB type A for foot control Kensington Security Slot Design and finishing Material high class polymers with hygienic surface Color s dark grey pearl metallic Dimensions Product dimensions W D H 45 175 32 mm 1 8 6 9 1 3 inch Weight 120 g 4 2 oz Docking station Dimensions W D H 82 85 60 mm 3 2 3 3 2 4 Weight 276 g 9 7 oz Green specifications Compliant to 2011 65 EU RoHS Lead free soldered product Op...

Page 28: ... an outlet on a circuit different from that to which the receiver is connected Consult the dealer or an experienced radio TV technician for help Industry Canada IC regulatory infor mation This device contains licence exempt transmitter s receiv er s that comply with Innovation Science and Economic Development Canada s licence exempt RSS s Operation is subject to the following two conditions 1 This...

Page 29: ...ations are subject to change without notice Philips and the Philips shield emblem are registered trademarks of Ko ninklijke Philips N V and are used by Speech Processing Solutions GmbH under license from Koninklijke Philips N V All trademarks are the property of their respective owners 29 ...

Reviews: