background image

8

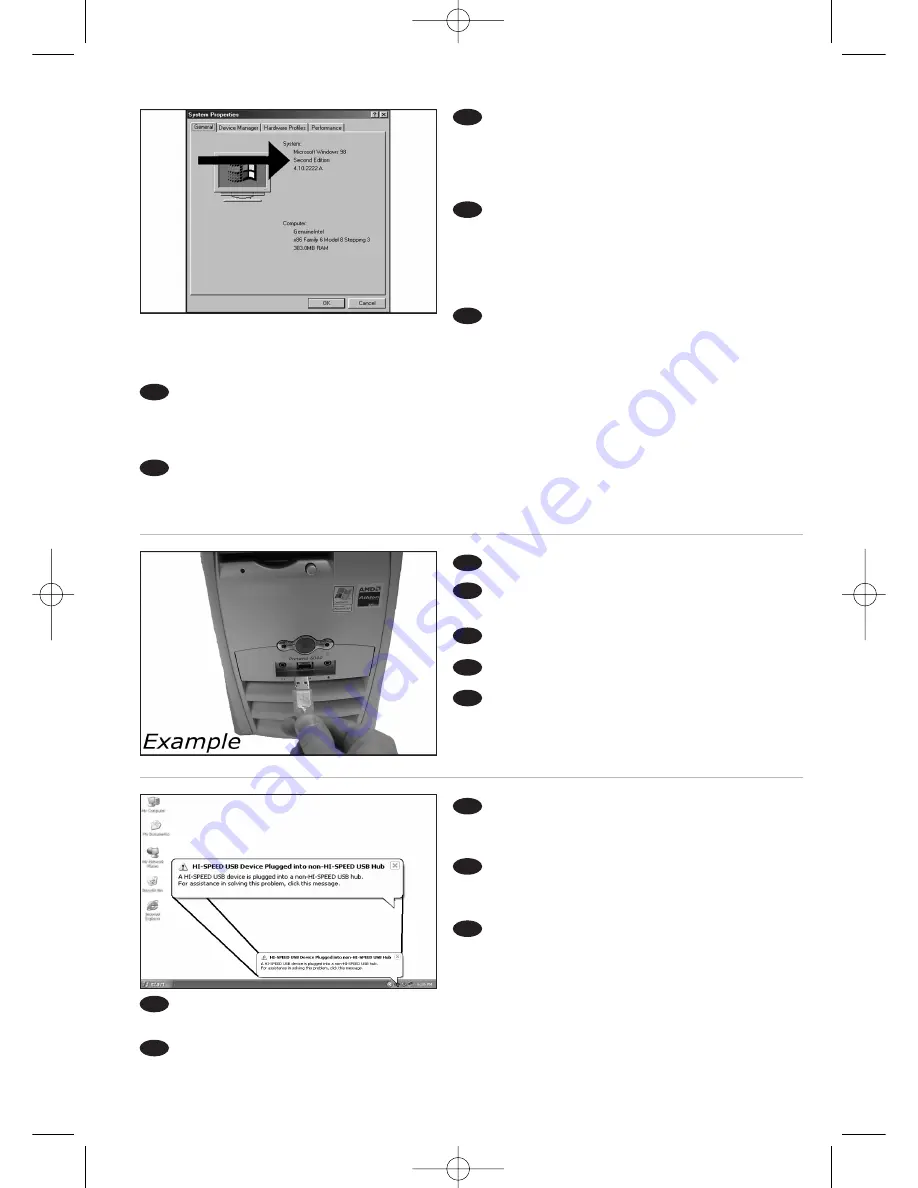
When you are using Windows 98 Second

Edition, please go to the end of this chapter.
Otherwise, continue with step 7.

Identify your Operating System by right clicking

on “My Computer” and choosing “Properties”.

Wenn Sie Windows 98 Second Edition

verwenden, gehen Sie bitte zum Ende dieses
Kapitels. Ansonsten fahren Sie mit Schritt 7 fort.

Sie ermitteln die Version Ihres Betriebssystems,

indem Sie auf „Arbeitsplatz“ klicken und dann
„Eigenschaften“ wählen.

Si vous utilisez Windows 98 Deuxième

Édition, passez directement à la fin de ce chapitre ; sinon, continuez à l’étape 7.

Identifiez votre système d’exploitation en cliquant avec le bouton droit sur "Poste de travail" puis en

sélectionnant "Propriétés".

Se si utilizza Windows 98 Second Edition, andare alla fine di questo capitolo.

Altrimenti continuare partendo dal punto 7.

Identificare il sistema operativo facendo clic con il pulsante destro del mouse su “Risorse del

computer” e selezionando “Proprietà”.

Ga naar het eind van dit hoofdstuk als u Windows 98 Second Edition gebruikt.

Zo niet, ga dan verder met stap 7.

U kunt zien welk besturingssysteem u gebruikt door met de rechtermuisknop op Deze computer te

klikken en Eigenschappen te selecteren.

Connect the USB cable to the computer.

Schließen Sie das USB-Kabel an den

Computer an.

Branchez le câble USB à l’ordinateur.

Collegare il cavo USB al computer.

Sluit de USB-kabel aan op de computer.

UK

D

F

NL

I

7

Windows XP will warn you when you connect

the external rewriter to a slow USB 1 connection.
Check step 5 again. 

Windows XP warnt Sie, wenn Sie den

externen ReWriter an eine langsame USB 1.0-Buchse
anschließen. Kontrollieren Sie nochmals Schritt 5.

Windows XP affiche un message

d'avertissement si vous avez branché le graveur
externe à un port USB 1 (faible débit). 
Vérifiez les instructions de l’étape 5.

Windows XP darà un avviso se si effettua il collegamento al rewriter esterno tramite una

connessione USB 1 lenta. Controllare nuovamente il punto 5.

Windows XP waarschuwt u als u de externe brander op een trage USB 1-verbinding aansluit.

Controleer stap 5 nog een keer.

UK

D

F

NL

I

8

6

UK

D

F

I

NL

HowTo_Ext_RW_Nero7.qxd  17-08-2006  13:53  Pagina 8

Summary of Contents for SPD3800CC/05

Page 1: ...L E PT TR PL SV Install Guide Installationsanleitung Guide d installation Guida d installazione Installatiegids Guía de instalación Guia de Instalação Kurulum Kılavuzu Instrukcja montażu Installationsguide HowTo_Ext_RW_Nero7 qxd 17 08 2006 13 53 Pagina 1 ...

Page 2: ...xterne USB 11 Vos logiciels sont ils à jour 13 Comment créer un disque vidéo 17 Comment créer un disque audio ou de données 25 Comment copier un disque 29 Vous avez besoin d aide ou de plus d informations 34 Indice Guida alla connessione del ReWriter USB esterno 5 Guida alla disconnessione del ReWriter USB esterno 11 Aggiornamento 13 Guida alla creazione di un video disc 17 Guida alla creazione di...

Page 3: ...er cihazı nasıl ayrılır 43 Güncel mi 45 Video diski nasıl oluşturulur 49 Bzir ses veya veri diski nasıl oluşturulur 57 Bir disk nasıl kopyalanır 61 Daha fazla bilgi veya yardım gereklidir 66 Spistreści Podłączanie zewnętrznej nagrywarki USB 37 Odłączanie zewnętrznej nagrywarki USB 43 Aktualizacja 45 Tworzenie płyty wideo 49 Nagrywanie płyt audio lub danych 57 Kopiowanie płyt 61 Potrzebna pomoc lub...

Page 4: ...HowTo_Ext_RW_Nero7 qxd 17 08 2006 13 53 Pagina 4 ...

Page 5: ...k D Stromversorgung B Dieses Handbuch 2 Teile C Die Nero Software CD E HiSpeed USB Kabel Le coffret d emballage contient les éléments suivants A Votre nouveau lecteur D Alimentation B Ce mode d emploi 2 éléments C Le disque du logiciel Nero E Câble USB haut débit Contenuto della confezione A La nuova unità D Alimentazione B Questo manuale 2 parti C Il disco del software Nero E Cavo USB HiSpeed Dit...

Page 6: ...connecting your external rewriter to your computer A Power B HiSpeed USB C Audio connector Auf der Rückseite finden Sie die Buchsen die Sie benötigen um den externen ReWriter an Ihren Computer anzuschließen A Strom B HiSpeed USB C Audioanschluss Les connecteurs requis pour brancher votre graveur externe à l ordinateur se trouvent au dos de l appareil A Alimentation B Port USB haut débit C Connecte...

Page 7: ... vidéos Ricercare il connettore USB HiSpeed sul proprio PC A Logo per l USB HiSpeed o il connettore preferiti B Logo per il connettore USB LowSpeed alternativo Quando si effettua un collegamento a una presa USB LowSpeed o USB 1 x le velocità sono limitate 4x in scrittura e 6x in lettura su CD 0 7x in lettura su DVD e non è possibile scrivere su DVD o guardare un video Zoek de HiSpeed USB connector...

Page 8: ...ofdstuk als u Windows 98 Second Edition gebruikt Zo niet ga dan verder met stap 7 U kunt zien welk besturingssysteem u gebruikt door met de rechtermuisknop op Deze computer te klikken en Eigenschappen te selecteren Connect the USB cable to the computer Schließen Sie das USB Kabel an den Computer an Branchez le câble USB à l ordinateur Collegare il cavo USB al computer Sluit de USB kabel aan op de ...

Page 9: ...chiedere alcuni secondi I popup mostrati dipendono dal sistema operativo De stuurprogramma s worden automatisch geïnstalleerd Dit kan een paar seconden duren Welke pop ups worden weergegeven hangt af van uw besturingssysteem NL UK D F I UK D F I NL 11 Choose Nero 7 Essentials and follow the instructions on the screen When finished continue with the next chapter Wählen Sie Nero 7 Essentials und bef...

Page 10: ...r voir étape 7 3 L Assistant Ajout de nouveau matériel apparaît 4 Cliquez sur Suivant à l affichage du message L Assistant recherche de nouveaux pilotes 5 Choisissez Rechercher le meilleur pilote pour votre périphérique 6 Sélectionnez Définir un emplacement 7 Naviguez jusqu au répertoire Philips drivers sur le disque Nero puis cliquez sur Suivant 8 Les pilotes sont ensuite installés Solo per Windo...

Page 11: ...er le périphérique en toute sécurité Per scollegare fare clic sull icona Safely Remove Hardware Rimozione sicura dell hardware Klik op het pictogram Hardware veilig verwijderen UK D F I NL 2 Click on Safely remove USB Mass Storage Device Klicken Sie auf USB Massenspeichergerät sicher entfernen Cliquez sur Retirer Périphérique de stockage de masse USB en toute sécurité Fare clic su Safely remove US...

Page 12: ...ld Sie auf dem Bildschirm dazu aufgefordert werden Lorsque ce message s affiche vous pouvez débrancher le graveur externe Scollegare il rewriter esterno quando appare Koppel uw externe brander los wanneer dit bericht wordt weergegeven 3 UK D F I NL HowTo_Ext_RW_Nero7 qxd 17 08 2006 13 53 Pagina 12 ...

Page 13: ...telligent Agent Wenn er auf dem Desktop nicht zurVerfügung steht wählen Sie Start Programme Philips Intelligent Agent Philips Intelligent Agent Lancez Philips Intelligent Agent S il n est pas directement disponible sélectionnez Démarrer Tous les Programmes Philips Intelligent Agent Philips Intelligent Agent Avviare Philips Intelligent Agent Se non fosse disponibile selezionare Start Tutti i Progra...

Page 14: ... Essentials Nero ProductSetup Sélectionnez Démarrer Tous les Programmes Nero 7 Essentials Nero ProductSetup Scegliere Start Tutti i programmi Nero 7 Essentials Nero ProductSetup Kies Start Alle Programma s Nero 7 Essentials Nero ProductSetup Download the updates and install them Laden Sie die Updates herunter und installieren Sie sie Téléchargez les mises à jour et installez les Effettuare il Down...

Page 15: ... la mise à jour de Nero È possibile Windows Firewall visualizzi un messaggio di avvertimento Fare clic su Unblock Sblocca per consentire l aggiornamento di Nero De Firewall van Windows kan een waarschuwing geven Klik op Uitschakelen zodat uw Nero kan worden bijgewerkt Click OK Klicken Sie auf OK Cliquez sur OK Fare clic su OK Klik op OK Click OK Klicken Sie auf OK Cliquez sur OK Fare clic su OK Kl...

Page 16: ...nload und die Aktualisierung selbstständig durch Nero télécharge et se met à jour automatiquement L aggiornamento di Nero viene scaricato ed eseguito Nero gaat automatisch downloaden en bijwerken 9 F I NL UK D HowTo_Ext_RW_Nero7 qxd 17 08 2006 13 53 Pagina 16 ...

Page 17: ...a creazione di un video disc Hoe maak ik een video cd 1 Start Nero StartSmart Essentials Starten Sie Nero StartSmart Essentials Lancez Nero StartSmart Essentials Avviare Nero StartSmart Essentials Start Nero StartSmart Essentials UK UK D F I NL HowTo_Ext_RW_Nero7 qxd 17 08 2006 13 53 Pagina 17 ...

Page 18: ...want to capture video from a camera connect it to your PC Otherwise go to step 8 Schließen Sie Ihren PC an wenn Sie Video von einer Kamera aufnehmen möchten Ansonsten fahren Sie mit Schritt 8 fort Si vous souhaitez capturer de la vidéo à partir d une caméra raccordez la à l ordinateur Sinon allez à l étape 8 Se si desidera catturare il video da una camera collegarla al PC Altrimenti passare al pun...

Page 19: ...ess here Während der Aufnahme sehen Sie hier den Fortschritt Pendant la capture l avancement s affiche ici Durante il processo di cattura qui sarà possibile visualizzare l avanzamento Tijdens het laden ziet u hier de voortgang UK D F I NL Click Next when all video sequences are captured Klicken Sie auf Weiter sobald alle Videosequenzen aufgenommen sind Cliquez sur Suivant quand toutes les séquence...

Page 20: ...schijf kiest u Videobestanden toevoegen Ga anders verder met stap 10 You can edit the loaded movies by choosing Edit Movie Sie können die geladenen Filme bearbeiten indem Sie Film bearbeiten wählen Vous pouvez éditer les films chargés en choisissant Editer le film È possibile modificare i film caricati selezionando Modifica Filmato U kunt de geladen films bewerken door Film bewerken te kiezen Sele...

Page 21: ...Klicken Sie danach auf Weiter Vous pouvez également recouper les séquences vidéo enregistrées en faisant glisser les marqueurs Lorsque vous avez terminé choisissez Suivant Inoltre qui è possibile accorciare il video registrato facendo scorrere i marcatori Al termine selezionare Avanti U kunt de opgenomen video ook bijsnijden door de markeringen te verschuiven Kies als u klaar bent Volgende UK D F ...

Page 22: ...prima del film Fare clic su Avanti per continuare Preview uw film Klik op Volgende om verder te gaan You can change the layout the background add titles here When done choose Next twice Sie können jetzt das Layout oder den Hintergrund ändern und Titel usw hinzufügen Klicken Sie danach zweimal auf Weiter Vous pouvez changer la mise en forme l arrière plan ajouter des titres ici Lorsque vous avez te...

Page 23: ...rocède au transcodage et grave le disque NeroVision Express esegue la codifica intermedia e la masterizzazione del disco NeroVision Express transcodeert en brandt uw cd UK D F I NL Congratulations your disc has been written successfully You may exit the application now Glückwunsch Ihre Disc wurde erfolgreich beschrieben Sie können jetzt die Anwendung verlassen Félicitations le disque a été gravé a...

Page 24: ...24 HowTo_Ext_RW_Nero7 qxd 17 08 2006 13 53 Pagina 24 ...

Page 25: ...e audio ou de données Guida alla creazione di un disco audio o di un disco dati Hoe maak ik een audio of data cd 1 Start Nero StartSmart Starten Sie Nero StartSmart Lancez Nero StartSmart Avviare Nero StartSmart Start Nero StartSmart UK UK D F I NL HowTo_Ext_RW_Nero7 qxd 17 08 2006 13 53 Pagina 25 ...

Page 26: ...n disco audio selezionare Crea CD Audio Voor een audio cd kies Audio cd maken For data choose Make Data CD or Make Data DVD Für Daten wählen Sie Daten CD erstellen oder Daten DVD erstellen Pour créer un disque de données choisissez Créer un CD de données ou Créer un DVD de données Per i dati selezionare Creare CD dati o Creare DVD dati Voor data kies Data cd maken of Data dvd maken 4 3 2 UK D F I ...

Page 27: ...quez sur Ajouter Lorsque vous avez terminé cliquez sur Fermer Selezionare tutti i file da masterizzare e fare clic su Aggiungi Al termine fare clic su Chiudi Selecteer alle bestanden die moeten worden gebrand en klik op Toevoegen Klik op Sluiten als u klaar bent UK D F I NL Check your files and click Next Kontrollieren Sie Ihre Dateien und klicken Sie auf Weiter Vérifiez les fichiers et cliquez su...

Page 28: ...beschrieben Sie können jetzt die Anwendung verlassen Félicitations le disque a été gravé avec succès Vous pouvez maintenant quitter l application Congratulazioni è stata completata la scrittura del disco Ora è possibile uscire dall applicazione Gefeliciteerd de cd is met succes gebrand U kunt de toepassing nu verlaten Nero is burning your disc Nero brennt Ihre Disc Nero commence la gravure du disq...

Page 29: ...copia di un disco Hoe kopieer ik een cd 1 Start Nero StartSmart Essentials Starten Sie Nero StartSmart Essentials Lancez Nero StartSmart Essentials Avviare Nero StartSmart Essentials Start Nero StartSmart Essentials UK UK D F I NL HowTo_Ext_RW_Nero7 qxd 17 08 2006 13 53 Pagina 29 ...

Page 30: ...ive and click Copy Wählen Sie das Ziellaufwerk und klicken Sie auf Kopieren Sélectionnez le lecteur cible et cliquez sur Copier Selezionare l Unità di destinazione e fare clic su Copia Selecteer het doelstation en klik op Kopieren Select the source drive Wählen Sie das Quelllaufwerk Sélectionnez le lecteur source Selezionare l Unità di origine Selecteer het bronstation 4 3 2 UK D F I NL UK D F I N...

Page 31: ...the application now Glückwunsch Ihre Disc wurde erfolgreich beschrieben Sie können jetzt die Anwendung verlassen Félicitations le disque a été gravé avec succès Vous pouvez maintenant quitter l application Congratulazioni è stata completata la scrittura del disco Ora è possibile uscire dall applicazione Gefeliciteerd uw cd is met succes geschreven U kunt de toepassing nu sluiten UK D F I NL HowTo_...

Page 32: ...mber at www philips com support or contact Philips Customer Care Additional warranty information is available in the PhilipsWarranty folder on the Nero software disc The making of unauthorised copies of copy protected material including computer programmes files broadcasts and sound recordings may be an infringement of copyrights and constitute a criminal offence This equipment should not be used ...

Page 33: ...im Ordner Philips Warranty auf der Nero Software CD Die unbefugte Vervielfältigung urheberrechtlich geschützter Werke einschließlich Computerprogramme Dateien Rundfunksendungen und musikalischer Werke kann eine Verletzung des Urheberrechts darstellen und eine Strafbarkeit begründen Dieses Gerät darf zu den genannten mißbräulichen Zwecken nicht verwendet werden WEEE Kennzeichnung Entsorgung Ihres a...

Page 34: ...istance à la clientèle de Philips Pour plus d informations concernant la garantie consultez le dépliant Garantie Philips du disque Nero La réalisation de copies non autorisées de tout matériel dont la reproduction est interdite notamment les programmes informatisés dossiers émissions ou enregistrements sonores peut représenter une contrefaçon de droits et constituer une infraction Cet équipement n...

Page 35: ...la garanzia sono disponibili nella cartella PhilipsWarranty sul disco del software Nero Copie non autorizzate di materiale protetto da copie inclusi programmi per computer documenti registrazioni di radiogrammi e suoni possono essere una violazione del copyright e costituire un illecito penale Questa apparecchiatura non può essere utilizzata a tali scopi IndicativoWEEE Smaltimento di vecchi prodot...

Page 36: ... map Philips Warranty op de schijf met de Nero software Het zonder toestemming vervaardigen van kopieën van auteursrechtelijk beschermde werken inclusief computer programma s bestanden uitzendingen en geluidsopnames kan een inbreuk op auteursrechten en een strafbaar feit zijn De apparatuur dient niet voor dergelijke doeleinden gebruikt te worden WEEE markering Verwijdering van uw oud product Uw pr...

Page 37: ...s na caixa A Sua nova unidade D Fonte de alimentação B Este manual 2 peças C O disco do software E Cabo USB de alta Nero velocidade Bu kutu içinde bulunabilir A Yeni sürücünüz D Güç kaynağı B Bu kılavuz 2 parça C Nero yazılım diski E HiSpeed USB Kablosu W opakowaniu znajduje się A Nowy napęd D Kabel zasilający B Niniejsza instrukcja 2 części C Płyta z programem E Kabel HiSpeed USB Nero Innehållet ...

Page 38: ... al ordenador A Alimentación B USB de alta velocidad C Conector de audio Na parte traseira você encontrará os plugues necessários para conectar seu regravador externo ao seu computador A Power Alimentação B HiSpeed USB USB de alta velocidade C Audio connector Conector de áudio Arka tarafta harici yeniden yazıcıyı bilgisayarınıza bağlamak için gereken fişleri bulabilirsiniz A Güç B HiSpeed USB C Se...

Page 39: ...zlemek mümkün değildir Znajdź port HiSpeed USB w komputerze szukając A Logo lub gniazda preferowanej magistrali HiSpeed USB B Logo lub gniazda alternatywnej magistrali LowSpeed USB Podłączenie do magistrali LowSpeed USB lub USB 1 x spowoduje ograniczenie prędkości CD zapis 4x i odczyt 6x DVD odczyt 0 7x oraz uniemożliwienie zapisu płyt DVD lub odtwarzania filmów Leta rätt på HiSpeed USB anslutning...

Page 40: ... du använder Windows 98 Second Edition går du vidare till slutet av det här kapitlet I annat fall fortsätter du med steg 7 Identifiera ditt operativsystem genom att högerklicka på Den här datorn och välja Egenskaper Conecte el cable USB al ordenador Conecte o cabo USB ao computador USB kablosunu bilgisayara bağlayın Podłącz kabel USB do komputera Anslut USB kabeln till datorn E PT TR SV PL 7 Windo...

Page 41: ...e Może to potrwać kilka sekund Wyświetlane ekrany różnią się odpowiednio do systemu operacyjnego Drivrutinerna installeras automatiskt Det kan ta några sekunder Vilka popupmeddelanden som visas beror på operativsystemet SV E PT TR PL E PT TR PL SV 11 Elija Nero 7 Essentials y siga las instrucciones en pantalla Cuando haya terminado continúe en el capítulo siguiente Selecione Princípios básicos do ...

Page 42: ...CD ROM yoksa lütfen Sık Sorulan Sorular a bakın www philips com storageupdates 2 Nero ekranı adım 11 deki gibi gösterildiğinde harici yeniden yazıcıyı bilgisayara bağlayın adım 7 deki gibi 3 Yeni Donanım Ekle Sihirbazı açılır 4 Sihirbaz yeni sürücüler arıyor ekranında Sonraki yi tıklayın 5 En iyi sürücüleri ara seçeneğini belirleyin 6 Konum belirt i seçin 7 Nero diski üzerindeki Philips sürücüleri...

Page 43: ...ımı Güvenle Kaldır simgesini tıklayın Aby odłączyć nagrywarkę kliknij ikonę Bezpieczne usuwanie sprzętu Om du vill koppla bort den klickar du på ikonen Säker borttagning av maskinvara E PT TR PL SV 2 Haga clic en Extracción segura de dispositivo de almacenamiento masivo USB Clique em Remover com segurança dispositivo de armazenamento em massa USB USB Toplu Depolama Cihazları nı tıklayın Kliknij Be...

Page 44: ...je Desconecte seu regravador externo quando aparecer o seguinte Bu göründüğünde harici yeniden yazıcıyı ayırın Następnie odłącz zewnętrzną nagrywarkę Koppla bort den externa brännaren när detta visas 3 E PT TR PL SV HowTo_Ext_RW_Nero7 qxd 17 08 2006 13 54 Pagina 44 ...

Page 45: ...mlar Philips Intelligent Agent Philips Intelligent Agent ı seçin Uruchom program Philips Intelligent Agent Jeśli jest niedostępny kliknij Start Wszystkie programy Philips Intelligent Agent Philips Intelligent Agent Starta Philips Intelligent Agent Om det inte är tillgängligt väljer du Start Alla Program Philips Intelligent Agent Philips Intelligent Agent UK E PT TR PL SV 2 Haga clic en Comprobar l...

Page 46: ...dos os Programas Nero 7 Essentials Nero ProductSetup Sırasıyla Başlat Tüm Programlar Nero 7 Essentials Nero ProductSetup seçeneklerini belirleyin Kliknij Start Wszystkie Programy Nero 7 Essentials Nero ProductSetup Välj Start Alla Program Nero 7 Essentials Nero ProductSetup Descargando las actualizaciones e instalándolas Faça o download das atualizações e instale as Güncellemeleri indir ve kur Pob...

Page 47: ...o Windows pode avisá lo Clique em Desbloquear para permitir a actualização do Nero Windows Firewall sizi uyarabilir Nero nun güncellenmesi için Unblock Engelleme seçeneğini belirleyin Może pojawić się ostrzeżenie zapory systemu Windows Kliknij Odblokuj aby umożliwić aktualizację programu Nero Windows Firewall kan varna dig Klicka på Sluta blockera så att Nero kan uppdateras 47 6 7 8 E PT TR PL SV ...

Page 48: ...máticamente O Nero transfere e actualiza o software Nero yüklenir ve güncellenir Program Nero pobierze i zainstaluje aktualizację Nero laddas ner och uppdateras automatiskt 9 E PT TR PL SV HowTo_Ext_RW_Nero7 qxd 17 08 2006 13 54 Pagina 48 ...

Page 49: ... wideo Hur går det till att göra en videoskiva 1 Inicie Nero StartSmart Essentials Inicie o Nero StartSmart Essentials Nero StartSmart Essentials ı başlat Uruchom program Nero StartSmart Essentials Starta Nero StartSmart Essentials UK E PT TR PL SV HowTo_Ext_RW_Nero7 qxd 17 08 2006 13 54 Pagina 49 ...

Page 50: ...iere capturar vídeo desde una cámara conéctela a su PC De lo contrario vaya al paso 8 Se desejar capturar vídeo de uma câmera conecte a ao seu PC Caso contrário vá para a etapa 8 Kameradan video yakalamak istiyorsanız bunu PC nize bağlayın Aksi halde 8 adıma gidin Jeśli chcesz przechwycić wideo z kamery podłącz ją do komputera W przeciwnym razie przejdź do kroku 8 Om du vill hämta video från en ka...

Page 51: ...ptura você verá o progresso aqui Yakalama sırasında ilerleme durumunu buradan göreceksiniz W trakcie przechwytywania tutaj możesz obserwować postęp operacji När hämtningen pågår ser du förloppet här E PT TR PL SV Haga clic en Siguiente cuando se hayan capturado todas las secuencias de vídeo Clique em Avançar quando todas as seqüências de vídeo tiverem sido capturadas Tüm video sıraları yakalandığı...

Page 52: ...ån hårddisken väljer du Addera videofiler Annars går du till steg 10 Puede editar las películas cargadas escogiendo Editar película Você pode editar os filmes carregados selecionando Editar filme Filmi Düzenle yi seçerek yüklenen filmleri düzenleyebilirsiniz Możesz edytować załadowane filmy klikając Edytuj film Du kan redigera de laddade filmerna genom att välja Redigera film Seleccione los ficher...

Page 53: ...avado deslizando os marcadores Quando tiver terminado clique em Avançar Ayrıca işaretleyicileri kaydırarak kaydedilen görüntüyü kırpabilirsiniz Bittiğinde İleri yi seçin Możesz również przycinać nagrany film przesuwając wskaźniki Po zakończeniu kliknij Dalej Du kan också trimma den inspelade videon genom att skjuta markörerna När du är klar väljer du Nästa E PT TR PL SV Después de editar todos los...

Page 54: ...u Kliknij Dalej aby kontynuować Förhandsgranska filmen Klicka på Nästa för att fortsätta Puede cambiar el diseño fondo añadir títulos aquí Cuando haya terminado elija Siguiente dos veces Você pode alterar o layout o fundo adicionar títulos aqui Quando tiver terminado selecione Avançar duas vezes Yerleşimi arkaplanı başlıkları ekle yi buradan değiştirebilirsiniz Bittiğinde İleri yi iki kez seçin Tu...

Page 55: ...o NeroVision Express diskinizin kod aktarımını ve yakma işlemini gerçekleştirir Program NeroVision Express transkoduje i nagrywa płytę NeroVision Express kodar om och bränner skivan E PT TR PL SV Felicitaciones su disco se ha grabado con éxito Ahora puede salir de la aplicación Parabéns seu disco foi gravado com sucesso Você pode sair do aplicativo agora Tebrikler diskiniz başarıyla yazdırıldı Uyg...

Page 56: ...56 HowTo_Ext_RW_Nero7 qxd 17 08 2006 13 54 Pagina 56 ...

Page 57: ...ki nasıl oluşturulur Nagrywanie płyt audio lub danych Hur går det till att göra en ljud eller dataskiva 1 Inicie Nero StartSmart Inicie o Nero StartSmart Nero StartSmart ı başlatın Uruchom program Nero StartSmart Starta Nero StartSmart UK E PT TR PL SV HowTo_Ext_RW_Nero7 qxd 17 08 2006 13 54 Pagina 57 ...

Page 58: ...dio kliknij Utwórz Audio CD För en ljudskiva väljer du Skapa Audio CD Para datos elija Crear CD de datos o Crear DVD de datos Para dados selecione Criar CD de dados ou Criar DVD de dados Veriler için Veri CD si Yarat veya Veri DVD si Yarat ı seçin W przypadku danych kliknij Utwórz dysk CD z danymi lub Utwórz dysk DVD z danymi För data väljer du Skapa Data CD eller Skapa Data DVD 4 3 2 E PT TR PL S...

Page 59: ...m dosyaları seçin ve Ekle ye tıklayın Bittiğinde Kapat a tıklayın Wybierz wszystkie pliki do nagrania i kliknij Dodaj Po zakończeniu kliknij Zamknij Markera alla filer som ska brännas och klicka på Lägg till Klicka på Stäng när du är klar E PT TR PL SV Compruebe sus archivos y haga clic en Siguiente Verifique seus arquivos e clique em Avançar Dosyalarınızı kontrol edin ve İleri ye tıklayın Sprawdź...

Page 60: ...gravado com sucesso Você pode sair do aplicativo agora Tebrikler diskiniz başarıyla yazıldı Uygulamadan şimdi çıkabilirsiniz Gratulacje Zapis płyty zakończył się pomyślnie Możesz zakończyć pracę programu Grattis du har bränt en skiva Du kan stänga programmet nu Nero está grabando su disco O Nero está gravando seu disco Nero diskinizi yakıyor Program Nero rozpocznie nagrywanie płyty Nero bränner sk...

Page 61: ...ur går det till att kopiera en skiva 1 Inicie Nero StartSmart Essentials Inicie o Nero StartSmart Essentials Nero StartSmart Essentials ı başlatın Uruchom program Nero StartSmart Essentials Starta Nero StartSmart Essentials UK E PT TR PL SV HowTo_Ext_RW_Nero7 qxd 17 08 2006 13 54 Pagina 61 ...

Page 62: ...Seleccione la unidad de destino y haga clic en Copiar Selecione a unidade de destino e clique em Copiar Hedef sürücüyü seçin ve Kopyala ya tıklayın Wybierz napęd docelowy i kliknij Kopiuj Välj målenhet och klicka på Kopiera Seleccione la unidad de origen Selecione a unidade de origem Kaynak sürücüyü seçin Wybierz napęd źródłowy Välj källenhet 4 3 2 E PT TR PL SV E PT TR PL SV E PT PL SV TR HowTo_E...

Page 63: ...co se ha grabado con éxito Ahora puede salir de la aplicación Parabéns seu disco foi gravado com sucesso Você pode sair do aplicativo agora Tebrikler diskiniz başarıyla yazıldı Uygulamadan şimdi çıkabilirsiniz Gratulacje Zapis płyty zakończył się pomyślnie Możesz zakończyć pracę programu Grattis du har bränt en skiva Du kan stänga programmet nu E PT TR PL SV HowTo_Ext_RW_Nero7 qxd 17 08 2006 13 54...

Page 64: ...vicio de Atención al Cliente de Philips Hay información adicional sobre la garantía en la carpeta Philips Warranty del disco del software Nero La realización de copias no autorizadas de materiales protegidos contra copias incluyendo programas de ordenador archivos emisiones y grabaciones de sonido puede ser una violación de derechos de propiedad intelectual y constituir un delito Este equipo no de...

Page 65: ...o ao Cliente da Philips Há informações adicionais sobre a garantia disponíveis no folheto Garantia da Philips no disco do software Nero A cópia não autorizada de material protegido por direitos autorais incluindo programas de computação arquivos transmissões e gravações de áudio poderá infringir direitos autorais e constituir crime Este equipamento não deve ser usado para tais propósitos MarcaWEEE...

Page 66: ...söründe bulabilirsiniz Bilgisayar programlari dosyalar yayimlar ve ses kayitlari dahil kopyalanmasi korunan bilgilerin yetkisiz kopyalanmasi kopya haklarna tecavüz olarak kabul edilebilir ve cezalandirilmasi gereken bir suçu olusturabilir Bu cihaz bu gibi amaçlarla kullanilmamalidir WEEE İşareti Eski ürününüzün atılması Ürününüz geri dönüşüme tabi tutulabilen ve yeniden kullanılabilen yüksek kalit...

Page 67: ...ncji są dostępne w folderze Philips Warranty na płycie z programem Nero Dokonywanie nielegalnych kopii materialów chronionych przez prawo autorskie w tym programów komputerowych zbiorów przekazów radiowych i nagran moze stanowic naruszenie praw autorskich i czyn zabroniony prawem karnym Ten sprzet nie moze byc uzywany w takich celach OznaczenieWEEE Usuwanie zużytych produktów Niniejszy produkt zos...

Page 68: ...antiinformation finns i mappen Philips garanti på Nero programvaruskivan Det kan vara straffbart att kränka andras upphovsrättigheter vid olovlig framställning av kopior av kopieringsbeskyddat material såsom dataprogram filer tv utsåndningar och ljudupptagningar Denna product får icke användas till dessa ändamål WEEE märkning Kassering av din gamla produkt Produkten är utvecklad och tillverkad av ...

Page 69: ...69 Notes HowTo_Ext_RW_Nero7 qxd 17 08 2006 13 54 Pagina 69 ...

Page 70: ...Notes 70 HowTo_Ext_RW_Nero7 qxd 17 08 2006 13 54 Pagina 70 ...

Page 71: ...orkstations weighing less than 18 kg LASER SAFETY This unit employs a laser Do not remove the cover or attempt to service this device when connected due to the possibility of eye damage LASER SICHERHEIT In das Gerät ist ein Laser eingebaut Nehmen Sie die Abdeckung nicht ab und versuchen Sie nicht das Gerät zu reparieren solange es angeschlossen ist Es besteht die Gefahr einer Augenverletzung CAUTI...

Page 72: ...All dimensions shown are approximate 2006 Koninklijke Philips Electronics N V All rights reserved Reproduction copying usage modifying hiring renting public performance transmission and or broadcasting in whole or part is prohibited without the written consent of Philips Electronics N V 9305 125 2474 3 HowTo_Ext_RW_Nero7 qxd 17 08 2006 13 54 Pagina 72 ...

Reviews: