background image

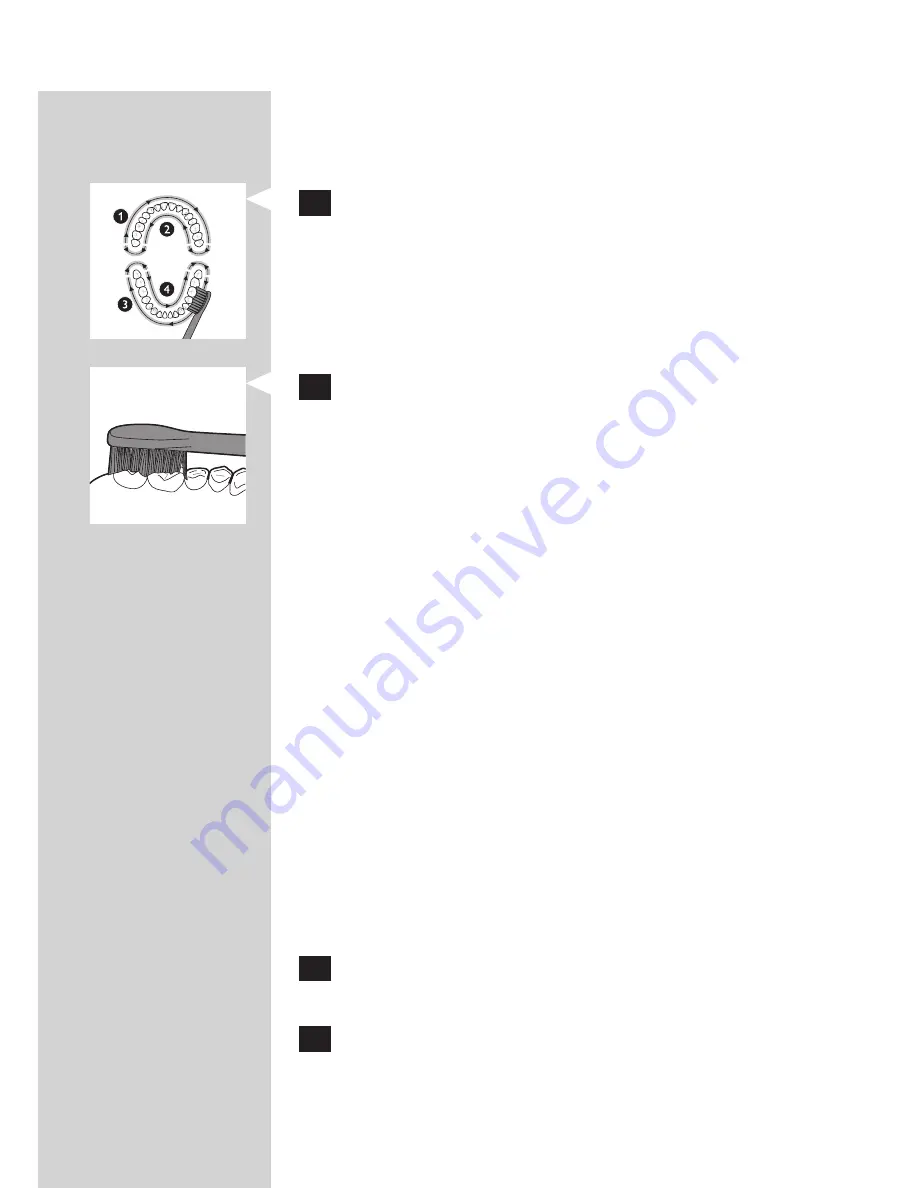
Note: To make sure you brush evenly throughout the 

mouth, divide your mouth into 4 sections using the 

Quadpacer feature (see chapter ‘Features’).

 6 

 Brush each section for 30 seconds for a total 

brushing time of 2 minutes. Start with section 

1 (outside top teeth) and then brush section 

2 (inside top teeth). Continue with section 

3 (outside bottom teeth) and finally brush 

section 4 (inside bottom teeth).

 7 

 After you have completed the brushing 

cycle, you can spend additional time brushing 

the chewing surfaces of your teeth and areas 

where staining occurs. You may also brush your 

tongue, with the toothbrush switched on or 

off, as you prefer.

The Sonicare is safe to use on:

 - Braces (brush heads wear out sooner when used 

on braces)

 - Dental restorations (fillings, crowns, veneers)

Note: You can switch the toothbrush on or off at any 

time by pressing and holding the power on/off button 

for 2 seconds.
clean and White mode brushing 

instructions

The Clean and White mode combines 2 minutes 

of Clean mode for a whole mouth clean, with an 

additional 30 seconds of White mode to focus on 

the visible front teeth.

 1 

 Brush the first 2 minutes as instructed in steps 

1-6 above.

 2 

 After the 2 minutes of Clean mode, the White 

mode begins with a change in brushing sound 

and motion. This is your signal to start brushing 

the upper front teeth for 15 seconds.

EngliSH

11

Summary of Contents for Sonicare HealthyWhite

Page 1: ...HealthyWhite Rechargeable SonicToothbrush ...

Page 2: ...1 ...

Page 3: ...HealthyWhite Rechargeable Sonic toothbrush English 4 Deutsch 22 Español 43 Français 63 Italiano 83 Nederlands 103 Português 124 ...

Page 4: ...nitiser away from water Do not place or store it over or near water contained in a bathtub washbasin sink etc Do not immerse the charger and or sanitiser in water or any other liquid After cleaning make sure the charger and or sanitiser is completely dry before you connect it to the mains Warning The mains cord cannot be replaced If the mains cord is damaged discard the charger and or sanitiser Al...

Page 5: ... Consumer Care Centre in your country see chapter Guarantee and support This appliance can be used by children aged from 8 years and above and by persons with reduced physical sensory or mental capabilities or lack of experience and knowledge if they have been given supervision or instruction concerning use of the appliance in a safe way and if they understand the hazards involved Cleaning and use...

Page 6: ...you have had oral or gum surgery in the previous 2 months consult your dentist before you use the toothbrush Consult your dentist if excessive bleeding occurs after using this toothbrush or if bleeding continues to occur after 1 week of use Also consult your dentist if you experience discomfort or pain when you use the Sonicare The Sonicare toothbrush complies with the safety standards for electro...

Page 7: ...care device and is not intended for use on multiple patients in a dental practice or institution Stop using a brush head with crushed or bent bristles Replace the brush head every 3 months or sooner if signs of wear appear Do not use other brush heads than the ones recommended by the manufacturer If your toothpaste contains peroxide baking soda or bicarbonate common in whitening toothpastes thorou...

Page 8: ...ter the sanitising cycle Do not touch the UV light bulb when it is hot Do not operate the sanitiser without the protective screen in place to avoid contact with a hot bulb If the sanitiser has been used for 3 consecutive UV clean cycles i e 3 times in a row switch it off for at least 30 minutes before ou start another UV clean cycle Electromagnetic fields EMF This Philips appliance complies with a...

Page 9: ...t shown Sanitiser drip tray Not shown Protective screen for UV light bulb Note The contents of the box vary based on the type purchased Preparing for use Attaching the brush head 1 Align the front of the brush head with the front of the handle 2 Firmly press the brush head down onto the metal shaft until it stops Charging the appliance 1 Put the plug of the charger in a wall socket 2 Place the han...

Page 10: ...fully charged you may keep the Sonicare on the charger when it is not in use It takes 24 hours to fully charge the battery Using the appliance Brushing instructions 1 Wet the bristles and apply a small amount of toothpaste 2 Place the toothbrush bristles against the teeth at a slight angle towards the gumline 3 Press the power on off button to switch on the Sonicare 4 Apply light pressure to maxim...

Page 11: ...r tongue with the toothbrush switched on or off as you prefer The Sonicare is safe to use on Braces brush heads wear out sooner when used on braces Dental restorations fillings crowns veneers Note You can switch the toothbrush on or off at any time by pressing and holding the power on off button for 2 seconds Clean and White mode brushing instructions The Clean and White mode combines 2 minutes of...

Page 12: ... switched on Clean mode Standard mode for superior teeth cleaning Sensitive mode specific types only Gentle yet thorough cleaning for sensitive gums and teeth Clean and White mode 2 minutes of Clean mode with an additional 30 seconds of White mode to focus on your visible front teeth Note When Sonicare is used in clinical studies the default 2 minute Clean mode must be selected However in whitenin...

Page 13: ...s inactive Deactivating or activating the Easy start feature 1 Attach your brush head to the handle 2 Place the handle on the plugged in charger To deactivate Easy start Press and hold the power on off button for 2 seconds You hear 1 beep to indicate that the Easy start feature has been deactivated To activate Easy start Press and hold the power on off button for 2 seconds You hear 2 beeps to indi...

Page 14: ... paused for 30 seconds or longer the handle is placed on the charger Quadpacer specific types only The Quadpacer is an interval timer that has a short beep and pause to remind you to brush the 4 sections of your mouth evenly and thoroughly When you use the two minute Clean or Sensitive mode you hear a short beep and a pause in brushing action at 30 60 and 90 second intervals When you use the Clean...

Page 15: ...onsumer Care if The window is broken or missing from the sanitiser The UV light bulb remains on when the door is open The sanitiser gives off smoke or a burning smell while it is operating Note UV light can be harmful to the human eye and skin Keep the sanitiser out of reach of children at all times 1 After brushing rinse the brush head and shake off excess water Do not place the travel cap on the...

Page 16: ... is closed properly Note The sanitiser stops if you open the door during the sanitising cycle Note The sanitiser cycle runs for 10 minutes and then automatically switches off The sanitiser is in operation when the blue light glows through the window When the sanitising cycle is complete the sanitiser automatically shuts off Cleaning Do not clean the brush head handle charger or UV sanitiser in the...

Page 17: ...re cleaning 2 Use a damp cloth to wipe the surface of the charger UV sanitiser specific types only Do not immerse the sanitiser in water or rinse it under the tap Do not clean the sanitiser when the UV light bulb is hot For optimal effectiveness it is recommended to clean the sanitiser every week 1 Unplug the sanitiser 2 Pull the drip tray straight out Rinse the drip tray and wipe it clean with a ...

Page 18: ...al clasp and push the bulb into the clasp 8 Reinsert the protective screen To reinsert the screen align the pegs on the screen with the slots on the reflective surface near the UV light bulb Push the screen straight into the slots on the sanitiser Storage If you are not going to use the appliance for an extended period of time remove the mains plug from the wall socket Then clean the appliance and...

Page 19: ... accessories To buy accessories or spare parts visit www shop philips com service or go to your Philips dealer You can also contact the Philips Consumer Care Centre in your country see the worldwide guarantee leaflet for contact details Environment Do not throw away the appliance or the UV light bulb bulb contains mercury with the normal household waste at the end of its life but hand it in at an ...

Page 20: ... This process is not reversible To remove the rechargeable battery you need a flat head standard screwdriver Observe basic safety precautions when you follow the procedure described below Be sure to protect your eyes hands fingers and the surface on which you work 1 Remove the toothbrush from the charger switch it on and let it operate until it stops Continue to switch on the Sonicare until the ba...

Page 21: ...arrier Guarantee and support If you need information or support please visit www philips com support or read the separate worldwide guarantee leaflet Guarantee restrictions The terms of the international guarantee do not cover the following Brush heads Damage caused by use of unauthorised replacement parts Damage caused by misuse abuse neglect alterations or unauthorised repair Normal wear and tea...

Page 22: ...fmerksam durch und bewahren Sie sie für eine spätereVerwendung auf Gefahr Halten Sie das Ladegerät und oder die UV Reinigungsstation von Wasser fern Stellen Sie sie nicht über oder nahe einer mit Wasser gefüllten Badewanne bzw einem Waschbecken ab Tauchen Sie Ladegerät und oder Reinigungsstation nicht in Wasser oder andere Flüssigkeiten Schließen Sie das Ladegerät und oder die Reinigungsstation na...

Page 23: ... der Nähe von heißen Oberflächen Bedienen Sie die Reinigungsstation nicht an Orten an denen Sprühprodukte verwendet werden oder Sauerstoff verabreicht wird Benutzen Sie das Gerät nicht wenn es beschädigt ist Bürstenkopf Handstück Ladegerät und oder Reinigungsstation Die Geräteteile lassen sich nicht vom Benutzer warten reparieren Ist das Gerät defekt wenden Sie sich bitte an das Philips Service Ce...

Page 24: ...beaufsichtigt Bewahren Sie das Gerät und das Kabel außerhalb der Reichweite von Kindern unter 8 Jahren auf Kinder dürfen nicht mit dem Gerät spielen Benutzen Sie die UV Reinigungsstation nicht wenn die UV Lampe bei offener Klappe noch leuchtet UV Licht kann schädlich für das menschliche Auge und die Haut sein Halten Sie die UV Reini gungsstation immer von Kindern fern Achtung Reinigen Sie den Bürs...

Page 25: ... noch anhält Konsultieren Sie Ihren Zahnarzt auch wenn Sie beim Gebrauch von Sonicare Unbehagen oder Schmerz verspüren Die Sonicare Zahnbürste entspricht den Sicherheitsstandards für elektromagnetische Geräte Wenn Sie alsTräger eines Herzschrittmachers oder eines anderen Implantats Fragen zurVerwendung des Geräts haben setzen Sie sich bitte mit Ihrem Arzt oder dem Hersteller des Schrittmachers ode...

Page 26: ...erwendung durch mehrere Patienten in einer Zahnarztpraxis oder Zahnklinik geeignet Benutzen Sie keinen Bürstenkopf mit abgeknickten oder zerdrückten Borsten Tauschen Sie den Bürstenkopf spätestens nach 3 Monaten oder sobald Abnutzungserscheinungen zu erkennen sind aus Benutzen Sie nur die vom Hersteller für diese Zahnbürste empfohlenen Bürstenköpfe BeiVerwendung peroxid natron oder bikarbonathalti...

Page 27: ...d direkt nach dem Reini gungsvorgang ist die UV Lampe heiß Berühren Sie die heiße UV Lampe nicht Verwenden Sie die UV Reinigungs station nicht ohne den aufgesetzten Schutzschirm um einen Kontakt mit der heißen Lampe zu vermeiden Wenn die Reinigungsstation 3 UV Reinigungszyklen hintereinander durchlaufen hat schalten Sie sie mindestens 30 Minuten lang aus bevor Sie einen weiteren UV Reinigungszyklu...

Page 28: ...inigungsstation mit integriertem Ladegerät und Kabelaufwicklung Nicht abgebildet UV Lampe Nicht abgebildet Abtropfschale der UV Reinigungsstation Nicht abgebildet Schutzschirm für UV Lampe Hinweis Abhängig vom gekauften Modell kann der Packungsinhalt variieren Für den Gebrauch vorbereiten Den Bürstenkopf befestigen 1 Richten Sie dieVorderseite des Bürstenkopfs an derVorderseite des Handstücks aus ...

Page 29: ...erlich grün leuchtendes Licht 50 100 Blinkendes grünes Licht 10 49 Blinkendes gelbes Licht Weniger als 10 Standard Ladestandsanzeige nur bestimmte Gerätetypen Kontinuierlich grün leuchtendes Licht 50 100 Blinkendes grünes Licht Weniger als 50 Hinweis Wenn der Akku der Sonicare fast leer ist hören Sie nach Ablauf des Putzzyklus 3 Signaltöne und die Akkuladestandsanzeige blinkt 30 Sekunden lang Hinw...

Page 30: ...m in kleinen Vorwärts und Rückwärtsbewegungen so über die Zähne dass die längeren Borsten in die Zahnzwischenräume gelangen Verfahren Sie auf diese Weise bis zum Ende des Putzvorgangs Hinweis Damit alle Zähne gleichmäßig geputzt werden teilen Sie Ihren Mund mit der Quadpacer Funktion in vier Abschnitte auf siehe Produktmerkmale 6 Bürsten Sie jeden Abschnitt 30 Sekunden lang bei einer Gesamtputzzei...

Page 31: ...eitung für den Clean White Modus Der Clean White Modus umfasst einen 2 minütigen Clean Modus für die Reinigung des gesamten Mundraums und zusätzlich einen 30 Sekunden dauernden White Modus zur gründlichen Reinigung der sichtbarenVorderzähne 1 Putzen Sie Ihre Zähne in den ersten 2 Minuten wie in den Schritten 1 6 beschrieben 2 Nach 2 Minuten im Clean Modus setzt der White Modus ein Dies erkennen Si...

Page 32: ...dmodus für überragende Zahnreinigung Sensitive Modus nur bestimmte Gerätetypen Sanfte und doch gründliche Reinigung für empfindliches Zahnfleisch und Zähne Clean White Modus 2 minütiger Clean Modus plus 30 Sekunden White Modus für die sichtbarenVorderzähne Hinweis Wird die Sonicare in klinischen Studien eingesetzt muss der standardmäßig eingestellte 2 minütige Clean Modus angewandt werden Für Stud...

Page 33: ...t Funktion deaktiviert Die Easy Start Funktion deaktivieren bzw aktivieren 1 Setzen Sie den Bürstenkopf auf das Handstück 2 Stellen Sie das Handstück in das an das Stromnetz angeschlossene Ladegerät So deaktivieren Sie Easy Start Halten Sie den Ein Ausschalter 2 Sekunden gedrückt Sie hören einen Signalton sobald die Easy Start Funktion deaktiviert ist So aktivieren Sie Easy Start Halten Sie den Ei...

Page 34: ...degerät stellen Quadpacer nur bestimmte Gerätetypen Der Quadpacer ist ein Intervalltimer mit einem kurzen akustischen Signal gefolgt von einer Pause damit die 4 Abschnitte des Mundes gründlich und gleichmäßig geputzt werden Wenn Sie den 2 minütigen Clean oder Sensitive Modus verwenden hören Sie einen kurzen Signalton und der Putzvorgang wird nach 30 60 und 90 Sekunden jeweils kurz unterbrochen Im ...

Page 35: ...ngsstation von der Stromversorgung verwenden Sie sie nicht mehr und wenden Sie sich an den Kundendienst Das Fenster der Reinigungsstation ist zerbrochen oder fehlt Die UV Lampe leuchtet weiterhin wenn die Klappe geöffnet ist Die Reinigungsstation verströmt bei Betrieb Rauch oder Brandgeruch Hinweis UV Licht kann für das menschliche Auge und die Haut schädlich sein Die Reinigungsstation sollte stet...

Page 36: ...ecken Sie den Netzstecker in eine Steckdose 5 Schließen Sie die Klappe und drücken Sie den grünen Ein Ausschalter für den Start des UV Reinigungsvorgangs einmal Hinweis Die Reinigungsstation lässt sich nur bei geschlossener Klappe einschalten Hinweis Die UV Reinigungsstation hält denVorgang an wenn Sie die Klappe während der Reinigung öffnen Hinweis Der Reinigungszyklus dauert 10 Minuten danach sc...

Page 37: ...a diese dadurch beschädigt werden kann 2 Wischen Sie die Oberfläche des Handstücks mit einem feuchten Tuch ab Bürstenkopf 1 Spülen Sie Bürstenkopf und Borsten nach jedem Gebrauch unter fließendem Wasser ab 2 Nehmen Sie einmal pro Woche den Bürstenkopf vom Handstück und spülen Sie dieVerbindung zwischen Bürstenkopf und Handstück mit warmem Wasser ab Ladegerät 1 Trennen Sie vor dem Reinigen den Netz...

Page 38: ...nd wischen Sie sie mit einem feuchten Tuch nach 3 Reinigen Sie alle Oberflächen im Inneren mit einem feuchten Tuch 4 Nehmen Sie den Schutzschirm vor der UV Lampe heraus Um den Schutzschirm zu entfernen greifen Sie die Ecken der Schnappvorrichtungen drücken Sie sie behutsam zusammen und ziehen Sie den Schutzschirm heraus 5 Nehmen Sie die UV Lampe heraus Halten Sie die Lampe fest und ziehen Sie sie ...

Page 39: ...en und an einem kühlen trockenen Ort ohne direkte Sonneneinstrahlung aufbewahren Das Kabel kann in der Kabelaufwicklung an der Reinigungsstation aufbewahrt werden nur bestimmte Gerätetypen Bürstenköpfe können auf den Stiften auf der Rückseite des Ladegeräts aufbewahrt werden Ersatz Bürstenkopf Um optimale Ergebnisse zu erzielen tauschen Sie Sonicare Bürstenköpfe spätestens nach 3 Monaten aus Verwe...

Page 40: ...s Gerät am Ende seiner Lebensdauer in den normalen Hausmüll sondern bringen Sie dieTeile zum Recycling zu einer offiziellen Sammelstelle Der integrierte Akku der Sonicare enthält Substanzen die die Umwelt gefährden können Entfernen Sie den Akku bevor Sie das Gerät an einer offiziellen Recyclingstelle abgeben Geben Sie den gebrauchten Akku bei einer Batteriesammelstelle ab Falls Sie beim Entfernen ...

Page 41: ...er ein bis der Akku völlig leer ist 2 Stecken Sie einen Standard Schraubendreher in den Schlitz an der Unterseite des Handstücks Drehen Sie den Schraubendreher gegen den Uhrzeigersinn um die Bodenabdeckung zu lösen 3 Legen Sie das Handstück auf eine feste Oberfläche mit den Tasten nach oben Klopfen Sie leicht mit einem Hammer 2 5 cm vom unteren Rand auf das Gehäuse 4 Halten Sie das Handstück kopfü...

Page 42: ...den Geräteteile Schäden unterliegen nicht den Bedingungen der internationalen Garantie Bürstenköpfe Schäden die durch den Gebrauch von nicht zugelassenen Ersatzteilen verursacht werden Schäden durch Missbrauch falsche Benutzung Fahrlässigkeit Manipulation oder Reparatur durch Unbefugte Normale Abnutzungserscheinungen wie abgeschlagene Stellen Kratzer Abschürfungen Verfärbungen oderVerblassen UV La...

Page 43: ...arlo en el futuro Peligro Mantenga el cargador y o el higienizador alejados del agua No los coloque ni guarde por encima o cerca del agua contenida en bañeras lavabos fregaderos etc No sumerja el cargador ni el higienizador en agua ni en otros líquidos Después de limpiarlos asegúrese de que el cargador y o el higienizador estén completamente secos antes de enchufarlos a la red eléctrica Advertenci...

Page 44: ...n el higienizador Este aparato contiene piezas que no son reemplazables Si el aparato está dañado póngase en contacto con el Servicio de Atención al Cliente de Philips en su país consulte el capítulo Garantía y asistencia Este aparato puede ser usado por niños a partir de 8 años y por personas con su capacidad física psíquica o sensorial reducida y por quienes no tengan los conocimientos y la expe...

Page 45: ...tenga el higienizador fuera del alcance de los niños en todo momento Precaución No lave el cabezal del cepillo el mango el cargador la cubierta del cargador ni el higienizador en el lavavajillas Consulte a su dentista antes de utilizar este cepillo dental si ha sufrido cirugía oral o de las encías en los 2 últimos meses Consulte a su dentista si se produce un sangrado excesivo después de usar este...

Page 46: ...o los dientes las encías y la lengua No lo utilice con otra finalidad Deje de utilizar este aparato y consulte a su médico si experimenta algún tipo de dolor o molestia El cepillo dental Sonicare es un aparato de higiene personal y no ha sido concebido para su uso en múltiples pacientes de clínicas o instituciones No utilice un cabezal de cepillo si tiene las cerdas aplastadas o curvadas Sustituya...

Page 47: ... objetos que bloqueen estas rejillas ejemplos de objetos revistas papel de cocina y pelo La lámpara de rayos UV está caliente durante e inmediatamente después del ciclo de higienización No toque la lámpara de rayos UV cuando esté caliente Para evitar el contacto con la lámpara caliente no utilice el higienizador si la pantalla protectora no está colocada en su sitio Si el higienizador se ha utiliz...

Page 48: ...carga de lujo sólo en modelos específicos Indicador de carga estándar sólo en modelos específicos 7 Cargador de viaje 8 Higienizador por rayos UV con cargador y recogecable incorporados No se muestra lámpara de rayos UV No se muestra bandeja antigoteo del higienizador No se muestra pantalla protectora para la lámpara de rayos UV Nota El contenido de la caja varía en función del modelo que adquiera...

Page 49: ...ible en la batería Indicador de carga de lujo sólo en modelos específicos Verde permanente 50 100 Verde parpadeante 10 49 Amarillo parpadeante menos del 10 Indicador de carga estándar sólo en modelos específicos Verde permanente 50 100 Amarillo parpadeante menos del 50 Nota Si la carga de la batería del Sonicare está baja oirá 3 pitidos después de completar un ciclo de cepillado y el indicador de ...

Page 50: ...ueño movimiento hacia delante y hacia atrás de forma que las cerdas más largas lleguen a los espacios interdentales Continúe con este movimiento durante el ciclo de cepillado Nota Para asegurar el cepillado uniforme de toda la boca divida la cavidad bucal en 4 secciones mediante la función Quadpacer consulte el capítulo Características 6 Cepille cada sección durante 30 segundos durante un tiempo t...

Page 51: ...tón de encendido apagado durante 2 segundos Instrucciones de cepillado en el modo Clean White El modo Clean White combina 2 minutos de modo Limpieza para una limpieza completa de la boca con 30 segundos adicionales del modo Blanqueado para insistir en los dientes anteriores 1 Cepíllese los dientes los primeros 2 minutos como se indica en los pasos del 1 al 6 anteriores 2 Después de los 2 minutos d...

Page 52: ...rior de los dientes Modo Sensitive Suave sólo en modelos específicos Limpieza suave y en profundidad para dientes y encías sensibles Modo Clean White Limpieza y Blanqueado 2 minutos de modo Limpieza con 30 segundos adicionales en modo Blanqueado para insistir en los dientes anteriores Nota Cuando se utiliza Sonicare en estudios clínicos se debe seleccionar el modo Limpieza predeterminado de 2 minu...

Page 53: ...á activada Cómo desactivar o activar la función Easy start 1 Fije el cabezal del cepillo al mango 2 Coloque el mango en el cargador enchufado Para desactivar la función Easy start Mantenga pulsado el botón de encendido apagado durante 2 segundos Oirá 1 pitido que indica que se ha desactivado la función Easy start Para activar la función Easy start Mantenga pulsado el botón de encendido apagado dur...

Page 54: ... la función Smartimer continuará desde donde se detuvo Smartimer se volverá a ajustar automáticamente al inicio de un ciclo de 2 minutos si se interrumpe el cepillado durante 30 segundos o más el mango está colocado en el cargador Quadpacer solo en modelos específicos Quadpacer es un temporizador de intervalos que utiliza un pitido corto y una pausa para ayudarle a cepillarse las 4 secciones de la...

Page 55: ...r puede utilizar el recogecable de la parte inferior del higienizador para guardar el cable sobrante Higienizador sólo en modelos específicos Con el higienizador por rayos UV puede limpiar el cabezal del cepillo después de cada uso Desenchufe el higienizador deje de utilizarlo y llame al Servicio de Atención al Cliente si La ventana está rota o se ha desprendido del higienizador La lámpara de rayo...

Page 56: ... encajar Sonicare Nota No limpie cabezales de cepillo Sonicare For Kids en el higienizador 4 Enchufe la clavija a la toma de corriente 5 Cierre la puerta y pulse el botón verde de encendido apagado una vez para seleccionar el ciclo de limpieza de rayos UV Nota El higienizador solo se puede encender si la puerta está bien cerrada Nota El higienizador se apaga si se abre la puerta durante el ciclo d...

Page 57: ...co con ningún objeto afilado ya que podría dañarla 2 Utilice un paño húmedo para limpiar la superficie del mango Cabezal del cepillo 1 Enjuague siempre el cabezal y las cerdas después de cada uso 2 Quite el cabezal del cepillo del mango y enjuague la conexión del cabezal del cepillo al menos una vez a la semana con agua caliente Cargador 1 Desenchufe el cargador antes de limpiarlo 2 Utilice un pañ...

Page 58: ...tar la pantalla protectora agarre los bordes cerca de los botones de presión apriete suavemente y extráigala 5 Quite la lámpara de rayos UV Para quitar la lámpara de rayos UV agárrela y sáquela del casquillo metálico 6 Limpie la pantalla protectora y la lámpara de rayos UV con un paño húmedo 7 Vuelva a colocar la lámpara de rayos UV Para volver a colocar la lámpara alinee la parte inferior de la m...

Page 59: ...cepillo Sustituya los cabezales de Sonicare cada 3 meses para conseguir unos resultados óptimos Utilice solo los cabezales de repuesto Sonicare originales de Philips adecuados para este modelo Lámpara de rayos UV Las lámparas de rayos UV están disponibles en el Servicio de Atención al Cliente de Philips en su país Solicitud de accesorios Para comprar accesorios o piezas de repuesto visite www shop...

Page 60: ...ogida oficial Si no puede quitar la batería puede llevar el aparato a un servicio de asistencia técnica de Philips donde la extraerán y se desharán de ella de forma no perjudicial para el medio ambiente Cómo extraer la batería recargable Este proceso no es reversible Para extraer la batería recargable se necesita un destornillador plano normal Tenga en cuenta las medidas de seguridad básicas cuand...

Page 61: ...icie sólida con los botones orientados hacia arriba y dé un ligero golpe en la carcasa a 2 5 cm del borde inferior con un martillo 4 Sujete el mango boca abajo y presione en el eje para sacar los componentes del mango 5 Introduzca el destornillador debajo del circuito junto a las conexiones de la batería y gírelo para romper las conexiones Quite el circuito y separe la batería de la carcasa de plá...

Page 62: ... garantía internacional no cubre los siguientes daños Cabezales del cepillo Deterioros causados por el uso de piezas de repuesto no autorizadas Deterioros causados por el uso inapropiado abusos negligencias alteraciones o reparaciones no autorizadas Desgaste normal incluyendo arañazos desportilladuras abrasiones desteñidos o pérdida de color Lámpara de rayos UV Español 62 ...

Page 63: ...térieur Danger Évitez tout contact du chargeur et ou de l assainisseur avec l eau Ne les placez pas et ne les rangez pas sur ou près d une baignoire d un lavabo ou d un évier Ne les plongez pas dans l eau ni dans tout autre liquide Après le nettoyage assurez vous que le chargeur et ou l assainisseur sont parfaitement secs avant de les brancher sur le secteur Avertissement Il est impossible de remp...

Page 64: ...tré Si l appareil tête de brosse manche de la brosse chargeur et ou assainisseur est endommagé cessez de l utiliser L appareil ne contient aucune pièce réparable S il est endommagé contactez le Service Consommateurs de votre pays voir le chapitre Garantie et assistance Cet appareil peut être utilisé par des enfants âgés de 8 ans ou plus des personnes dont les capacités physiques sensorielles ou in...

Page 65: ...pas jouer avec l appareil Cessez d utiliser l assainisseur si la lampe UV reste allumée alors que l appareil est ouvert Les UV peuvent être dangereux pour les yeux et la peau Tenez toujours l assainisseur hors de portée des enfants Attention Ne mettez pas la tête de brosse le manche le chargeur de voyage le couvercle du chargeur ou l assainisseur au lave vaisselle Si vous avez reçu des soins bucco...

Page 66: ...s avez des questions concernant l utilisation de la brosse à dents Sonicare avec un stimulateur cardiaque ou tout autre dispositif implanté contactez votre médecin traitant ou le fabricant de ce dispositif avant utilisation Si vous avez des problèmes de santé consultez votre médecin avant d utiliser la brosse à dents Sonicare Cet appareil a été conçu exclusivement pour le brossage des dents des ge...

Page 67: ... têtes de brosse que celles recommandées par le fabricant Si votre dentifrice contient du peroxyde du bicarbonate de soude ou du bicarbonate couramment utilisés dans les dentifrices blanchissants nettoyez bien la tête de brosse avec de l eau et du savon après chaque utilisation afin de prévenir toute fissure éventuelle du plastique N insérez pas d objets dans les orifices d entrée et de sortie d a...

Page 68: ...viter tout contact avec la lampe car elle peut être chaude Si l assainisseur a été utilisé pour 3 cycles de nettoyage UV consécutifs c est à dire 3 fois à la suite éteignez le au moins pendant 30 minutes avant de lancer un nouveau cycle de nettoyage UV Champs électromagnétiques CEM Cet appareil Philips est conforme à toutes les normes et à tous les règlements applicables relatifs à l exposition au...

Page 69: ... Chargeur de voyage 8 Assainisseur UV avec chargeur intégré et range cordon Non illustré lampe UV Non illustré plateau égouttoir de l assainisseur Non illustré écran de protection pour lampe UV Remarque Le contenu de la boîte varie selon le modèle acheté Avant utilisation Fixation de la tête de brosse 1 Alignez la partie inférieure de la tête de brosse avec la partie supérieure du manche 2 Insérez...

Page 70: ...50 100 Vert clignotant 10 49 Jaune clignotant moins de 10 Témoin de charge Standard certains modèles uniquement Vert continu 50 100 Vert clignotant moins de 50 Remarque Lorsque le niveau de charge de la batterie de la Sonicare est faible la brosse à dents émet 3 signaux sonores une fois le cycle de brossage terminé et le témoin de charge se met à clignoter pendant 30 secondes Remarque Pour que la ...

Page 71: ...c un léger mouvement de va et vient de sorte que les poils les plus longs atteignent les espaces interdentaires Continuez ainsi jusqu à la fin du cycle de brossage Remarque Pour assurer un brossage uniforme divisez votre bouche en 4 sections à l aide de la fonction Quadpacer voir le chapitre Caractéristiques 6 Brossez chaque section pendant 30 secondes jusqu à ce que les 2 minutes de brossage soie...

Page 72: ...t pendant 2 secondes Instructions de brossage pour le mode Propreté et Blancheur Le mode Propreté et Blancheur se compose d un mode Propreté de 2 minutes pour le nettoyage de toute la bouche et d un mode Blancheur de 30 secondes supplémentaires pour un nettoyage approfondi des dents visibles 1 Commencez par les 2 minutes de brossage comme indiqué aux étapes 1 6 ci dessus 2 Une fois le mode Propret...

Page 73: ...ndeur des dents et des gencives Mode Sensible certains modèles uniquement Balayage plus doux pour les dents et les gencives sensibles Mode Propreté et Blancheur Mode Propreté pendant 2 minutes puis mode Blancheur pendant 30 secondes pour un nettoyage approfondi des dents visibles Remarque Dans le cadre d études cliniques il est conseillé de sélectionner le mode Propreté de 2 minutes Toutefois dans...

Page 74: ...n de la fonction Easy start 1 Fixez la tête de brosse au manche 2 Placez le manche sur le chargeur préalablement branché Pour désactiver la fonction Easy start Appuyez sur le bouton marche arrêt et maintenez le enfoncé pendant deux secondes Un signal sonore vous indique que la fonction Easy start est désactivée Pour activer la fonction Easy start Appuyez sur le bouton marche arrêt et maintenez le ...

Page 75: ...adpacer sur certains modèles uniquement La fonction Quadpacer est un minuteur à intervalles réguliers qui émet un bref signal sonore et suspend le cycle de manière à nettoyer de façon homogène et efficace les 4 quadrants de votre bouche Lorsque vous utilisez le mode Sensible ou Propreté de 2 minutes un bref signal sonore est émis et le brossage s interrompt par intervalle de 30 60 et 90 secondes L...

Page 76: ...ommateurs si La vitre est cassée ou n a pas été fournie avec l assainisseur La lampe UV reste allumée alors que l appareil est ouvert De la fumée ou une odeur de brûlé s échappe de l assainisseur en fonctionnement Remarque Les UV peuvent être dangereux pour les yeux et la peau Tenez toujours l assainisseur hors de portée des enfants 1 Après chaque utilisation rincez la tête de brosse et secouez la...

Page 77: ...e fois sur le bouton vert marche arrêt pour sélectionner le cycle de nettoyage UV Remarque Vous ne pouvez allumer l assainisseur qu une fois le portillon correctement fermé Remarque L assainisseur cesse de fonctionner si vous ouvrez l appareil pendant le cycle d assainissement Remarque Le cycle de l assainisseur dure 10 minutes après quoi l appareil s éteint automatiquement L assainisseur est en c...

Page 78: ...étallique avec des objets pointus sous peine de l endommager 2 Essuyez la surface du manche à l aide d un chiffon humide Tête de brosse 1 Rincez la tête de brosse et les poils après chaque utilisation 2 Retirez la tête de brosse du manche et rincez la base de la tête de brosse au moins une fois par semaine à l eau chaude Chargeur 1 Débranchez le chargeur avant de procéder au nettoyage 2 Essuyez la...

Page 79: ...a lampe UV Pour retirer l écran saisissez les bords situés près des fermoirs appuyez légèrement et tirez l écran de protection 5 Retirez la lampe UV Pour retirer la lampe saisissez la et sortez la de sa fixation métallique 6 Nettoyez l écran de protection et la lampe UV à l aide d un chiffon humide 7 Réinsérez la lampe UV Pour réinsérer la lampe alignez le bas de l ampoule avec la fixation métalli...

Page 80: ...ur Remplacement Tête de brosse Pour obtenir des résultats optimaux remplacez les têtes de brosse Sonicare au moins tous les 3 mois Utilisez uniquement des têtes de brosse de rechange Philips destinées à ce modèle Lampe UV Des ampoules UV de rechange sont disponibles via le Service Consommateurs Philips de votre pays Commande d accessoires Pour acheter des accessoires ou des pièces de rechange visi...

Page 81: ... assigné à cet effet Si vous n arrivez pas à retirer la batterie vous pouvez apporter l appareil dans un Centre Service Agréé Philips qui prendra toute l opération en charge dans le respect de l environnement Retrait de la batterie rechargeable Ce processus est irréversible Pour retirer la batterie rechargeable munissez vous d un tournevis à tête plate standard Respectez les mesures de sécurité él...

Page 82: ...rie et tournez pour rompre ces connexions Retirez le circuit imprimé et séparez la batterie du boîtier en plastique Garantie et assistance Si vous avez besoin d une assistance ou d informations supplémentaires consultez le site Web www philips com support ou lisez le dépliant séparé sur la garantie internationale Limites de la garantie La garantie internationale ne couvre pas les éléments suivants...

Page 83: ...ri Pericolo Tenete il caricabatterie e o l igienizzatore lontani dall acqua Non appoggiateli né riponeteli vicino a vasche lavandini lavabi ecc Non immergete il caricabatterie e o l igienizzatore in acqua o in altre sostan ze liquide Dopo la pulizia assicuratevi che il caricabatterie e o l igienizzatore siano completamente asciutti prima di collegarli alla presa di corrente Avviso Il cavo di alime...

Page 84: ...ra caricabatterie e o igienizzatore non utilizzate in nessun caso l apparecchio Questo apparecchio non contiene parti riparabili In caso di danni dell appa recchio contattate il centro assistenza clienti del vostro paese vedere il capi tolo Garanzia e assistenza Quest apparecchio può essere usato da bambini a partire da 8 anni di età e da persone con capacità fisiche sensoriali o mentali ridotte o...

Page 85: ...portello sia aperto I raggi UV potrebbero essere nocivi per gli occhi e la pelle Tenete l igienizzatore lontano dalla portata dei bambini Attenzione Non pulite la testina il manico il caricabatterie il coperchio del caricabatterie e o l igienizzatore nella lavastoviglie Se nel corso degli ultimi 2 mesi vi siete sottoposti a interventi su denti o gengive chiedete il parere del vostro dentista prima...

Page 86: ...edico prima di utilizzare Sonicare Questo apparecchio è destinato esclusivamente alla pulizia di denti e gengive Non utilizzatelo per scopi diversi da quelli previsti Qualora avvertiate dolore durante l utilizzo contattate il vostro medico Lo spazzolino Sonicare è un apparecchio assolutamente personale e non deve essere utilizzato da più persone o presso studi dentistici Non utilizzate l apparecch...

Page 87: ...rbida o in una posizione o un luogo in cui eventuali oggetti possono bloccare le prese ad esempio riviste fazzoletti di carta e capelli La lampadina a raggi UV diventa incandescente durante e subito dopo il ciclo di igienizzazione Non toccate la lampadina a raggi UV se incandescente Non mettete l igienizzatore in funzione senza lo schermo protettivo per evitare il contatto con una lampadina Se ave...

Page 88: ...i utilizzo 6 Indicatore di ricarica batterie Indicatore di ricarica deluxe solo alcuni modelli Indicatore di ricarica standard solo alcuni modelli 7 Caricabatterie da viaggio 8 Igienizzatore UV con caricabatterie integrato e avvolgicavo Non illustrato lampadina a raggi UV Non illustrato vassoio antigoccia igienizzatore Non illustrato schermo protettivo per lampadina a raggi UV Nota il contenuto de...

Page 89: ...ricarica della batteria mostra il livello di carica residuo della batteria Indicatore di ricarica deluxe solo alcuni modelli Spia verde fissa 50 100 Spia verde lampeggiante 10 49 Spia gialla lampeggiante inferiore al 10 Indicatore di ricarica standard solo alcuni modelli Spia verde fissa 50 100 Spia verde lampeggiante inferiore al 50 Nota quando la batteria del Sonicare è quasi scarica vengono eme...

Page 90: ...ete delicatamente lo spazzolino avanti e indietro in modo che le setole più lunghe raggiungano lo spazio interdentale Procedete in questo modo per tutto il ciclo Nota Per assicurare una corretta pulizia di tutti i denti dividete la bocca in 4 sezioni utilizzando la funzione Quadpacer vedere capitolo Caratteristiche 6 Spazzolate ciascuna sezione per 30 secondi per un tempo totale di 2 minuti Inizia...

Page 91: ... d uso in modalità pulizia e sbiancamento La modalità pulizia e sbiancamento combina 2 minuti della modalità pulizia per una pulizia completa della bocca con ulteriori 30 secondi di modalità sbiancamento per concentrarsi sui denti anteriori 1 Per i primi 2 minuti attenetevi alle istruzioni delle operazioni da 1 a 6 sopra descritte 2 Dopo i primi 2 minuti in modalità pulizia la modalità sbiancament...

Page 92: ...à denti sensibili solo alcuni modelli Pulizia delicata ma efficace per denti e gengive sensibili Modalità pulizia e sbiancamento 2 minuti in modalità pulizia e 30 secondi in modalità sbiancamento per un azione più decisa sui denti anteriori maggiormente visibili Nota quando Sonicare viene impiegato per studi clinici è necessario selezionare la modalità pulizia predefinita da 2 minuti Mentre per st...

Page 93: ...vata Disattivazione attivazione della funzione Easy start 1 Inserite la testina sul manico 2 Posizionate il manico sul caricabatterie collegato alla presa di corrente Per disattivare la funzione Easy Start Tenete premuto il pulsante on off per 2 secondi Verrà emesso 1 segnale acustico per indicare la disattivazione della funzione Easy start Per attivare la funzione Easy Start Tenete premuto il pul...

Page 94: ...iene posizionata sul caricabatterie Quadpacer solo per alcuni modelli La funzione Quadpacer è un timer a intervalli che emette un breve segnale acustico e interrompe il funzionamento per indicare di pulire le 4 sezioni della bocca in modo preciso e accurato Utilizzando la modalità pulizia o la modalità denti sensibili per due minuti dopo gli intervalli di 30 60 e 90 secondi viene emesso un breve s...

Page 95: ...finestrella è rotta o mancante all interno dell igienizzatore La lampadina a raggi UV rimane accesa nonostante lo sportello sia aperto L igienizzatore emette fumo o odore di bruciato durante il funzionamento Nota i raggi UV potrebbero essere nocivi per gli occhi e la pelle Tenete l igienizzatore lontano dalla portata dei bambini 1 Dopo un ciclo di pulizia sciacquate la testina ed eliminate l acqua...

Page 96: ...pulsante on off verde per selezionare il ciclo di pulizia UV Nota potete accendere l igienizzatore solo quando lo sportello è ben chiuso Nota L igienizzatore si arresta quando viene aperto lo sportello durante il ciclo di igienizzazione Nota il ciclo di igienizzazione dura 10 minuti trascorsi i quali l igienizzatore si spegne automaticamente L igienizzatore è in funzione quando la luce blu è visib...

Page 97: ...uarnizione in gomma intorno alla parte metallica onde evitare danneggiamenti 2 Passate un panno morbido sull intera superficie del manico Testina 1 Risciacquate la testina e le setole dopo l uso 2 Rimuovete la testina dall impugnatura e sciacquate in acqua calda l attacco della testina almeno una volta a settimana Caricabatterie 1 Scollegate il caricabatterie prima di pulirlo 2 Passate un panno mo...

Page 98: ...no umido 3 Pulite tutte le superfici interne con un panno umido 4 Rimuovete lo schermo protettivo posto dinanzi alla lampadina UV Per rimuovere lo schermo protettivo afferrate le estre mità vicino ai ganci premetele delicatamente e tirate 5 Rimuovete la lampadina UV Per rimuovere la lampadina afferratela e estraetela dal gancio metallico 6 Pulite lo schermo protettivo e la lampadina UV con un pann...

Page 99: ...ite l apparecchio e riponetelo in un luogo fresco e asciutto lontano dai raggi diretti del sole Potete utilizzare la funzione avvolgicavo dell igienizzatore solo modelli specifici per riporre facilmente il cavo Potete riporre le testine sui ganci sul retro del caricabatterie Sostituzione Testina Per ottenere risultati ottimali sostituite la testina del Sonicare ogni 3 mesi Utilizzare solo testine ...

Page 100: ...i rifiuti domestici ma consegnateli a un centro di raccolta autorizzato per il riciclaggio In tal modo potrete contribuire a mantenere l ambiente pulito La batteria ricaricabile integrata dello spazzolino Sonicare contiene delle sostanze che possono inquinare l ambiente Rimuovete sempre la batteria prima dello smaltimento e portate l apparecchio presso un centro di raccolta ufficiale Smaltite la b...

Page 101: ...a non sarà completamente scarica 2 Inserite un cacciavite a testa piatta standard nella scanalatura sulla base del manico Ruotate il cacciavite in senso antiorario per rilasciare il cappuccio inferiore 3 Posizionate l impugnatura su una superficie solida e colpite leggermente con un martello il rivestimento a 2 5 cm dal margine inferiore 4 Tenete l impugnatura al contrario e premete la parte metal...

Page 102: ...azioni della garanzia I seguenti componenti sono esclusi dalla garanzia internazionale Testine Danni causati dall uso di parti di ricambio non autorizzate Danni dovuti a un uso improprio abuso trascuratezza alterazioni o riparazioni non autorizzate La normale usura incluso scheggiature graffi abrasioni scoloritura o alterazione dei colori Lampadina a raggi UV Italiano 102 ...

Page 103: ...zo nodig later te kunnen raadplegen Gevaar Houd de oplader en of de UV reiniger uit de buurt van water Plaats of bewaar deze niet in de buurt van of boven een bad wasbak gootsteen enz Dompel de oplader en of de UV reiniger nooit in water of een andere vloeistof Zorg ervoor dat de oplader en of de UV reiniger na het schoonmaken helemaal droog is voordat u deze op het stopcontact aansluit Waarschuwi...

Page 104: ...raat niet langer als het op enige wijze beschadigd is opzetborstel handvat van de tandenborstel oplader en of UV reiniger Dit apparaat bevat geen repareerbare onderdelen Als het apparaat beschadigd is neem dan contact op met het Consumer Care Centre in uw land zie hoofdstuk Garantie en ondersteuning Dit apparaat kan worden gebruikt door kinderen vanaf 8 jaar en door personen met verminderde licham...

Page 105: ...araat spelen Gebruik de UV reiniger niet meer als de UV lamp blijft branden als het deurtje open staat UV licht kan schade aan ogen en huid veroorzaken Houd de UV reiniger altijd buiten het bereik van kinderen Let op Maak de opzetborstel het handvat de oplader de opladerkap en of de UV reiniger niet schoon in de vaatwasmachine Raadpleeg uw tandarts voordat u de tandenborstel gebruikt als u in de a...

Page 106: ...voor elektromagnetische apparaten Als u een pacemaker of ander geïmplanteerd apparaat hebt neem dan contact op met uw arts of de fabrikant van het geïmplanteerde apparaat voor u de tandenborstel gaat gebruiken Raadpleeg uw arts voordat u de Sonicare gebruikt als u medische klachten hebt Dit apparaat is alleen bedoeld voor het reinigen van tanden tandvlees en de tong Gebruik het niet voor andere do...

Page 107: ...aat uitsluitend met de door de fabrikant aanbevolen opzetborstels Als uw tandpasta peroxide dan wel zuiveringszout of natriumbicarbonaat bevat veelvoorkomend in witmakende tandpasta s moet u de opzetborstel na ieder gebruik grondig schoonmaken met zeep en water Hiermee voorkomt u dat er barsten in het plastic ontstaan Stop geen voorwerpen in de luchtopeningen van de UV reiniger en voorkom dat deze...

Page 108: ...afdekscherm Zo voorkomt u contact met een hete lamp Als de UV reiniger 3 opeenvolgende UV reinigingscycli is gebruikt d w z 3 keer achter elkaar schakel het apparaat dan ten minste 30 minuten uit voordat u een volgende UV reinigingscyclus start Elektromagnetische velden EMV Dit Philips apparaat voldoet aan alle toepasbare richtlijnen en voorschriften met betrekking tot blootstelling aan elektromag...

Page 109: ...iniger met ingebouwde oplader en snoerwikkelaar Niet afgebeeld UV lamp Niet afgebeeld lekbakje voor UV reiniger Niet afgebeeld afdekscherm voor UV lamp Opmerking De inhoud van de doos kan per type verschillen Klaarmaken voor gebruik De opzetborstel bevestigen 1 Houd de opzetborstel zo vast dat de voorzijde zich op één lijn bevindt met de voorzijde van het handvat 2 Druk de opzetborstel op de metal...

Page 110: ...e alleen bepaalde typen Groen 50 100 Knippert groen 10 49 Knippert geel minder dan 10 Standaardoplaadlampje alleen bepaalde typen Groen 50 100 Knippert groen minder dan 50 Opmerking Als de accu van de Sonicare bijna leeg is hoort u aan het eind van de poetsbeurt 3 piepjes en knippert het oplaadlampje gedurende 30 seconden Opmerking Om de accu altijd volledig opgeladen te houden plaatst u de Sonica...

Page 111: ...rstel langzaam kleine stukjes heen en weer over de tanden zodat de langere haren tussen de tanden komen Ga de volledige poetsbeurt zo door Opmerking Om ervoor te zorgen dat u overal even goed poetst moet u uw mond in 4 kwadranten verdelen en de Quadpacer gebruiken zie hoofdstuk Functies 6 Poets elk kwadrant gedurende 30 seconden om zo een poetsbeurt van 2 minuten te voltooien Begin met kwadrant 1 ...

Page 112: ...elk gewenst moment in of uitschakelen door de aan uitknop 2 seconden lang ingedrukt te houden Poetsinstructies voor de Clean White modus De Clean White modus bestaat uit 2 minuten poetsen van uw volledige gebit in de Clean modus plus 30 seconden in de White modus voor extra reiniging van de zichtbare voortanden 1 Poets de eerste 2 minuten zoals wordt uitgelegd in de voorgaande stappen 1 6 2 Na 2 m...

Page 113: ...aald typen Modus voor het voorzichtig maar grondig reinigen van gevoelig tandvlees en gevoelige tanden Clean White modus 2 minuten in de Clean modus plus 30 seconden in de White modus voor extra reiniging van de zichtbare voortanden Opmerking Wanneer de Sonicare wordt gebruikt voor klinisch onderzoek moet de standaard Clean modus van 2 minuten worden gekozen Bij onderzoeken naar witmakende tandpas...

Page 114: ...asy start functie niet actief Easy start uitschakelen of inschakelen 1 Bevestig de opzetborstel op het handvat 2 Plaats het handvat op de op netspanning aangesloten oplader Easy start uitschakelen Houd de aan uitknop 2 seconden ingedrukt U hoort 1 piepje dat aangeeft dat de Easy start functie is uitgeschakeld Easy start inschakelen Houd de aan uitknop 2 seconden ingedrukt U hoort 2 piepjes die aan...

Page 115: ...urt langer dan 30 seconden onderbreekt u het handvat op de oplader plaatst Quadpacer alleen bij bepaalde typen De Quadpacer is een timer die een kort piepje laat horen en voor een korte onderbreking van de poetsbeurt zorgt om u eraan te herinneren elk van de 4 kwadranten in uw mond even lang en grondig te poetsen Als u de Clean modus of de Sensitive modus van twee minuten gebruikt hoort u na 30 60...

Page 116: ...stopcontact gebruik deze niet langer en bel Consumer Care wanneer Het venster van de UV reiniger is beschadigd of ontbreekt De UV lamp blijft branden als het deurtje open staat Er rook uit de UV reiniger komt of de UV reiniger een brandlucht verspreid wanneer deze in werking is Opmerking UV licht kan schade aan ogen en huid veroorzaken Houd de UV reiniger altijd buiten het bereik van kinderen 1 Sp...

Page 117: ... opzetborstels 4 Steek de stekker in een stopcontact 5 Sluit het deurtje en druk één keer op de groene aan uitknop om de UV reinigingscyclus te selecteren Opmerking U kunt de UV reiniger alleen inschakelen als het deurtje volledig is gesloten Opmerking De UV reiniger stopt als u het deurtje tijdens de reinigingscyclus opent Opmerking De UV reinigingscyclus duurt 10 minuten waarna de UV reiniger au...

Page 118: ... duwen omdat dit schade kan veroorzaken 2 Maak het gehele oppervlak van het handvat schoon met een vochtige doek Opzetborstel 1 Spoel de borstel en de borstelharen na iedere poetsbeurt onder de kraan af 2 Verwijder minimaal één keer per week de opzetborstel van het handvat en spoel het aansluitpunt van de borstel met warm water schoon Oplader 1 Haal de stekker uit het stopcontact voordat u de opla...

Page 119: ... doek 3 Maak alle oppervlakken aan de binnenkant schoon met een vochtige doek 4 Verwijder het afdekscherm dat zich voor de UV lamp bevindt U verwijdert het scherm door de randjes naast de vergrendelingen beet te pakken zachtjes te knijpen en het afdekscherm dan naar buiten te trekken 5 Verwijder de UV lamp Verwijder de lamp door deze vast te pakken en uit de metalen klem te trekken 6 Maak het afde...

Page 120: ...waar het op een koele en droge plaats buiten direct zonlicht U kunt de snoerwikkelaar van de UV reiniger alleen bepaalde typen gebruiken om het netsnoer netjes op te bergen U kunt de opzetborstels opbergen door ze op de pinnen op de achterkant van de oplader te plaatsen Vervanging Opzetborstel Vervang de Sonicare opzetborstels om de 3 maanden voor optimale resultaten Gebruik alleen originele Phili...

Page 121: ...en inzamelpunt om ze te laten recyclen Op die manier levert u een bijdrage aan een schonere leefomgeving De ingebouwde accu van de Sonicare bevat stoffen die schadelijk kunnen zijn voor het milieu Verwijder altijd de accu voordat u het apparaat afdankt en inlevert op een door de overheid aangewezen inzamelpunt Lever de accu in op een officieel inzamelpunt voor batterijen Als u problemen ondervindt...

Page 122: ...leeg is 2 Steek een gewone platte schroevendraaier in de sleuf in de onderkant van het handvat Draai de schroevendraaier linksom om het afdekplaatje aan de onderkant te verwijderen 3 Plaats het handvat op een stevige oppervlak met de knopjes naar boven en tik voorzichtig met een hamer op de behuizing op circa 2 5 cm afstand van de onderkant 4 Houd het handvat ondersteboven en duw het omlaag op de ...

Page 123: ...ende zaken vallen niet onder de voorwaarden van de internationale garantie Opzetborstels Beschadiging veroorzaakt door gebruik van ongeautoriseerde reserveonderdelen Schade als gevolg van verkeerd gebruik misbruik verwaarlozing wijzigingen of ongeautoriseerde reparaties Gewone slijtage inclusief kerfjes krasjes schuurplekken verkleuring of verbleking UV lamp Nederlands 123 ...

Page 124: ...nha o carregador e o Higienizador UV afastados da água Não os coloque nem os guarde sobre ou próximo de banheiras lavatórios lava loiças etc com água Nunca mergulhe o carregador e ou o Higienizador UV em água ou em qualquer outro líquido Depois da limpeza certifique se de que o carregador e o Higienizador UV estão completamente secos antes de os ligar à corrente Aviso O fio de alimentação não pode...

Page 125: ...va pega da escova carregador e ou higienizador interrompa a sua utilização Este aparelho não contém peças que possam ser reparadas Se o aparelho estiver danificado contacte o Centro de Apoio ao Cliente do seu país consulte o capítulo Garantia e assistência Este aparelho pode ser utilizado por crianças com idade igual ou superior a 8 anos e por pessoas com capacidades físicas sensoriais ou mentais ...

Page 126: ...a porta está aberta A luz UV pode ser prejudicial aos olhos e à pele Mantenha sempre o Higienizador UV fora do alcance de crianças Cuidado Não lave a cabeça da escova a pega o carregador a tampa do carregador e o Higienizador na máquina de lavar louça Se tiver sido submetido a uma cirurgia da boca ou das gengivas nos últimos 2 meses consulte o seu dentista antes de utilizar a escova de dentes Cons...

Page 127: ...izar a Sonicare Este aparelho destina se unicamente à lavagem dos dentes gengivas e língua Não o utilize para nenhum outro fim Interrompa a utilização do aparelho e contacte o seu médico caso sinta algum desconforto ou dor A escova Sonicare é um dispositivo de uso pessoal pelo que não deve ser usada em vários pacientes em consultórios ou clínicas dentárias Interrompa a utilização da cabeça da esco...

Page 128: ... o numa superfície macia ou numa posição ou localização onde haja objectos a bloquear estas aberturas exemplos de objectos revista lenços de papel e cabelo A lâmpada UV está quente durante e imediatamente após o ciclo do Higienizador UV Não toque na lâmpada UV enquanto esta estiver quente Não trabalhe com o purificador sem a estrutura de protecção colocada para evitar o contacto com lâmpadas quent...

Page 129: ...ndicador de carga padrão apenas em modelos específicos 7 Carregador de viagem 8 Higienizador UV com carregador integrado e enrolador do fio Não ilustrado Lâmpada UV Não ilustrado Tabuleiro do Higienizador UV Não ilustrado Estrutura de protecção da lâmpada UV Nota Os conteúdos da caixa variam com base no tipo de escova adquirido Preparar para a utilização Colocação da cabeça da escova 1 Alinhe a pa...

Page 130: ...as em modelos específicos Verde 50 100 Verde intermitente 10 49 Amarelo intermitente inferior a 10 Indicador de carga padrão apenas em modelos específicos Verde 50 100 Verde intermitente inferior a 50 Nota Quando a carga da bateria da Sonicare estiver fraca irá ouvir 3 sinais sonoros depois de concluído o ciclo de escovagem o indicador de carga da bateria apresentar se á intermitente durante 30 se...

Page 131: ...entes num pequeno movimento para trás e para a frente de modo a que as cerdas mais compridas alcancem os espaços interdentários Continue este movimento durante o ciclo de escovagem Nota Para se certificar de que escova toda a boca uniformemente divida a boca em 4 secções utilizando a função Quadpacer consulte o capítulo Funções 6 Escove cada secção durante 30 segundos para um período de escovagem ...

Page 132: ...mido o botão de ligar desligar durante 2 segundos Instruções para o modo de escovagem Clean and White O modo Clean and White combina 2 minutos no modo Clean para uma limpeza geral da boca e 30 segundos adicionais no modo White para se concentrar nos dentes da frente visíveis 1 Escove nos primeiros dois minutos seguindo os passos 1 6 acima descritos 2 Depois de 2 minutos no modo Clean uma alteração...

Page 133: ... Modo Sensitive apenas em modelos específicos Limpeza suave mas profunda para dentes e gengivas sensíveis Modo Clean and White 2 minutos no modo Clean seguidos de 30 segundos adicionais no modo White para se concentrar nos dentes da frente visíveis Nota Quando a Sonicare é usada em ensaios clínicos deve seleccionar se o modo Clean de 2 minutos predefinido Contudo em estudos de branqueamento reduçã...

Page 134: ...Activação ou desactivação da função Easy start 1 Coloque a cabeça da escova na pega 2 Coloque a pega no carregador ligado à corrente Para desactivar a função Easy start Prima e mantenha premido o botão de ligar desligar durante 2 segundos Irá ouvir 1 sinal sonoro indicando que a função Easy start foi desactivada Para activar a função Easy start Prima e mantenha premido o botão de ligar desligar du...

Page 135: ...0 segundos ou mais a pega for colocada no carregador Quadpacer apenas em modelos específicos O Quadpacer é um temporizador de intervalo que inclui um breve sinal sonoro e uma pausa para o relembrar de que deve escovar as 4 secções da boca de forma uniforme e cuidadosa Ao usar os modos Clean ou Sensitive de 2 minutos irá ouvir um breve sinal sonoro e sentir uma pausa na escovagem nos intervalos de ...

Page 136: ...io ao Cliente se a janela estiver partida ou não se encontrar no higienizador a lâmpada UV permanecer acesa quando a porta está aberta o higienizador libertar fumo ou um cheiro a queimado enquanto está em funcionamento Nota A luz UV pode ser nociva para o olho e a pele humana Mantenha higienizador sempre fora do alcance de crianças 1 Depois da escovagem enxagúe a cabeça da escova e sacuda o excess...

Page 137: ...o botão verde de ligar desligar uma vez para seleccionar o ciclo de limpeza UV Nota Só pode ligar o higienizador se a porta estiver fechada correctamente Nota O higienizador pára caso abra a porta durante o ciclo de desinfecção Nota O ciclo do Higienizador UV funciona durante 10 minutos desligando se depois automaticamente O higienizador está em funcionamento quando a luz azul brilha através da ja...

Page 138: ...lica com objectos afiados pois pode danificá lo 2 Utilize um pano húmido para limpar toda a superfície da pega Cabeça da escova 1 Enxagúe a cabeça da escova e as cerdas após cada utilização 2 Retire a cabeça da escova da pega e enxagúe a ligação da cabeça da escova pelo menos uma vez por semana com água morna Carregador 1 Desligue a ficha do carregador antes de proceder à limpeza 2 Utilize um pano...

Page 139: ...o húmido 3 Limpe todas as superfícies interiores com um pano húmido 4 Retire a estrutura de protecção em frente à lâmpada UV Para remover a estrutura segure nas extremidades junto aos encaixes aperte suavemente e puxe a estrutura de protecção para fora 5 Retire a lâmpada UV Para retirar a lâmpada agarre a e puxe a para fora da abraçadeira metálica 6 Limpe a estrutura de protecção e a lâmpada UV co...

Page 140: ...ocal fresco e seco afastado da luz directa do sol Pode utilizar a funcionalidade do enrolador do fio no higienizador apenas modelos específicos para guardar devidamente o fio de alimentação Pode guardar as cabeças da escova nos encaixes na parte de trás do carregador Substituição Cabeça da escova Substitua as cabeças da escova Sonicare de 3 em 3 meses para obter os melhores resultados Utilize apen...

Page 141: ...ico normal no final da sua vida útil entregue o num ponto de recolha oficial para reciclagem Ao fazê lo ajuda a preservar o ambiente A bateria recarregável incorporada da Sonicare contém substâncias que podem poluir o ambiente Retire sempre a bateria antes de eliminar o aparelho entregando o num ponto de recolha oficial Elimine a bateria num ponto de recolha oficial para baterias Se tiver problema...

Page 142: ...ma chave de parafusos plana normal na ranhura localizada na parte inferior da pega Rode a chave de parafusos para a esquerda para libertar a tampa da parte inferior 3 Coloque a pega numa superfície sólida com os botões voltados para cima e toque ligeiramente na estrutura com um martelo a 2 5 cm do rebordo inferior 4 Mantenha a pega virada ao contrário e pressione o eixo para libertar os componente...

Page 143: ...eguintes situações não estão abrangidas pelos regulamentos da garantia internacional Cabeças da escova Danos causados pela utilização de peças de substituição não autorizadas Danos causados por utilização indevida abuso negligência alterações ou reparação não autorizada Desgaste normal incluindo falhas riscos erosão descoloração ou desvanecimento Lâmpada UV Português 143 ...

Page 144: ...V All rights reserved PHILIPS and Philips shield are registered trademarks of KPENV Sonicare and the Sonicare logo are trademarks of Philips Oral Healthcare Inc and KPENV Protected by U S and international patents Other patents pending Reg U S Pat Tm Off 4235 020 7315 1 ...

Reviews: