


17
16
T
o
cancel a Sleep T
imer
, press and release the POWER button in TV Mode or
press and hold
SLEEP
until the remotes beeps twice, and the LED blinks
twice.
Notes
1.
Entering Setup using the Code Search button clears any previously set
Sleep T
imer
.
2.
If the TV Power button has been learned then the learned command is sent
when the Sleep T
imer is activated.
TV or CD/Audio V
olume/Mute Punch-Thr
ough
User selectable TV or Audio Device V
olume Punch-through is a feature which
lets you select which device is controlled by the V
olume/Mute keys. Normally
other types of remotes punch-through to the device programmed under the TV
Mode when the V
olume/Mute keys are pressed e.g. when in DVD Mode,
pressing V
olume/Mute operates the TV sound. W
ith this remote you can select
TV
, or one of the programmed Audio devices, as the volume punch-through
ta
rget e.g. if you use your A/V Amplifier for sound then pressing V
olume/
Mute buttons in any Mode can control your A/V Amplifier sound.
The Mode selected for V
olume punch-through control must be either TV
Mode, or an AUDIO Mode programmed with a CD or Audio Device. Any
other selection (VCR, DVD, CBL, SA
T) is denied with an LED “error flash.”
The power-on default is TV V
olume punch-through.
Note: When TV is the punch-through device, all CD/Audio Modes take any
V
olume/Mute button press commands from the CD/Audio code. All other
device types punch-through to TV V
olume/Mute control. When CD/Audio is
the punch-through device, all Modes take any V
olume/Mute button press
commands from that CD/Audio code.
1.
Press and hold the Code Search button until the LED remains on (after
approximately 2-3 seconds) and the Main Setup Screen is shown.
2.
Release the Code Search button.
3.
Press and hold the Mode button for device you want the V
olume buttons to
control (e.g. AUX, or AUDIO) until the LED blinks.
4.
Press
QUIT
.
The Default V
olume Control is now set for that Mode.
VCR/DVD Punch-Thr
ough
This remote lets you Punch-through to the last VCR or DVD device used.
Normally other types of remotes only punch-through (from another Mode) on
the 6 VCR carriage keys, to the device programmed under the VCR Mode key
.
This is not much use if you are using a DVD programmed under a Mode other
than VCR. This remote punches-through to the last VCR or DVD device you
used. For example, if you have 3 DVD/VCR devices programmed into this
remote, the last one you accessed on the remote will be the one that has control
Ad
v
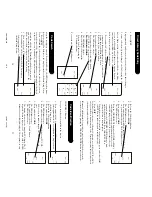
anced Options/Features
possible labels, although only the options for the Mode you selected are shown
at any one time.
Note:
1.
Resetting the Mode button labels back to their power-on default setting,
results in an automatic save for that Mode.
2.
Y
o
u cannot change the
SCREEN
button.
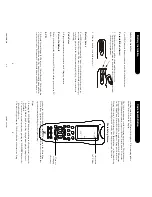
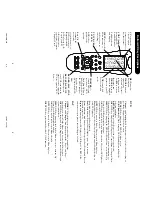
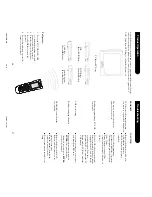
Setting
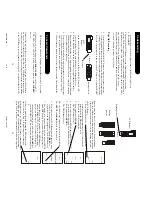
a TV
Sleep Timer
The Sleep T
imer feature lets the remote turn of
f your TV
after a period of 1 to 99 minutes. The TV Power command
is sent at the end of the timed period. The LCD
SLEEP
button is used for setting a TV Sleep T
imer and is only
available in TV Mode. The LCD
SLEEP
button is not
revealed for any other Mode that you might have set for
TV
.
1.
Press the TV Mode button.
2.
Press
SCREEN
to toggle to the TV screen that displays
the
SLEEP
button, shown here.
3.
Press and hold
SLEEP
until the LED remains on
(after approx. 2-3 seconds).
4.
Release
SLEEP
.
5.
Press and release TWO numeric keys (01-99)
for the time required. E.G., 0, then 7 for 7 secs.
The LED blinks of
f and the display
returns to normal operation.
6.
The TV Sleep T
imer is now set.
7.
Leave the Remote pointing towards your TV with an unobstructed path.
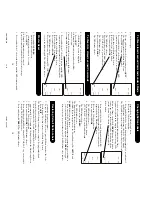
GU
ID
E
QU
IT
ME
N
U
SC
RE
EN
OK
SL
EE
P
TO
GGL
E
PIP
CC
MO
VE
SET
U
P
KE
Y
?
SL
EEP
6
4
2
5
0
1
8
3
79
MOV
E
GU
ID
E
DV
D
TA
PE
LEVE
L
VI
D
EO
RE
AR
QU
IT
EN
TE
R
CE
NT
ER
ME
N
U
FR
O
N
T
IN
PU
T
SC
REEN
IN
FO
MOD
E
SU
B-T
CD
OK
CO
D
E
BA
ND
TU
N
ER
TOGGL
E
6
4
2
5
0
1
8
3
79
PI
P
RE
TU
RN
TV
TI
TL
E
CC
SU
B
DS
P
LR
N
-B
LR
N
-A
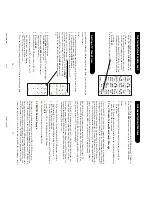
6.
The display shows the current labels for that
Mode. The
SETUP
and
SCREEN
labels are
also shown.
7.
T
o
reset the current Mode button labels back
to their Default settings, press and hold the
current Mode button (TV
, VCR, SA
T
, etc.) on
the rubber keypad until the Main Setup Screen
is shown.
8.
Press
QUIT
.
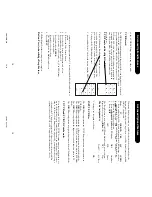
The display shown to the right shows ALL the
Restoring Default Labels, cont.
PM8TSMD.p65
12/9/02, 4:53 PM
16-17