background image

Initial operation 7

3  Initial operation

Placement

You can install the projector in the following 
configurations. Follow the guidelines below for 
different projector placement.

Notice

For overhead mounting on ceiling, 
purchase a projector mount 
recommended by an installation 
professional and follow the instructions 
that come with the mount.
Before mounting on the ceiling, make 
sure the ceiling can support the weight 
of the projector and mounting kit.
For ceiling installation, this product 
must be securely attached to the ceiling 
in accordance with the installation 
instructions. An improper ceiling 
installation may result in accident, injury 
or damage. 

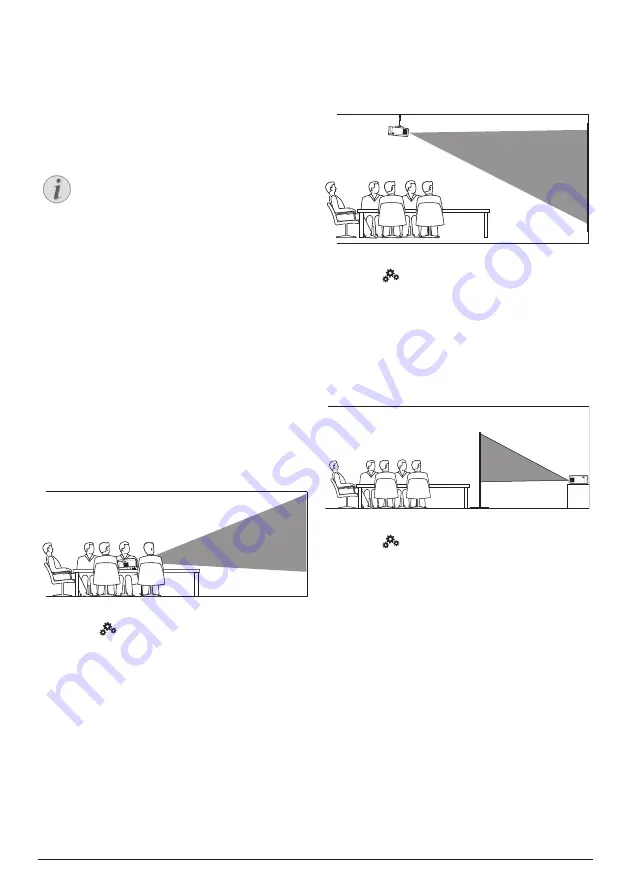
Front table

Place the projector on a table in front of the 
projection screen. This is the most common 
way to position the projector for quick 
setup and portability.

2  To adjust projection to the correct position,  

select 

 on the upper right of the home 

screen, and press 

OK

, then go to 

Projector 

Settings -


Image - Ceiling - Front.


Front ceiling

Mount the projector on the ceiling with 
upside up in front of the projection screen. 
A projector mount is required to mount the 
projector on ceiling.

2  To adjust projection to the correct position, 

select 

 on the upper right of the home 

screen, and press 

OK

, then go to 

Projector 

Settings -


Image - Ceiling - Ceiling Front.

Rear table

Place the projector on a table behind the 
projection screen. A special rear projection 
screen is required.

2  To adjust projection to the correct position, 

select 

 on the upper right of the home 

screen, and press 

OK

, then go to 

Projector 

Settings -


Image - Ceiling - Rear

.

Summary of Contents for PicoPix

Page 1: ...User Manual Register your product and get support at www philips com support PPX620 PicoPix Max Mobile Projector ...

Page 2: ...onnect to devices through HDMI 15 Connect to devices through USB C 15 Connect to external wire speakers or headphones 16 7 Browse storage devices 16 Copy files to the internal storage 17 Play video from storage devices 17 Play music from storage devices 17 Play photo from storage devices 17 8 Wireless projection 18 Screen mirroring for iOS devices and Mac 18 Cast video for iOS devices 18 Screen mi...

Page 3: ...GER Danger of personal injury This symbol gives warning of danger of personal injury Physical injury or damage can result from improper handling CAUTION Damage to the product or loss of data This symbol gives warning of damage to the product and possible loss of data Damage can result from improper handling What s in the box a Quick Start Guide b PicoPix Max projector PPX620 c Tripod ball mount at...

Page 4: ...able Have your product checked by an authorised service centre Keep the product away from open flames e g candles The product has built in battery Do not dissemble and modify The built in battery should be replaced by qualified service staff only Do not try to replace the built in battery yourself Incorrect handling of the battery or using the wrong type of battery can cause damage to the product ...

Page 5: ...n to turn the projector off Turn off the product and unplug from the power outlet before cleaning the surface see Cleaning page 21 Use a soft lint free cloth Never use liquid gaseous or easily flammable cleaners sprays abrasives polishes alcohol Do not allow any moisture to reach the interior of the product DANGER Risk of eye irritation This product is equipped with a high power LED Light Emitting...

Page 6: ...to the HDMI output on a playback device e USB A port Connect to a USB storage device for media play f 3 5 mm audio output connect to external speakers or headphones g USB C VIDEO Connect to the USB C video output on a playback device h USB C POWER Connect to the power supply Remote control OK a d e b c g f h i a Enable the on screen pointer and to click on items b Confirm a selection or entry c Ac...

Page 7: ...on a table in front of the projection screen This is the most common way to position the projector for quick setup and portability 2 To adjust projection to the correct position select on the upper right of the home screen and press OK then go to Projector Settings Image Ceiling Front Front ceiling 1 Mount the projector on the ceiling with upside up in front of the projection screen A projector mo...

Page 8: ... power adapter Then connect the power adapter to the wall outlet a b c If needed select an appropriate power plug for connecting to the wall outlet To attach a supplied power plug to the power adapter align the slots on the power plug with the two pins of the power adapter then slide the power plug in Operation by built in battery The projector can be also operated on built in battery for portabil...

Page 9: ...ed on the LED on the projector turns blue if the projector is not being charged When charging the LED on the projector turns red regardless of the projector switching on or off Change screen size The projection screen size or size of images is determined by the distance between the lens of the projector and the projection surface The projection distance needs to be 1 2 times the width of your desi...

Page 10: ... OK to perform calibration Customized correction 4 corner correction You can manually adjust the image shape by re positioning four corners of the projection image This also lets you correct for left or right position of the projector 1 Select on the upper right of the home screen and press OK then go to Projector Settings Image Keystone Correction 4 Corner Correction 2 In the 4 corner correction ...

Page 11: ...he upper right of the home screen and press OK then go to Projector Settings Bluetooth On Enable Bluetooth by selecting Switch Bluetooth if not enabled 2 Press and hold OK and on the remote control until the LED on the remote control flashes red Bluetooth on the remote control is activated 3 Select Scan for devices in the Bluetooth settings interface to search for Bleutooth devices available 4 Sel...

Page 12: ...lications setup and other useful features on the projector Access system settings You can access the system settings on the home screen 1 Press the Navigation buttons on the remote control to select the icon on the upper right of the home screen 2 Press OK on the remote control to access the options then select Projector Settings to access the system settings Access online services Some pre loaded...

Page 13: ...en use two fingers and move them on the touchpad To return to the previous screen interface level press touch button on the top of the projection Use the AirMote control Before you can use this feature make sure that the remote control is paired with the projector for AirMote control see Step 2 activate on screen pointer page 11 Use wired keyboard mouse Simply connect the USB A plug of your wired ...

Page 14: ...etwork 1 Turn on your Bluetooth speaker 2 On the projector access the Bluetooth settings Select on the upper right of the home screen and press OK then go to Projector Settings Bluetooth On Then enable Bluetooth by selecting Switch Bluetooth if not enabled 3 In the Bluetooth settings interface of the projector select your Bluetooth speaker name from the Bluetooth device list 4 The projector is con...

Page 15: ...ss OK then go to Projector Settings Input Source HDMI Connect to devices through USB C Connect a USB C device e g a mobile phone tablet or laptop to the projector through USB C connection With this connection images are shown on the projection screen and audio is played on the projector 1 Using a USB C cable connect the connector on the projector to the USB C port on the playback device HDMI MICRO...

Page 16: ...the external speakers or headphones are connected to the projector HDMI MICRO SD USB 2 When connecting to the headphones use the volume control on the remote control to adjust the volume to a comfortable level 7 Browse storage devices Through the projector you can access and play the pictures audio and video files stored on the local storage and connected storage devices e g a USB flash drive HDD ...

Page 17: ...f applicable or use the playback control bar displayed if applicable During playback press on the remote control to access more play options and settings e g play mode screen format and audio track etc then use OK and the navigation buttons on the remote control to make a selection Play music from storage devices 1 Select a music file from the content browser and press OK Then select a music playe...

Page 18: ...under Screen Mirroring to connect your iPhone to the projector Or on your Mac access the screen mirroring option located on the top of the computer screen then select the projector name to connect your Mac to the projector 3 After successful connection the screen contents of your iPhone Mac are casted to the projection surface Cast video for iOS devices You can cast videos from your iOS device on ...

Page 19: ...e screen The Miracast icon appears when you move the on screen pointer or press in the area above the app list on the home screen 2 On your Android device or Windows PC access the screen mirroring settings and select the Wireless Display option Then select the projector name under Wireless Display to connect your Android device or Windows PC to the projector 3 After successful connection the scree...

Page 20: ...ction Enable or disable auto correction of the image shape when tilting the projector upwards or downwards Calibration Perform this function if the auto keystone correction does not correct the image shape ideally 4 Corner Correction Manually adjust the image shape This function is not available when using HDMI or USB C video input Digital Zoom Scale the projection image within the range from 80 t...

Page 21: ...ohol etc Do not allow any moisture to reach the interior of the projector Do not spray the projector with any cleaning fluids Wipe over the surfaces gently Be careful that you do not scratch the surfaces Cleaning the lens Use a soft brush or lens cleaning paper for cleaning the lens of the projector DANGER Do not use any liquid cleaning agents Do not use any liquid cleaning agents for cleaning the...

Page 22: ...rojector using a USB C PD adapter the adapter must be 60W or higher and support 15V at 3A or 4A 20V is not supported The projector is charged slowly When powered on the external power will be used first to run the projector and unused power will charge the battery For faster charging charge while the projector is powered off The projector turns itself off Low battery power When the projector is ru...

Page 23: ...eck if the video output of the external device is turned on Only the home menu appears and not the image from the connected computer Check if the resolution of the computer is set to 1080P The projector cannot read the USB stick The projector does not support the exFAT file system Format the USB stick in FAT format then use it The projector does not react to remote control commands Check the batte...

Page 24: ...equency range Your smartphone is not fast enough to compress the screen data and send it simultaneously over WiFi Your smartphone may maintain parallel connections to your home network and the projector This will reduce the available bandwidth Disabling temporarily the connection to your home network may help The temperature of the projector s surface is warm For this projector it is normal to gen...

Page 25: ...roid Sound Internal speaker 2 x 4W Connection Wi Fi 802 11a b g n ac 2 4 5GHz Airplay Miracast Bluetooth Bluetooth 5 0 connect external speaker Connectivity 2x USB Type C power and video 1x USB A 1x HDMI 1x Micro SD Power source Power adapter Input 100 240V 50 60Hz 1 5A max PD output DC 5V 3A DC 9V 3A DC 12V 3A DC 15V 4A DC 20V 3 25A Power output 65W Built in battery 16500 mAh last up to 180 minut...

Page 26: ...arty responsible for compliance could void the user s authority to operate the equipment 15 105 Information to user This equipment has been tested and found to comply with the limits for a Class B digital device pursuant to Part 15 of the FCC Rules These limits are designed to provide reasonable protection against harmful interference in a residential installation This equipment generates uses and...

Page 27: ...ack of the trademarks and does not justify the assumption that these dedicated terminologies are free trademarks Other product names used herein are for identification purposes only and may be trademarks of their respective owners Screeneo Innovation SA disclaims any and all rights in those marks Neither Screeneo Innovation SA nor its affiliates shall be liable to the purchaser of this product or ...

Page 28: ... was brought to the market by Screeneo Innovation SA further referred to in this document as Screeneo Innovation SA and is the manufacturer of the product 2020 Screeneo Innovation SA All rights reserved Headquarters Screeneo Innovation SA Route de Lully 5C 1131 Tolochenaz Switzerland www philips com welcome PicoPix Max EN ...

Reviews: