background image


EN      67  


En

gl

is

Supported multimedia connections


USB: Connect only those USB devices 
that consume 500 mA of power or less. 
 

 - NTFS, FAT 16 (Read only) 


 - FAT 32 


Ethernet LAN RJ-45 

Supported image files


JPEG: *.jpg, *.jpeg, *.mpo 


GIF (87a, 89a): *.gif 


PNG: *.png 


BMP: *.bmp, *.dib 


JPS: *.jps 


PNS: *.pns 


BMS: *.bms 


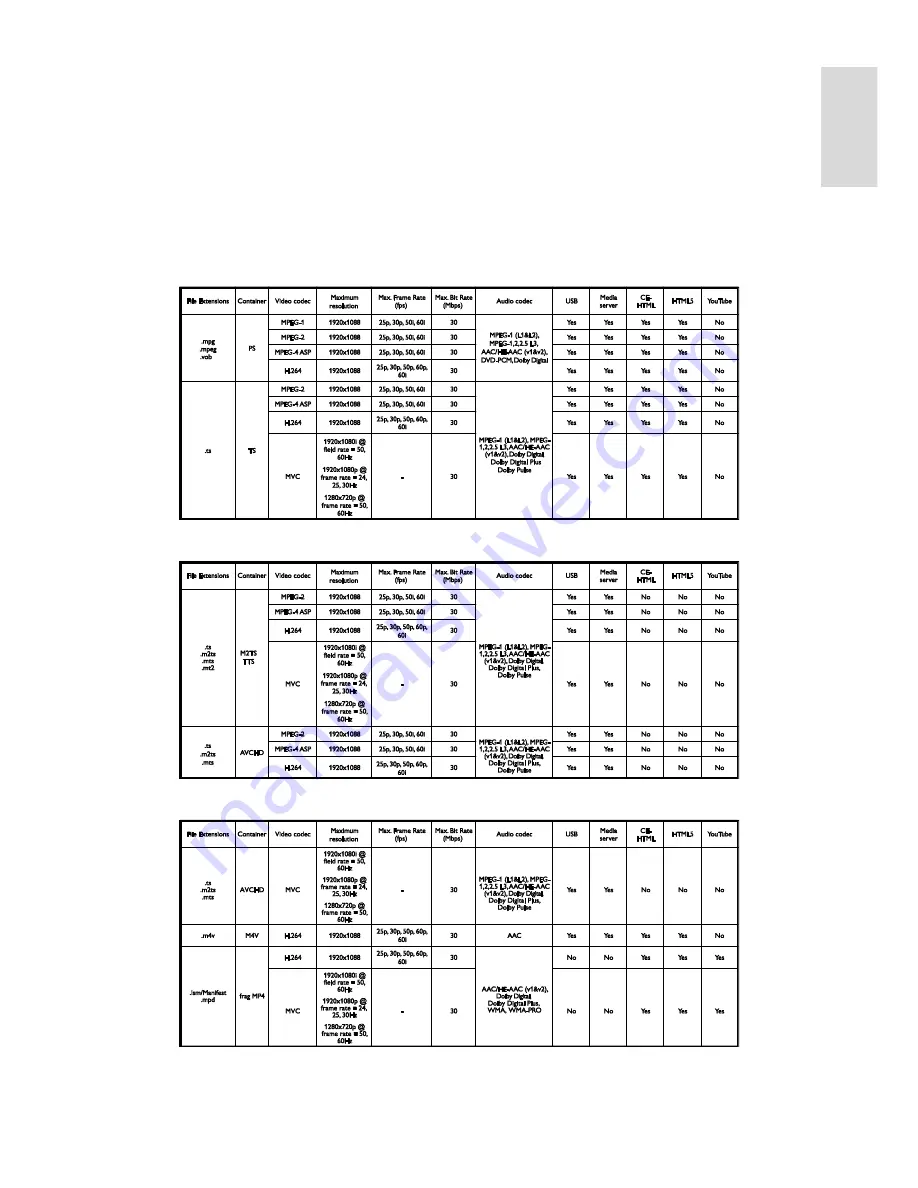
Supported audio/video formats


Supported audio/video formats


Supported audio/video formats


Summary of Contents for PFL50x8H/12

Page 1: ...EN User Manual Register your product and get support at www philips com welcome PFL50x8H 12 PFL50x8K 12 PFL50x8T 12 PFL50x8T 60 PFL50x8M 08 ...

Page 2: ...guage settings 40 Universal access settings 41 Other settings 42 Update software 42 Reset all 44 5 Connect your TV 45 About cables 45 Connect antenna 46 Connect devices 46 Connect more devices 53 Watch connected devices 55 Set up EasyLink devices 56 Connect to a network and the Internet 58 Connect a CAM Conditional Access Module 60 6 Troubleshooting 62 General issues 62 Channel issues 62 Picture i...

Page 3: ...When disconnecting the power always pull the power plug never the cord Ensure that you have full access to the power plug power cord and outlet socket at all times Risk of damage to the TV Two people are required to lift and carry a TV that weighs more than 25kg or 55lbs When stand mounting the TV use only the supplied stand Secure the stand to the TV tightly Place the TV on a flat level surface t...

Page 4: ...efore exposing yourself to flashing light sources rapid image sequences or 3D viewing To avoid discomfort such as dizziness headache or disorientation we recommend not watching 3D for extended periods of time If you experience any discomfort stop watching 3D and do not immediately engage in any potentially hazardous activity for example driving a car until your symptoms have disappeared If symptom...

Page 5: ...yes should be level with the centre of the screen TV placement You can apply the best sound settings for your TV by selecting the TV placement wall mount or stand mount 1 Press 2 Select Setup then press OK 3 Select TV settings General settings or TV placement 4 Select On a TV stand or Wall mounted then press OK Lock the TV Your TV is equipped with a Kensington security slot at the base of the TV T...

Page 6: ...targeted at consumers which like any electronic apparatus in general have the ability to emit and receive electromagnetic signals One of Philips leading Business Principles is to take all necessary health and safety measures for our products to comply with all applicable legal requirements and to stay well within the Electro Magnetic Field EMF standards applicable at the time of producing the prod...

Page 7: ...T DIVX VIDEO ON DEMAND This DivX Certified device must be registered in order to play purchased DivX Video on Demand VOD movies To obtain your registration code locate the DivX VOD section in your device setup menu Go to vod divx com for more information on how to complete your registration Skype is a trademark of Skype Limited or its related companies PlayReady Final Products Content owners use M...

Page 8: ...ve devices Switch off connected EasyLink HDMI CEC Consumer Electronic Control compliant devices that are inactive While you watch TV press the Green button and select Inactive devices off Power management An advanced power management helps save the energy consumed by this TV To view how your personalised TV settings affect the TV s relative power consumption press then select Setup Watch demos Act...

Page 9: ...on To exit from the Help menu press Visit the Philips website If you can t find what you need in the onscreen Help visit the Philips support website at www philips com support On the Philips support website you can also Find answers to Frequently Asked Questions FAQ Download a printable PDF version of this user manual Email us a specific question Chat online with Philips Consumer Care available in...

Page 10: ...mote control at the sensor Make sure that the line of sight between the remote control and the TV is not blocked Remote control 1 Standby Switch the TV on or to standby 2 Play buttons Control playback of multimedia files 3 GUIDE Access TV guide 4 3D Switch on 3D 5 SOURCE Watch a connected device 6 AMBILIGHT Switch Ambilight on or off 7 TV Watch TV 8 FORMAT Change picture format 9 Home Access the H...

Page 11: ...o control connected HDMI CEC enabled devices through other buttons that are available through the on screen remote control Make sure that Easylink is switched on after connection Read more about Easylink in Connect your TV Set up Easylink devices Control devices Page 57 To access the on screen remote control 1 While you watch a connected device press OPTIONS 2 Select Show remote control then press...

Page 12: ...e not going to use the TV for an extended period of time disconnect the TV from the mains plug Automatic switch off You can save energy with this TV s energy efficiency settings which are enabled by default If there is no user interaction such as pressing a remote control button or a control on the TV for four hours the TV will automatically switch to standby To disable automatic switch off 1 Whil...

Page 13: ...rder channels Lock a channel Listen to digital radio Filter channels 1 While you watch TV press LIST 2 Press OPTIONS then select Filter 3 Select an option then press OK Digital Analogue Display all channels in the channels list Digital TV channels Display only digital channels Analogue Channels Display only analogue channels Free scrambled Display all channels in the channels list Scrambled channe...

Page 14: ... OK Watch connected devices Before you can watch a device connect the device to the TV See Connect your TV Connect devices Page 46 Select a device with SOURCE 1 Press SOURCE 2 Select a device then press OK Select a device from the Home menu 1 Press 2 Select Source then press OK 3 Select the device then press OK To add or manage your connected devices see Connect your TV Watch connected devices Cha...

Page 15: ...view a channel s programme guide information if the age rating of the channel is equal or higher than the age rating set on your TV the channel is locked From the broadcaster Select broadcaster programme guide Before you use the programme guide check the following settings 1 Press 2 Select Setup TV settings General settings TV guide 3 Select From the broadcaster then pressOK Access broadcaster pro...

Page 16: ...ecording Identify channel Manually update channel information Select day Select the day to display Manual record Set a scheduled recording Reload Page Refresh the page display Zoom Change zoom level of page display Security info Display programme security information Watch 3D What you need Your TV is a 3D TV Before you watch 3D read the health warning information in Important Safety 3D health warn...

Page 17: ...isplays pictures that overlap horizontally 3D top bottom inverted or 3D side by side inverted Select if the TV displays distorted images such as the background appearing nearer to you Convert 2D to 3D You can convert any 2D programme to watch it in 3D 1 Press 3D then select 2D to 3D conversion To switch off 2D to 3D conversion 1 Press 3D then select 2D Note If you switch to another activity the co...

Page 18: ... can do You can play videos photos and music on your TV from Your computer connected through the home network A USB device connected to the TV Play files from computer What you need A wired or wireless home network connected with a Universal Plug and Play uPnP router Optional An LAN cable that connects your TV to your home network A media server running on your computer Appropriate settings on you...

Page 19: ...t a video then select Play all To skip to the next or previous video press CH or CH To pause the video press OK Press OK again to resume playback To skip forward or backward 10 seconds press or To search forward or backwards press or Press the button repeatedly to toggle between different speeds To stop the video press Video options While you play video press OPTIONS then press OK to select an opt...

Page 20: ...ent from a media server you can select another media server Play DivX VOD Video On Demand This TV is DivX Certified R and plays high quality DivX Video On Demand videos To play DivX VOD videos from a video store or from your computer you must first activate DivX VOD on the TV The DivX VOD activation of your TV is free of charge Register the TV If the TV is not yet activated when you start the play...

Page 21: ...ster at any time Connect the TV to the Internet 1 On your home network connect a router with a high speed connection to the Internet 2 Switch on the router 3 Install the network See Connect the TV Connect to a network and the Internet Page 58 Start Smart TV 1 Press SMART TV The terms and conditions of use are displayed 2 Follow the onscreen instructions to complete registration Note The first time...

Page 22: ... 2 Select Setup Network settings 3 Select Clear Internet memory then press OK Rent online videos What you need Make sure that your TV is connected to the Internet through a high speed broadband connection See Connect your TV Connect to a network and the Internet Page 58 Access a video store 1 Press SMART TV 2 Access the App Gallery to search for available video store apps in your country 3 Select ...

Page 23: ...For network connection see Connect your TV Connect to a network and the Internet Page 58 Access interactive TV You can identify channels that offer interactive services by a message that invites you to press the Red button or OK to access an interactive programme 1 Switch to a digital channel with interactive services While the application is loading a blinking symbol is displayed When the applica...

Page 24: ...nor is it responsible for damage to or loss of data in the device Formatting removes all data from the connected USB hard drive The USB hard drive is formatted exclusively for this TV Keep it permanently connected to the TV You cannot access the contents of the USB hard drive from another TV or PC Do not overload the USB port If you connect a USB hard drive device that consumes more than 500mA pow...

Page 25: ...mes as well as future TV programmes Note Recording is only supported in countries with programme guides In Nordic countries the TV provides limited support for subtitles while recording TV programmes What you need Tune your TV to receive digital TV channels such as DVB broadcasts See Change your TV settings Channels Automatic installation Page 37 Connect a USB 2 0 compatible hard drive with a mini...

Page 26: ...hard drive until this process is complete Start recording One touch recording You can record the programme you are currently watching with a single button 1 While you watch TV press Recording starts immediately A pop up window is displayed indicating the end time of the programme 2 Optional Use the Navigation buttons to mark the end time of the recording 3 Select Confirm then press OK 4 To stop re...

Page 27: ...K A list of recordings is displayed 3 Select a recording from the list then press OK The recording starts to play Sort recordings 1 Press 2 Select Recordings then press OK A list of recordings is displayed 3 Press OPTIONS 4 Select an option to sort by name date expiry date or type then press OK Note If a broadcaster limits the number of days that a recording can be viewed after the programme has b...

Page 28: ...n your computer Visit www skype com to retrieve your password Create an account If you do not have a Skype name and password you can create an account from your TV 1 Select Don t have a Skype Name then press OK 2 Read the Skype End User License Agreement Terms of Service and Privacy Statement Once complete select Accept and press OK 3 When prompted add information about your name Skype name passwo...

Page 29: ...ce and video calls Make a voice call You can make a Skype call without video Note Make sure that a video camera is connected for voice calls too 1 In the Skype main menu select Contacts then press OK 2 Select the contact then press OK 3 Select Call then press OK Voice call options During a call press OPTIONS to access these options Mute Mute the microphone Hold Put the call on hold End call End th...

Page 30: ... storage is lost Recording of a TV programme is stopped You will need to resume recording again after you finish the call Playback of rental films is stopped To resume watching the rented film you need to go back to the video store or broadcast service Some video stores and services do not allow you to restart the film Manage voicemails If someone calls you on Skype and you are offline they can le...

Page 31: ... each player can experience different views on the same TV 1 Press SOURCE 2 Select the game console then press OK 3 If needed load a game disc on the game console 4 On the game console select a multi player or two player game then select split screen viewing 5 Press OPTIONS on the TV remote control 6 Select Picture and sound Two player gaming 7 Select Top bottom or Side by side then press OK 8 Put...

Page 32: ...mary and secondary languages 1 Press 2 Select Setup Channel settings or Satellite settings 3 Select Languages Primary Text or Secondary Text 4 Select a language then press OK Subpages If the text page contains several subpages you can view each subpage in succession These subpages are shown on a bar next to the main page number Press or to select them Search You can search for a word or number tha...

Page 33: ...start set the clock mode to Manual 1 In the Clock menu select Date or Time then press OK 2 Set the time or date with the Navigation buttons 3 Select Done then press OK Sleep timer You can switch the TV to standby after a specified time During the countdown to the specified time you can switch off your TV earlier or reset the sleep timer 1 Press 2 Select Setup TV settings General settings Sleep tim...

Page 34: ...s according to age 1 Press 2 Select Setup Channel settings or Satellite settings 3 Select Child lock Parental rating You are prompted to enter the child lock code 4 Enter the child lock code with the Numeric buttons 5 Select an age rating then press OK All programmes above the selected age rating are blocked For information on child lock codes see Use more of your TV Set locks and timers Child loc...

Page 35: ...se HD Fine tune each pixel to match surrounding pixels and produce a brilliant high definition image Advanced sharpness Enable superior sharpness especially on lines and contours in the picture Dynamic contrast Dynamically enhance the details in the dark medium and light areas of the picture Dynamic backlight Select a backlight level to optimise dynamic power consumption and picture contrast Colou...

Page 36: ...age 57 Clear Sound Enhance sound quality Audio Out format Select the type of audio output through the digital audio output connector Choose between Multichannel and Stereo Audio Out levelling Set the output level for stereo audio Select Less for a certain amount of loss in intensity or signal strength Select More for no loss in intensity or signal strength HDMI 1 ARC Enable audio output from the A...

Page 37: ... channels are found the list of installed channels may display empty channel numbers You can rename or reorder these channels Install analogue channels You can search and store analogue TV channels one by one Step 1 Select your system Note Skip this step if your system settings are correct 1 While you watch TV press 2 Select Setup Channel settings Channel installation 3 Select Analogue Manual inst...

Page 38: ... channels and stores new channels everyday Empty channels are removed from the channel list Switch off the channel update message If a channel update is performed a message is displayed at startup You can switch off this message 1 Press 2 Select Setup Channel settings or Satellite settings 3 Select Channel installation Channel update message 4 Select Off then press OK Switch off automatic updates ...

Page 39: ...hannels to a TV with pre installed channels 1 Switch on the second TV on which you want to copy the channel list 2 Press 3 Select Setup Search for channels Reinstall channels then press OK The country menu is displayed 4 Make sure that the country setting is the same as for the first TV 5 Press 6 Press Cancel to exit 7 If the country setting is different reinstall the second TV to match the countr...

Page 40: ...complete select Finish and then press OK Add and remove satellites You can add or remove satellites at any time and install channels from new satellites Note Before you add satellites make sure that the connection type is correct See Change your TV settings Satellite Settings Install satellite channels Page 39 1 Press 2 Select Setup Search for satellite then press OK 3 Select Add satellite then pr...

Page 41: ...btitle language or Secondary subtitle language and select from the available languages 4 Press OK to confirm Universal access settings Switch on Some digital TV broadcasters provide special audio and subtitle features for people who are hearing or visually impaired You can switch these features on or off 1 Press 2 Select Setup TV settings General settings 3 Select Universal access On or Off then p...

Page 42: ...cts in the visually impaired audio Type of speech 1 Press 2 Select Setup Channel settings or Satellite settings 3 Select Languages Visually impaired or Speech 4 Select a setting then press OK Descriptive Hear descriptive speech in the visually impaired audio Subtitles Hear subtitles in the visually impaired audio Other settings TV demo You can watch a demo to find out more about the features on th...

Page 43: ...e file into a folder 7 Eject and disconnect the USB flash drive from the computer Upgrade the TV software Caution Do not switch off the TV or remove the USB flash drive during the software upgrade If a power failure occurs during the upgrade do not remove the USB flash drive from the TV The TV continues the upgrade as soon as power is restored If an error occurs during the upgrade retry the upgrad...

Page 44: ...ches to standby and on again automatically Wait for the TV to switch back on Do not switch the TV on yourself Note If the TV is connected to the Internet the TV displays the availability of new software at startup Philips may occasionally push a software upgrade to your TV over the Internet Follow the on screen instructions to upgrade the TV software Reset all You can reset all picture and sound s...

Page 45: ...e to the CVBS Y connector on the TV HDMI An HDMI connection has the best picture and sound quality An HDMI cable combines video and audio signals Connect HDMI for high definition HD TV signals and to switch on EasyLink An HDMI Audio Return Channel ARC connector allows output of TV audio to an HDMI ARC compliant device Connect HDMI cables shorter than 5 meters 16 4 feet Y Pb Pr Component video Y Pb...

Page 46: ...a Connect the antenna to the TV Connect devices Blu ray or DVD disc player Connect the disc player to the TV with an HDMI cable Connect the disc player to the TV with a component video cable Y Pb Pr and an audio L R cable ...

Page 47: ... digital TV receiver to the TV with an antenna cable For certain models only Connect the satellite or digital TV receiver to the TV with an HDMI cable Connect the digital TV receiver to the TV with a component video cable Y Pb Pr and an audio L R cable ...

Page 48: ...EN 48 Connect the digital TV receiver to the TV with a SCART cable Video recorder Connect the recorder to the TV with an antenna cable Connect the recorder to the TV with an HDMI cable ...

Page 49: ...ish Connect the recorder to the TV with a component video cable Y Pb Pr and an audio L R cable Connect the recorder to the TV with a SCART cable Game console Connect the game console to the TV with an HDMI cable ...

Page 50: ...o the TV with a component video cable Y Pb Pr and an audio L R cable Home theatre Connect an HDMI ARC compliant home theatre to the TV with an HDMI cable Connect the home theatre to the TV with an HDMI cable and a coaxial audio cable ...

Page 51: ...onnect the home theatre to the TV with a component video cable Y Pb Pr and an audio L R cable Connect the home theatre to the TV with a SCART cable Digital camera Connect the digital camera to the TV with a USB cable ...

Page 52: ...EN 52 Digital camcorder Connect the digital camcorder to the TV with an HDMI cable Connect the digital camcorder to the TV with a component video cable Y Pb Pr and an audio L R cable ...

Page 53: ...ish Connect more devices USB storage device Connect the USB hard drive to the TV with a USB cable Connect the USB flash drive with a USB cable to the TV Computer Connect the computer to the TV with an HDMI cable ...

Page 54: ...a USB cable to the TV Keyboard and mouse USB keyboard You can connect a USB keyboard to enter text such as device names on the TV or text for Smart TV apps USB mouse You can connect a USB mouse to navigate pages on the Internet and click on links Note If you need extra USB connectors use a USB hub You can also connect the USB mouse to a connected USB keyboard ...

Page 55: ...e next field Tab and Shift Go to the previous field Home Scroll to the top of the page End Scroll to the bottom of the page Page Up Go to the previous page Page Down Go to the next page Zoom in or out Fit to the width of the page When the TV detects the mouse you can set the tracking speed 1 Press 2 Select Setup TV settings General settings Pointer mouse settings 3 Change the mouse settings Use th...

Page 56: ...r you have switched on Philips EasyLink the following features are available One touch play When you play an HDMI CEC compliant device the TV switches on from standby and switches to the correct source One touch standby When you press on the TV remote control the TV and all HDMI CEC compliant devices switch to standby mode Auto switch off inactive devices If a HDMI CEC compliant device has been in...

Page 57: ...The TV switches the connecting device to standby after 10 minutes of inactivity 1 Press 2 Select Setup TV settings General settings EasyLink 3 Select Auto switch off devices On then press OK Select speaker output If a connected device is HDMI Audio Return Channel HDMI ARC compliant you can output TV audio through an HDMI cable Additional audio cables are not required Make sure you connect the devi...

Page 58: ...e shift The subtitles are then displayed over the video image Switch on auto subtitle shift 1 Press 2 Select Setup TV settings General settings EasyLink 3 Select Auto subtitle shift On then press OK Connect to a network and the Internet What you can do View Media If you connect the TV to a home network you can play photos music and videos from your computer See Use your TV Play multimedia files Pa...

Page 59: ...Reception quality depends on the location of the wireless router and your local Internet service provider To reduce network traffic switch off unused network equipment in the home network When playing video over your wireless home network we recommend that you use an IEEE 802 11 N router The connection speed may differ according to the operating environment of your wireless home network Start wire...

Page 60: ...gree to the End User Licence Agreement Network settings TV network name If you have more than one TV in your home network you can rename this TV to give it a unique name 1 Press 2 Select Setup Network settings TV network name then press OK 3 Use the onscreen keyboard or the remote control keypad to enter the name Switch on Miracast This TV is a Miracast certified TV To seamlessly display content f...

Page 61: ...e directions printed on the CAM to insert the CAM into the Common Interface slot at the side of the TV Push the CAM in as far as it will go 3 Switch on the TV then wait for the CAM to be activated This takes a few minutes To maintain access to encrypted digital TV channels leave the CAM in the slot Access CAM services 1 After you insert and activate the CAM press OPTIONS 2 Select Common interface ...

Page 62: ... TV from standby press on the remote control or press any key on the TV The standby light on the TV blinks red Disconnect the power cable from the power outlet Wait until the TV cools down before you reconnect the power cable If the blinking reoccurs contact Philips Consumer Care The TV audio is in the wrong language If you select audio language via OPTIONS the TV resets to the default language wh...

Page 63: ...or moving devices away from the TV If reception on only one channel is poor fine tune this channel There is poor picture quality from connected devices Make sure that the devices are connected properly Make sure that the picture settings are set correctly The TV did not save your picture settings Make sure that the TV location is set to Home You can change and save settings in this mode The pictur...

Page 64: ...itional audio cable is connected to AUDIO L R or AUDIO IN mini jack only You cannot use EasyLink features Make sure that your HDMI devices are HDMI CEC compatible EasyLink features only work with devices that are HDMI CEC compatible If an HDMI CEC compliant audio device is connected to the TV and the TV does not display any mute or volume icon when the volume is muted increased or decreased When a...

Page 65: ...he wireless network is not working try a wired network connection Make sure that the firewalls in your network allow access to the TV wireless connection Contact Philips Warning Do not attempt to repair the TV yourself This may cause severe injury irreparable damage to your TV or void your warranty If are not able to resolve your problem refer to the frequently asked questions FAQs for this TV at ...

Page 66: ...re Display Display type LED backlight Full HD Diagonal size 81 cm 32 inches 107 cm 42 inches 117 cm 46 inches 127 cm 50 inches Aspect ratio 16 9 widescreen Panel resolution 1920x1080p Picture enhancement Pixel Plus HD Perfect Motion Rate PMR 300 Hz 3D Easy 3D Ambilight Sound Output power RMS 10 THD PFL5008 and PFL5018 20 W PFL5028 and PFL5038 24 W Clear Sound Mono Stereo Secondary audio programmin...

Page 67: ...ices that consume 500 mA of power or less NTFS FAT 16 Read only FAT 32 Ethernet LAN RJ 45 Supported image files JPEG jpg jpeg mpo GIF 87a 89a gif PNG png BMP bmp dib JPS jps PNS pns BMS bms Supported audio video formats Supported audio video formats Supported audio video formats ...

Page 68: ...EN 68 Supported audio video formats Supported audio video formats Supported audio video formats Supported audio formats ...

Page 69: ...ndows Twonky Media Microsoft Windows Mac OS X Sony Vaio Media Server Microsoft Windows TVersity Microsoft Windows Nero MediaHome DiXiM Microsoft Windows XP Macrovision Network Media Server Microsoft Windows Fuppes Linux uShare Linux Connectivity Rear HDMI 1 ARC HDMI Audio Return Channel HDMI 2 AUDIO IN DVI Stereo 3 5 mm mini jack NETWORK Ethernet LAN RJ 45 SERV U Service port CVBS Y Pb Pr Audio L ...

Page 70: ...analogue 31 channels install automatic 31 channels install digital 32 channels install satellite 33 channels logo 12 channels reinstall 37 channels rename 12 channels sort 12 channels switch 12 channels update 32 child lock 28 CI 49 clock 28 codecs supported 54 Common Interface 49 computer play files 16 Conditional Access Module 49 connect computer 44 connect digital camcorder 43 connect digital c...

Page 71: ...ter 14 EPG Internet 14 external hard disk 44 F favourite channels list 12 G game console connect 41 game settings 27 games two player 27 H HbbTV 19 HDMI 38 HDMI ARC 38 hearing impaired access 35 help onscreen 8 Help version 57 home mode 35 home network 48 home theatre connect 42 I install channels automatic 31 Interactive TV 19 Internet connect 48 Internet Smart TV 18 K Kensington lock 5 key beep ...

Page 72: ...programmes 22 recorder connect 40 recordings delete 24 recordings schedule 23 recordings watch 24 recycle 7 reinstall 37 remote control 10 rename channels 12 rename connected device 46 rent online video 19 S safety 4 satellite add or remove 34 satellite install channels 33 satellite settings 33 SCART 38 schedule recordings 23 screen care 5 sensors 10 settings assistant 30 settings audio format 31 ...

Page 73: ...28 text 2 5 27 text digital text 28 text dual screen 27 text enlarge 27 text language 27 text subpages 28 text Table Of Pages 27 trademarks and copyrights 7 TV controls 10 TV guide 14 TV guide broadcaster 14 TV guide Internet 14 TV receiver connect 39 TV speakers mute 12 U universal access enable 34 universal access hearing impaired 35 universal access visually impaired 35 update source list 46 US...

Page 74: ...Specifications are subject to change without notice Philips and the Philips shield emblem are registered trademarks of Koninklijke Philips Electronics N V and are used under license from Koninklijke Philips Electronics N V 2013 TP Vision Netherlands B V All rights reserved www philips com ...

Reviews: