background image

13

EN

• 

[RANDOM] 

(Random): Play all tracks 

randomly.

To return to normal play, press 

MODE


repeatedly to select 

[OFF] 

(off).

Note


Random play cannot be selected when you play the 

programmed tracks.

Program tracks

You can program a maximum of 40 tracks.

In Disc or USB A mode, press   to stop 

playing. 

Press 

PROG

 to activate the program 

mode.


»

A number flashes on the screen.

For MP3 tracks, press 

ALB//-

 to 

select an album.

Press   or   to select a track number, 

then press 

PROG

 to confirm selection.

Repeat steps 3 to 4 to program other 

tracks.

Press 

 to play the programmed track.

• 

To erase the program, press   twice.

Note


The function is not available in 

USB B

 mode.

Play audio through Bluetooth

The unit can stream music from your Bluetooth 

device to the system through Bluetooth. 

Note


Make sure that your Bluetooth device is compatible 

with this product.


Before pairing a device with this unit, read its user 

manual for Bluetooth compatibility.


The effective operation range between the unit and a 

Bluetooth device is approximately 10 meters (30 feet). 


The unit can memorize a maximum of 8 paired devices.


Any obstacle between the unit and a Bluetooth device 

can reduce the operational range. 


Keep away from any other electronic device that may 

cause interference.

Slide 

CROSS FADER

 to the far left. 

Press 

Bluetooth

 to turn on the Bluetooth 

function of the unit.


»

The Bluetooth indicator blinks.

On your Bluetooth device, enable 

Bluetooth and search for Bluetooth devices 

(refer to the user manual of the device).

When 

[PHILIPS NTRX505]

 is displayed 

on your device, select it to start pairing 

and connection. If necessary, enter default 

password “0000”. 


»

After successful connection, the 

Bluetooth indicator turns solid blue. 

Play audio on your device.


»

Audio streams from your device to 

the unit.

• 

To start, pause, or resume play, press 

.

• 

To select another track, press   or  .

To disconnect the Bluetooth-enabled device:

• 

Disable Bluetooth on your device; or

• 

Move the device beyond the 

communication range.

To connect another Bluetooth-enabled device:

• 

Disable Bluetooth on the current device, 

and then connect another device.

Listen to an external device

You can listen to an external audio device 

through the speakers of this unit.

Summary of Contents for NTRX505

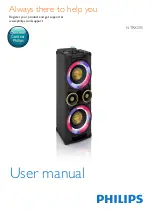
Page 1: ...www philips com support NTRX505 User manual Always there to help you Register your product and get support at Question Contact Philips ...

Page 2: ......

Page 3: ...gram radio stations automatically 15 Program radio stations manually 15 Select a preset radio station 15 Change AM tuning grid 15 7 Adjust volume level and sound effect 16 Adjust volume level 16 Mute sound 16 Apply AUTO DJ effect 16 Apply DJ effects manually 16 Select a preset sound effect 16 Enhance bass 17 Apply NX Bass 17 Adjust equalizer settings 17 8 Other features 18 Mix sound 18 Speak or si...

Page 4: ...sources such as radiators heat registers stoves or other apparatus including amplifiers that produce heat Protect the power cord from being walked on or pinched particularly at plugs convenience receptacles and the point where they exit from the apparatus Only use attachments accessories specified by the manufacturer Use only with the cart stand tripod bracket or table specified by the manufacture...

Page 5: ...quid filled objects lighted candles Where the MAINS plug or an appliance coupler is used as the disconnect device the disconnect device shall remain readily operable Caution Use of controls or adjustments or performance of procedures other than herein may result in hazardous radiation exposure or other unsafe operation ...

Page 6: ...vices swap play between the dual audio sources with the cross fader listen to FM or AM radio stations speak or sing with microphones through the loudspeakers of the unit and record to a USB storage device To enrich sound this unit offers you these sound effects Digital Sound Control DSC Dynamic Bass Boost DBB DJ effects NX Bass Enhancement What s in the box Check and identify the contents of your ...

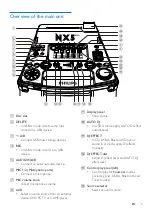
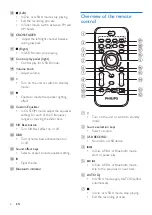
Page 7: ...olume h AUX Select an audio source from an external device DVD PC TV or GAME player b c c d e e f h g s q t n o p i m u v w x y z j k l n r a i Display panel Show status j AUTO DJ In USB A mode apply AUTO DJ effect automatically k DJ EFFECT In CD USB A Bluetooth Tuner or Audio in A mode apply DJ effects manually l DJ EFFECT dial Adjust DJ effect level and AUTO DJ effect level m Control play panel ...

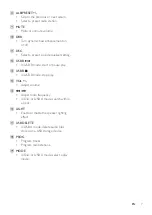
Page 8: ...e 5 frequency ranges by moving the slider bars w NX Bass button Turn NX Bass effect on or off x DBB Turn dynamic bass enhancement on or off y Sound effect keys Select a preset sound equalizer setting z Eject the disc Bluetooth indicator Overview of the remote control a Turn on the unit or switch to standby mode b Source selection keys Select a source c USB RECORD Record to a USB device d In Disc U...

Page 9: ...r setting l USB B In USB B mode start or pause play m USB B In USB B mode stop play n VOL Adjust volume o Adjust radio frequency In Disc or USB A mode search within a track p LIGHT Enable or diable the speaker lighting effect q USB DELETE In USB A mode delete audio files stored on a USB storage device r PROG Program tracks Program radio stations s MODE In Disc or USB A mode select a play mode ...

Page 10: ...nect power Caution Risk of product damage Make sure that the power supply voltage corresponds to the voltage printed on the back or the underside of the product Risk of electric shock When you unplug the power cord always pull the plug from the socket Never pull the cord Note Before connecting to AC power make sure that you have completed all other connections 1 Adjust the voltage selector on the ...

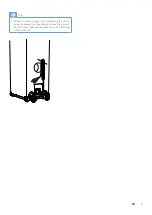
Page 11: ...9 EN Tip When you are not using or are transporting the unit to keep the power cord organized and above the ground fix the power cable with the cable tie on the back panel of the main unit ...

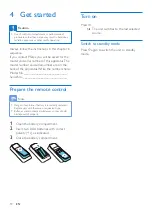
Page 12: ...of the apparatus Write the numbers here Model No __________________________ Serial No ___________________________ Prepare the remote control Note Danger of explosion if battery is incorrectly replaced Replace only with the same or equivalent type Batteries contain chemical substances so they should be disposed of properly 1 Open the battery compartment 2 Insert two AAA batteries with correct polar...

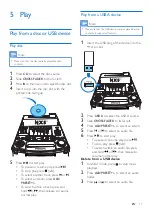
Page 13: ...ress and hold then release to resume normal play Play from a USB A device Note Make sure that the USB device contains playable audio contents in supported formats 1 Insert the USB plug of the device into the A socket 2 Press USB A to select the USB A source 3 Slide CROSS FADER to its far left 4 Press ALB PRESET to select an album 5 Press or to select an audio file 6 Press to start play To pause or...

Page 14: ...y 3 Press USB RECORD to start recording For Disc mode press USB RECORD repeatedly to select A REC ONE record one the first or current track is recorded B REC ALL record all all tracks or the remaining tracks are recorded Play starts automatically from the beginning of the disc or the selected track and the recording starts To stop recording press Note If the USB device does not have enough memory ...

Page 15: ...device is approximately 10 meters 30 feet The unit can memorize a maximum of 8 paired devices Any obstacle between the unit and a Bluetooth device can reduce the operational range Keep away from any other electronic device that may cause interference 1 Slide CROSS FADER to the far left 2 Press Bluetooth to turn on the Bluetooth function of the unit The Bluetooth indicator blinks 3 On your Bluetoot...

Page 16: ...cket rotate the source selector on the main unit to select the Audio In B source Play from other audio device You can also play audio from a PC aTV DVD player or game player 1 Press AUX repeatedly to cycle through GAME PC IN TV and DVD sources AUDIO IN A 2 Connect the white and red audio cables not supplied to the AUX sockets on the back of the main unit the headphone socket on a PC or the AUDIO O...

Page 17: ... to activate automatic program mode AUTO auto is displayed The unit stores radio stations with sufficient signal strength automatically After all available radio stations are stored the first stored radio station is broadcast automatically Program radio stations manually 1 Tune to a radio station 2 Press PROG to activate the program mode A position number is displayed 3 Press ALB PRESET to allocat...

Page 18: ...Metal and PARTY party To turn off the AUTO DJ effects press AUTO DJ repeatedly to select OFF Off To adjust the occurrence frequency and sound level of the added effects rotate the DJ EFFECT dial Note These effects are added by the application automatically and randomly The function is only available in USB A mode Apply DJ effects manually You can also add the preset DJ effects by yourself Press DJ...

Page 19: ...he sound volume increases to a higher level and stays at this level for 5 seconds FIRING firing is displayed Stage 2 The sound volume gradually decreases to its original level in 10 seconds DISCHARGE discharge is displayed Stage 3 The sound volume keeps at normal level for 40 seconds RECHARGE recharge is displayed Note To reactivate the NX bass effect press the button again after the 3 stages are ...

Page 20: ...on the connected external device USB B Select the USB B source and then play audio on the connected USB B device 3 Use the CROSS FADER control to adjust the balance between Source A and Source B channels during playback Speak or sing with a microphone With this unit you can speak or sing to a music source with a microphone 1 Turn the MIC volume knob to the minimum level 2 Connect a microphone not ...

Page 21: ...7 5 108MHz AM 531 1602kHz 9KHz 530 1700KHz 10KHz Tuning Grid 50KHz FM 9KHz 10KHz AM Number of Presets 30 FM 10 AM Bluetooth BluetoothVersion V2 1 EDR Bluetooth Frequency Band 2 4GHz 2 48GHz ISM Band Range 10 m Free space General information AC Power 110 127V 220 240V 50 60 Hz Operation Power Consumption 110 W Standby Power Consumption 15 W USB Direct Version 2 0HS DC 5V 500mA Dimensions Main Unit ...

Page 22: ...ported sampling frequencies 32 kHz 44 1kHz 48 kHz Supported Bit rates 32 320 kbps variable bit rates ID3 tag v1 2 or later Directory nesting up to a maximum of 8 levels Maintenance Clean the cabinet Use a soft cloth slightly moistened with a mild detergent solution Do not use a solution containing alcohol spirits ammonia or abrasives Clean discs When a disc becomes dirty clean it with a cleaning c...

Page 23: ...orrect format disc Cannot display some files in USB device The number of folders or files in the USB device has exceeded a certain limit This phenomenon is not a malfunction The formats of these files are not supported USB device not supported The USB device is incompatible with the unit Try another one Cannot apply sound effects when playing from a USB B device USB B mode does not support DBB DSC...

Page 24: ...ry packaging has been omitted We have tried to make the packaging easy to separate into three materials cardboard box polystyrene foam buffer and polyethylene bags protective foam sheet Your system consists of materials which can be recycled and reused if disassembled by a specialized company Please observe the local regulations regarding the disposal of packaging materials exhausted batteries and...

Page 25: ...23 EN ...
Page 26: ...e of its affiliates further referred to in this document as WOOX Innovations and is the manufacturer of the product WOOX Innovations is the warrantor in relation to the product with which this booklet was packaged Philips and the Philips Shield Emblem are registered trademarks of Koninklijke Philips N V NTRX505X_78_UM_V3 0 ...

Reviews: