background image

10

f

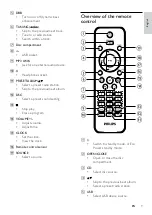
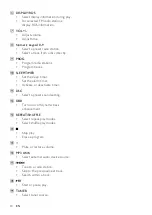
  DISPLAY/RDS

Select display information during play.

• 

For selected FM radio stations: 

• 

display RDS information.

g

  VOL +/-

Adjust volume.

• 

Adjust time.

• 

h

  Numeric keypad 0-9

Select a preset radio station.

• 

Select a track from a disc directly.

• 

i

  PROG

Program radio stations.

• 

Program tracks.

• 

j

  SLEEP/TIMER

Set the sleep timer.

• 

Set the alarm timer.

• 

Activate or deactivate timer.

• 

k

  DSC

Select a preset sound setting.

• 

l

  DBB

Turn on or off dynamic bass 

• 

enhancement.

m

  REPEAT/SHUFFLE

Select repeat play modes.

• 

Select shuffle play modes.

• 

n


Stop play.

• 

Erase a program.

• 

o


Mute or restore volume.

• 

p

  MP3 LINK

Select external audio device source.

• 

q


/

Tune to a radio station.

• 

Skip to the previous/next track.

• 

Search within a track.

• 

r


Start or pause play.

• 

s

  TUNER

Select tuner source.

• 

EN

Summary of Contents for MCM305

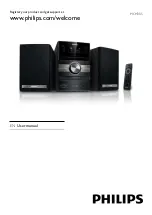
Page 1: ...Register your product and get support at www philips com welcome EN User manual MCM305 ...

Page 2: ...y 14 Program tracks 14 Display play information 14 6 Listen to the radio 15 Tune to a radio station 15 Program radio stations automatically 15 Program radio stations manually 15 Select a preset radio station 15 Show RDS information 15 Set RDS clock 16 7 Adjust sound 17 Adjust volume level 17 Select a preset sound effect 17 Enhance bass 17 Mute sound 17 8 Use more of your Micro System 18 Set the sl...

Page 3: ...eries shall not be exposed to excessive heat such as sunshine fire or the like p Apparatus shall not be exposed to dripping or splashing 1 Important Safety a Read these instructions b Keep these instructions c Heed all warnings d Follow all instructions e Do not use this apparatus near water f Clean only with dry cloth g Do not block any ventilation openings Install in accordance with the manufact...

Page 4: ...Consumer Lifestyle may void the user s authority to operate the equipment q Do not place any sources of danger on the apparatus e g liquid filled objects lighted candles r This product may contain lead and mercury Disposal of these materials may be regulated due to environmental considerations For disposal or recycling information please contact your local authorities or the Electronic Industries ...

Page 5: ...nsent See Copyright Act 1956 and The Performer s Protection Acts 1958 to 1972 This apparatus includes this label This product complies with the radio interference requirements of the European Community Your product is designed and manufactured with high quality materials and components which can be recycled and reused When this crossed out wheeled bin symbol is attached to a product it means that ...

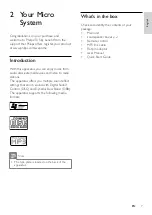
Page 6: ...efit from the support that Philips offers register your product at www philips com welcome Introduction With this apparatus you can enjoy music from audio discs external devices and listen to radio stations The apparatus offers you multiple sound effect settings that enrich sound with Digital Sound Control DSC and Dynamic Bass Boost DBB The apparatus supports the following media formats Note The t...

Page 7: ...8 c Open or close the disc compartment d Start or pause play Overview of the main unit a Display panel Display current status b STANDBY ON Turn on the apparatus switch to standby mode EN ...

Page 8: ...c bass enhancement f TUNING Skip to the previous next track Tune to a radio station Search within a track g Disc compartment h USB socket i MP3 LINK Jack for an external audio device j Headphone socket k PRESET ALBUM Select a preset radio station Skip to the previous next album l DSC Select a preset sound setting m Stop play Erase a program n VOLUME Adjust volume Adjust time o CLOCK Set the clock ...

Page 9: ...racks j SLEEP TIMER Set the sleep timer Set the alarm timer Activate or deactivate timer k DSC Select a preset sound setting l DBB Turn on or off dynamic bass enhancement m REPEAT SHUFFLE Select repeat play modes Select shuffle play modes n Stop play Erase a program o Mute or restore volume p MP3 LINK Select external audio device source q Tune to a radio station Skip to the previous next track Sea...

Page 10: ...partment 2 Insert 2 UM 4 AAA batteries with correct polarity as indicated 3 Close the battery compartment 220 240V 110 127V 3 Get started Caution Use of controls or adjustments or performance of procedures other than herein may result in hazardous radiation exposure or other unsafe operation Always follow the instructions in this chapter in sequence If you contact Philips you will be asked for the...

Page 11: ...he main unit to activate the clock setting mode SET CLOCK set clock is displayed briefly Then the hour digits are displayed and begin to blink Note In Eco Power Standby mode press CLOCK to show clock first and then press and hold CLOCK to proceed clock setting 2 Press on the main unit repeatedly to select 12 hour or 24 hour format 3 Turn VOLUME to set the hour 4 Press CLOCK to confirm The minute d...

Page 12: ...ocket on this unit the headphone socket on an MP3 player 3 Start to play the MP3 player See the user manual of the MP3 player 4 Play Play disc 1 Press CD to select the disc source 2 Press to open the disc tray 3 Insert a disc with the printed side facing up then close the disc tray Play starts automatically To pause resume play press To stop play press For MP3 WMA files to select an album press To...

Page 13: ...return to normal play press REPEAT SHUFFLE repeatedly until play mode is no longer displayed Program tracks You can program a maximum of 20 tracks 1 In CD USB mode at the stop position press PROG to activate the program mode PROG program blinks on the display 2 For MP3 WMA tracks press to select an album 3 Press to select a track number then press PROG to confirm 4 Repeat steps 2 to 3 to program m...

Page 14: ...me are displayed 1 Tune to a RDS station 2 Press DISPLAY RDS repeatedly to scroll through the following information if available Station name 6 Listen to the radio Tune to a radio station Note For optimal reception fully extend and adjust the position of the FM antenna 1 Press TUNER to select the tuner source 2 Press and hold for more than 2 seconds SEARCH search is displayed The radio tunes to a ...

Page 15: ...ignal broadcast together with the RDS signal to set the clock of the apparatus automatically 1 Tune to a RDS radio station that transmits time signals 2 Press and hold DISPLAY RDS for more than 2 seconds Note The accuracy of the transmitted time depends on the RDS station that transmits the time signal EN ...

Page 16: ...elect a preset sound effect 1 During play press DSC repeatedly to select POP pop JAZZ jazz CLASSIC classic ROCK rock Enhance bass 1 During play press DBB to turn on or off dynamic bass enhancement If DBB is activated DBB is displayed Mute sound 1 During play press to mute unmute sound E n g l i s h EN ...

Page 17: ...hen the unit is turned on press SLEEP TIMER repeatedly to select a set period of time in minutes When sleep timer is activated the display shows To deactivate sleep timer 1 Press SLEEP TIMER repeatedly until SLP OFF is displayed When sleep timer is deactivated disappears on the display Set the alarm timer This unit can be used as an alarm clock The DISC TUNER or USB is activated to play at a prese...

Page 18: ...name length Maximum album number 255 Supported sampling frequencies 32 kHz 44 1 kHz 48 kHz Supported Bit rates 32 256 kbps variable bit rates 9 Product information Note Product information is subject to change without prior notice Specifications Amplifier Rated Output Power 2 X 15 W RMS Frequency Response 60 16 kHz 3 dB Signal to Noise Ratio 62 dB Disc Laser Type Semiconductor Disc Diameter 12 cm ...

Page 19: ...s Supported formats USB or memory file format FAT12 FAT16 FAT32 sector size 512 bytes MP3 bit rate data rate 32 320 Kbps and variable bit rate WMA v9 or earlier Directory nesting up to a maximum of 8 levels Number of albums folders maximum 99 Number of tracks titles maximum 999 ID3 tag v2 0 or later File name in Unicode UTF8 maximum length 128 bytes Unsupported formats Empty albums an empty album ...

Page 20: ...eset the clock timer 10 Troubleshooting Caution Never remove the casing of this apparatus To keep the warranty valid never try to repair the system yourself If you encounter problems when using this apparatus check the following points before requesting service If the problem remains unsolved go to the Philips web site www philips com support When you contact Philips ensure that your apparatus is ...

Page 21: ... 2011 Koninklijke Philips Electronics N V All rights reserved MCM305_55_UM_V1 0 ...

Reviews: