background image

English

15

Preparation

Setting the clock

After connecting MCM279 to the power supply,
set the clock first.

1

 Press and hold 

STANDBY-ON/ ECO

POWER 

to switch the set to Standby mode.

 ➜ 

The display shows the set time.

➜ 

-- --:-- -- displays by default if you have not set

the clock.

2

In the standby mode, press and hold 

DISPLAY/

CLOCK 

( or 

CLOCK

on the remote control ).

➜ 

The hours digits start flashing.

3

To switch between 12 hour and 24 hour display,
press 

PROGRAM 

( or 

PROG

on the remote

control ).

4

Hold down or press 

VOLUME


+/-

 repeatedly

to set the hours.

5

Press 

DISPLAY/CLOCK 

( or 

CLOCK

on

the remote control )


to confirm.

The minutes digits start flashing

6

Hold down or press 

VOLUME


+/-

 repeatedly

to set the minutes.

7

Press 

DISPLAY/CLOCK

 ( or 

CLOCK

on

the remote control ) to confirm.
–  To exit without storing the clock setting press

9

.

Helpful hints:

– The clock setting will be erased when the system
is disconnected from the power supply.

– The set will exit from the clock setting mode if
no button is pressed within 90 seconds.

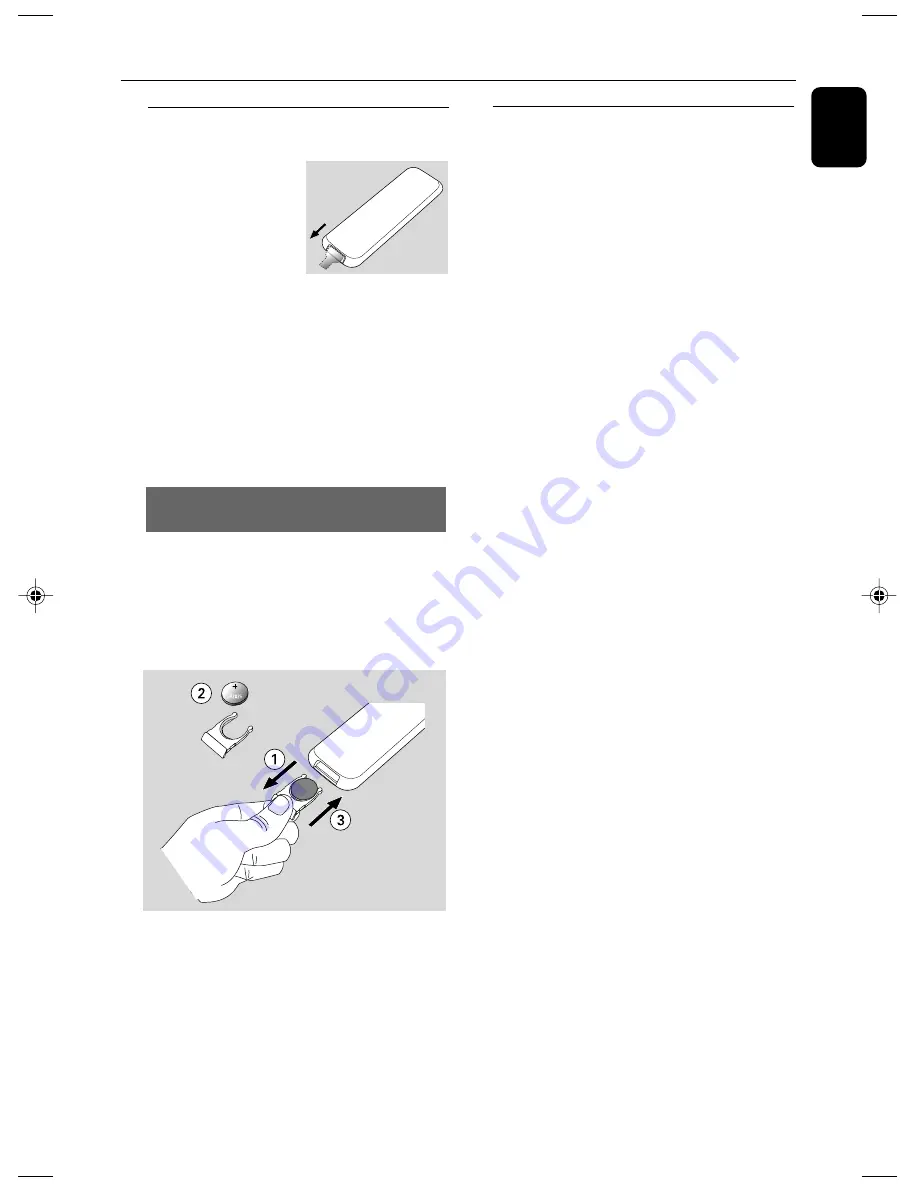
Using the remote control

IMPORTANT!

– Remove the
protective plastic tab
before using the
remote control.

– Always point the
remote control directly
towards IR area on the main set.

Notes for remote control:
– First select the source you wish to
control by pressing one of the source select
keys on the remote control (for example
CD, TUNER).
– Then select the desired function (for
example 

ÉÅ

,

í

 , 

ë

).

To replace the remote controls’
battery (CR2025)

CAUTION!
– Batteries contain chemical substances,
so they should be disposed of properly.

1

Push to open the battery tray.

2

Replace a new battery according to the
indicated polarity.

3

Push the battery tray back to close it.

P001-P028_MCM279_55_Eng

11/27/07, 11:28

15

Summary of Contents for MCM279

Page 1: ...MCM239D Micro Hi Fi System User manual Register your product and get support at www philips com welcome Manual de usuario Manual do usuário MCM279 ...

Page 2: ...eros choques asaltos riñas etc México Es necesario que lea cuidadosamente su instructivo de manejo No abrir riesgo de choque eléctrico Verifique que el voltaje de alimentación sea el requerido para su aparato ATENCIÓN Para evitar el riesgo de choque eléctrico no quite la tapa En caso de requerir servicio dirijase al personal calificado PRECAUCIÓN ADVERTENCIA Descripción Minisistema de Audio Modelo...

Page 3: ...3 M I C R O S Y S T E M M C M 2 7 9 WMA MP3 CD CD R CD RW COMPATIBLE VOLUME PROGRAM DISPLAY CLOCK ALBUM PRESET SOURCE STOP DSC DBB STANDBY ON OPEN CLOSE IR 3 4 5 2 1 6 8 7 9 0 ...

Page 4: ... operation ATENCIÓN El uso de mando o ajustes o la ejecucción de métodos que no sean los aquí descritos puede ocasionar peligro de exposición a radiación CUIDADO A utilização de comandos ou ajustes ou a execução de procedimentos diferentes dos descritos neste manual podem provocar uma exposição a radiações perigosas ou outras operações inseguras ...

Page 5: ...5 English Español Nederlands Italiano Svenska Dansk Português Index English 6 Español 28 Português 52 ...

Page 6: ...playing the clock 16 CD Discs for playback 17 Playing discs 17 Selecting and searching 18 Selecting a different track Finding a passage within a track during playback Programming tracks 18 Reviewing the program Erasing the program Different play modes REPEAT SHUFFLE 19 Display track information MP3 WMA only 19 Tuner Tuning to radio stations 20 Programming radio stations 20 Autostore Automatic prog...

Page 7: ...s shall not be exposed to dripping or splashing Place the system in a location with adequate ventilation to prevent internal heat build up in your system Allow at least 10 cm 4 inches clearance from the rear and the top of the unit and 5 cm 2 inches from each side The ventilation should not be impeded by covering the ventilation openings with items such as newspapers table cloths curtains etc Do n...

Page 8: ...re To establish a safe volume level Set your volume control at a low setting Slowly increase the sound until you can hear it comfortably and clearly without distortion Listen for reasonable periods of time Prolonged exposure to sound even at normally safe levels can also cause hearing loss Be sure to use your equipment reasonably and take appropriate breaks Be sure to observe the following guideli...

Page 9: ...s albums for MP3 WMA only TUNER selects a preset radio station 4 CD USB press and hold fast searches CD tracks files backwards forwards Tuner tunes to radio stations ÉÅ CD USB starts or pauses playback 6 IR sensor for the infrared remote control Helpful hints Always point the remote control towards this sensor 7 DSC Digital Sound Control selects predefined sound settings ROCK JAZZ POP CLASSIC OFF ...

Page 10: ...k 0 PROG CD USB programs tracks Tuner programs preset radio stations In clock setting mode switches between 12 hour and 24 hour display RDS NEWS no function on this version TIMER enters the timer setting mode press and hold for more than 2 seconds Notes for remote control First select the source you wish to control by pressing one of the source select keys on the remote control for example CD TUNE...

Page 11: ...USB storage device MP3 player 0 opens closes the CD door í ë CD USB selects previous next track 9 CD USB stops playback erase a program Tuner press and hold to change tuning grid between 10 kHz and 9 kHz Numeric keypad 0 9 selects track or station number DSC Digital Sound Control selects predefined sound settings ROCK JAZZ POP CLASSIC OFF DBB Dynamic Bass Boost turns the bass enhancement on off Co...

Page 12: ...the left speaker to LEFT red and black and the cable of the right speaker to RIGHT red and black as follows a Press the clip of the red terminal and fully insert the stripped portion of the colored or marked speaker cable into the socket then release the clip b Press the clip of the black terminal and fully insert the stripped portion of the black or unmarked speaker cable into the socket then rel...

Page 13: ...ernal device through the powerful speakers of Hi Fi system 1 Insert the USB device s USB plug into the socket on the front panel of the main set Or for the devices with USB cable a Insert one plug of the USB cable not supplied to the socket on the front panel of the main set b Insert the other plug of the USB cable to the USB output terminal of the USB device Or for the memory card a Insert the me...

Page 14: ...The type plate is located on the rear of the set Warning To avoid overheating of the system a safety circuit has been built in Therefore your system may switch to Standby mode automatically under extreme conditions If this happens let the system cool down before reusing it not available for all versions This product complies with the radio interference requirements of the European Community CAUTIO...

Page 15: ...the remote control to confirm To exit without storing the clock setting press 9 Helpful hints The clock setting will be erased when the system is disconnected from the power supply The set will exit from the clock setting mode if no button is pressed within 90 seconds Using the remote control IMPORTANT Remove the protective plastic tab before using the remote control Always point the remote contro...

Page 16: ... the stop position for more than 15 minutes the set will switch off automatically to save power Volume control Volume adjustment Adjust the volume by pressing VOLUME VOL and the actual value between 1 and 31 are displayed VOL MIN is the minimum volume level VOL MAX is the maximum volume level MUTE You can temporarily switch off the sound without switching off the set 1 Press MUTE to switch off the...

Page 17: ...n dlf are ignored and will not be played DRM protected WMA files WMA files in Lossless orVBR format IMPORTANT Make sure that the file names of MP3 files end with mp3 For DRM protected WMA files use Windows Media Player 10 or later for CD burning conversion Visit www microsoft com for details about Windows Media Player and WM DRM Windows Media Digital Rights Management Playing discs 1 Press SOURCE ...

Page 18: ...ired sequence If you like store any track more than once 1 In the stop position press PROGRAM to start programming PROG flashes 2 Press 4 on the set or í ë on the remote control once or repeatedly until the desired track number appears in the display MP3 WMA press ALBUM PRESET on the set or 3 4 on the remote control and 4 on the set or í ë on the remote control to select the desired album and trac...

Page 19: ...E repeatedly until the various modes are no longer displayed Helpful hints In the shuffle mode press to select tracks CD Display track information MP3 WMA only The ID3 tag is part of an MP3 WMA file and contains various track information such as the track s title or the artist s name During playback press DISPLAY repeatedly on the remote control Display show title name album name and ID3 tag infor...

Page 20: ... 1 Press ALBUM PRESET on the set or 3 4 on the remote control buttons once or more to select the preset number where programming should start Note If no tuner preset number is selected default is preset 1 and all your presets will be erased 2 Press and hold PROGRAM until AUTO appears Available stations FM and MW are programmed After all stations are stored the first preset station will then be pla...

Page 21: ...lay Non supported file formats are skipped This means that e g Word documents doc or MP3 files with extension dlf are ignored and will not be played AAC WAV PCM audio files DRM protected WMA files WMA files in Lossless format How to transfer music files from PC to a USB mass storage device By dragging and dropping music files you can easily transfer your favorite music from PC to a USB mass storag...

Page 22: ...URCE once or more to select USB or USB on the remote control The icon appears NO AUDIO appears if no audio file is found in the USB device 3 Play the USB s audio files as you do with the albums tracks on a CD See CD Note For compatibility reasons the album track information may differ from what it is displayed through flash players music management software File names or ID3 tags will be displayed...

Page 23: ...d is the same as the one of a file stored in the USB device the file will not be recorded In this case MCM279 s display will show flashing Err and duP interchangeably 3 seconds For some USB device of low speed the playback may go with muted sound for some seconds which will depend on the capability of the low speed USB device Deleting audio files on a USB device 1 Check the USB device has been pro...

Page 24: ...ton is pressed within 90 seconds Activating and deactivating TIMER In standby mode press and hold TIMER ON OFF on the remote once or more to activate or deactivate the timer Display shows if activated and disappears if deactivated Helpful hints The timer will not work at the set time if the set is switched on the timer is deactivated The set will switch toTuner source automatically if no CD is ins...

Page 25: ... Output power 2 x 30 W RMS Signal to noise ratio 65 dBA Frequency response 100 18kHz 3 dB Input sensitivity AUX 0 5V max 1 V Impedance loudspeakers 6 Ω Impedance headphones 32 Ω 1000 Ω 15mW CD PLAYER Frequency range 100 18kHz Signal to noise ratio 65 dBA TUNER FM wave range 87 5 108 MHz MW wave range 1 Tuning grid 10 kHz 530 1700 kHz 2 Tuning grid 9 kHz 531 1602 kHz Number of presets 40 Antenna FM...

Page 26: ...re reversed Problem Solution Insert a disc Wait until the moisture condensation at the lens has cleared Replace or clean the disc see Maintenance Use a finalised CD RW or a correct MP3 WMA CD format disc Check if the number of folders exceeds 999 or the number of titles exceeds 999 If the signal is too weak adjust the antenna or connect an external antenna for better reception Increase the distanc...

Page 27: ...s been disconnected Reset the clock timer Troubleshooting It is not set in the USB mode Select USB mode The device is not securely connected to MCM279 s USB port Re connect the device The device is not supported by MCM279 or the audio file format stored on the device is not supported by MCM279 Use a compatible device playable audio file format You stop recording when the MP3 or WMA file you want t...

Reviews: