


14
English
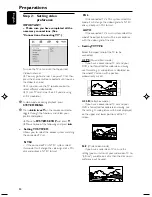
Step 4: Connecting TV
IMPORTANT!
– You only need to make one video
connection from the following options,
depending on the capabilities of your TV
system.
– Connect the DVD system directly to
the TV.
Using Video In jack (CVBS)
+
–
SPEAKER 4Ω
R L
1
Use the composite video cable (yellow) to
connect the system's
VIDEO
jack to the video
input jack (or labelled as A/V In, Video In,
Composite or Baseband) on the TV set.
2
To hear the sound of this DVD Player through
your TV, use the audio cables (white/red-not
supplied) to connect
LINE OUT (L/R)
jacks of
the DVD Player to the corresponding AUDIO
IN jacks on the TV.
Using S-Video In jack
Connections
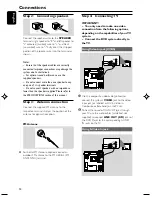
Step 2: Connecting speakers
1
2
Connect the speaker wires to the
SPEAKER
terminals, right speaker to "R" and left speaker to
"L", coloured (marked) wire to "+" and black
(unmarked) wire to "-". Fully insert the stripped
portion of the speaker wire into the terminal as
shown.
Notes:
– Ensure that the speaker cables are correctly
connected. Improper connections may damage the
system due to short-circuit.
– For optimal sound performance, use the
supplied speakers.
– Do not connect more than one speaker to any
one pair of +/- speaker terminals.
– Do not connect speakers with an impedance
lower than the speakers supplied. Please refer to
the SPECIFICATIONS section of this manual.
Step 3: Antenna connection
Connect the supplied FM antenna to the
respective terminals. Adjust the position of the
antenna for optimal reception.
FM Antenna
●
For better FM stereo reception, connect an
outdoor FM antenna to the FM AERIAL (FM
ANTENNA) terminal.
+
–
SPEAKER 4Ω
R L
pg001-pg041_MCD396-Eng
5/13/09, 15:20
14
Summary of Contents for MCD396
Page 1: ...MCD396 DVD MicroTheater Register your product and get support at www philips com welcome ...
Page 2: ...2 CAUTION Visible and invisible laser radiation If the cover is open do not look at the beam ...
Page 3: ...3 2 1 3 4 6 5 0 9 8 7 ...
Page 4: ...4 1 7 8 6 4 0 7 8 5 2 3 9 TAPE TAPE USB AUX USB AUX ...