background image

15

English

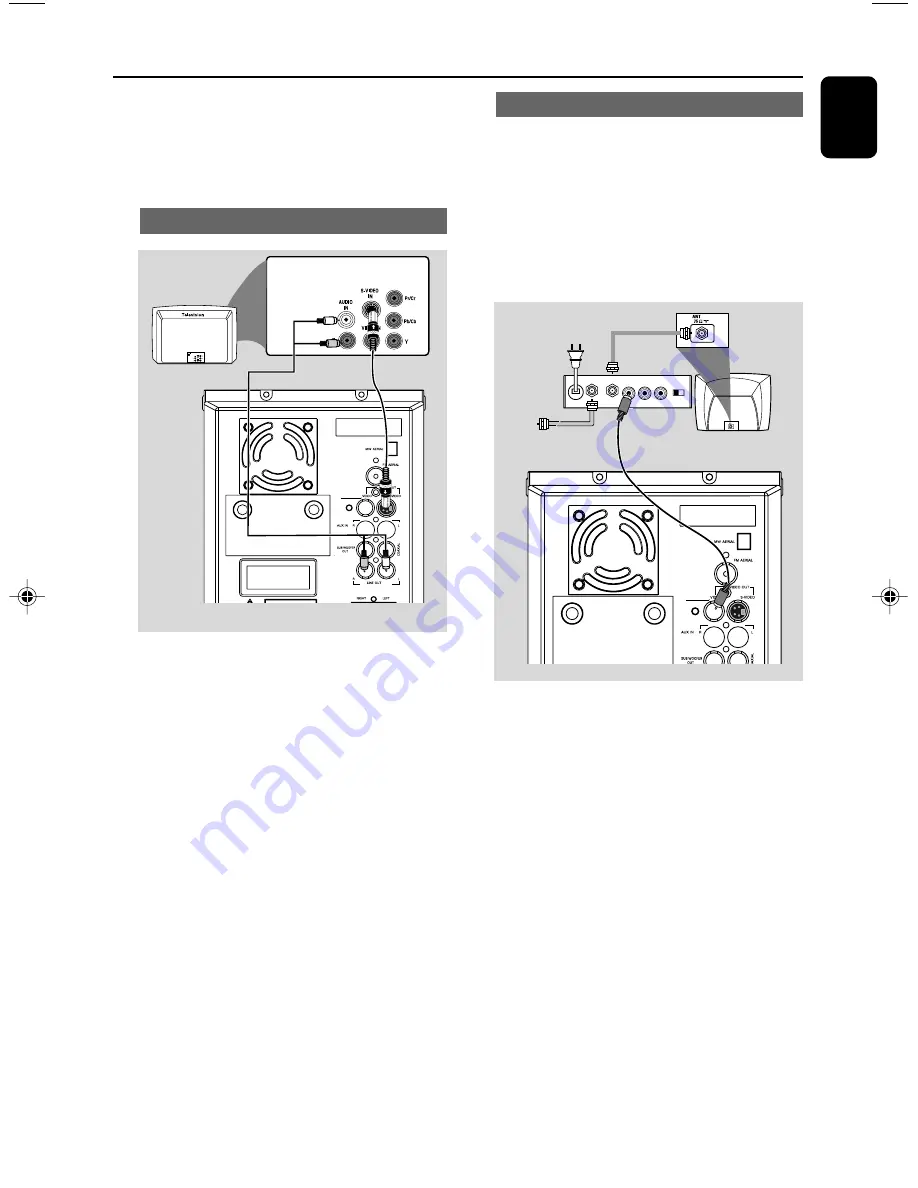
Using an accessory RF modulator

IMPORTANT!
– If your TV set only has a single
Antenna In jack (or labelled as 75 ohm or
RF In), you will need a RF modulator in
order to view the DVD playback via TV.
See your electronics retailer or contact
Philips for details on RF modulator
availability and operations.

1

Use the composite cable (yellow) to connect the
system's 

VIDEO

 jack to the video input jack on

the RF modulator.

2

Use an RF coaxial cable (not supplied) to
connect the RF modulator to your TV's RF jack.

Connections

AUDIO  IN
R             L

VIDEO

IN

TO TV

ANT IN

CH3   CH4

RF coaxial cable to TV

Back of RF Modulator

(example only)

Antenna or

Cable TV  signal

2

To hear the sound of this DVD Player through
your TV, use the audio cables (white/red-not
supplied) to connect LINE OUT (L/R) jacks of
the DVD Player to the corresponding AUDIO
IN jacks on the TV.

Using S-Video In jack

1

Use the S-Video cable (not supplied) to connect
the system's 

S-VIDEO

 jack to the S-Video

input jack (or labelled as Y/C or S-VHS) on the
TV set.

2

To hear the sound of this DVD Player through
your TV, use the audio cables (white/red-not
supplied) to connect LINE OUT (L/R) jacks of
the DVD Player to the corresponding AUDIO
IN jacks on the TV.

pg001-pg040_MCD295-58-Eng

2006.3.24, 17:02

15

Summary of Contents for MCD295

Page 1: ...MCD295 DVD MicroTheatre User manual PÛÍÓ Ó ÒÚ Ó ÔÓÎ ÁÓ ÚÂÎfl ...

Page 2: ...2 CAUTION Visible and invisible laser radiation If the cover is open do not look at the beam ...

Page 3: ...3 1 5 4 3 6 2 7 9 8 0 ...

Page 4: ...4 1 2 7 0 ª 3 8 9 0 7 5 6 8 4 ...

Page 5: ...y rights owned by Macrovision Corporation and other rights owners Use of this copyright protection technology must be authorized by Macrovision Corporation and is intended for home and other limited viewing uses only unless otherwise authorized by Macrovision Corporation Reserve engineering or disassembly is prohibited DivX DivX Certified and associated logos are trademarks of DivXNetworks Inc and...

Page 6: ...7679 Latina 7665 Latvian 7686 Letzeburgesch 7666 Limburgan Limburger 7673 Lingala 7678 Lithuanian 7684 Luxembourgish 7666 Macedonian 7775 Malagasy 7771 Magyar 7285 Malayalam 7776 Maltese 7784 Manx 7186 Maori 7773 Marathi 7782 Marshallese 7772 Moldavian 7779 Mongolian 7778 Nauru 7865 Navaho Navajo 7886 Ndebele North 7868 Ndebele South 7882 Ndonga 7871 Nederlands 7876 Nepali 7869 Norsk 7879 Northern...

Page 7: ...7 7 English Р ус с к и й Index English 8 êÛÒÒÍËÈ 41 ...

Page 8: ... language preference 20 Basic Functions Switching the system on 21 Switching the system to Eco Power Standby mode 21 Power saving automatic standby 21 Sound control 21 DBB DSC LOUDNESS Volume control 21 Disc Operations Playing discs 22 Using the disc menu 22 Basic playback controls 22 24 Pausing playback Selecting a track chapter title Resuming playback from the last stopped point Zoom Repeat Shuf...

Page 9: ...e consequences for the environment and human health System Menu Options Basic operations 27 SYSTEM SETUP 27 29 TV SYSTEM SCREEN SAVER TVTYPE PASSWORD RATING DEFAULT DIVX R VOD registration code LANGUAGE SETUP 29 VIDEO SETUP 29 BRIGHTNESS CONTRAST HUE SATURATION AUDIO SETUP 29 30 DIGITAL OUT DOWNMIX 3D PROCESSING LPCM NIGHT MODE Radio Reception Tuning to radio stations 31 Programming radio stations...

Page 10: ...rmat Max title album name 10 characters Max title number plus album is 255 Max nested directory is 8 levels The max album number is 32 The max MP3 track number is 999 Supported sampling frequencies for MP3 disc 32 kHz 44 1 kHz 48 kHz Supported Bit rates of MP3 disc are 32 64 96 128 192 256 kbps The following formats can t be supported The files like VMA AAC DLF M3U PLS WAV The discs recorded under...

Page 11: ...ver when the player is suddenly moved from cold to warm surroundings making it impossible to play a disc Leave the player in the warm environment until the moisture evaporates Do not block the vents Do not operate the system in an enclosed cabinet and allow about 10 cm 4 inches of free space all around the player for adequate ventilation 10 cm 4 inches 10 cm 4 inches 10 cm 4 inches DVD Micro Hi Fi...

Page 12: ...d easily Cleaning the head and the tape paths To ensure good recording and playback quality clean the head A the capstan s B and pressure roller s C after every 50 hours of tape operation Use a cotton swab slightly moistened with cleaning fluid or alcohol You also can clean the head by playing a cleaning tape once C B A B C Demagnetising the head Use a demagnetising tape available at your dealer ...

Page 13: ...rd to the wall outlet ensure that all other connections have been made Never make or change any connections with the power switched on High voltage Do not open You run the risk of getting an electric shock The machine does not contain any user serviceable parts Modification of the product could result in hazardous radiation of EMC or other unsafe operation To avoid overheating of the system a safe...

Page 14: ...to RIGHT and left speaker to LEFT coloured marked wire to and black unmarked wire to Fully insert the stripped portion of the speaker wire into the terminal as shown Notes Ensure that the speaker cables are correctly connected Improper connections may damage the system due to short circuit For optimal sound performance use the supplied speakers Do not connect more than one speaker to any one pair ...

Page 15: ...TV s RF jack Connections AUDIO IN R L VIDEO IN TO TV ANT IN CH3 CH4 RF coaxial cable toTV Back of RF Modulator example only Antenna or CableTV signal 2 To hear the sound of this DVD Player through yourTV use the audio cables white red not supplied to connect LINE OUT L R jacks of the DVD Player to the corresponding AUDIO IN jacks on theTV Using S Video In jack 1 Use the S Video cable not supplied ...

Page 16: ...cks to the AUDIO OUT jacks on the other audio visual device such as aTV VCR Laser Disc player or cassette deck Before starting operation press SOURCE on the front panel to select AUX or press AUX on the remote in order to activate the input source Using theVCR for recording DVDs B Connect one of the system s VIDEO OUT jacks to the correspondingVIDEO IN jack and LINE OUT R L jacks to the AUDIO IN j...

Page 17: ...to view the current status of the system 8 SOURCE to select the respective sound source DISC TUNER TAPE or AUX 9 LOUDNESS enables or disables automatic loudness adjustment 0 DBB enables or disables bass enhancement DSC selects different types of preset sound equalizer settings CLASSIC JAZZ POP or ROCK VOLUME adjusts the volume upward downward adjusts the hours and minutes in clock timer setting mo...

Page 18: ...SLEEP to set the sleep auto off timer function LOUDNESS enables or disables automatic loudness adjustment DSC selects different types of preset sound equalizer settings CLASSIC JAZZ POP or ROCK DBB enables or disables bass enhancement MUTE to interrupt or resume sound reproduction DISPLAY OSD displays information onTV screen during playback FM to set stereo or mono sound mode SLOW selects differen...

Page 19: ...ted or will not be used for a long time Do not use old and new or different types of batteries in combination Batteries contain chemical substances so they should be disposed of properly Step 2 Setting the clock 1 Go to Standby mode 2 Press and hold CLOCK RDS on the front panel SET CLOCK is displayed briefly Then the hour digits flash on the display screen 3 Turn the VOLUME control on the front pa...

Page 20: ... set use this setting you must also set your widescreen TV to full size available on a disc then the disc s own preference will be used Step 3 Setting video preference IMPORTANT Make sure you have completed all the necessary connections See Connections ConnectingTV Turn on theTV set and set it to the correct Video In channel You may go to channel 1 on yourTV set then press the channel button repea...

Page 21: ...y each disc will be selected 3 Press 5 4 to select a language and press OK 4 Repeat steps 2 3 for other settings To exit the menu Press SYSTEM MENU again Note The format you select must be available on the disc If it is not the setting forTVType will not affect the picture during playback To exit the menu Press SYSTEM MENU again Step 4 Setting language preference You can select your preferred lang...

Page 22: ...Bass Boost DBB enhances the bass response Press DBB on the remote to enable disable DBB feature Some discs might be recorded in high modulation which causes a distortion at high volume If this occurs switch off DBB or reduce the volume DSC Digital Sound Control DSC provides a different type of preset sound equalizer setting Press DSC on the remote repeatedly to select CLASSIC JAZZ POP or ROCK LOUD...

Page 23: ...layback will start automatically depending on the disc type If a disc menu appears on theTV see Using the Disc Menu If the disc is locked by parental control you must enter your four digit password See SYSTEM SETUP PASSWORD 6 At any time simply press STOP 9 to stop playback Disc Operations Using the disc menu For disc with Table Of Contents a menu may appear on theTV screen once you load the disc ...

Page 24: ...FULLE REPEAT ALL SHFULLE OFF 2 Playback starts automatically In shuffle playback mode Press PRESETí ë to select another track in a shuffle order 3 Press STOP 9 to stop shuffle playback Repeat A B DVD VCD CD MP3 WMA 1 Press REPEAT A B at your chosen starting point 2 Press REPEAT A B again at your chosen end point The section A and B can be set only within the same chapter track The section will now...

Page 25: ...f the current track title Remaining playback time of the current track title Elapsed playback time of the whole disc Display off OR Remaining playback time of the current track title Elapsed playback time of the whole disc Remaining playback time of the whole disc Display off For MP3 CD Elapsed playback time of the current track Remaining playback time of the current track Special disc features Pl...

Page 26: ...c Playback selection During playback you can Press PRESETí ë to select another track in the current album Press PLAY PAUSE 2 repeatedly to pause resume playback Playing JPEG Picture CD General operation 1 Load a JPEG Picture CD A data disc menu appears on theTV screen and playback starts automatically from the first file 2 Press 22 to move to the folder column on the left of theTV screen then use ...

Page 27: ... rotate the picture on theTV screen 5 flip the picture vertically 4 flip the picture horizontally 22 rotate the picture anti clockwise 33 rotate the picture clockwise Disc Operations Playing a DivX disc This DVD player supports the DivX movie playback that you download from your computer onto a CD R RW see System Menu Options DIVX R VOD registration code for more information 1 Load a DivX disc Pla...

Page 28: ... VOD TV SYSTEM See Preparations Step 3 Setting video preference for details SCREEN SAVER This function is used to turn the screen saver on or off ON In STOP PAUSE or No DISC mode if no actions are performed about 3 minutes the screen saver will be activated OFF Screen saver is disabled TV TYPE See Preparations Step 3 Setting video preference for details PASSWORD You can enter your four digit passw...

Page 29: ...ugh the movie rating may be printed on the Disc cover The rating level feature does not work for such Discs Rating explanations 1 KID SAFE Suitable for children 2 G General Audience recommended as acceptable for viewers of all ages 3 PG Parental Guidance suggested 4 PG 13 Material is unsuitable for children under age 13 Parental Guidance suggested 5 6 PG R R Parental Guidance Restricted recommende...

Page 30: ...ownloaded videos from DivX VOD can only be played back on this DVD player Time search feature is not available during DivX movie playback LANGUAGE SETUP The options included in LANGUAGE SETUP page are OSD LANGUAGE AUDIO LANG SUBTITLE LANG and MENU LANG See Preparations Step 4 Setting language preference for details VIDEO SETUP The options included inVIDEO SETUP page are COMPONENT TV MODE BRIGHTNES...

Page 31: ...s a virtual surround sound experience using just two speakers OFF CONCERT CHURCH PASSIVE WIDE and LIVE LPCM If you connect the DVD Player to a PCM compatible receiver via the coaxial terminal you may need to adjust LPCM Discs are recorded at a certain sampling rate The higher the sampling rate the better the sound quality 48kHz Playback a disc recorded at the sampling rate of 48kHz 96kHz Playback ...

Page 32: ...r each band in the memory Automatic programming Press PROGRAM for more than three seconds to activate programming All available stations are programmed AUTO is displayed and available stations are programmed in order of waveband Manual programming 1 Tune to your desired station refer to Tuning to radio stations 2 Press PROGRAM to activate programming PROG flashes on the display 3 Press PRESETí ë t...

Page 33: ...ncy Setting the RDS clock Some RDS radio station may be transmitting a real clock time at an interval of every minute It is possible to set the clock by using a time signal which is broadcast together with the RDS signal 1 Tune to a RDS station refer to Tuning to radio stations 2 Press CLOCK RDS for more than two seconds SEAR TM is displayed When RDS time is read RDS and RDS time value are display...

Page 34: ...king of unauthorized copies of copy protected material including computer programmes files broadcasts and sound recordings may be an infringement of copyrights and constitute a criminal offence This equipment should not be used for such purposes IMPORTANT Recording is permissible if copyright or other rights of third parties are not infringed upon Tape playback 1 Select TAPE source Display shows t...

Page 35: ... To stop recording press STOP OPENÇ0 It is not possible to listen to another source It is not possible to activate the timer function Synchro start CD recording 1 Select CD source Press í ë select the desired track 2 Press RECORD to start recording Playing of the CD programme starts automatically from the beginning of the CD It is not necessary to start the CD player separately One touch recording...

Page 36: ...ME control on the front panel or press VOLUME on the remote to set the minutes and press TIMER to confirm ON or OFF flashes 4 Turn the VOLUME control on the front panel or press VOLUME on the remote to activate or deactivate the timer and press TIMER to complete the setting Display shows if activated and disappears if deactivated Sleep timer setting The sleep timer enables the system to switch off...

Page 37: ... of programmable tracks 16 Signal to noise ratio 65 dBA Channel separation 40 dB 1 kHz Total harmonic distortion 0 1 1 kHz TUNER FM wave range 87 5 108 MHz MW wave range 531 1602 kHz Sensitivity at 75 Ω mono 26 dB signal to noise ratio 2 8 µV stereo 46 dB signal to noise ratio 61 4 µV Selectivity 28 dB Total harmonic distortion 5 Frequency response 63 5500 Hz 6 dB Signal to noise ratio 50 dBA TAPE...

Page 38: ...ntil the moisture condensed at the lens has cleared Replace or clean the disc see Maintenance Use a readable disc or correctly recorded format MP3 CD Select the appropriate video input mode on the TV set Check if theTV set is switched on Check the video connection Check if the system is securely connected Sometimes a slight picture distortion may appear This is not a malfunction Clean the disc Con...

Page 39: ...tem is in pause slow motion or fast forward reverse mode press PLAY PAUSE 2 to resume the normal play mode Make sure the MP3 CD was recorded within 32 256 kbps bit rate with sampling frequencies at 48 kHz 44 1 kHz or 32 kHz Ensure that the DTS disc also supports Dolby Digital output If the signal is too weak adjust the antenna or connect an external antenna for better reception Increase the distan...

Page 40: ...ugh the MP3 format one CD R or CD RW can contain about 10 times as much data volume as a regular CD can Multichannel DVD is specified to have all sound tracks constitute one sound field Multichannel refers to a structure of sound tracks having three or more channels Parental control A function of the DVD to limit playback of the disc by the age of the users according to the limitation level in eac...

Reviews: