background image

22

English

Discs information

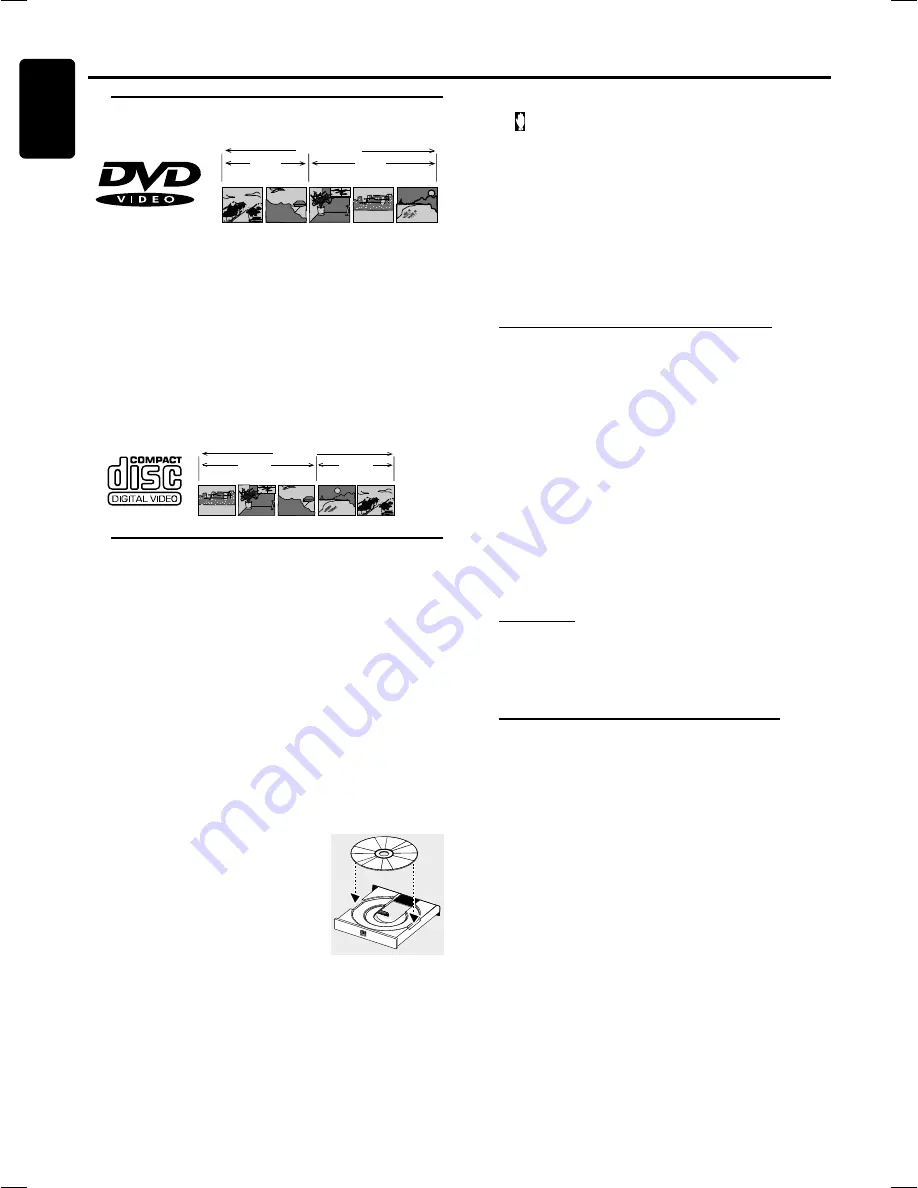
DVD video discs may have one or more Titles, and each
Title may have one or more Chapters.

Playback stops at the end of each Title.

Video CDs may have one or more Tracks, and each Track
may have one or more Indexes.

To  make easy and convenient access, you can move
between Tracks and Indexes.

Some Video CDs have Play Back Control (PBC), which is a
predefined playback sequence stored on the disc (refer to
“Special VCD/SVCD  features”).

Audio CDs contain only Tracks.

Basic playback

IMPORTANT!

Do not move the DVD system during

playback, doing so may damage the DVD system.

Do not push on the disc tray or put any

objects other than disc on the disc tray, doing so
may cause the DVD system malfunction.

DVD discs and players are designed with

regional restrictions. Before playing a disc, make
sure the disc is the same zone as your player.

Depending on the DVD or VIDEO CD, some

operations may be different or restricted.

1

Press 

STANDBY ON 

to switch on the system.

2

Press 

OPEN/CLOSE

 to open the disc tray.

3

Load a disc with the label side facing
up.

4

Press 

OPEN/CLOSE

 again to

close the tray.

There will be a short delay while

the player identifies the disc and
reads the menu from the disc.

Some discs will start playing automatically, others will display
the Disc Contents Menu on the TV screen.  If the menu is
presented, use 

/

 4

/

 1 

/

 2

 keys to highlight your selection

and press 

OK

  to confirm.To select a play option, press

numeric keypad (0-9)

.

5

Press

ÉÅ

  to start playback.

O

PERATIONS

Operations

Notes:

 If the inhibit icon (or X) appears on the TV screen when

a button is pressed, it means the function is not available on
the disc you are playing.

To interrupt playback

Press

ÉÅ

.

The picture freezes and the sound will be muted.

To resume playback, press

ÉÅ

  again.

To stop playback

Press 

Ç

.

Skipping to another title (track) / chapter

Press 

S

  or 

  repeatedly during playback to skip

backward or forward.  Each press will take the disc to the
beginning of the previous or next  title ( track) / chapter.

Note:

– If the REPEAT - TRACK function has been set, pressing

S

 or 

will replay the same title ( track) / chapter.

To skip to the beginning of the current title (track)
/ chapter during playback

Press 


once.

To go directly to any title (track) / chapter

Use the 

numeric keypad (0-9)

 to enter the number of

the desired title ( track) / chapter.

Fast Search

1

Hold down  

S

 or 

T

  for about more than 1 seconds

to fast reverse or forward the disc.

2

To resume normal play, press

ÉÅ

 .

Continue playback from the last stop point

In stop mode and when a disc has not been removed, press

RESUME

  to resume playback from the point at which it

stopped.

To cancel the resume mode

Press 

Ç

 again.

Notes:

– When the player is disconnected from the power supply or
the disc tray is opened, the resume option will be cancelled
automatically.
– When PBC is ON resume mode is not available.
– The resume mode may not be available on some disc.

      VIDEO CD

   TRACK 1                                    TRACK 2

INDEX 1

INDEX 2

INDEX 1

INDEX 2

INDEX 3

DVD-VIDEO DISC

TITLE 1                                           TITLE 2

CHAPTER 1

CHAPTER 2

CHAPTER 1

CHAPTER 2

CHAPTER 3

Summary of Contents for LX3750W - LX Home Theater System

Page 1: ...ur new product We can guide you through Connections First time Setup or any of the Features We want you to start enjoying your new product right away CALL US BEFORE YOU CONSIDER RETURNING THE PRODUCT 1 800 531 0039 or Visit us on the web at www philips com S EE WHY INSID E I M PORTAN T Return yourWarranty Registration Card within 10 days ...

Page 2: ...ur right to maximum protection under the terms and conditions of your Philips warranty Owner Confirmation Your completed Warranty Registration Card serves as verification of ownership in the event of product theft or loss Model Registration Returning your Warranty Registration Card right away guarantees you ll receive all the information and special offers which you qualify for as the owner of you...

Page 3: ...ditions 1 This device may not cause harmful interference and 2 This device must accept any interference received including interference that may cause undesired operation NOTE PICTURES SHOWN MAY BE DIFFERENT BETWEEN COUNTRIES NEVER MAKE OR CHANGE CONNECTIONS WITH THE POWER SWITCHED ON Laser Type Semiconductor laser GaAIAs Wave length 650nm Output Power 7mW Beam divergence 60 degree Systems Inc All...

Page 4: ...e they exit from the apparatus 11 Only use attachments accessories specified by the manufacturer 12 Use only with the cart stand tripod bracket or table specified by the manufacturer or sold with the apparatus When a cart is used use caution when moving the cart apparatus combination to avoid injury from tip over 13 Unplug this apparatus during lightning storms or when unused for long periods of t...

Page 5: ...Operations Discs information 22 Basic playback 22 23 Skipping to another title track chapter Fast Search Continue playback from the last stop point Repeat play Repeat A B Program favorite tracks Special DVD VCD features 23 25 Changing subtitle language Changing sound track language Playing in slow motion mode Searching for a particular passage Display the disc information during playback Moving to...

Page 6: ...lay Maximum nested directory is 8 levels Maximum album number is 32 Maximum title number is 999 Supported sampling frequencies 32 kHz 44 1 kHz 48 kHz Supported Bit rates 32 256 kbps Variable Bit rates MPEG 1 layer 2 and 3 Audio MP3 Instruction and General Information INSTRUCTION AND GENERAL INFORMATION Following formats can t be supported The files like VMA AAC DLF M3U PLS WAV WMA Non English Albu...

Page 7: ...pen Handle the disc by its edge do not touch the surface Care of cabinet Use a soft cloth slightly moistened with a mild detergent solution Do not use a solution containing alcohol spirits ammonia or abrasives Finding a suitable location Place the player on a flat hard and stable surface Step 1 Placing the speakers and subwoofers For best possible surround sound all the speakers except subwoofer s...

Page 8: ... F Step 3 Connecting AD905W Wireless System 1 Connect the supplied Surround Speaker system using the supplied speaker cables to the speaker jacks on the AD905WA WIRELESS RECEIVER by matching the colours of the jacks and speaker plugs Extend the RECEIVER antenna 2 Connect the AD905WTWIRELESS TRANSMITTER s speaker cables to the speaker jacks on the DVD system Extend theTRANSMITTER antenna Notes Adju...

Page 9: ...ons CONNECTIONS Rear ofTV example only Y 1 AC MAINS S VIDEO VIDEOOUT VIDEO 75 V L R AUDIO OUT S VIDEO IN VIDEO IN Pr Cr Pb Cb Y COMPONENT VIDEO OUT Pr Cr Pb Cb Y AUDIO IN AUX TV AV AUDIO OUT WOOFER LINE OUT OUT OPTICAL COAXIAL DIGITAL IN Rear ofTV example only Y 1 AC MAINS AUDIO IN AUX TV AV AUDIO OUT WOOFER LINE OUT S VIDEO VIDEOOUT VIDEO AM ANTENNA OUT OPTICAL COAXIAL DIGITAL IN FM 75 AUDIO OUT ...

Page 10: ...se the audio cables white red to connect TV IN L R jacks to the corresponding AUDIO OUT jacks on theTV Before starting operation pressTV AV on the remote to select TV AV in order to activate the input source Deactivate Progressive Scan through System Menu See page 21 System Setup DVD Setting the Progressive Scan Mode IMPORTANT If yourTV only has a single Antenna In jack or lapelled as 75 ohm or RF...

Page 11: ...nnecting FM AM antennas 1 Connect the supplied AM loop antenna to the AM jack Place the AM loop antenna on a shelf or attach it to a stand or wall 2 Connect the supplied FM antenna to the FM jack Extend the FM antenna and fix its ends to the wall Notes Adjust the position of the antennas for optimal reception Position the antennas as far as possible from yourTV VCR or other radiation sources to pr...

Page 12: ...ck 1 Connect the DVD system s DIGITAL IN jack to the DIGITAL OUT jack on a digital audio device Before starting operation press AUX DI on the remote to select AUX DIG in order to activate the input source Recording digital 2 Connect the DVD system s DIGITAL OUT COAXIAL or OPTICAL jack to the DIGITAL IN jack on a digital recording device DTS DigitalTheatre System compatible with a Dolby Digital dec...

Page 13: ...SMITTER and AD905WA WIRELESS RECEIVER CHANNEL SELECTOR switch so that both units are using the same channel 9 On your LX3750W DVD system play an audio source and activate the surround sound mode option Adjust the volume to reproduce surround sound in the rear speakers 10 Extend the antenna vertically on both the AD905WT WIRELESS TRANSMITTER and AD905WA WIRELESS RECEIVER to improve reception Check ...

Page 14: ...am disc tracks in Tuner mode to program preset radio station 6 VOLUME to adjust the master volume Front view Top view Side view 7 STANDBY ON to switch between power on and standby modes 8 PLAY PAUSEÉ Å in Disc mode only to start or interrupt disc playback 9 STOP Ç in disc mode only to stop playing the disc 0 SEARCH S T in Disc mode press to skip to the previous next chapter track in Disc mode hold...

Page 15: ...of the jacks on the rear panel Electrostatic discharge may cause permanent damage to the unit 7 DIGITAL IN connect from an audio equipment with digital audio output 8 SPEAKERS connect to the front center rear surround and subwoofer speakers 9 COMPONENT VIDEO OUT connect to TV with COMPONENT input 0 S VIDEO OUT connect to a TV with S video input VIDEO OUT connect to a TV with video input AC Power C...

Page 16: ...er radio frequency 6 É Å to start or interrupt disc playback 7 Ç to stop playing the disc 8 SURROUND to select multichannel surround Dolby Digital DTS VSS Dolby Pro Logic or Dolby Pro Logic II or stereo sound effect 9 SOUND to select the various sound effect CONCERT DRAMA ACTION SCI FI CLASSIC JAZZ ROCK or DIGITAL 0 REPEAT to repeat chapter title track album or disc REPEAT A B to repeat a specific...

Page 17: ...system 2 Press SOURCE until DISC appears on the display panel or press DISC on the remote 3 Turn on the TV and set to the correct video in channel You should see the blue Philips DVD background screen on the TV Usually this channel is between the lowest and highest channels and may be called FRONT A V IN or VIDEO See yourTV manual for more details Or you may go to channel 1 on your TV then press t...

Page 18: ...u To exit the System Setup menu press SYSTEM MENU or OK Preparations Setting the picture TV Shape Select the aspect ratio of theTV to be connected 4 3 PS Pan and Scan mode If you have a conventionalTV set and your DVD is not formatted for widescreen viewing use this setting A wide picture is displayed on the wholeTV screen with a portion automatically cut off 4 3 LB Letterbox mode If you have a co...

Page 19: ...nnected the digital output COAXIAL or OPTICAL to a multichannel decoder receiver Select PCM 96K if the external components is capable of processing digital signal input with sampling rates of 96 kHz Select PCM 48K if the external components is incapable of processing 96 kHz digital signal input then convert to standard signal with sampling rates of 48 kHz Select OFF to deactivate the digital outpu...

Page 20: ... the disc For example consider a disc that generally is suitable for most audiences and it is rated at level 1 for the most part However in the middle there are also scenes rated at 6 not suitable for children NO PARENTAL It will play all discs 8 ADULT Mature material should be viewed only by adults due to graphic sexual material violence or language 7 NC 17 No children under age 17 not recommende...

Page 21: ...is required Press 4 to activate the Progressive Scan Progressive Scan icon will light up If theTV System is set to PAL theTV System will automatically set to NTSC Off Select this if a normal covertionalTV is connected to your DVD system Press 4 again to restore to normalTV system Interlace Scan will appear You need to set the video out to Pr Pb Y See page 19 System Setup DVD video out When the sur...

Page 22: ...t a play option press numeric keypad 0 9 5 PressÉ Å to start playback OPERATIONS Operations Notes If the inhibit icon or X appears on theTV screen when a button is pressed it means the function is not available on the disc you are playing To interrupt playback PressÉ Å The picture freezes and the sound will be muted To resume playback pressÉ Å again To stop playback Press Ç Skipping to another tit...

Page 23: ...numeric keypad 0 9 to input the track number in the order you want If you attempt to program more than 99 tracks FULL is displayed 3 Press OK to store the track Repeat steps 2 3 to store other tracks 4 To start program play pressÉ Å 5 To stop playback press Ç once OPERATIONS Operations 6 To cancel the program press Ç again Note The Program mode may not be available on some disc Use the menu bar to...

Page 24: ...t the required search speed For DVD or MP3 reverse FR X 2 FR X 4 FR X 6 FR X 8 PLAY forward FF X 2 FF X 4 FF X 6 FF X 8 PLAY For VCD CVD SVCD or CD Press 4 key to select the required search speed reverse FR X 1 FR X 2 FR X 3 FR X 4 PLAY forward FF X 1 FF X 2 FF X 3 FF X 4 PLAY 3 To resume normal play pressÉ Å Display the disc information during playback Select from the menu bar and press 4 key to ...

Page 25: ...ss 4 key to play the disc step by step one frame each step 2 To resume normal play press É Å Checking the contents of DVD 1 Press DISC MENU on the remote control If the current title has a menu the menu will appear on the screen Otherwise the disc menu will be displayed 2 Use 1 2 3 4 keys to select the desired title or chapter followed byÉ Å or OK The selected title or chapter starts playing Notes...

Page 26: ...se S or T in the menu to view the previous next page if available You can set the transition effects for each picture Twelve slide show transition modes are provided as below Mode 0 no special transition effect by default Mode 1 wipe from top to bottom Mode 2 wipe from bottom to top Mode 3 wipe from top bottom to center Mode 4 wipe from center to top bottom Mode 5 vertical blind Mode 6 wipe from l...

Page 27: ...eps 1 4 to store other radio stations Notes The old stored content in the selected address will be covered when you operates the unit as above During programming if no key is pressed within five seconds the system will exit the program mode automatically Listening to preset radio stations In tuner mode press 1 or 2 or use the numeric keypad 0 9 to select the desired preset number The preset number...

Page 28: ...ead of 11 1 for Dolby Digital and the 20 bit resolution Dolby Pro Logic Surround The Dolby Pro Logic Surround system is a specially encoded two channels analog format that will produce sound through four speaker channels front left center front right monaural surround when a Dolby Pro Logic Decoder is used It is also compatible with stereo systems but the user will only have two channels Front Lef...

Page 29: ...ROUND mode is set to Stereo or VSS mode REAR and CENTER keys are void In test tone mode volume control is void To switch off the volume temporarily Press MUTE MUTE ON is displayed Press MUTE again or increase the volume level Note When MUTE is activated ON all sound on the rear jacks AUDIO OUT DIGITAL OUT will remain on To listen through the headphones Connecting headphones to n n n n n will switc...

Page 30: ...kHz 48 kHz 4 Hz 44 kHz 96 kHz Digital Output SPDIF Coaxial Optical MISCELLANEOUS Power Supply Rating 120V 60Hz Power Consumption 160W Dimensions w x h x d 390 mm x 55 mm x 399 mm Weight 4 4 kg ECO Standby Power 1 W IR REMOTE CONTROL Effective Range 8 Meter Number of Keys 45 Battery 1 5V AA x 2 SPEAKERS Front Speakers System 2 way shielded Impedance 8 Ω Speaker drivers 2 x 2 woofer 1 75 tw Dimensio...

Page 31: ...the disc Place the disc with the playback side down Press SYSTEM MENU to turn off the setup menu screen Cancel the parental control rating function or change the rating level Moisture has condensed inside the system Remove the disc and leave the system turned on for about an hour The DVD system does not respond Disconnect the power plug from the outlet and insert again when the buttons are pressed...

Page 32: ...he local Philips service organization will attempt to provide service although there may be a delay if the appropriate spare parts and technical manual s are not readily available MAKE SUREYOU KEEP Please keep your sales receipt or other document showing proof of purchase Attach it to this owner s manual and keep both nearby Also keep the original box and packing material in case you need to retur...

Page 33: ...English E s p a ñ o l Français SC JW 418 10 CLASS 1 LASER PRODUCT LX3750W Meet Philips at the Internet http www philips com PHILIPS CONSUMER ELECTRONICS NORTH AMERICA Knoxville Tennessee 37914 1810 USA ...

Reviews: