Philips LC5131 User Manual Download Page 16

8. Operation

16

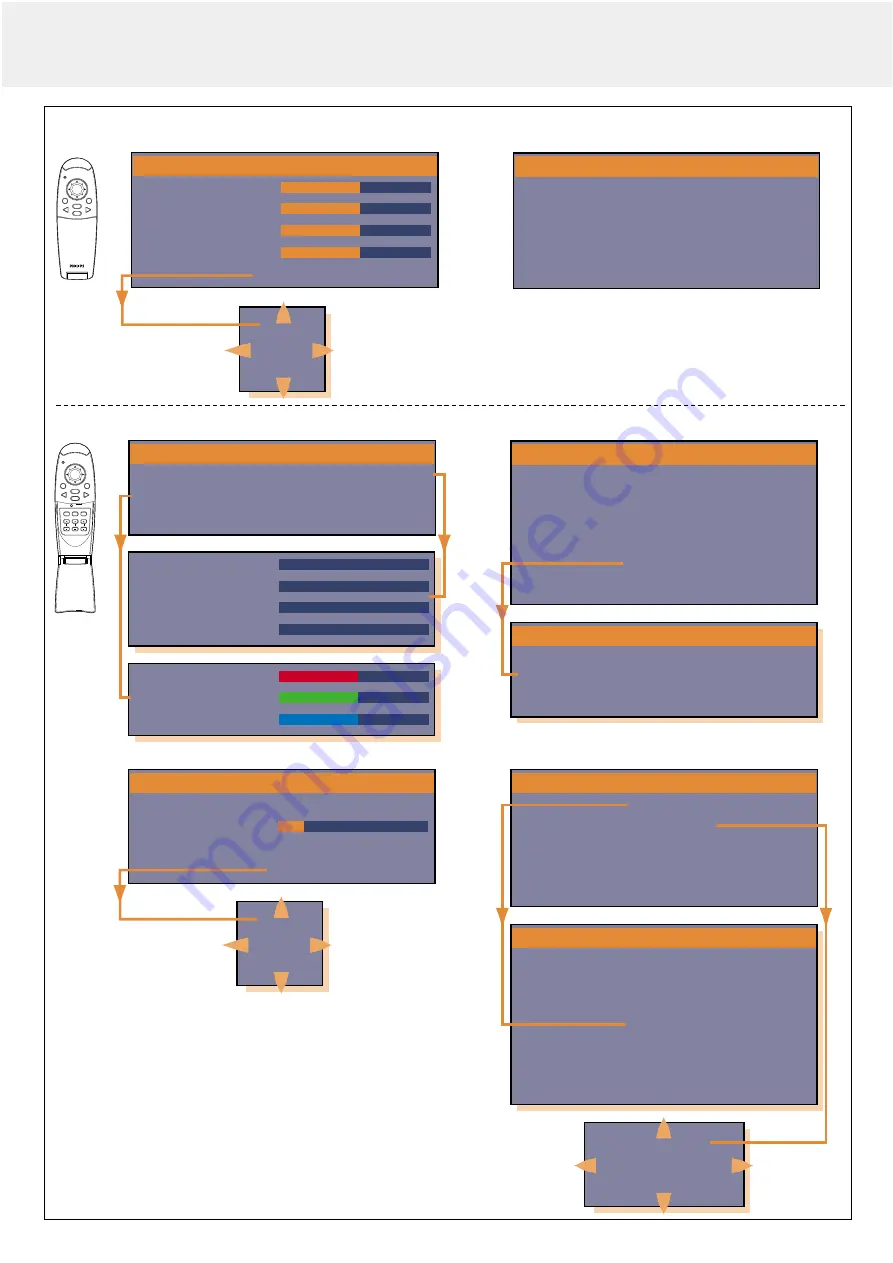
Menu structure - data input

Note: 

The IMAGE and INFORMATION features are also
accessible in the Advanced menu. 

IMAGE 

COLOR 

VIEW SET UP OPTION INFO.

V-EFFECT  

NORMAL 

NATURAL REAL CUSTOM

COLOR TEMP. 

LOW 

MIDDLE NORMAL HIGH

SOURCE CHANGE  

DATA  

YCbCr

INDEX

1

RED

0

GREEN

0

BLUE

0

RED

0

GREEN

0

BLUE

0

IMAGE 

COLOR 

VIEW 

SET UP OPTION INFO.

ASPECT

  REAL


AUTO


DIRECT      4:3>16:9

FILTER

  1

D-KEYSTONE

  NORMAL


FULL

-PAN-

POSITION

IMAGE 

COLOR VIEW 

SET UP 

OPTION 

INFO.

-LANGUAGE-

-MENU POSITION-

MENU TYPE

TRANSLUCENT


OPAQUE

DISPLAY TIME

     30 SEC

ON SCREEN

OFF


ON

Menu position

IMAGE 

COLOR 

VIEW 

SET UP

 OPTION INFO.

SOUND MUTE

OFF


ON

BACKGROUND

BLUE


BLACK

AUTO GAIN

OFF


ON

AUTO SOURCE

OFF


ON

      -PROJECTION-

AUTO POWER OFF

OFF


ON

NORMAL

VERT HORIZONTALLY

REVERSED HORIZONTALLY

REVERSED VERTICALLY

ENGLISH

Deutsch

Français

ITALIANO

Español

Svenska

¥

Auto image D-Freeze

A/V Mute

D-Zoom

Volume

D-Keystone

Mouse

Standby
          /On

Video

Menu

Cancel

Data

Mouse

Standby
          /On

Video

Menu

Cancel

Data

IMAGE


INFORMATION

BRIGHTNESS

0

CONTRAST

0

PICTURE ADJ

0

FINE PICTURE

0

-POSITION-

IMAGE 

INFORMATION

-RESET-

-LAMP USAGE HOURS RESET-

RESOLUTION

1024  X  768

FREQUENCY

H: 48.4 KH z

V: 60 Hz

LAMP USAGE

34

STATUS

-0.02  12

POSITION

Data mode - Advanced menu
flip cover open

Data mode - Normal menu
flip cover closed

Summary of Contents for LC5131

Page 1: ...Philips Multimedia projector LC5141 LC5131 User guide English A ut o im ag e In pu t S ta nd by O n St at us ...

Page 2: ...ag e In pu t St an db y O n OP EN Sta tus 2 fig 1 fig 2 0 Controls and connections Audio in Mouse Data YCbCr Video in S Video in Data YCbCr S Video in Video in Mouse Audio in A u t o i m a g e I n p u t S t a n d b y O n y Status 2 1 3 4 5 6 7 8 9 0 ...

Page 3: ...0 Controls and connections 3 fig 3 Mouse Standby On Video Menu Cancel Data Auto image D Freeze A V Mute D Zoom Volume D Keystone Mouse Standby On Video Menu Cancel Data ª º fl fi ...

Page 4: ... must accept any interference received including interference that may cause undesired operation These limits are designed to provide reasonable protection against harmful interference when the equipment is operated in a commercial environment This equipment generates uses and can radiate radio frequency energy and if not installed and used in accordance with the user s guide may cause harmful int...

Page 5: ... grounded plug for European versions only The 3 pin 2 pin grounded plug will fit only into a grounding type power outlet If the plug does not fit use an adapter that is properly grounded or have an electrician install a grounded type outlet Do not attempt to modify this AC plug 13 For added protection of the projector during a lightning storm or when it is left unattended or not in use for long pe...

Page 6: ...On Screen Display information screens and menus in 8 languages provide you with additional information to help you make the right choices about installation and operation and to perform the correct actions The standard OSD language is English In addition you can select French Spanish German Italian Swedish Chinese and Japanese The transmitter of the wireless remote control allows you to operate bo...

Page 7: ... menu is active the Cursor Control controls the menu cursor rear fig 2 Ventilation slots Audio in Input sockets for connection to the Audio OUT sockets of a video recorder S VHS PAL NTSC SECAM or to the Audio OUT socket of a PC Mouse Socket for connecting a computer mouse Data YCbCr Input socket for connecting to the Data out terminal of a computer or the component video signal output S Video in I...

Page 8: ...lly at a distance of about 1 2 m approx 3 9 feet and the maximum size is approx 200 inches at a distance of 6 8 m approx 22 3 feet from the screen Use the following information when you fix the position of the projector Screen size diagonal Projection distance L Distance lens from center lens to bottom of image H mtrs inch mtrs feet cm inch 0 94 36 1 2 3 93 9 1 3 9 1 52 60 2 0 6 56 16 9 6 65 2 03 ...

Page 9: ...mage Vertical keystone correction If projector and screen are not properly placed the picture will be distorted producing a keystone image Vertical keystone correction allows you to correct picture distortion of the vertical keystone type by internal scaling By pressing the D Keystone buttons of the remote control you can fine adjust the projected image Moving the projector 1 Press the Standby On ...

Page 10: ...n the RC Unit Remote control mouse functions The cursor key on the remote control operates the computer mouse functions If a computer running Windows is connected the OK button on the remote control operates as the computer mouse left click button and the Cancel button as the computer mouse right click button If a Macintosh computer is connected the OK and CANCEL buttons operate in the same way as...

Page 11: ...pter 7 Installation 11 No CONNECTIONS Computer AV products side Projector side Computer VGA Cable CABLE Mini D Sub 15P male RCA pin male Mini D Sub 15P male RCA pin male 4 5 6 7 3 RCA Video Cable 1 2 3 5 mm stereo mini jack male PC Audio Cable Audio Conversion Cable Mouse Cable PS 2 Mouse Cable USB 3 5 mm stereo mini jack male 3 5 mm stereo minijack female S Video Cable Mini Din 4P male Mini Din 4...

Page 12: ... supplied When connecting the projector to a Macintosh computer use the VGA MAC adapter optional 2 Connect the audio OUT socket of the computer to the Audio in socket of the projector For this use the PC audio cable 3 supplied Connecting to PC mouse connector General The remote control of this projector can be used as the PC mouse wireless mouse function by connecting the Mouse connector of this p...

Page 13: ...cket and the red plug into the R socket In case your VCR Laser Disc player video camera or TV is equipped with a Scart connector depending on region 1 Connect the Scart RCA Audio Video adapter optional to the Scart connector of the VCR Laser Disc player video camera or TV 2 Plug the video audio connection cables 2 3 and or 4 supplied into both the adapter and the Video socket and Audio socket of t...

Page 14: ...t video equipment to the corresponding Data YCbCr connector of the projector For this use a YCbCr Component cable optional 3 To use the built in audio system connect one end of the computer audio cable 3 to the Audio in terminal on the projector Connect the other end 4 to the Audio output terminal on the video source Audio in Mouse Data YCbCr Video in S Video in 7 Installation 14 Connecting to vid...

Page 15: ...urce A V muted On Screen Display menu General explanation All video and data adjustments and settings except A V Mute are done via On Screen Displays and with help of Menu and Cursor Control on the remote control The basic settings concerning image and lamp usage are presented in the normal menu This menu will be displayed when the Menu button is pressed with the remote control Flip cover closed A...

Page 16: ...N SCREEN OFF ON Menu position IMAGE COLOR VIEW SET UP OPTION INFO SOUND MUTE OFF ON BACKGROUND BLUE BLACK AUTO GAIN OFF ON AUTO SOURCE OFF ON PROJECTION AUTO POWER OFF OFF ON NORMAL VERTICALLY HORIZONTALLY REVERSED HORIZONTALLY REVERSED VERTICALLY ENGLISH Deutsch Français ITALIANO Español Svenska Auto image D Freeze A V Mute D Zoom Volume D Keystone Mouse Standby On Video Menu Cancel Data Mouse St...

Page 17: ...N AUTO SOURCE OFF ON PROJECTION AUTO POWER OFF OFF ON NORMAL VERTICALLY HORIZONTALLY REVERSED HORIZONTALLY REVERSED VERTICALLY AUTO NTSC NTSC 4 43 PAL PAL M PAL N PAL60 SECAM IMAGE COLOR VIEW SET UP OPTION INFO LANGUAGE MENU POSITION MENU TYPE TRANSLUCENT OPAQUE DISPLAY TIME 30 SEC ON SCREEN OFF ON Menu position ENGLISH Deutsch Français ITALIANO Español Svenska Auto image D Freeze A V Mute D Zoom ...

Page 18: ...can be made For details see Data mode Normal menu Note In case the Auto image feature is adressed in Video mode the picture will mute for a short while No setting of Auto image will take place in Video mode Menu access of projector functions DATA MODE NORMAL MENU Press the Menu button with the flip cover of the remote control closed to display the advanced menu then use the cursor key up down to s...

Page 19: ...n make your desired personal setting COLOR TEMP Color temperature Adjusts the overall picture impression from warm to cool Four different types of color balance can be set beforehand LOW MEDIUM STANDARD and HIGH Personal settings can be made to set the resp R G and B levels To activate the personal setting press the OK button on the remote control when the color balance setting is selected With th...

Page 20: ...ey you can select the desired color system Note Only the NTSC 3 58 and PAL can be used for component video The selection is automatic when AUTO is used SOURCE CHANGE For changing the possible input signal acceptance via the Data input connector Data for standard PC signals YCbCr for component video signals DVD VIEW ASPECT To set the aspect ratio Four different settings can be selected for images R...

Page 21: ...ing menu Use the cursor key to select one of the following languages English German French Italian Spanish Swedish Chinese Japanese MENU POSITION Menu Display Position The menu display position can be set with this function To activate the MENU POSITION feature press the OK button on the remote control when MENU POSITION has been adressed in the OPTION setting menu With the cursor key you can move...

Page 22: ...f usage has exceeded 1100 hours Thus the menu cannot be displayed In such case replace the lamp housing then use the following procedure to reset 1 Connect the power cord Standby status will be activated 2 Press the Input and Auto image buttons of the main unit at the same time for 5 sec or more The lamp hours of usage will be reset After resetting the Status indicator that turned on because 1100 ...

Page 23: ...mps produced and tested under the test conditions of our company for a long term however it may become shorter depending on the conditions of usage After the lamp has been operating for 1000 hours or longer the Status indicator on the control panel will light and the LAMP USAGE icon which shows hours of total lamp usage will be displayed on the screen When this happens turn off the unit and replac...

Page 24: ...t signal Check the resolution of the PC The remote control does not work Does the send indicator LED light If it does not light the batteries are exhausted In such cases replace with fresh batteries Is there any obstacle between the remote control and the photoreceptors of the main unit Is the remote control being used outside its effective range Is there a fluorescent light or other strong light ...

Reviews: