background image

PC Connection

21

EN

9 PC  Connection

Type 4 (PC)

(LPF¦935, LPF¦940)

Requirements

PC

Your computer must meet the following minimum re-
quirements:

Processor

Processor

Pentium II-Processor with:
800 MHz for Windows 2000 (SP¦3) · ME
1 GHz for Windows XP · Vista 32bit

RAM

RAM

128 MB for Windows 2000 (SP¦3) · ME
192 MB for Windows XP
512 MB for Windows Vista Home
1.024 MB for Windows Vista Premium · Business · Ulti-
mate

Operating System

Operating System

Windows 2000 (SP¦3) · ME · XP · Vista

Free Hard Drive Space

Free Hard Drive Space

260 MB of free hard drive space

Connection

Connection

USB 1.1 · USB 2.0 Full Speed

Customer Information

Installing the Software

Installation

Installation-CD

On the installation CD supplied with your device, you will
find the 

Companion Suite LL

 and 

Scan-to-PDF

. With

the 

Companion Suite LL

, you can access the address

book of the device from your computer and add or edit en-
tries. You can also alter your device settings as well as
checking the toner level of the toner cartridge. With 

Scan-

to-PDF

 scan the documents with your device and save

them directly as PDF files.

1

Close all open programs and applications before begin-
ning the installation process. Place the installation CD
in the CD-ROM drive of your computer. The program
will start automatically.

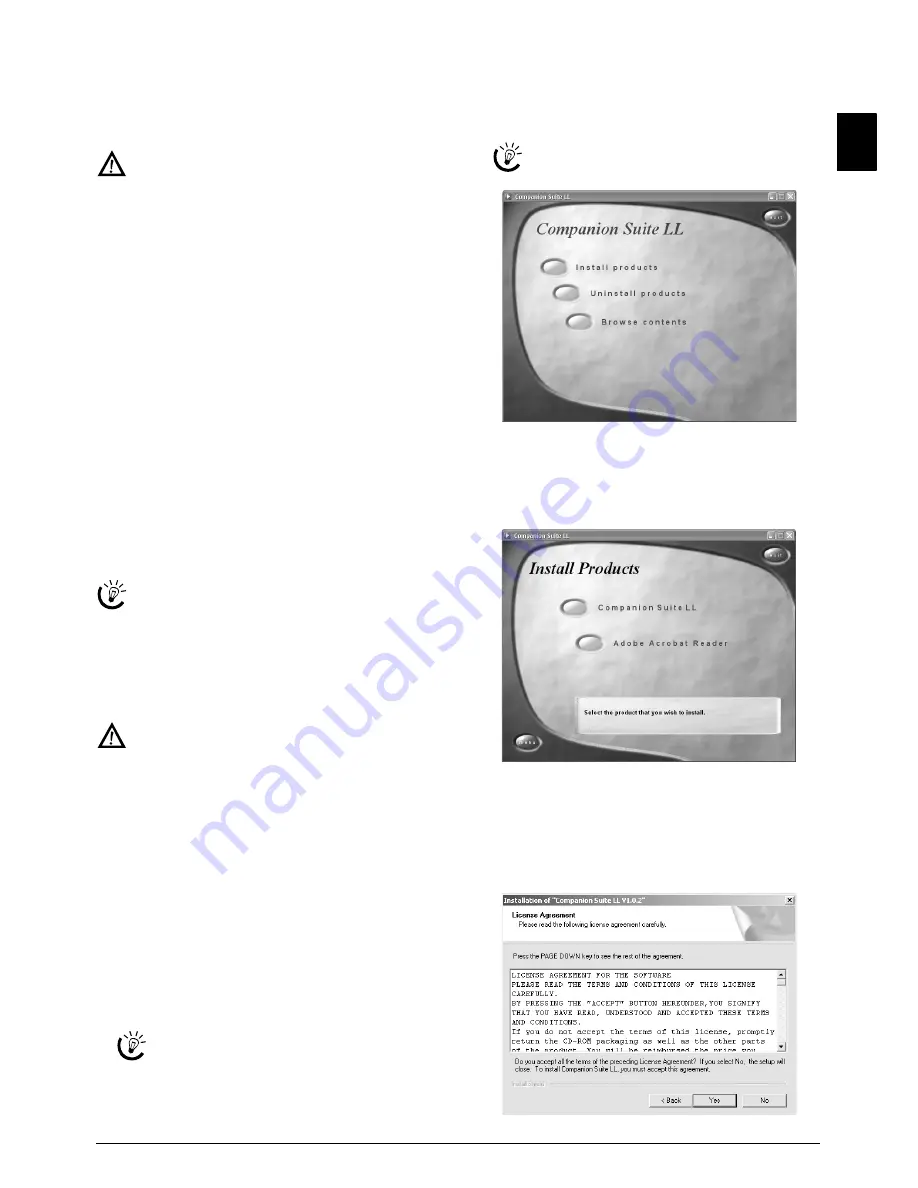
2

The 

Companion Suite LL

 window appears on the

screen. You can install or uninstall 

Companion Suite

LL

. Click on 

Install products

.

3

By selecting 

Companion Suite LL

, you will install

Companion Suite LL

 and 

Scan-to-PDF

, as well as

the drivers for the printer and scanner. By selecting

Adobe Acrobat Reader

 you will install 

Acrobat

Reader

. Click on 

Companion Suite LL

.

4

Your computer will now prepare for the installation
process. Then a window will appear on the screen in
which you may start the installation process. Click on

Next

.

5

Next you will be asked to accept the licensing condi-
tions. Click on 

Yes

.

You can connect your device to a PC (Microsoft
Windows operating system). The device is not com-
patible with Linux or Apple Macintosh.

Should problems with the PC connection arise, have
the following information to hand when you contact
technical customer services: hardware configuration
of your computer, operating system installed and se-
curity programmes used (anti-virus programmes,
firewall). Then we can help you more quickly.

First

 install the software. The device may not be

connected to the PC before this. After the software
installation, the PC must be restarted. 

Only then

should you connect your PC and the device with a
USB cable.

If the program does not start automatically, select
the CD-ROM drive in the Windows Explorer
and start the program 

Setup.exe

 with a double-

click.

Click on 

Browse contents

 to view the files on

the installation CD.

Summary of Contents for Laserfax LPF 920

Page 1: ...EN User Manual LPF 920 LPF 925 LPF 935 LPF 940 ...

Page 2: ...s Received SMS messages can be managed with the extensive func tions of the SMS menu Text2Fax You can enter text on your device and send as a fax trans mission to another device in countries and networks with out SMS function If you want your device can print Sudoku puzzles in four different difficulty levels with solution PC Connection You can connect the device to your computer PC with Microsoft...

Page 3: ...opy 17 Adjusting Copies 17 7 SMS 18 SMS Requirements 18 Sending SMS 18 Receiving SMS Messages 18 Reading SMS Messages 18 Printing SMS Messages 18 Deleting SMS Messages 19 Modifying the Settings 19 Sending Text2Fax 19 8 Fun and Games 20 Sudoku 20 9 PC Connection 21 Requirements 21 Installing the Software 21 Using Companion Suite 22 Editing the Telephone Book 22 Modifying the Settings 23 Displaying ...

Page 4: ...n The packing materials should be kept out of the hands of children Magnetic telephone handset The telephone handset of the device is magnetic Caution small metallic objects paper clips may be retained if placed near or on the telephone handset Power Supply Check whether the mains voltage of your device Check whether the mains voltage of your device indicated on the type label matches the mains vo...

Page 5: ...age 14 3 SMS Function is not supported in all countries and networks Function is not supported in all countries and networks 31 Sending SMS 31 Sending SMS page 18 32 Reading SMS 32 Reading SMS page 18 33 Deleting SMS 33 Deleting SMS page 19 34 Printing SMS 34 Printing SMS page 18 35 Settings for sending and receiving SMS 35 Settings for sending and receiving SMS page 19 36 Changing Transmitting an...

Page 6: ...e Plug n Print card 10 Telephone Handset with Spiral Cable Type 3 Telephone handset with spiral cable LPF 925 LPF 935 Außenansicht nummeriert 1 Toner Cartridge Toner cartridge Außenansicht Tonerkartusche Connections on the Rear Side 1 Telephone Handset Socket Socket Connection socket for the telephone LPF 925 LPF 935 2 External Devices ƒ EXT Socket Connection socket for additional de vices 3 Telep...

Page 7: ...ception Copy COPY Press twice making copies automatically Press once adjusting copies Help Print list of functions jobs settings printing fax jour nal or telephone book Sudoku printing a game printing the fax templates SMS Function is not supported in all countries and networks _ Calling up the SMS menu function is not support ed in all countries and networks in countries and net works without SMS...

Page 8: ... paper in standard format A4 210 297 millimetre preferably80 g m2 Follow the specifications in the tech nical data Loading Paper Preparing Paper 1 Remove the cover from the paper tray 2 Put in only as much paper as will fit under the raised limit markers on the upper edge of the paper tray see also the drawings on the cover of the paper tray You can load up to 250 sheets If one of the parts is mis...

Page 9: ...t be inserted into the device For this reason a starter cartridge is supplied with the device The toner level memory for this starter cartridge was set at the factory The starter cartridge need not be updated with a Plug n Print card For each additional toner cartridge that you insert into your device you must update the toner lev el memory with the Plug n Print card provided 1 Open the cover by t...

Page 10: ... Date and Time 1 Enter the date two digits for each field for example 31 05 25 for May 31th 2025 2 Enter the time e g 14 00 for 2 pm 3 Confirm with OK Once you have removed the protection strip do not shake the toner cartridge any more Other wise it is possible that toner dust will be released into the air Your device is an analogue fax device Group 3 It is not an ISDN device Group 4 and therefore...

Page 11: ...h the Handset Replaced Press μ to dial without lifting up the handset You will hear the dial tone from the loudspeaker the dialling proc ess will commence immediately Telephone Book Help 4 Telephone book Telephone Book Call the telephone book functions using am You can store new entries search for entries as well as set and edit groups You can save up to 200 entries in the telephone book of your d...

Page 12: ...lete individ ual recipients Press am to add a recipient from the telephone book 9 Confirm with OK 10 If necessary enter a new number for the group 11 Confirm with OK Deleting a Group 1 Press am 2 Using select CANCEL 3 Confirm with OK 4 Select the group that you would like to delete 5 Confirm with OK 6 Confirm the deletion with OK Calling Line Identification CLIP Function is not supported in all co...

Page 13: ...ved entry 3 Press μ 4 Press o Press 3 and OK to print the fax journal of the last 30 transmissions Do not insert any documents into the machine that are wet have been edited with correction fluid are soiled or have a coated surface are written on with a soft pencil with paint chalk or charcoal originate from newspapers or magazines printing ink are held together with office or notebook staples or ...

Page 14: ... 24 hours 1 Insert the document 2 Press OK 24 and OK 3 Enter the desired number using the numeric keypad or select a saved entry 4 Confirm with OK 5 Enter the time at which the document should be trans mitted e g 14 00 for 2 pm 6 Confirm with OK 7 Using select the desired contrast 8 Confirm with OK After a short warm up phase the device will read the document into the memory and will send out the ...

Page 15: ...mber using the numeric keypad or select a saved entry 3 Confirm with OK 4 Enter the time at which the document should be polled e g 14 00 for 2 pm 5 Confirm with OK 6 The device is now in standby mode You can continue to carry on telephone conversations or send other fax transmissions during this time Jobs Polling Send of Faxes 1 Insert the document 2 Press OK 23 and OK 3 Using select SIMPLE or MU...

Page 16: ... 52 and OK 2 Using select the job that you would like to modify 3 Confirm with OK 4 Enter the desired changes and confirm by pressing OK Deleting a Job 1 Press OK 53 and OK 2 Using select the job that you would like to delete 3 Confirm with OK 4 Confirm the deletion with OK Printing a Job 1 Press OK 54 and OK 2 Using select the job that you would like to print out 3 Confirm with OK Printing the Jo...

Page 17: ...sting Copies 1 Press COPY 2 Enter the number of times you would like to copy the document maximum of 99 copies 3 Confirm with OK 4 Select the desired resolution using You have a higher resolution available to you for copying than you have for fax transmissions RESOL FAST For documents without special fea tures RESOL QUALITY For documents with small print or drawings RESOL PHOTO For the highest res...

Page 18: ... 8 Press _ The message is sent Receiving SMS Messages Receiving SMS Messages When you have received an SMS the green light â _ will shine on your device and the _ symbol will appear on the display Received SMS messages are printed out au tomatically If you have turned the automatic printing function off the SMS messages will be stored Your device can store up to 30 SMS messages Reading SMS Message...

Page 19: ... Use to select whether you would like to turn the function on or off 5 Confirm with OK Switching Notification Tone On Off Switching Notification Tone On Off You will hear a notification tone whenever an SMS mes sage has arrived You have the option of turning this func tion off 1 Press OK 35 and OK 2 Using select BEEP SMS 3 Confirm with OK 4 Use to select whether you would like to turn the function...

Page 20: ...how many copies of the Sudoku you would like to print maximum 9 copies 5 Confirm with OK 6 Using select if you would like to print the solution 7 Confirm with OK Printing the Solution 1 Press OK 68 and OK 2 Using select SOLUTION 3 Confirm with OK Sudoku for Every Day You can have a new Sudoku automatically printed each day 1 Press OK 68 and OK 2 Using select AUTO 3 Confirm with OK 4 Using indicate...

Page 21: ...matically 2 The Companion Suite LL window appears on the screen You can install or uninstall Companion Suite LL Click on Install products 3 By selecting Companion Suite LL you will install Companion Suite LL and Scan to PDF as well as the drivers for the printer and scanner By selecting Adobe Acrobat Reader you will install Acrobat Reader Click on Companion Suite LL 4 Your computer will now prepar...

Page 22: ...Director from the Start menu Start Companion Suite Click on Address book to edit the telephone book of your device Click on Settings to change the basic settings of your device Under Status you can select the settings for the display of the toner level as well as for the application Scan to PDF If you would like to create PDF files out of scanned documents click on the large icon Doc Manager in th...

Page 23: ...rm with OK Archiving the Telephone Book Introduction With the address book of the Companion Suite LL you can save the telephone book entries of your device to your PC or load saved entries file format csv Export Click on File Export to save the telephone book en tries You can select the directory in which you would like to save the file Import Click on File Import to add entries to the address boo...

Page 24: ...of your document first A long document is then output sorted the first page lies on top Scanning Scan to PDF Scan to PDF With Scan to PDF scan the documents with your device and save them directly as PDF files Configuring the nec essary settings in the Status menu also see chapter Set tings for Scan to PDF page 23 Document Formats Use documents with size A4 210 297 millimetres with 60 90 g m2 Do n...

Page 25: ... would like to use fairly often for example for scanning of a frequently used document type 1 First configure all the settings 2 Click on New 3 Enter a name for the profile 4 Click on Save Pre selection To scan documents with the saved settings select this pro file from the selection menu Uninstalling the Software 1 Close all open programs and applications before begin ning the uninstall process L...

Page 26: ...e device Entering the PIN Code 1 Press OK 61 and OK 2 Using select LOCKING CODE 3 Confirm with OK 4 Enter a four digit PIN code 5 Confirm with OK 6 Enter the code again for confirmation purposes 7 Confirm with OK Locking the Keyboard 1 Press OK 61 and OK 2 Using select LOCK KEYBD 3 Confirm with OK 4 Enter the four digit PIN code 5 Confirm with OK 6 Use to select whether you would like to turn the ...

Page 27: ...be printed after each successful fax transfer as well as after interrupted transfers ON ERROR The transmission will only be printed if the fax transfer was not successfully completed or if it was ter minated prematurely 3 Confirm with OK Additional Fax Reception Options Sorted Print Outs Sorted Print Outs If your device receives fax transmissions with multiple pag es it will sort the pages as it p...

Page 28: ...LPF 935 Automatic Mode If the Automatic Mode is active the device will check to determine whether the incoming call is a fax transmission or a telephone call The device will automatically receive fax transmissions While the device is checking the call it continues to ring You can accept telephone calls at any time After a predetermined number of rings the device will take over the call and automat...

Page 29: ...nsert the telephone cable of the additional device into the EXT socket RJ 11 connection on the device Externe Geräte anschließen Connecting in Serial Connection to the Telephone Line Order of Connections In order for the fax switch to function the machine must be first in the series if multiple devices are connected to the same telephone socket Follow the correct order Multiple Telephone Sockets U...

Page 30: ...vice The cartridge should snap securely into position 8 Close the cover Make sure that the cover snaps securely into position on both sides 9 NEW CARTRIDGE appears on the display Confirm with OK Use only original consumable materials These are available from a specialised retailer or through our order service see back side of this user manual Oth er consumable materials can cause damage to the de ...

Page 31: ...ckward 2 It is possible that you will have to remove the toner car tridge in order to reach the paper Should the error message UNREADABLECARD appear on the display you may have inserted the Plug n Print card incorrectly The contacts must face to the left as you insert the card into the de vice You can interrupt the recharging process at any time by pressing j However the toner level memory must be...

Page 32: ...e instruc tions on the display In case of a paper jam do not forcefully remove the paper but rather pull it gently out of the de vice and throw it away carefully It is possible that the toner may not be completely set on the print out and toner dust could be released into the air Do not inhale the released toner dust Remove the toner dust from clothing or objects with cold water hot water would on...

Page 33: ...t The device will not receive faxes on its own page 28 You hear a whistling tone or silence in the handset The call is a fax Press o on the device Press 5 on the additional telephone Hang up Problems with Printing No printing Printing is interrupted Paper or document jam no paper or toner cartridge Follow the instructions on the display Copy is blank or the recipient has received a blank sheet Ins...

Page 34: ... dialling process begins you can freely combine and edit telephone book entries manually entered digits numbers from the redial list or numbers from the caller list For example if you have saved the telephone number pre fix of an inexpensive telephone service provider see Call by Call as a telephone book entry select this entry and manually enter the desired telephone number or select an other num...

Page 35: ...ontrast to the soft modem its features and functions are fixed and thus cannot be changed see Soft Modem see Modem ISDN Integrated Services Digital Network ITU International Telecommunications Union UN organisa tion Journal The journal contains information pertaining to the last tel ephone calls as well as to sent and received faxes and SMS messages The journal can be printed out manually or the m...

Page 36: ...Frequency In many countries tone dialling has replaced pulse dial ling in which each number was sent as a corresponding number of pulses With tone dialling a specific tone is as signed to each key referred to as DTMF tones Toner Level Memory Update the toner level memory of your device with the Plug n Print card that is included with each new toner car tridge Your device registers the extent of to...

Page 37: ...on Quality Quality 400 200 dpi Resolution Photo Photo 400 200 dpi Multiple Copies Multiple Copies up to 99 pages Computer Network Connection Type 4 PC LPF 935 LPF 940 Type of connection Type of connection USB 1 1 USB 2 0 Full Speed Supported Operating Systems Supported Operating Systems Windows 2000 SP 3 ME XP Vista Subject to Change Technical specifications subject to change with out notice Guara...

Page 38: ...nc tion of the line used by the subscriber or his correspondent Transmission faults for example poor geographical cov erage by radio transmitters interference or poor line qual ity The local network fault wiring servers workstations or the failure of the transmission network such as but not limited to interferences fault or poor quality of the net work Modification of the parameters of the cellula...

Page 39: ...w the statutory regulations of your country with re gard to the legal validity of fax transmissions particularly in connection with the validity of signatures meeting de livery deadlines or disadvantages resulting from the loss of quality in the transmission etc Take care to maintain the statutory regulations of your country regarding telecommunications secrecy and data privacy This product is int...

Page 40: ...eive the maximum benefit from your product Introduction 3 We can assist your more quickly if you do not call us from the machine rather an external telephone Keep a printout of the settings as well as the serial number of the machine handy The serial number can be found on the type label PC Connection Should problems with the PC connection arise have the following information to hand when you cont...

Reviews: