


Alignments
8.
8.3.4
Geometry
Introduction
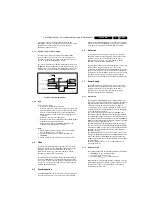
The geometry alignment menu contains several items for
correct picture geometry alignment.
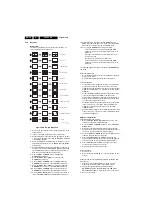
Figure 8-4 Geometry alignments
1.
Connect the RF output of a video pattern generator to the
antenna input.
2.
Input a crosshatch test pattern to the television set.
3.
Set the amplitude of the video pattern generator to at least
1 mV and set the frequency to 475.25 MHz (PAL/SECAM)
or 61.25 MHz (NTSC).
4.
Press the SMART PICTURE button on the remote control
transmitter repeatedly to choose PERSONAL or MOVIES
picture mode.
5.
Activate SDAM by pressing the following key sequence on
the remote control transmitter:
0 6 2 5 9 6
directly followed
by the MENU button (do not allow the display to time out
between entries while keying the sequence).
6.
Use the MENU UP/DOWN keys to highlight the
GEOMETRY sub menu.
7.
Press the MENU LEFT/RIGHT keys to enter the
GEOMETRY sub menu.
8.
Use the MENU UP/DOWN keys to highlight either the
HORIZONTAL sub menu or the VERTICAL sub menu.
9.
Press the MENU LEFT/RIGHT keys to enter either the
HORIZONTAL sub menu or the VERTICAL sub menu.
10. Use the MENU UP/DOWN keys to select items in the
HORIZONTAL sub menu or the VERTICAL sub menu.
11. Use the MENU LEFT/RIGHT keys to adjust the values of
items in the HORIZONTAL and VERTICAL sub menus.
12. When all desired changes to the HORIZONTAL and
VERTICAL sub menu values are made, press the MENU
button twice to return to the top level SDAM menu.
13. To ensure the GEOMETRY settings are saved:
–
Turn the television set 'off' by using the 'POWER'
button on the remote control transmitter or the local
keyboard.
–
Disconnect the television set from AC power for at
least ten seconds.
–
Reconnect the television set to AC power.
–
Turn the television set 'on' by using the 'POWER'
button on the remote control transmitter or the local
keyboard.
The following alignments can be performed in the GEOMETRY
sub menu:
Horizontal Alignments:
•
Horizontal Shift (HSH). Select Horizontal Shift to center the
picture on the screen.
•
Picture Width (PW). Aligns the width of the picture.
Vertical Alignments:
•
Vertical slope (VSL). Aligns the picture so the proportions
are the same at the top and bottom of the screen. This
alignment must be performed first, before all other vertical
alignments. Turning SBL, 'on' will assist in performing this
alignment.
•
Vertical Amplitude (VAM). Aligns the height of the picture
(other vertical alignments are NOT compensated).
•
Vertical S-Correction (VSC). Aligns the vertical linearity, so
that the vertical intervals of the grid-patterns are the same
over the entire height of the screen.
•
Vertical Shift (VSH). Aligns the vertical center of the picture
to the vertical center of the CRT. After performing this
alignment, it may be necessary to perform the VAM
alignment again.
•
Service blanking (SBL). Turns the blanking of the lower half
of the screen 'on' or 'off' (to be used in combination with the
vertical slope alignment).
Methods of Adjustment
Vertical Amplitude and Position
1.
Select SERVICE BLANKING (SBL) and set it to 1. The
lower half of the picture will be blanked.
2.
Press the MENU UP/DOWN buttons to select VERTICAL
SLOPE (VSL).
3.
Align VSL to start the blanking exactly at the horizontal
white line at the center of the test circle (align the bottom of
the screen so that castellations just disappear).
4.
Press the MENU UP/DOWN buttons to select SBL and set
it back to 0. The full picture reappears.
5.
Select VERTICAL AMPLITUDE (VAM) and align the
picture height to approximately 13.0 - 13.1 blocks (align the
top of the screen so that castellations just disappear).
6.
Select VERTICAL SHIFT (VSH) and align for vertical
centering of the picture on the screen.
7.
Repeat the last two steps if necessary.
Horizontal Phase
1.
Set PW to "0".
2.
Select Horizontal Shift (HSH) to center the picture on the
screen.
Horizontal and Vertical Shift Offset for NTSC (TriNorma and
PAL chassis)
1.
Align the set for VSH and HSH (according to above
mentioned procedures) with a PAL system signal.
2.
Change the signal to NTSC system and adjust
HORIZONTAL SHIFT OFFSET (H60) and VERTICAL
SHIFT OFFSET (V60) to center the picture on the screen.
3.
Repeat if necessary.
CL 16532044_022.eps
140501
1
2
3
4
5
6
7
8
9
10
11
12
VERT. SLOPE
VERT. SHIFT
VERT. AMPLITUDE
V.S-CORRECTION
HOR. SHIFT
HOR. AMPLITUDE
E/W PARABOLE
UPPER E/W CORNER
LOWER E/W CORNER
E/W TRAPEZIUM
HOR. PARALLELOGRAM
HOR. BOW
Summary of Contents for L03.2L AA
Page 1: ......