background image

13

       6 Change 

settings

  This section helps you to change the settings of 
your home theater. 

 Caution

 Most of the settings are already con gured 


with the best value for the home theater. 
Unless you have a speci c reason to change a 
setting, it is best to leave it at the default value.

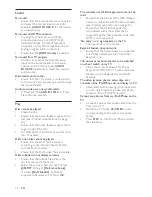
    Access the setup menu

    1

 Press 


SETUP

 .

    The following menu appears.


»

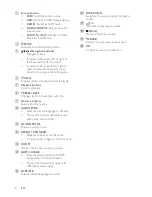
 Symbol

 Description


[General Setup]


[Audio Setup]


[Video Setup]


[Preference Setup]

      2

  Select a setup menu, then press  

OK

 .

  See the following sections for information 
about how to change the settings of your 
home theater.

    3

 Press 


 BACK

  to return to the previous 

menu, or press     

SETUP

  to exit.

 Note

 You cannot change a setting that is grayed out.


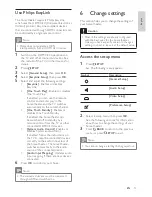
        Use Philips EasyLink

   The home theater supports Philips EasyLink, 
which uses the HDMI CEC (Consumer Electronics 
Control) protocol. EasyLink-compliant devices 
that are connected through HDMI connectors can 
be controlled by a single remote control. 

 Note

 Philips does not guarantee 100% 


interoperability with all HDMI CEC devices.

      1

  Switch on the HDMI CEC operations on 

the TV and other connected devices. See 
the manual of the TV or other devices for 
details. 

    2

 Press 


SETUP

 .

    3

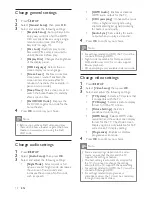
 Select 


[General Setup]

 , then press  

OK

 .

    4

 Select 


[EasyLink Setup]

 , then press  

OK

 .

    5

  Select and adjust the following settings: 


• 

[EasyLink]

  : Enables or disables 

EasyLink.


• 

[One Touch Play]

  : Enables or disables 

One Touch Play.

  If enabled, you can use the remote 
control to start disc play in the 
home theater and the TV switches 
automatically to the correct channel.
     

• 

[One Touch Standby]

  : Enables or 

disables One Touch Standby.

  If enabled, the home theater can 
be switched off to standby by a 
remote control from the TV or other 
connected HDMI CEC devices.
     

• 

[System Audio Control]

  :Enables or 

disables System audio control.

  If enabled, follow the instructions on 
the TV to map the connected devices 
correctly to the audio connectors of 
the home theater. The home theater 
switches automatically to the audio 
source of the connected device.
     

• 

[Audio Input Mapping]

  : Updates audio 

input mapping if there are new devices 
connected. 

      6

 Press 


OK

  to con rm your choice. 

 Note

 The connected devices must be connected 


through HDMI and switched on.

English

EN

1_HTS5200_12_EN-US_v3.indd   Sec1:13

6/8/2010   1:35:51 PM

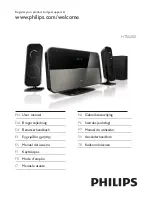
Summary of Contents for HTS5200

Page 1: ...om welcome EN User manual DA Brugervejledning DE Benutzerhandbuch EL ES Manual del usuario FI Käyttöopas FR Mode d emploi IT Manuale utente NL Gebruiksaanwijzing PL Instrukcja obs ugi PT Manual do utilizador SV Användarhandbok TR Kullan m k lavuzu HTS5200 ...

Page 2: ......

Page 3: ...audio fromTV or other devices 8 5 Use your home theater 9 Before you start 9 Choose your sound 9 Play a disc 10 Play from radio 11 Play audio fromTV or other devices 11 Play from a USB storage device 11 Play from an iPod or iPhone 12 More play features for disc or USB 12 Use Philips EasyLink 13 6 Change settings 13 Access the setup menu 13 Change general settings 14 Change audio settings 14 Change...

Page 4: ...de to complete the registration process and learn more about DivX VOD Windows Media and the Windows logo are trademarks or registered trademarks of Microsoft Corporation in the United States and or other countries 1 Notice Copyright This item incorporates copy protection technology that is protected by U S patents and other intellectual property rights of Rovi Corporation Reverse engineering and d...

Page 5: ... the power cord always pull the plug never the cable Risk of short circuit or re Before you connect the product to the power outlet ensure that the power voltage matches the value printed on the back or bottom of the product Never connect the product to the power outlet if the voltage is different Risk of injury or damage to the home theater For wall mountable products use only the supplied wall m...

Page 6: ...place the product or any objects on power cords or on other electrical equipment If the product is transported in temperatures below 5 C unpack the product and wait until its temperature matches room temperature before connecting it to the power outlet Visible and invisible laser radiation when open Avoid exposure to beam Do not touch the disc optical lens inside the disc compartment Risk of overh...

Page 7: ...lations on your purchase and welcome to Philips To fully bene t from the support that Philips offers register your home theater at www philips com welcome Main unit a Increases or decreases volume b Display panel c Play Pause Starts pauses or resumes play d Stop Stops play In radio mode erases the current preset radio station e Eject Ejects the disc from the disc compartment f Disc compartment g S...

Page 8: ...rward In radio mode press left or right to search a radio station press up or down to ne tune a radio frequency f INFO Displays information about what is playing g Playback buttons Control playback h TREBLE BASS Changes treble or bass Use with i Numeric buttons Selects an item to play j AUDIO SYNC Selects an audio language or channel Press and hold to synchronize audio with video Use with k SOUND ...

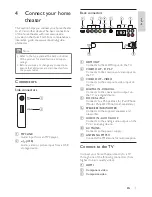
Page 9: ...for radio reception Connect to the TV Connect your home theater directly to a TV through one of the following connectors from highest to basic quality video a HDMI b Component video c Composite video 4 Connect your home theater This section helps you connect your home theater to aTV and other devices The basic connections of the home theater with its accessories are provided in the Quick Start For...

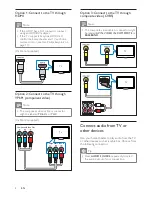
Page 10: ...O SOURCE repeatedly to select the audio output of your connection TV 2 1 TV Option 1 Connect to the TV through HDMI Note If the HDTV has a DVI connector connect using an HDMI DVI adapter If the TV supports EasyLink HDMI CEC control the home theater and TV with one remote control see Use Philips EasyLink on page 13 Cable not supplied Option 2 Connect to the TV through YPbPr component video Note The...

Page 11: ...epeatedly to cycle through the available sound modes Sound mode Description ACTION ROCK Enhanced low and high range Ideal for action movies and rock or pop music DRAMA JAZZ Clear mid and high range Ideal for drama movies and jazz music CONCERT CLASSIC Neutral sound Ideal for live concerts and classical music SPORTS Moderate mid range and surround effects for clear vocals and the atmosphere of a li...

Page 12: ...uage for video INFO Displays information about what is playing REPEAT Repeats a chapter or title ANGLE Displays options for different camera angles Change virtual surround mode DVS Dolby Virtual Speaker technology creates a highly compelling 5 1 channel listening experience from as few as two speakers Press SURROUND to switch surround sound or stereo sound Change treble or bass Change the high fre...

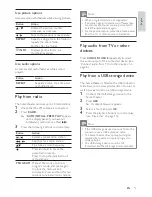
Page 13: ...USB storage device must be FAT formatted and Mass Storage Class compliant Use picture options Access several useful features while viewing pictures Button Action Rotates the picture counter clockwise or clockwise Skips to the previous or next picture REPEAT Repeats a single le in the folder or repeats the entire folder Shuf es les in a folder INFO Displays photo albums in a thumbnail overview Use ...

Page 14: ... connecting and installing a Philips Dock for iPod iPhone you can use the home theater to play music movies and photos from your iPod or iPhone Note Philips Dock for iPod iPhone is sold separately You can charge your iPod iPhone on the dock while the home theater is in iPod mode Dock your iPod or iPhone 1 Connect the dock to the home theater and connect the yellow composite cable from the dock to ...

Page 15: ...all HDMI CEC devices 1 Switch on the HDMI CEC operations on the TV and other connected devices See the manual of the TV or other devices for details 2 Press SETUP 3 Select General Setup then press OK 4 Select EasyLink Setup then press OK 5 Select and adjust the following settings EasyLink Enables or disables EasyLink One Touch Play Enables or disables One Touch Play If enabled you can use the remo...

Page 16: ... setting ensure that the TV supports the new setting For settings related to HDMI the TV must be connected through HDMI For settings related to progressive or component video the TV must be connected through Component Video Change general settings 1 Press SETUP 2 Select General Setup then press OK 3 Select and adjust the following settings EasyLink Setup Sets up EasyLink to enjoy easy controls of ...

Page 17: ...ress OK 3 Select and adjust the following settings Audio Selects audio language for video Subtitle Selects subtitle language for video Disc Menu Selects menu language for video disc Parental Restricts access to discs that are recorded with ratings To play all discs irrespective of the rating select level 8 PBC Displays or skips the content menu for VCD and SVCD discs MP3 JPEG Display Displays the ...

Page 18: ...x 395 x 342 mm Weight 5 25 kg Cable length 4 m Speakers System full range satellite Speaker impedance 6 ohm Speaker drivers 1 x 76 mm 3 woofer 25 mm 1 tweeter Frequency response 150 Hz 20 kHz Dimension WxHxD 114 x 316 x 114 mm Weight 1 03 kg Cable length 2 m 8 Product specifications Note Speci cation and design are subject to change without notice Region code The type plate on the back or bottom o...

Page 19: ...t The buttons on this home theater do not work Disconnect the home theater from the power outlet for a few minutes then reconnect Picture No picture Ensure that the TV is switched to the correct source for this home theater If this happens when you change the TV system switch to its default mode 1 Press 2 Press 3 Press SUBTITLE If this happens when you switch on the progressive scan mode switch to...

Page 20: ...and select the correct input source for example AUDIO SOURCE for the device you want to play No sound on HDMI connection You might not hear any sound if the connected device is not HDCP High bandwidth Digital Content Protection compliant or only DVI compatible Use an analog or digital audio connection Ensure that the HDMI Audio is enabled No sound from TV program Connect an audio cable from the au...

Page 21: ... product speci cations 16 R radio play 11 program 11 tune 11 recycle 4 region code 16 remote control 5 repeat 10 rotate pictures 11 10 Index A ampli er 16 audio connection 8 language 15 10 synchronize with video 12 audio input mapping 13 C care 4 change settings 13 connect audio from TV 8 11 guide 7 other devices 8 TV 7 connectors 7 contact us 17 D disc play 10 supported discs 16 disposal of your ...

Page 22: ...ay musical slideshow 12 software update 15 version 15 sound mode 9 treble and bass 10 troubleshooting 18 subtitle language 10 system audio control 13 T time search video 12 troubleshooting 17 TV audio from TV 8 11 connect 7 U USB play 11 V video options 10 settings 14 synchronize with audio 12 video on demand VOD 14 EN ...

Page 23: ... Lao 7679 Latina 7665 Latvian 7686 Letzeburgesch 7666 Limburgan Limburger 7673 Lingala 7678 Lithuanian 7684 Luxembourgish 7666 Macedonian 7775 Malagasy 7771 Magyar 7285 Malayalam 7776 Maltese 7784 Manx 7186 Maori 7773 Marathi 7782 Marshallese 7772 Moldavian 7779 Mongolian 7778 Nauru 7865 Navaho Navajo 7886 Ndebele North 7868 Ndebele South 7882 Ndonga 7871 Nederlands 7876 Nepali 7869 Norsk 7879 Nor...

Page 24: ... 2010 Koninklijke Philips Electronics N V All rights reserved sgptt_1023 12_v3 ...

Reviews: