background image

8

EN

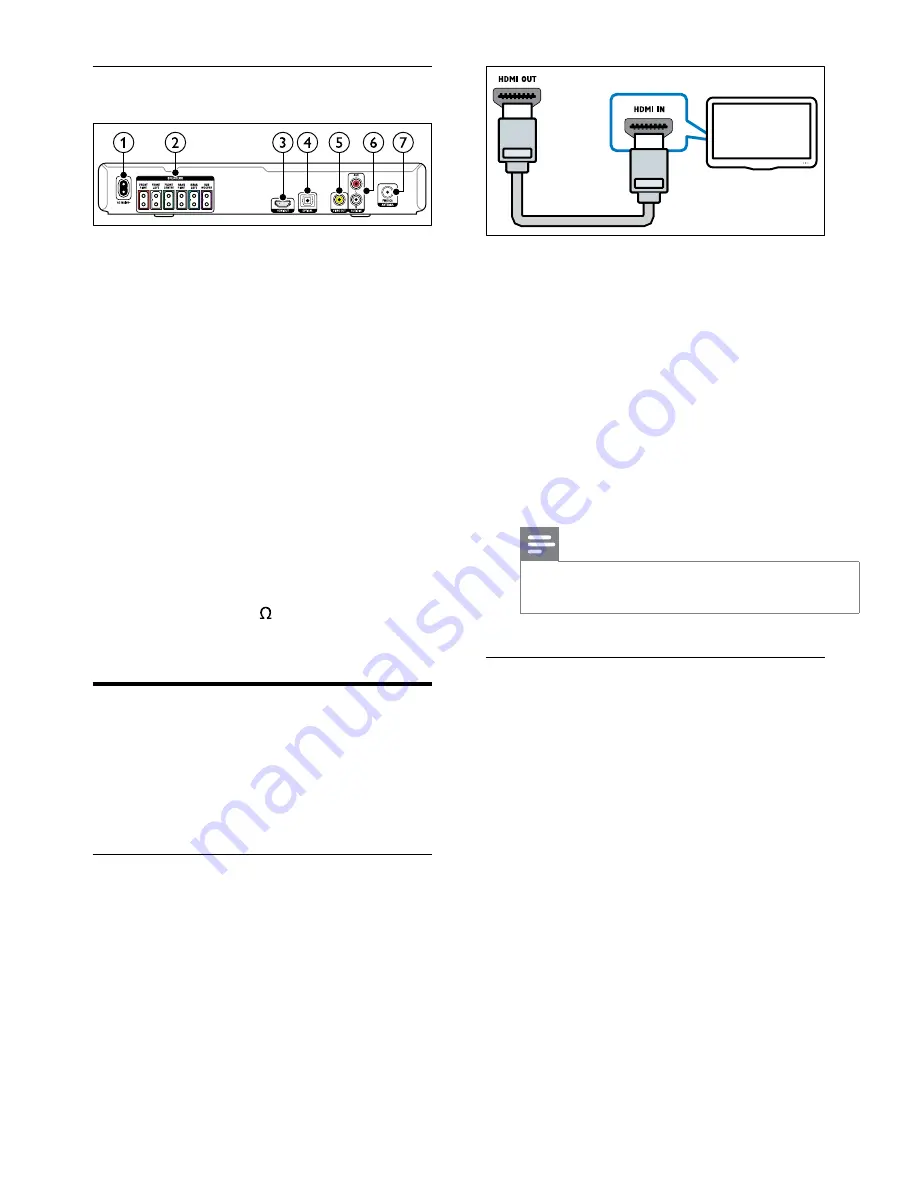
Back connectors


AC MAINS

Connect to the power supply.

SPEAKERS

Connect to the supplied speakers and subwoofer.

HDMI OUT

Connect to the HDMI input on the TV. 

OPTICAL

Connect to an optical audio output on the 

TV or a digital device. 

VIDEO OUT

Connect to the composite video input on 

the TV.

AUDIO IN-AUX

Connect to an analog audio output on the TV 

or an analog device. 

ANTENNA FM 75 

Signal input from an antenna, cable or satellite.

Connect to TV

Connect your home theater to a TV to watch 

videos. You can listen to audio from TV programs 

through your home theater speakers. Use the best 

quality connection available on your home theater 

and TV.

Option 1: Connect to TV through HDMI

Best quality video

With a standard HDMI connection, you need an 

additional audio cable to play the audio from the 

TV through your home theater (see 'Connect 

audio from TV and other devices' on page 9).

Using a High Speed HDMI cable, connect 

the 

HDMI OUT

 connector on your home 

theater to the 

HDMI

 connector on the TV.

The HDMI connector on the TV might be 

labeled 

HDMI IN


On your TV, turn on HDMI-CEC. For details, 

see the TV user manual.


»

When you play a disc on your home 

theater, the video is automatically 

displayed on TV and the audio is 

automatically played on the home theater. 

To play audio from TV programs through 

your home theater, connect an additional 

audio cable (see 'Connect audio from TV and 

other devices' on page 9). 

On your home theater, press 

SOURCE


repeatedly to select the correct audio input.

Note


If your TV has a DVI connector, you can use an 

HDMI/DVI adapter to connect to TV.

Option 2: Connect to the TV through 

composite video

Basic quality video

If your TV does not have HDMI connectors, 

connect your home theater to the TV through a 

composite connection. A composite connection 

does not support high-definition video.

With a composite connection, you need an 

additional audio cable to play the audio from the 

TV through your home theater (see 'Connect 

audio from TV and other devices' on page 9).

Using a composite video cable, connect the 

VIDEO

 connector on your home theater to 

the composite video connector on the TV.

The composite video connector might be 

labeled 

AV IN

VIDEO IN

COMPOSITE

, or 

BASEBAND

.

TV

Summary of Contents for HTS3531

Page 1: ...HTS3531 Register your product and get support at www philips com welcome 用户手册 User manual ...

Page 2: ......

Page 3: ...romTV and other devices 9 5 Use your home theater 10 Choose sound 10 Discs 10 USB storage devices 11 DivX 11 Karaoke 12 Audio video and picture options 13 Radio 14 MP3 player 14 Create MP3 files 15 EasyLink 15 6 Change settings 16 Picture 16 Sound 17 Language 17 Parental control 18 Energy saving 18 Apply factory settings 19 7 Update software 19 Check software version 19 Update software through USB...

Page 4: ...ivX video with advanced features and premium content ABOUT DIVXVIDEO DivX is a digital video format created by DivX LLC a subsidiary of Rovi Corporation This is an official DivX Certified device that plays DivX video Visit divx com for more information and software tools to convert your files into DivX videos ABOUT DIVXVIDEO ON DEMAND This DivX Certified device must be registered in order to play ...

Page 5: ...mbled stands on flat level surfaces that can support the combined weight of the speaker and stand Never place the product or any objects on power cords or on other electrical equipment If the product is transported in temperatures below 5 C unpack the product and wait until its temperature matches room temperature before connecting it to the power outlet Visible and invisible laser radiation when ...

Page 6: ... dispose of your old products with your normal household waste Correct disposal of your old product helps to prevent potential negative consequences for the environment and human health Your product contains batteries covered by the European Directive 2006 66 EC which cannot be disposed with normal household waste Please inform yourself about the local rules on separate collection of batteries bec...

Page 7: ...ght to fast backward or fast forward In radio mode press left or right to search a radio station press up or down to fine tune a radio frequency f Displays information about what is playing g Playback buttons Control playback h Switches to surround sound or stereo sound i Selects an audio language or channel Press and hold to synchronize audio with video Use with j Numeric buttons Selects an item ...

Page 8: ...nd then play a disc 4 Connect your home theater This section helps you connect your home theater to aTV and other devices For information about the basic connections of your home theater and accessories see the quick start guide For a comprehensive interactive guide see www connectivityguide philips com Note For identification and supply ratings refer to the type plate at the back or bottom of the...

Page 9: ...left and right side of your seating position either in line with it or slightly behind it For best effect point the speakers towards the seating position and place the speakers just above the ear level when seated 5 SUBWOOFER subwoofer Place the subwoofer at least one meter to the left or right of theTV Leave about ten centimeter clearance from the wall Connect Connect your speakers and the subwoo...

Page 10: ...eTV The HDMI connector on theTV might be labeled HDMI IN 2 On yourTV turn on HDMI CEC For details see theTV user manual When you play a disc on your home theater the video is automatically displayed onTV and the audio is automatically played on the home theater 3 To play audio fromTV programs through your home theater connect an additional audio cable see Connect audio fromTV and other devices on ...

Page 11: ...e on your TV home theater and other devices Note The audio connections in this user manual are only recommendations You can use other connections too Option 1 Connect audio through a digital optical cable Best quality audio Using an optical cable connect the OPTICAL connector on your home theater to the OPTICAL OUT connector on theTV or other device The digital optical connector might be labeled S...

Page 12: ...t a surround mode MULTI CH Traditional 5 1 channel for a more relaxing cinematic experience STEREO Two channel stereo sound Ideal for listening to music Note If the audio source is a 2 1 channel multi channel mode will output 5 channel stereo sound Discs Your home theater can play DVDs VCDs and CDs It can also play discs that you ve made at home such as CD R discs of photos and music 1 Insert a di...

Page 13: ...ight to synchronize the audio with the video 5 Press OK to confirm Note Press and hold on the remote control for quick access to the audio sync setup menu USB storage devices Enjoy pictures audio and video on a USB storage device What you need A USB storage device that is formatted for FAT and complies with the Mass Storage Class A USB extension cable if the USB storage device does not fit into th...

Page 14: ...ish andTurkish Central Europe Albanian Croat Czech Dutch English German Hungarian Irish Polish Romanian Slovak Slovene and Sorbian Cyrillic Bulgarian Belorussian English Macedonian Moldavian Russian Serbian and Ukrainian Greek Greek Hebrew Hebrew Chinese Simp Simplified Chinese Karaoke Play a Karaoke disc on your home theater and sing along with the music What you need A Karaoke microphone Karaoke...

Page 15: ...title time Ch Time Skip to a specific part of the video by entering the chapter time Disc Time Skip to a specific part of the video by entering the disc time forVCD SVCD only Track Time Skip to a specific part of the video by entering the track time for VCD SVCD only Preview Select a content preview for disc Repeat Select a repeat mode Time Disp Select the information of time display Picture optio...

Page 16: ...et radio station Navigation buttons left right Search for a radio station Navigation buttons up down Fine tune a radio frequency Press to stop the installation of radio stations Press and hold to erase the preset radio station Manual Press once to access program mode and press again to store the radio station Automatic Press and hold for three seconds to reinstall the radio stations Listen to radi...

Page 17: ...ct Exit and then press OK CREATE MP3 OPTIONS TRACK Bitrate 128kbps SUMMARY Select Track 0 Start Exit Select All Deselect All Time 00 00 Track01 04 14 Track02 04 17 Track03 03 58 Track04 04 51 Track05 03 53 Track06 04 09 Track07 04 38 Speed Normal CRT ID3 Yes Device USB1 Note When the conversion is in process do not press any buttons DTS CDs and copy protected CDs cannot be converted Write protecte...

Page 18: ...gs This section helps you to change the settings of your home theater Caution Most of the settings are already configured with the best value for your home theater Unless you have a reason to change a setting it is best to leave it at the default value Note You cannot change a setting that is grayed out To return to the previous menu press To exit the menu press Picture Change the picture settings...

Page 19: ... Audio Off and then press OK Language Select a language for the home menu audio and subtitles Home menu 1 Press 2 Select General Setup and then press OK 3 Select OSD Language and then press OK 4 Select a menu language for your home theater and then press OK Disc audio 1 Press 2 Select Preference Setup and then press OK 3 Select Audio and then press OK 4 Select an audio language for discs and then ...

Page 20: ...c buttons 5 Select an age rating and then press OK To play all discs irrespective of the rating select level 8 Lock disc To restrict access to discs that are not encoded with ratings and parental control lock the disc manually You can lock upto 20 discs on your home theater 1 While playing a disc press 2 Select General Setup and then press OK 3 Select Disc Lock Lock and then press OK A message pro...

Page 21: ...e regularly Compare the version of your current software with the latest version on www philips com support Check software version 1 Press 2 Select Preference Setup and then press OK 3 Select Version Info and then press OK The software version is displayed Update software through USB or CD R What you need A CD R or a USB flash drive with at least 75MB of memory The USB flash drive must be FAT form...

Page 22: ...ord for a few seconds and then reconnect it Note When the software update is in progress do not turn off the power or remove the USB flash drive or CD R 8 Product specifications Note Specifications and design are subject to change without notice Region codes The type plate on the back or bottom of the home theater shows which regions it supports Media formats DVD Video DVD R RW DVD R RW DVD R R DL...

Page 23: ...ina Russia India 220 240V 50 Hz Latin America Asia Pacific 110 240V 50 60 Hz Power consumption 55 W Standby power consumption 0 9 W Dimensions WxHxD 360 x 58 x 325 mm Weight 2 3 kg Subwoofer Output power 50 W RMS 30 THD Impedance 4 ohm Speaker drivers 133 mm 5 25 woofer Dimensions WxHxD 160 x 265 x 265 mm Weight 2 50 kg Cable length 3 m Speakers Center speaker Output power 50 W RMS 30 THD System 1...

Page 24: ...ect the audio cable from your home theater to yourTV or other devices see Connect audio fromTV and other devices on page 9 Set up the audio for the connected device see Set up audio for connected devices on page 9 Reset your home theater to its factory settings see Apply factory settings on page 19 then switch it off and switch on again On your home theater press repeatedly to select the correct a...

Page 25: ... on the TV the home theater automatically switches on This behavior is normal when you are using Philips EasyLink HDMI CEC To make the home theater work independently switch off EasyLink 10 Index A amplifier 21 audio HDMI audio 17 predefined modes 10 quality 9 settings 17 speaker setup 7 specifications 21 audio language 17 audio options 13 auto standby 18 B brightness 19 C care environment 4 produ...

Page 26: ...ay audio 16 enable auto standby 18 HDMI CEC 15 screen saver 19 energy auto standby 18 brightness 19 screen saver 19 sleep timer 18 F factory settings 19 FM antenna 8 H HDMI audio 17 video settings 17 HDMI CEC 15 K karaoke 12 L language audio 17 disc menu 17 onscreen menu 17 subtitle 17 M main unit overview 4 specifications 21 troubleshooting 22 manually setup speakers 7 media formats 20 MP3 connec...

Page 27: ...14 ratings 18 recycling 4 region codes 20 remote control batteries 21 overview 5 repeat 13 S safety disposal 4 use of the product 3 screen saver 19 settings audio 17 auto standby 18 default 19 disc language 17 HDMI audio 17 HDMI video 17 HDMI CEC 15 menu language 17 parental rating 18 password 18 picture 16 power 18 restore 19 screen saver 19 sleep timer 18 subtitle language 17 video 16 setup spea...

Page 28: ...2 picture 22 play 22 sound 22 U update software check current version 19 update 19 USB format 21 USB storage device options 13 play 11 specifications 21 V video picture settings 16 synchronize picture and sound 11 VOD code for DivX 11 video formats 21 video options 13 VOD code for DivX 11 ...

Reviews: