background image

6

EN

Source buttons

HDMI IN

: Switch your source to the 

HDMI IN connection.

HDMI ARC

: Switch your source to HDMI 

ARC connection.

OPTICAL

: Switch your audio source to 

the optical connection. 

AUDIO IN

: Switch your audio source to 

the MP3 connection (3.5mm jack).

USB

: Switch to USB mode.

 : Switch to Bluetooth mode.

SOURCE

: Select an input source for this 

product. Or for Spotify Premium users, 

quickly resume Spotify Connect play.

 /   (Previous/Next)

Skip to the previous or next track.

 (Play/Pause)

Start, pause or resume play.

/-

Increase or decrease treble.

Volume control

• 

+/-

: Increase or decrease volume.

• 

 : Mute or restore volume.

Sound mode control

SMART

: Automatically select a predefined 

sound mode to suit your video or music.

MUSIC

: Select stereo sound mode.

VOICE

: Select voice clarity sound mode.

SURR

: Select surround sound mode.

AUDIO SYNC +/-

Increase or decrease audio delay.

AUTO VOL  ON/OFF

Turn auto volume on or off.

NIGHT ON/OFF

Turn night mode on or off.

DIM

Set the brightness of the display panel for 

this product.

BASS +/-

Increase or decrease bass.

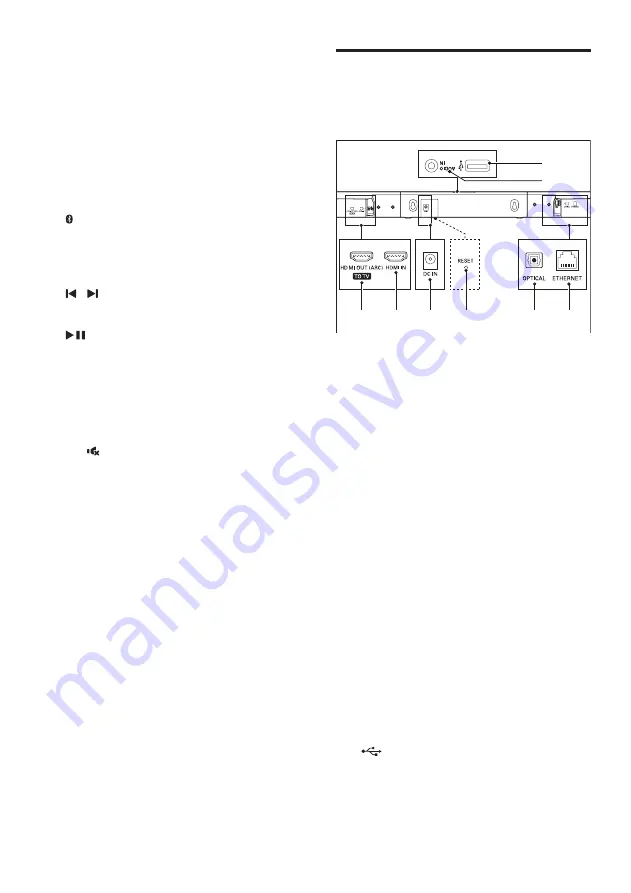
Connectors

This section includes an overview of the 

connectors available on this product.


HDMI OUT (ARC) - TO TV

Connect to the HDMI (ARC) input on the 

TV.

HDMI IN

Connect to the HDMI output on a digital 

device.

DC IN

Connect to the power supply.

RESET

Press with a pin to reset this product to 

the factory settings.

OPTICAL

Connect to an optical audio output on the 

TV or a digital device. 

ETHERNET

Connect to the ethernet port on a 

broadband modem or router.

AUDIO IN

Audio input from, for example, an 

MP3 player (3.5mm jack).

 (USB)

•  Connect to a USB storage device for 

audio media play.

•  Upgrade software of this product.

•  Charge a USB device.

a

b

c

d

e

f

g

h

Summary of Contents for HTL5160B

Page 1: ...HTL5160B www philips com support User manual Always there to help you Register your product and get support at Question Contact Philips ...

Page 2: ......

Page 3: ...rough HDMI 10 4 Google Cast and Spotify Connect11 Connect this product to network 11 Stream music to this product 11 Navigate the App home menu 12 5 Use your product 12 Adjust the volume 12 Choose your sound 12 Play audio through Bluetooth 13 Connect Bluetooth via NFC 14 MP3 player 14 USB storage devices 14 Auto standby 15 Set display brightness 15 Apply factory settings 15 Set up EasyLink HDMI CE...

Page 4: ...ue printed on the back or bottom of the product Never connect the product to the power outlet if the voltage is different Risk of injury or damage to this product For wall mounting this product must be securely attached to the wall in accordance with the installation instructions Use only the supplied wall mount bracket if available Improper wall mounting may result in accident injury or damage If...

Page 5: ...d with high quality materials and components which can be recycled and reused This symbol on a product means that the product is covered by European Directive 2012 19 EU This symbol means that the product contains batteries covered by European Directive 2013 56 EU which cannot be disposed of with normal household waste Inform yourself about the local separate collection system for electrical and e...

Page 6: ...ilips com If you prefer not to use email or if you do not receive confirmation receipt within a week after mailing to this email address please write to Open SourceTeam Gibson Innovations Limited 5 F Philips Electronics Building 5 Science Park East Avenue Hong Kong Science Park Shatin N T Hong Kong The texts of the licenses and acknowledgements for open source software used in this product are inc...

Page 7: ...l f NFC tag Tap the NFC enabled device on the tag for Bluetooth connection Remote control This section includes an overview of the remote control a Standby On Switch this product on Switch this product to ECO standby when this product is not connected to the network Switch this product to networked standby when this product is connected to the network When EasyLink is enabled press and hold for at...

Page 8: ...E Select voice clarity sound mode SURR Select surround sound mode h AUDIO SYNC Increase or decrease audio delay i AUTOVOL ON OFF Turn auto volume on or off j NIGHT ON OFF Turn night mode on or off k DIM Set the brightness of the display panel for this product l BASS Increase or decrease bass Connectors This section includes an overview of the connectors available on this product a HDMI OUT ARC TO ...

Page 9: ...ps you connect this product to a TV and other devices For information about the basic connections of this product and accessories see the quick start guide Note For identification and supply ratings see the type plate at the back or bottom of the product Before you make or change any connections make sure that all devices are disconnected from the power outlet Network setup prompt When this produc...

Page 10: ...seconds press twice then Volume once and then hold down BASS If the pairing succeeds the indicator on the subwoofer lights up white If the pairing fails the indicator on the subwoofer blinks white slowly 4 If the pairing fails repeat the steps above Note If the wireless dis connection or pairing up lasts 1 minute the subwoofer automatically switches to standby and the LED on the subwoofer turns of...

Page 11: ...this product Option 2 Connect to TV through optical cable Best quality audio TV TV 1 Using an optical cable connect the OPTICAL connector on this product to the optical output on theTV The digital optical output on theTV might be labeled OPTICAL OUT SPDIF or SPDIF OUT 2 Press OPTICAL on the remote control of this product to enable the optical connection Option 3 Connect to TV through analog audio ...

Page 12: ... product to enable the analog audio connection Connect digital devices through HDMI Connect a digital device such as a set top box DVD Blu ray player or games console to this product through a single HDMI connection When you connect the devices in this way and play a file or game the video is automatically displayed on your TV and audio is automatically played on this product 1 Using a High Speed ...

Page 13: ... When prompted go to the Wi Fi list of the iOS device to select this product then return to the App to continue the network setup When this product is connecting to the network white LED on this product blinks When this product is connected to the network white LED on this product lights up Note During network setup accept the Google service and privacy agreement to enable Google Cast enabled apps...

Page 14: ...se this product to play media from a wide range of sources Before you start Make the necessary connections described in the quick start guide or download the user manual from www philips com support Switch this product to the correct source for other devices Adjust the volume 1 Press Volume to increase or decrease a volume level To mute sound press To restore the sound press again or press Volume ...

Page 15: ... phone or laptop and then you can listen to the audio files stored on the device through the speakers of this product What you need A Bluetooth device which supports Bluetooth profiles A2DP AVRCP Bluetooth version BluetoothV4 1 with Bluetooth Low Energy The maximum operational range between the main unit and a Bluetooth device is approximately 10 meters 30 feet 1 Press on the remote control to swi...

Page 16: ...layed on the display panel If the connection fails BT on the display panel blinks continuously 3 Select and play audio files or music on your NFC device To break the connection tap again the NFC device onto the NFC tag on this product MP3 player Connect your MP3 player to play your audio files or music What you need An MP3 player A 3 5mm stereo audio cable 1 Using the 3 5mm stereo audio cable conn...

Page 17: ...this product to ECO standby Note If this product is in ECO standby the red LED lights up If this product is in networked standby the white LED lights up and the red LED turns off Set display brightness You can press DIM repeatedly to select a different brightness level of the display panel on this product If you select AUTO OFF LED message is switched off after 10 seconds of button inactivity Appl...

Page 18: ...roduct can switch to standby with the remote control of theTV or other HDMI CEC devices On the remote control of this product press and hold for at least three seconds to switch all connected HDMI CEC compliant devices to standby 6 Update software To get the best features and support update your product with the latest software Check software version 1 Launch Philips HCWeSet app on your mobile dev...

Page 19: ...named UPG b Put the UPG file in the root directory 3 Connect the USB storage device to the USB connector on this product 4 Launch Philips HCWeSet app on your mobile device Make sure that you connect this product to the network 5 Go to the App home page 6 Tap to access the menu options 7 Select My Speakers The connected devices are listed 8 Select the name of this product then select Software Updat...

Page 20: ...marker to mark two holes on the wall then secure two suitable screws in the holes 2 Fix the two supplied wall brackets on this product 3 Hang this product on the wall 2 2 2 5 mm 0 09 0 10 9 mm 0 35 3 5 4 mm 0 14 0 16 25 mm 0 98 8 Product specifications Note Specifications and design are subject to change without notice Amplifier Total output power 320W RMS 0 5 dB 10 THD Frequency response 20 Hz 20...

Page 21: ...ity for all climates Storage temperature and humidity 40 C to 70 C 5 to 95 Subwoofer Power supply 220 240V 50 60 Hz Power consumption 30 W Standby power consumption 0 5 W Impedance 2 ohm Speaker driver 1 x 203 mm 8 woofer Dimensions W x H x D 205 x 316 x 401 mm Weight 7 0 kg Remote control batteries 2 x AAA R03 1 5V Standby power management When the product remains inactive for 15 minutes it autom...

Page 22: ...splay panel When ERROR is displayed it indicates that an input audio format is not supported When ARC blinks it indicates that the connectedTV is not HDMI ARC compliant or an unsupported audio format is detected Bluetooth A device cannot connect with this product The device does not support the compatible profiles required for this product You have not enabled the Bluetooth function of the device ...

Page 23: ...r Spotify Connect services to this product This product is not connected to the network and perform the first time setup if the setup is not completed Cannot connect this product to the network Make sure that the wireless network is not disturbed by microwave ovens DECT phones or other neighboring Wi Fi devices Place the wireless router and this product within five meters of each other Make sure t...

Page 24: ...I Licensing LLC in the United States and other countries The Bluetooth word mark and logos are registered trademarks owned by Bluetooth SIG Inc and any use of such marks by Gibson Innovations Limited is under license Other trademarks and trade names are those of their respective owners The N Mark is a trademark or registered trademark of NFC Forum Inc in the United States and in other countries Go...

Page 25: ......

Page 26: ...been manufactured by and is sold under the responsibility of Gibson Innovations Ltd and Gibson Innovations Ltd is the warrantor in relation to this product Philips and the Philips Shield Emblem are registered trademarks of Koninklijke Philips N V and are used under license from Koninklijke Philips N V HTL5160B_12_UM_V4 0 ...

Reviews: