background image

33

4203.000.4682.1.indd   33

01-12-09   10:00

Summary of Contents for HP6576/00

Page 1: ...HP6576 4203 000 4682 1 indd 1 01 12 09 09 59 ...

Page 2: ...2 4203 000 4682 1 indd 2 01 12 09 09 59 ...

Page 3: ...3 J K 3 2 1 R P G Q N M O F E A H I D C B L 5 4 1 4203 000 4682 1 indd 3 01 12 09 09 59 ...

Page 4: ...4 4203 000 4682 1 indd 4 01 12 09 09 59 ...

Page 5: ...HP6576 English 6 Français 16 35 44 4203 000 4682 1 indd 5 01 12 09 09 59 ...

Page 6: ... matter how hard or soft you push The Opti light helps you to target and remove even the trickiest hairs so that you do not miss a hair The active hairlifter on the front of the active hairlifter with active massage gently vibrates and lifts flat lying hairs so that they can be easily removed The active massaging roller on the back of the active hairlifter with active massage vibrates to give the ...

Page 7: ... body hair on areas below the neck by epilating legs and shaving underarms and bikini area Do not use the epilator for any other purpose For hygienic reasons the appliance and the SmartTweezers should only be used by one person To prevent damage and injuries keep the running epilator with or without attachment away from scalp hair eyebrows eyelashes clothes threads cords brushes etc Do not use the...

Page 8: ...s easier just after taking a bath or shower Make sure your skin is completely dry when you start epilating Make sure your skin is clean entirely dry and free from grease Do not use any cream before you start epilating Epilation is easier and more comfortable when the hair has the optimum length of 3 4 mm If the hairs are longer we recommend that you either shave first and epilate the shorter regro...

Page 9: ... hairs for epilation If your hairs lie flat on your skin we advise you to use the active hairlifter with active massage The active hairlifter with active massage not only lifts up the hairs but its active massaging roller also minimises the pulling sensation of epilation Note Remove the basic epilation cap before you attach the optimal performance cap or the active hairlifter with active massage 1...

Page 10: ...have your underarms as shown in the figure Move the appliance in different directions Fig 16 7 When you have finished shaving switch off the appliance and clean the sensitive area shaving head see chapter Cleaning and maintenance 8 Put the trimming comb on the sensitive area shaving head when you store the appliance Trimming with the trimming comb Use the sensitive area shaving head with the trimm...

Page 11: ...the appliance again Do not press the appliance too hard onto the skin Using the SmartTweezers Your epilator comes with SmartTweezers with integrated light for the easy removal of facial hair such as your eyebrows The SmartTweezers are protected by a case with integrated mirror which allows you to depilate wherever and whenever you want The SmartTweezers are supplied ready for use with 3 button bat...

Page 12: ...water while turning them Fig 24 4 Dry the attachments before you use or store them Cleaning the epilating head of the epilator 1 Press the release knob 1 and remove the epilating head from the appliance 2 Fig 13 2 Remove loose hairs with the cleaning brush Fig 25 3 Rinse the epilating head under the tap for 5 10 seconds while turning the tweezers with your thumb Fig 26 Note Never try to detach the...

Page 13: ...ntil the speed setting indications flash white 2 times Fig 34 The epilator starts running and stops immediately when the travel lock becomes active 2 To deactivate the travel lock press and hold the on off button for 3 seconds until the speed setting indications flash white 2 times Fig 35 Note You can also insert the appliance plug into the inlet socket and the adapter into a wall socket to deacti...

Page 14: ...geable batteries contain substances that may pollute the environment Do not throw away non rechargeable batteries with the normal household waste but dispose of them at an official collection point for batteries Always remove the non rechargeable batteries before you dispose of the SmartTweezers with the normal household waste Guarantee and service If you need service or information or if you have...

Page 15: ... lights stop flashing after 30 seconds When the appliance has cooled down switch on the epilator again If the lights start flashing again the epilator has not yet cooled down sufficiently The rechargeable batteries are empty When the charging light lights up red continuously the batteries are empty and you need to charge the appliance see chapter Charging You can also run the appliance from the ma...

Page 16: ...e soit la pression que vous exercez sur votre peau La lumière Opti light vous permet de cibler et d éliminer même les poils les plus difficiles à repérer pour une épilation parfaite L accessoire de massage actif vibre doucement et soulève les poils couchés pour faciliter leur épilation Le rouleau massant actif à l arrière de l accessoire vibre de manière agréable sur la peau pour l apaiser après l...

Page 17: ...r sécurité Veillez à ce que les enfants ne puissent pas jouer avec l appareil La pince à épiler lumineuse n est pas un jouet Gardez la hors de portée des enfants Attention L épilateur est exclusivement destiné à l élimination des poils féminins dans les zones situées en dessous du cou par épilation jambes ou rasage aisselles et maillot N utilisez pas l épilateur à d autres fins que celles ci Pour ...

Page 18: ...iche sur l appareil et l adaptateur sur la prise murale Conseils d épilation Avant de commencer l épilation Remarque Nettoyez toujours la tête d épilation de l épilateur avant la première utilisation Lors de votre première utilisation nous vous conseillons d essayer l épilation sur une zone comportant peu de poils pour vous familiariser avec l épilateur Nous vous conseillons de vous épiler le soir...

Page 19: ...s tard selon ce qui est préférable pour votre peau Utilisez régulièrement une crème ou une éponge exfoliante par exemple sous la douche 24 h après l épilation pour éliminer la couche supérieure de peau morte afin de permettre aux poils fins de percer et ainsi éviter l apparition de poils incarnés Utilisation de l appareil Utilisation de l épilateur sur les jambes Si vous avez l habitude de vous ép...

Page 20: ...ial zones sensibles sur l appareil en appuyant jusqu à ce qu elle s encliquette fig 14 3 Allumez l appareil Remarque Sélectionnez la vitesse II lors de l utilisation de la tête de rasoir spécial zones sensibles 4 Étirez la peau à l aide de votre main libre Lorsque vous vous rasez les aisselles levez le bras pour tendre la peau 5 Placez la tête de rasoir spécial zones sensibles à un angle de 90 ave...

Page 21: ... indicateurs de vitesse ainsi que le voyant de charge clignotent en rouge 2 Laissez refroidir l appareil Les voyants arrêtent de clignoter au bout de 30 secondes 3 Vous pouvez rallumer l appareil une fois qu il a refroidi Si le voyant clignote à nouveau en rouge c est que l appareil n a pas suffisamment refroidi Protection anti surcharge Si vous exercez une pression trop forte de la tête d épilati...

Page 22: ... vers l avant dans le compartiment à piles et lampe Remarque La pince à épiler lumineuse fonctionne avec trois piles bouton alcalines de type L736H ou AG3 diam 7 8 x 3 4 mm 4 Refermez le compartiment à piles et lampe en faisant tourner le fond dans le sens des aiguilles d une montre à l aide d une pièce de monnaie fig 20 Nettoyage et entretien Remarque Assurez vous que l appareil est éteint et déb...

Page 23: ... soigneusement la tête de rasoir spécial zones sensibles et l accessoire tondeuse bikini à l aide d un torchon et laissez l unité de rasage sécher à l air Remarque N exercez aucune pression sur l unité de rasage afin d éviter toute détérioration 7 Remettez l unité de rasage sur la tête de rasoir spécial zones sensibles Fixez la tête de rasoir spécial zones sensibles sur l appareil en appuyant jusq...

Page 24: ...rées de l épilateur contiennent des substances qui peuvent nuire à l environnement Veillez à toujours retirer les batteries avant de mettre l épilateur au rebut à un endroit assigné à cet effet Déposez les batteries usagées à un endroit assigné à cet effet Si vous n arrivez pas à les retirer de l appareil vous pouvez apporter ce dernier dans un Centre Service Agréé Philips qui prendra toute l opér...

Page 25: ... Vous déplacez l épilateur dans la mauvaise direction Déplacez l appareil dans le sens inverse de la pousse des poils Assurez vous que le bouton marche arrêt est orienté dans le sens de déplacement de l appareil L angle entre la tête d épilation et la peau est incorrect Veillez à placer la tête d épilation sur la peau à un angle de 90 voir le chapitre Utilisation de l appareil Vous avez utilisé un...

Page 26: ...puisées Le verrouillage est activé Maintenez le bouton marche arrêt enfoncé pendant 3 secondes jusqu à ce que les indicateurs de vitesse clignotent 2 fois en blanc Le verrouillage est alors désactivé et vous pouvez appuyer sur le bouton marche arrêt pour allumer l appareil Vous pouvez également insérer la fiche dans la prise de l appareil et brancher l adaptateur sur le secteur pour désactiver le ...

Page 27: ...27 4203 000 4682 1 indd 27 01 12 09 10 00 ...

Page 28: ...28 4203 000 4682 1 indd 28 01 12 09 10 00 ...

Page 29: ...29 4203 000 4682 1 indd 29 01 12 09 10 00 ...

Page 30: ...30 4203 000 4682 1 indd 30 01 12 09 10 00 ...

Page 31: ...31 4203 000 4682 1 indd 31 01 12 09 10 00 ...

Page 32: ...32 4203 000 4682 1 indd 32 01 12 09 10 00 ...

Page 33: ...33 4203 000 4682 1 indd 33 01 12 09 10 00 ...

Page 34: ...34 4203 000 4682 1 indd 34 01 12 09 10 00 ...

Page 35: ...35 4203 000 4682 1 indd 35 01 12 09 10 00 ...

Page 36: ...36 4203 000 4682 1 indd 36 01 12 09 10 00 ...

Page 37: ...37 4203 000 4682 1 indd 37 01 12 09 10 00 ...

Page 38: ...38 4203 000 4682 1 indd 38 01 12 09 10 00 ...

Page 39: ...39 4203 000 4682 1 indd 39 01 12 09 10 00 ...

Page 40: ...40 4203 000 4682 1 indd 40 01 12 09 10 00 ...

Page 41: ...41 4203 000 4682 1 indd 41 01 12 09 10 00 ...

Page 42: ...42 4203 000 4682 1 indd 42 01 12 09 10 01 ...

Page 43: ...43 4203 000 4682 1 indd 43 01 12 09 10 01 ...

Page 44: ...44 4203 000 4682 1 indd 44 01 12 09 10 01 ...

Page 45: ...45 4203 000 4682 1 indd 45 01 12 09 10 01 ...

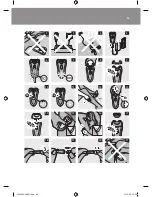
Page 46: ...46 2 3 4 1 2 5 6 7 1 1 2 8 9 1x 10 2x 11 12 1 2 13 14 15 16 17 18 19 20 21 4203 000 4682 1 indd 46 01 12 09 10 02 ...

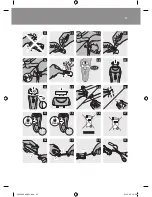
Page 47: ...47 22 23 24 25 26 27 28 29 2 1 30 31 32 33 3sec 34 3sec 35 36 37 38 39 40 41 4203 000 4682 1 indd 47 01 12 09 10 02 ...

Page 48: ...4203 000 4682 1 4203 000 4682 1 indd 48 01 12 09 10 02 ...

Reviews: