background image

84

Summary of Contents for HP6446

Page 1: ...Satinelle super sensitive HP6446 00 ...

Page 2: ...2 ...

Page 3: ...3 A B I K L J C D H E F G 1 ...

Page 4: ...4 ...

Page 5: ...ENGLISH 6 FRANÇAIS 18 30 41 51 74 86 HP6446 00 5 á Hô dG á Hô dG ...

Page 6: ... skin stays smooth for up to four weeks and regrowth is soft and downy Important Check if the mains voltage indicated on the adapter plug corresponds to your local mains voltage before you connect the appliance Make sure the appliance does not come into contact with water To prevent damage and injuries keep the running appliance away from your hair eyebrows eyelashes clothes threads cords brushes ...

Page 7: ...g during pregnancy or people who suffer from diabetes mellitus haemophilia or immunodeficiency should also consult their doctor first Your skin may become a little red and irritated the first few times you use the epilator This phenomenon will soon disappear as your skin becomes used to epilation and the hairs become thinner and softer If the irritation does not disappear within three days we advi...

Page 8: ...pilation process This appliance has been extensively tested on the armpits and the bikini line Some women will develop skin irritation when they epilate these areas for the first time We therefore advise you to try out the appliance on a small patch of skin first After use you can apply a mild cream or body milk to soothe your skin and reduce skin irritation Epilation is easier just after taking a...

Page 9: ...II high speed G Pilot light H Inlet socket for appliance plug I Appliance plug J Cord K Adapter plug L Brush Charging The appliance can be run directly from the mains or it can be run cordless when the batteries are charged Charge the batteries for at least 16 hours before first use and when the appliance has not been used for at least six months C 1 Check whether the appliance is switched off 2 P...

Page 10: ...ies Fully charged batteries have a cordless epilating time of about 25 minutes Use the appliance in cordless mode until the batteries are completely empty at least twice a year You can also let the appliance run without using it When the motor has stopped recharge the appliance for at least 16 hours In this way you will make sure that the batteries continue to perform well and have a long life Epi...

Page 11: ... Using the appliance Make sure your skin is clean entirely dry and free from grease Do not use any cream before you start epilating 1 Put the adapter plug K in the wall socket C 2 Insert the appliance plug I into the inlet socket H C 3 Remove the protective cover A C 4 Switch the appliance on by sliding the on off switch F to the desired speed setting Select speed I for areas with little hair grow...

Page 12: ...ward against the direction of hair growth Do not exert any pressure 9 Stretch your leg when you are epilating the back of your knee 10 Switch the appliance off by sliding the on off switch F to O Armpits and bikini line The precision cap only fits onto the appliance in one way The precision cap reduces the number of epilating discs that are active and stretches the skin during epilating It is part...

Page 13: ...cision cap B onto the appliance The precision cap can only be fitted onto the appliance in one way C 5 Switch the appliance on by selecting the desired speed We advise you to use speed II C 6 Stretch the skin with your free hand And place the appliance perpendicularly onto your skin without exerting any pressure Make sure both the epilating discs D and the pain softener C are in proper contact wit...

Page 14: ...pliance 1 Switch the appliance off and pull the adapter plug K out of the wall socket C 2 Remove the precision cap B C 3 Remove the epilating head D Press the ribbed sections and slide the epilating head D off the appliance in the direction of the arrow C 4 Clean all accessible parts and the discs D with the brush L Never try to remove the epilating discs from the epilating head D 5 Slide the epil...

Page 15: ...se remove the battery and dispose of it in an environmentally safe way NiCd batteries are marked with the f symbol All plastic parts are marked with recycle symbols You can also take the appliance to a Philips service centre where staff will be happy to help you remove the battery and dispose of it in an environmentally safe way 1 Remove the adapter plug K from the wall socket and let the applianc...

Page 16: ...ide of the parting line at the top of the appliance 6 Pull the two housing halves apart with your thumbs until the snap connections break 7 Remove all the components motor unit and the battery printed circuit board unit from the housing halves 8 Take the battery printed circuit board unit in your hand with the printed circuit pointing towards you C 9 Insert a screwdriver at right angles between th...

Page 17: ... so Guarantee service If you need service or information or if you have a problem please consult the worldwide guarantee leaflet If you need information or if you have a problem please visit the Philips Web site at www philips com or contact the Philips Customer Care Centre in your country you will find its phone number in the worldwide guarantee leaflet If there is no Customer Care Centre in your...

Page 18: ...uatre semaines et le poil repousse doux et fin Important Avant de brancher l appareil vérifiez que la tension indiquée sur l adaptateur correspond à la tension de votre secteur Ne laissez pas l appareil en contact avec de l eau Pour prévenir des dommages ou des blessures utilisez l appareil à distance respectable des cheveux cils sourcils vêtements fils cordons brosses etc Conservez l appareil à l...

Page 19: ...exemple les femmes enceintes les diabétiques les hémophiles ou les déficients immunitaires Lors des premières utilisations votre peau peut devenir rouge et irritée Il s agit d une réaction normale qui diminuera graduellement à chaque utilisation car la repousse a tendance à être plus douce au toucher Cependant si l irritation persiste plus de trois jours consultez votre médecin Un massage régulier...

Page 20: ... appareil a été testé d une manière exhaustive pour les aisselles et la ligne du maillot Quelques femmes peuvent subir une irritation de la peau quand elles utilisent l appareil pour la première fois dans ces zones corporelles Nous vous recommandons d essayer d abord l appareil sur une petite portion de peau Après utilisation vous pouvez appliquer une crême hydratante ou un lait corporel qui aider...

Page 21: ...male II vitesse rapide G Témoin lumineux H Prise femelle pour le connecteur I Connecteur J Cordon K Adaptateur secteur L Brosse Charge Votre appareil peut fonctionner branché directement sur l alimentation secteur ou sans fil lorsque les accumulateurs sont chargés Rechargez l appareil pendant 16 heures au minimum avant de l utiliser pour la première fois ou si vous ne l avez pas utilisé depuis six...

Page 22: ...ue possible des accumulateurs ne les rechargez pas pendant plus de 24 heures Une fois les accumulateurs complètement rechargés ils ont une autonomie de 25 minutes environ Au moins deux fois par an laissez l appareil fonctionner sans cordon jusqu à l épuisement des accumulateurs Vous pouvez faire ceci même lorsque l appareil n est pas en utilisation Lorsque l appareil s arrête rechargez le pendant ...

Page 23: ...argés Si les accumulateurs sont complètement déchargés l appareil ne fonctionnera pas immédiatement après l avoir branché C Arrêtez l appareil et laissez le charger pendant quelques minutes Ensuite vous pouvez mettre l appareil en marche et l utiliser branché sur secteur Utilisation Assurez vous que votre peau est propre sans graisse ni crèmes N appliquez aucune crème avant l épilation 1 Mettez l ...

Page 24: ...z la peau avec votre main libre pour redresser les poils 7 Placez la tête d épilation D perpendiculairement sur la peau afin que la tête d épilation D et le système anti douleur E soient en contact avec la peau C 8 Déplacez l appareil lentement dans un seul sens et dans le sens inverse de la pousse des poils le système anti douleur E doit être toujours visible N exercez pas de pression sur l appar...

Page 25: ...ation optimale les poils ne doivent pas être trop longs max 1 cm 1 Arrêtez l appareil C 2 Retirez le système anti douleur pour l épilation des jambes E de l appareil C 3 Fixez le système anti douleur pour l épilation des aisselles et du maillot C sur l appareil C 4 Placez l adapteur de précision B L adapteur de précision ne peut être fixé que dans une seule position C 5 Mettez en marche l appareil...

Page 26: ...e de la pousse des poils Nettoyage N utilisez pas de substances corrosives d éponge à récurer essence acétone etc pour nettoyer l appareil le nettoyage et l entretien régulier garantissent les meilleurs résultats et une durée de vie prolongée 1 Arrêtez l appareil et retirez l adaptateur secteur K de la prise murale C 2 Otez l adapteur de précision B C 3 Otez la tête d épilation D Appuyez sur les s...

Page 27: ...ngement C 1 Remettez le capot de protection A sur l appareil après utilisation 2 Conservez l appareil et les accessoires dans l étui fourni Environnement Lorsque vous vous séparerez de votre appareil en fin de vie retirez les accumulateurs et déposez les dans un endroit assigné à cet effet Les accumulateurs NiCd sont marqués du symbole f En vue de recyclage tous les composants en plastique ont des...

Page 28: ...ve au dessous de la tête d épilation D de l appareil à l aide d un tournevis C 5 Tenez l appareil avec les doigts positionnés des deux côtés sur le dessus de l appareil 6 Séparez les deux parties avec vos doigts jusqu à ce que les connexions se cassent 7 Retirez tous les composants le bloc moteur et l unité du circuit imprimé des deux parties de l appareil 8 Prenez l unité du circuit imprimé à la ...

Page 29: ...ssemblez pas l appareil pour le brancher sur le secteur après l avoir ouvert Il est dangereux Garantie et service Pour plus d informations visitez notre Philips Web site www philips com ou veuillez contacter le Service Consommateurs Philips de votre pays vous trouverez le numéro de téléphone dans le dépliant sur la garantie internationale S il n y a aucun Service Consommateurs Philips dans votre p...

Page 30: ... 30 ...

Page 31: ... 31 ...

Page 32: ...A B C D E F 0 I II G H I J K L C 1 32 ...

Page 33: ...2 C 3 C 4 C 33 ...

Page 34: ... 1 C 2 C 3 C 4 C 5 34 ...

Page 35: ...C 6 7 C 8 9 10 1 C 2 35 ...

Page 36: ...C 3 C 4 C 5 C 6 C 7 36 ...

Page 37: ...1 C 2 C 3 C 4 5 37 ...

Page 38: ...C 1 2 f 1 C 2 3 C 4 38 ...

Page 39: ...C 5 6 7 8 C 9 10 C 11 12 C 13 39 ...

Page 40: ...40 ...

Page 41: ... 41 ...

Page 42: ...42 ...

Page 43: ...A B C D E F O I II G H I J K L C 1 2 C 3 43 ...

Page 44: ...C 4 C 44 ...

Page 45: ...45 1 C 2 C 3 C 4 C 5 C 6 7 ...

Page 46: ...46 C 8 8 10 1 C 2 C 3 ...

Page 47: ...47 C 4 C 5 C 6 C 7 1 ...

Page 48: ...48 C 2 C 3 C 4 4 C 1 2 ...

Page 49: ... 1 C 2 3 C 4 C 5 6 7 8 49 ...

Page 50: ...50 C 9 10 C 11 12 C 13 ...

Page 51: ... 51 ...

Page 52: ...52 c c ...

Page 53: ...53 ...

Page 54: ...54 A B C E F O I II G H I J K L C 1 ...

Page 55: ...55 2 C 3 C 4 ...

Page 56: ... C 1 C 2 C 3 56 ...

Page 57: ...57 C 4 C 5 C 6 7 C 8 9 10 ...

Page 58: ...1 C 2 C 3 C 4 C 5 58 ...

Page 59: ...59 C 6 C 7 1 C 2 C 3 ...

Page 60: ...60 C 4 5 C 1 2 ...

Page 61: ...61 1 C 2 3 C 4 C 5 6 7 8 C 9 ...

Page 62: ...62 10 C 11 12 C 13 ...

Page 63: ... h É Éª ª d dG G á áe eó óÿ ÿG Gh h É Éª ª d dG G IQÉjR æe ƒLôf á µ ûe ájCG â LGh hCG áeóN ájCG G âéàMG GPG IQÉjR æe ƒLôf á µ ûe ájCG â LGh hCG áeóN ájCG G âéàMG GPG GƒæY â âfÎf G Y ùÑ a áëØ U GƒæY â âfÎf G Y ùÑ a áëØ U www philips com www philips com æµÁ ó H øFÉHõdG áeóÿ ùÑ a õcôÃ É üJ G hCG æµÁ ó H øFÉHõdG áeóÿ ùÑ a õcôÃ É üJ G hCG øµj GPG ŸÉ dG ɪ dG ë e øe JÉ dG ºbQ Y ƒ ü G øµj GPG ŸÉ dG ɪ dG...

Page 64: ... G HÉ UCG VƒH jój ÚH ádB G ªMG ádB G YCG óæY π üØdG N óæY ádB G ádB G YCG óæY π üØdG N óæY ádB G Ó üØæj CG G ΩÉ H G HÉ UCÉH AÉ dG ôW Ñë SG Ó üØæj CG G ΩÉ H G HÉ UCÉH AÉ dG ôW Ñë SG ájQÉ ÑdG fi IóMh h qôÙG äÉjƒàÙG πc YõfG ájQÉ ÑdG fi IóMh h qôÙG äÉjƒàÙG πc YõfG ádB G FÉ Z øe áYƒÑ ŸG ádB G FÉ Z øe áYƒÑ ŸG ÙG e ój áYƒÑ ŸG ájQÉ ÑdG fi IóMh òN ÙG e ój áYƒÑ ŸG ájQÉ ÑdG fi IóMh òN gÉŒÉH ƒÑ ŸG gÉŒÉH ƒÑ ŸG h ƒ...

Page 65: ...jQÉ H ƒµJ πµ ædG äÉjQÉ H ƒµJ NiCd NiCd IQÉ TÉH áªq e IQÉ TÉH áªq e NiCd NiCd æ üàdG IOÉYG IQÉ TÉH áªq e á µ à SÓÑdG dG πc æ üàdG IOÉYG IQÉ TÉH áªq e á µ à SÓÑdG dG πc ƒµ S å M ùÑ a äÉeóN õcôe G ádB G òNCG É jCG æµÁ ƒµ S å M ùÑ a äÉeóN õcôe G ádB G òNCG É jCG æµÁ á jô H º æe üq îàdG h äÉjQÉ ÑdG õæd hó S ƒØXƒŸG á jô H º æe üq îàdG h äÉjQÉ ÑdG õæd hó S ƒØXƒŸG áæeBG áæeBG FÉHô µdG qƒÙG YõfG FÉHô µdG q...

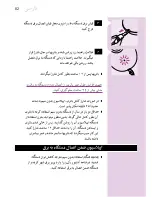
Page 66: ... G á FÉHô µdG eÉ G AÉ dG YõfG eÉ G AÉ dG YõfG B B ô û d á jõŸG SCGôdG YõfEG ô û d á jõŸG SCGôdG YõfEG D D á q ŸG á æŸG VG á q ŸG á æŸG VG ô û d á jõŸG SCGôdG YõfGh ô û d á jõŸG SCGôdG YõfGh D D º ùdG ÉŒÉH ádB G øe º ùdG ÉŒÉH ádB G øe UGôbC G h É dG ƒ UƒdG Ú à ùJ àdG dG πc Øq f UGôbC G h É dG ƒ UƒdG Ú à ùJ àdG dG πc Øq f D D IÉ TôØdG á SGƒH IÉ TôØdG á SGƒH á jõŸG SCGôdG øe ô û d á jõŸG UGôbC G õf h...

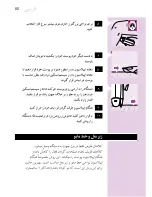
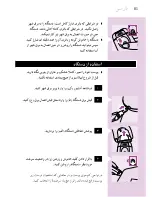
Page 67: ...dB G a IóMGh á jô H ádB G É æ ÑZôJ àdG áYô ùdG QÉ àNG ÓN øe a ádB G ôjOCG É æ ÑZôJ àdG áYô ùdG QÉ àNG ÓN øe a ádB G ôjOCG iƒ ü dG áYô ùdG ΩGóîà SÉH ë üæf iƒ ü dG áYô ùdG ΩGóîà SÉH ë üæf ll ll Y ÉjOƒªY ádB G V h Iô G ó dG á SGƒH Iô ûÑdG ó T Y ÉjOƒªY ádB G V h Iô G ó dG á SGƒH Iô ûÑdG ó T á jõŸG UGôbC G ƒµJ CG ócCÉJ V CG hO øe Iô ûÑdG á jõŸG UGôbC G ƒµJ CG ócCÉJ V CG hO øe Iô ûÑdG ô û d ô û d D D C ...

Page 68: ...G øY ô ûdG ádGRG óæY eób qóe áÑcô d á NGódG á æŸG øY ô ûdG ádGRG óæY eób qóe bƒàdG ìÉàØe Vh ÓN øe ádB G πªY ØbhCG bƒàdG ìÉàØe Vh ÓN øe ádB G πªY ØbhCG π ûàdG π ûàdG F F Y Y O O Gòg πª j a IóMGh á jô H ádB G Y eÉ G AÉ dG qÑ j Gòg πª j a IóMGh á jô H ádB G Y eÉ G AÉ dG qÑ j óeh πª J àdG ô û d á jõŸG UGôbC G ºbQ π J Y AÉ dG óeh πª J àdG ô û d á jõŸG UGôbC G ºbQ π J Y AÉ dG ádGRG ÓN üNC ÉH Ö SÉæe ƒg h...

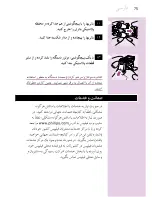
Page 69: ...l l ƒ Y ƒà àdG WÉæª d ƒ Y ƒà àdG WÉæª d Iô ûÑdG øe GóL áÑjôb ΩÉ dG å M WÉæª d h ØN ô T Iô ûÑdG øe GóL áÑjôb ΩÉ dG å M WÉæª d h ØN ô T ÓMɵdG h ÉàÑcôdG πãe ÓMɵdG h ÉàÑcôdG πãe áfƒë ûe äÉjQÉ ÑdG ƒµJ ÉeóæY FÉ G G ádB G π UƒH eƒ J áfƒë ûe äÉjQÉ ÑdG ƒµJ ÉeóæY FÉ G G ádB G π UƒH eƒ J óæY ádB G πª J ød πeɵdÉH äÉjQÉ ÑdG ÆôØJ ÉeóæY πeɵdÉH óæY ádB G πª J ød πeɵdÉH äÉjQÉ ÑdG ÆôØJ ÉeóæY πeɵdÉH AÉHô µdÉH ...

Page 70: ... hóH ádB G eóîà SG øe ÉeÉ ÆôØJ CG G AÉHô µdG á Uh hóH ádB G eóîà SG ádB G cÎJ CG É jCG æµÁ Éjƒæ S ÉJôe πbC G Y øë ûdG ádB G cÎJ CG É jCG æµÁ Éjƒæ S ÉJôe πbC G Y øë ûdG ó YCG qôÙG bƒJ óæY dG Gò d É eGóîà SG hO πª àd ó YCG qôÙG bƒJ óæY dG Gò d É eGóîà SG hO πª àd äÉjQÉ ÑdG CG Úæª J Gòµg áYÉ S 16 IóŸ ádB G øë T äÉjQÉ ÑdG CG Úæª J Gòµg áYÉ S 16 IóŸ ádB G øë T á jƒW IÎØd jód Ωhóà S ádB G CG h á dÉ ØH ø...

Page 71: ...d øµÁ hCG FÉ G AÉHô µdG á Uh øe Iô TÉÑe πª J CG ádBÓd øµÁ äÉjQÉ ÑdG øë T GPG FÉHô µdG ùdG hóH πª J CG øµÁ äÉjQÉ ÑdG øë T GPG FÉHô µdG ùdG hóH πª J CG øµÁ ΩGóîà S G πÑb πbC G Y áYÉ S 16 IÎØd äÉjQÉ ÑdG æë TG ΩGóîà S G πÑb πbC G Y áYÉ S 16 IÎØd äÉjQÉ ÑdG æë TG ô TCG áà S IÎØd ádB G ΩGóîà SG ºàj ÉeóæY h hC G ô TCG áà S IÎØd ádB G ΩGóîà SG ºàj ÉeóæY h hC G É j G ádÉM ádB G ìÉàØe CG ócCÉJ É j G ádÉM ádB...

Page 72: ... ádB G ΩGóîà SG ó H πãe Iô ûÑdG àd Gô ëà ùe Ñ J æµÁ ádB G ΩGóîà SG ó H ób àdG äÉ ùq ùëàdG Øîj dP CG å M ƒ Sƒ dG hCG ËôµdG ób àdG äÉ ùq ùëàdG Øîj dP CG å M ƒ Sƒ dG hCG ËôµdG ô J ô J CG Öéj øµd h Ωɪëà S G ó H π SCG ƒµJ ô ûdG ádGRG á ªY G CG Öéj øµd h Ωɪëà S G ó H π SCG ƒµJ ô ûdG ádGRG á ªY G πeɵdÉH ÉaÉL º ù G ƒµj πeɵdÉH ÉaÉL º ù G ƒµj CG å M Ó d ΩƒædG G Oƒ ÿG πÑb ô ûdG ádGRÉH ΩÉ dÉH ë üæf CG å M...

Page 73: ...UÉN É jô S hõj ôeC G Gòg äGôe Y Jô ûH Oƒ àJ CG ó H á UÉN É jô S hõj ôeC G Gòg äGôe GPG º fCG h QCG ª ùL äGÒ T íÑ üJ CG ó H h ô ûdG ádGRG á ªY GPG º fCG h QCG ª ùL äGÒ T íÑ üJ CG ó H h ô ûdG ádGRG á ªY Ö Ñ dG á LGôà ë üæf ΩÉjCG áKÓK ÓN QGôªM G hõj Ö Ñ dG á LGôà ë üæf ΩÉjCG áKÓK ÓN QGôªM G hõj ƒ ÖqæŒ Y óYÉ ùj áØ dG á SGƒH º àæŸG dóàdG G ƒ ÖqæŒ Y óYÉ ùj áØ dG á SGƒH º àæŸG dóàdG G ó H hCG πÑb GQƒa áØ...

Page 74: ...H ô ûdG ƒ dP ó H ƒµjh e aGƒàj ádB G Y QƒcòŸG ô TÉÑŸG FÉHô µdG QÉ àdG CG ócCÉJ e aGƒàj ádB G Y QƒcòŸG ô TÉÑŸG FÉHô µdG QÉ àdG CG ócCÉJ ádB G π UƒJ πÑb ó H ô TÉÑŸG FÉHô µdG QÉ àdG ádB G π UƒJ πÑb ó H ô TÉÑŸG FÉHô µdG QÉ àdG AÉŸG ádB G ùeÓJ G Y UôMG AÉŸG ádB G ùeÓJ G Y UôMG ádB G ƒµJ CG Y UôMG äÉHÉ UG ájCG hCG ádB G J Öæéàd ádB G ƒµJ CG Y UôMG äÉHÉ UG ájCG hCG ádB G J Öæéàd hCG É N ájCG h HÉ K h ÑLGƒ...

Page 75: ...75 ...

Page 76: ...74 ...

Page 77: ...77 ...

Page 78: ...78 ...

Page 79: ...79 ...

Page 80: ...80 ...

Page 81: ...81 ...

Page 82: ...82 ...

Page 83: ...83 ...

Page 84: ...84 ...

Page 85: ...85 ...

Page 86: ...86 ...

Page 87: ...87 ...

Page 88: ...88 ...

Page 89: ...89 ...

Page 90: ...u www philips com 4203 000 50491 ...

Reviews: