background image

ENGLISH

21

Problem

Possible cause

Solution

You have an ironing board 

cover that is not designed 

to cope with the high steam 

rate of the appliance.

Put an extra layer of felt material 

under the ironing board cover 

to prevent condensation on the 

ironing board. You can buy felt in 

a fabric shop.

Water droplets come 

out of the soleplate.

The steam that was still 

present in the hose has 

cooled down and condensed 

into water. This causes water 

droplets to come out of the 

soleplate.

Steam away from the garment for 

a few seconds.

Steam and/or water 

come out from under 

the EASY DE-CALC 

knob.

The EASY DE-CALC knob is 

not tightened properly.

Switch off the appliance and let 

the appliance cool down for 2 

hours. Unscrew the EASY DE-CALC 

knob and screw it back onto the 

appliance properly. Note: Some 

water may escape when you 

remove the knob.

The rubber sealing ring of 

the EASY DE-CALC knob is 

worn.

Contact an authorised Philips 

service centre for a new EASY DE-

CALC knob.

Dirty water and 

impurities come out 

of the soleplate or the 

soleplate is dirty.

Impurities or chemicals 

present in the water have 

deposited in the steam vents 

and/or on the soleplate.

Clean the soleplate with a damp 

cloth.

Too much scale and minerals 

have accumulated inside the 

appliance.

Descale the appliance regularly 

(see chapter ‘Cleaning and 

maintenance’, section ‘EASY DE-

CALC’).

The iron leaves a shine 

or an imprint on the 

garment.

The surface to be ironed 

was uneven, for instance 

because you were ironing 

over a seam or a fold in the 

garment.

PerfectCare is safe on all 

garments. The shine or imprint is 

not permanent and will come off 

if you wash the garment. Avoid 

ironing over seams or folds or 

you can place a cotton cloth over 

the area to be ironed to avoid 

imprints at seams and folds.

The appliance does not 

produce any steam.

There is not enough water 

in the water tank (the ‘water 

tank empty’ light flashes).

Fill the water tank (see chapter 

‘Using your appliance’, section 

‘Filling the water tank’).

The appliance is not hot 

enough to produce steam.

Wait until the ‘iron ready’ light on 

the iron lights up continuously.

You did not press the steam 

trigger.

Press the steam trigger and keep 

it pressed while you iron.

Summary of Contents for GC9642

Page 1: ... 2021 Philips Domestic Appliances Holding B V All rights reserved 4239 000 9597 4 21 10 2021 User Manual Gebrauchsanleitung GC9642 GC9644 ...

Page 2: ...1 2 4 12 11 10 13 16 17 14 9 8 5 18 6 7 3 15 ...

Page 3: ...GC9642 GC9644 ENGLISH 6 DEUTSCH 23 ...

Page 4: ...illing the water tank 10 Heating up 11 Carry lock 12 Temperature setting 12 Ironing 12 ECO mode 14 TURBO steam mode 14 Ironing tips 15 Safety auto off mode 15 Cleaning and maintenance 15 IMPORTANT DESCALING 16 IMPORTANT Descaling the soleplate 17 Storage 19 Guarantee and support 20 Troubleshooting 20 Technical information 22 ...

Page 5: ...use of the appliance in a safe way and understand the hazards involved Children shall not play with the appliance Cleaning and user maintenance shall not be made by children without supervision Keep the appliance and its cord out of reach of children less than 8 years of age when it is connected to the mains or cooling down Do not leave the appliance unattended when it is connected to the mains Ol...

Page 6: ...g to the instructions in chapter IMPORTANT DESCALING This appliance is intended for indoor household use only Electromagnetic fields EMF This Philips appliance complies with all applicable standards and regulations regarding exposure to electromagnetic fields Recycling This symbol means that this product shall not be disposed of with normal household waste 2012 19 EU Follow your country s rules fo...

Page 7: ...ue patented cyclonic chamber to maintain high pressure steam that penetrates deep into the fabric for fast ironing with no risk of water leakage Ironing is now truly simple no temperature adjustment no scorching no waiting for the appliance to heat up or cool down It is faster no matter who does the ironing With this OptimalTemp technology every single garment can be ironed effectively and safely ...

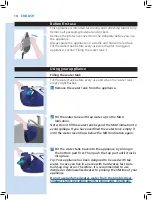
Page 8: ...pliance 2 Fill the water tank with tap water up to the MAX indication Note Do not fill the water tank beyond the MAX indication to avoid spillage If you have overfilled the water tank empty it until the water level drops below the MAX indication again 3 Put the water tank back into the appliance by sliding in the bottom part first Then push the top part until it locks into place Tip Your appliance...

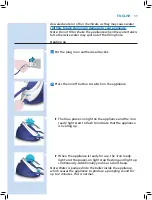
Page 9: ...ocket 2 Press the on off button to switch on the appliance The blue power on light on the appliance and the iron ready light start to flash to indicate that the appliance is heating up When the appliance is ready for use the iron ready light and the power on light stop flashing and light up continuously Additionally you hear a short beep Note Water is pumped into the boiler inside the appliance wh...

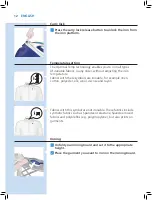
Page 10: ... temperature Fabrics with these symbols are ironable for example linen cotton polyester silk wool viscose and rayon Fabrics with this symbol are not ironable These fabrics include synthetic fabrics such as Spandex or elastane Spandex mixed fabrics and polyolefins e g polypropylene but also prints on garments Ironing 1 Unfold your ironing board and set it to the appropriate height 2 Place the garme...

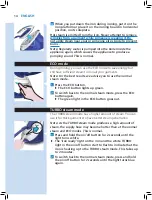
Page 11: ...t is recommended to keep the steam trigger pressed continuously while ironing Steam boost function The steam boost function is designed to help tackle difficult creases Double press the steam trigger for a continuous shot of steam It is not necessary to press and hold the steam trigger continuously when the steam boost function is activated To stop the steam boost function press the steam trigger ...

Page 12: ...rmal steam mode 1 Press the ECO button The ECO button lights up green 2 To switch back to the normal steam mode press the ECO button again The green light in the ECO button goes out TURBO steam mode The TURBO steam mode has a higher amount of steam You can use it for thick garments to have better steam penetration Note As the TURBO steam mode produces a high amount of steam the supply hose may bec...

Page 13: ...tons for more effective and faster ironing Safety auto off mode To save energy the appliance switches off automatically when it has not been used for 10 minutes The blue auto off light in the on off button starts to flash To activate the appliance again press the on off button The appliance then starts to heat up again Note The appliance is not switched off completely when it is in auto off mode T...

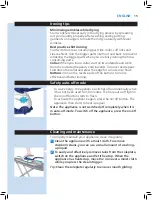
Page 14: ... you perform the descaling procedure 1 Remove the plug from the wall socket 2 Place the appliance on the edge of the tabletop 3 Hold a container with a capacity of at least 350ml under the EASY DE CALC knob and turn the knob anticlockwise Tip You can also take the appliance to a sink and place it in such a way that the EASY DE CALC knob points towards the sink 4 Remove the EASY DE CALC knob and le...

Page 15: ...nd brown stains may come out of the soleplate during ironing In this situation you need to descale the soleplate by following the procedure below We advice you to repeat the procedure twice to better clean the soleplate To avoid the risk of burns unplug the appliance and let it cool down for at least two hours before you descale the soleplate 1 Remove the plug from the wall socket 2 Place the appl...

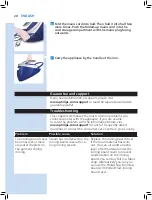
Page 16: ...DE CALC knob and turn it clockwise to fasten it 8 Put the appliance back on a stable and even surface Plug in the appliance and switch it on 9 Wait for 5 minutes for the appliance to heat up 10 Keep the steam trigger pressed continuously while you move the iron on a piece of thick cloth for 3 minutes Warning hot dirty water comes out of the soleplate 11 Stop moving the iron when no more water come...

Page 17: ...k the iron onto the iron platform by pushing the carry lock into position 5 Fold the supply hose in half Push the hose loop into the first hose storage compartment and pull it out at the other end Wind the folded hose around the base of the appliance Then push the hose loop into the second hose storage compartment ...

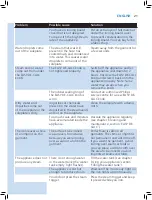
Page 18: ... solve the problem with the information below visit www philips com support for a list of frequently asked questions or contact the Consumer Care Centre in your country Problem Possible cause Solution The ironing board cover becomes wet or there are water droplets on the garment during ironing Steam has condensed on the ironing board cover after a long ironing session Replace the ironing board cov...

Page 19: ...ities come out of the soleplate or the soleplate is dirty Impurities or chemicals present in the water have deposited in the steam vents and or on the soleplate Clean the soleplate with a damp cloth Too much scale and minerals have accumulated inside the appliance Descale the appliance regularly see chapter Cleaning and maintenance section EASY DE CALC The iron leaves a shine or an imprint on the ...

Page 20: ...he on off button flashes The auto off function is activated automatically when the appliance has not been used for more than 10 minutes Press the power on off button to switch on the appliance again The appliance produces a pumping sound Water is pumped into the boiler inside the appliance This is normal If the pumping sound continues nonstop switch off the appliance and remove the plug from the w...

Page 21: ... füllen 27 Aufheizen 28 Transportverriegelung 29 Temperatureinstellung 29 Bügeln 30 ECO Einstellung Öko Einstellung 32 TURBO Dampfeinstellung 32 Bügeltipps 32 Modus automatische Sicherheitsabschaltung 33 Reinigung und Wartung 33 WICHTIG ENTKALKEN 33 Aufbewahrung 37 Garantie und Support 38 Deutschland 38 Fehlerbehebung 38 Technische Daten 40 ...

Page 22: ...Jahren und Personen mit verringerten physischen sensorischen oder psychischen Fähigkeiten oder Mangel an Erfahrung und Kenntnis verwendet werden wenn sie bei der Verwendung beaufsichtigt werden oder Anweisung zum sicheren Gebrauch des Geräts erhalten und die Gefahren verstanden haben Kinder dürfen nicht mit dem Gerät spielen Die Reinigung und Pflege des Geräts darf von Kindern nicht ohne Aufsicht ...

Page 23: ...ie das Bügeleisen auf die Abstellfläche schalten Sie das Gerät aus und ziehen Sie den Netzstecker aus der Steckdose wenn Sie den Bügelvorgang beendet haben wenn Sie das Gerät reinigen wenn Sie den Wassertank auffüllen oder leeren wenn Sie das Gerät unbeaufsichtigt lassen selbst wenn nur kurz Entkalken Sie das Gerät regelmäßig entsprechend den Anweisungen im Abschnitt WICHTIG ENTKALKEN Dieses Gerät...

Page 24: ...mit einer sehr heißen Bügelsohle erzielt Dann kam Dampf dazu um die Wärmeabgabe zu verstärken und so das Bügeln zu erleichtern Unsere Studien haben bestätigt dass die wirksamste Methode zur Beseitigung von Falten in der perfekten Kombination von intensivem Dampf und optimaler Temperatur der Bügelsohle liegt Der Schlüssel zur effektiven Faltenentfernung ist der Dampf nicht die Temperatur der Bügels...

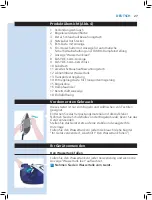
Page 25: ...tverriegelung 15 Bügelsohle 16 Dampfauslöser 17 Bereitschaftsanzeige 18 Einfüllöffnung Vor dem ersten Gebrauch Dieses Gerät ist nur zum Bügeln und Auffrischen von Textilien geeignet Entfernen Sie das Verpackungsmaterial und die Aufkleber Nehmen Sie die Schutzhülle von der Bügelsohle ab bevor Sie das Gerät verwenden Stellen Sie das Gerät stets auf eine stabile und waagerechte Unterlage Füllen Sie d...

Page 26: ...ickelt Wenn Sie in einer Region mit sehr hartem Wasser leben kann sich Kalk bilden Deshalb wird empfohlen den Wassertank mit destilliertem oder demineralisiertem Wasser zu füllen um die Lebensdauer Ihres Geräts zu verlängern Verwenden Sie kein parfümiertes Wasser Wasser aus dem Wäschetrockner Essig Stärke Entkalkungsmittel Bügelzusätze chemisch entkalktes Wasser oder andere Chemikalien da dies zu ...

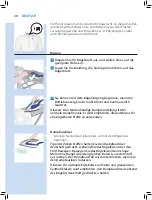
Page 27: ...eis Wasser wird innerhalb des Geräts in den Boiler gepumpt wodurch das Gerät bis zu 2 Minuten lang ein Pumpgeräusch erzeugt Dies ist normal Transportverriegelung 1 Drücken Sie die Entriegelungstaste für die Transportverriegelung um das Bügeleisen von der Abstellfläche zu trennen Temperatureinstellung Mit der Optimal Temp Technologie können Sie alle bügelechten Textilien ohne Einstellung der Bügelt...

Page 28: ...ch leuchtet Hinweis Die standardmäßige Dampfeinstellung ist der normale Dampfmodus Es wird empfohlen diesen Modus für alle bügelbaren Stoffe zu verwenden Dampfauslöser Drücken Sie den Dampfauslöser um mit dem Bügeln zu beginnen Tipp Bei dicken Stoffen halten Sie den Dampfauslöser dauerhaft gedrückt während Sie das Bügeleisen über den Stoff bewegen Bewegen Sie das Bügeleisen dann einige Male ohne D...

Page 29: ...lten Sie das Bügeleisen in senkrechter Position Ziehen Sie das Kleidungsstück mit einer Hand glatt um Falten noch effektiver zu entfernen Während Sie das Kleidungsstück glatt ziehen drücken Sie den Dampfauslöser und bewegen Sie das Bügeleisen nach oben und unten 4 Wenn Sie das Bügeleisen während des Bügelns abstellen stellen Sie es auf die Bügeleisen Abstellfläche oder stellen Sie es in waagerecht...

Page 30: ...st normal 1 Halten Sie den Ein Ausschalter 2 Sekunden lang gedrückt bis die Anzeige weiß leuchtet Die Bereitschaftsanzeige auf dem Bügeleisen und die weiße TURBO Anzeige am Ein Ausschalter beginnen zu blinken um anzuzeigen dass das Bügeleisen für die TURBO Dampfeinstellung aufgeheizt wird Dies kann bis zu 2 Minuten dauern 2 Um zurück zu der normalen Dampfeinstellung zu wechseln halten Sie den Ein ...

Page 31: ...en Sie den Ein Ausschalter Reinigung und Wartung Zu einer ordnungsgemäßen Wartung Ihres Gerät gehört auch es regelmäßig zu reinigen 1 Reinigen Sie das Gerät mit einem feuchten Tuch Hartnäckige Flecken können Sie mit etwas Spülmittel entfernen 2 Um Flecken einfach und effektiv von der Bügelsohle zu entfernen schalten Sie das Gerät ein und warten Sie bis es aufgeheizt ist Fahren Sie dann mit dem Büg...

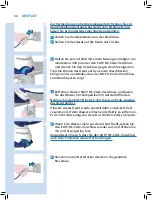
Page 32: ...er EASY DE CALC Verschluss zum Waschbecken zeigt 4 Entfernen Sie den EASY DE CALC Verschluss und lassen Sie das Wasser mit Kalkpartikeln in das Gefäß fließen Nehmen Sie den EASY DE CALC Verschluss nicht ab solange das Gerät heiß ist Hinweis Dieses Gerät wurde speziell dafür entwickelt Kalk zusammen mit dem Wasser einfach und effektiv zu entfernen Es ist nicht notwendig das Gerät zu schütteln oder ...

Page 33: ...s Risiko von Verbrennungen auszuschließen ziehen Sie den Netzstecker aus der Steckdose und lassen Sie das Gerät mindestens zwei Stunden abkühlen bevor Sie die Bügelsohle entkalken 1 Ziehen Sie den Netzstecker aus der Steckdose 2 Stellen Sie das Gerät auf die Kante des Tisches 3 Vergewissern Sie sich dass der Wasserbehälter leer ist 4 Halten Sie eine Tasse mit einem Fassungsvermögen von mindestens ...

Page 34: ... eine stabile und ebene Oberfläche Stecken Sie den Stecker in die Steckdose und schalten Sie das Gerät ein 9 Warten Sie 5 Minuten bis das Gerät aufgeheizt ist 10 Halten Sie den Dampfauslöser dauerhaft gedrückt während Sie das Bügeleisen 3 Minuten über ein dickes Tuch führen Warnung Heißes schmutziges Wasser tritt aus der Bügelsohle aus 11 Halten Sie das Bügeleisen an wenn kein Wasser mehr austritt...

Page 35: ...indem Sie die Transportverriegelung in der vorgesehen Position einrasten lassen 5 Legen Sie den Verbindungsschlauch in der Mitte zusammen Stecken Sie den Schlauch in das erste Schlauchaufbewahrungsfach und ziehen Sie ihn am anderen Ende heraus Wickeln Sie den zusammengelegten Schlauch um die Unterseite des Geräts Stecken Sie dann den Schlauch in das zweite Schlauchaufbewahrungsfach ...

Page 36: ...lips com support oder lesen Sie die internationale Garantie Faltblatt Deutschland Telefon 49 0 40 80 80 10 9 80 zum Festnetztarif Montag bis Freitag 08 00 20 00 Uhr Samstag 09 00 18 00 Uhr unter www philips de support Fehlerbehebung In diesem Abschnitt sind die häufigsten Probleme zusammengestellt die mit Ihrem Gerät auftreten können Sollten Sie ein Problem mithilfe der nachstehenden Informationen...

Page 37: ...ert Dadurch laufen Wassertropfen aus der Bügelsohle Halten Sie das Bügeleisen einige Sekunden lang von der Kleidung weg Dampf und oder Wasser tritt unter dem EASY DE CALC Verschluss aus Der EASY DE CALC Verschluss ist nicht fest genug angezogen Schalten Sie das Gerät aus und lassen Sie das Gerät zwei Stunden lang abkühlen Schrauben Sie den EASY DE CALC Verschluss ab und dann wieder richtig auf das...

Page 38: ...reitschaftsanzeige kontinuierlich leuchtet Der Dampfauslöser wurde nicht gedrückt Halten Sie den Dampfauslöser während des Bügelns gedrückt Der Wassertank ist nicht ordnungsgemäß in das Gerät eingesetzt Schieben Sie den Wassertank wieder in das Gerät bis er hörbar einrastet Das Gerät wurde nicht eingeschaltet Stecken Sie den Stecker in die Steckdose und drücken Sie den Ein Ausschalter um das Gerät...

Reviews: